Simple tips and tweaks to make your laptop more productive
Configure your laptop with our essential tips, tweaks and techniques
One of the drawbacks of Windows' most compelling feature - its versatility - is that it's set up to cater for as wide an audience as possible. You can start using it straight away, but as you become more familiar with how your laptop works, you might start to experience frustration at the way things are done.
Here's the good news: that compelling, versatile feature also allows you to use Windows in a variety of different ways. Instead of adapting the way you work, you can actually customise and tweak your laptop's settings to suit you. And in this feature we'll show you exactly how to do that.
You'll discover how to set up Windows to work the way you want it to, from configuring the desktop so your favourite programs and frequently accessed files are just a click or two away to creating your own customised shortcuts. You'll even be able to remap certain keys so they perform the functions you want them to rather than what your laptop manufacturer envisaged.
We'll also reveal a selection of free programs that are designed to be simpler to use, plus look at what hardware add-ons can help make your laptop both more productive and comfortable to use.
Whether you're a first-time laptop user or an old hand, you'll find something in this feature to help you get more from your computer. And you don't necessarily have to be a laptop owner to benefit either - many of the tweaks and tips offered here will work perfectly with desktop PCs too.
Let's start making your laptop more productive by taking advantage of its touchpad. It's tempting to see the touchpad as little more than a basic substitute for your mouse, but you're missing a trick if you do.
Most touchpads are touch sensitive, meaning you can do more than simply move the cursor around your screen and click to select. To see if your laptop has a touchpad that supports gestures, click 'Start', type mouse into the Search box and click 'Mouse' when prompted to open the Mouse Control Panel.
Sign up for breaking news, reviews, opinion, top tech deals, and more.
Look for a 'Device Settings' tab - select this and you should see a reference to your touchpad. Click the 'Settings' button beneath it and expand the Application Gestures section to see what gestures are available for your laptop model.
If your touchpad doesn't support gestures - or supported gestures are thin on the ground - you can purchase a standalone touchpad, such as Logitech's Wireless Touchpad (around £45, www.logitech.com). The box overleaf reveals some of the more common gestures available to you.
Alternatively, why buy new equipment when you can add simple gesture support for free? StrokeIt Home, which is free for personal use, adds support for gestures using your mouse or touchpad in conjunction with the right mouse button.
What's more, you'll soon be spending less time pointing and clicking - and more time doing the things you love.
Set up your desktop
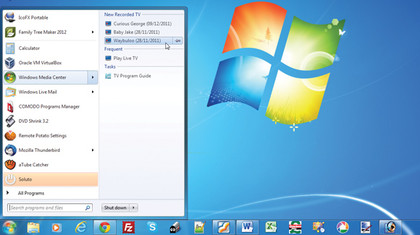
The Windows desktop is a user-friendly, approachable way to use your computer, but as always there are tips and tweaks to make it even more useful, efficient and better optimised for your way of working.
First, make better use of the Taskbar. It's always visible at the bottom of the screen, so you never need to clear away other windows to get to it, and if you're using Windows 7 you can take advantage of another time-saving feature in the form of Jump Lists as well.
Adding programs to the Taskbar is simple. Windows Vista and Windows XP users can simply drag program shortcuts on to the Taskbar. People with Windows 7 can right-click an existing shortcut on the desktop or Start menu and then choose 'Pin to Taskbar'.
When you right-click on certain Taskbar shortcuts in Windows 7 you'll see a jump list of recently accessed documents in that program appear, allowing you to open them and the program with a single click (click the pin icon next to an entry to place it permanently at the top of the jump list).
Windows 7 users can also customise the Taskbar's Notification area to choose exactly which icons are always visible. Click the arrow to its left to reveal all Notification area icons - drag one on to the Notification area to permanently pin it in place for easy access (icons can also be dragged the other way to hide them from view).
Windows 7 users can maximise windows by dragging them to the top of the screen, or place two windows side-by-side by dragging each to opposite sides of the screen. You can also select a window and quickly resize it by holding down the [Windows] key as you press an arrow key.
When browsing your computer's hard drive for files, Windows 7 and Vista users should make use of the Favourites section in the left-hand pane - drag a folder into this list to place a shortcut there for easy access.
Windows 7 users can also use the Library feature to group related folders into one easily accessible location - click 'Libraries' to get started.
Use gestures with your mouse
1. Basic orientation
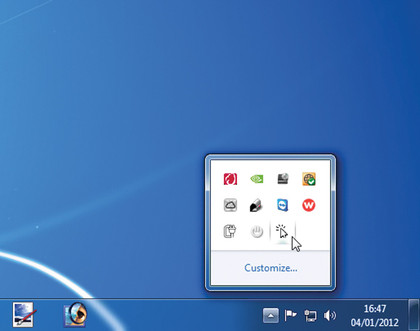
Download and install StrokeIt Home. Once installed, launch the program, which will appear in the Taskbar Notification area as a small white cursor, indicating it's active and ready to use (right-clicking this disables StrokeIt - the cursor will turn red). Gestures are performed by holding the right mouse button as you perform the gesture, which appears on-screen.
2. Practice existing gestures
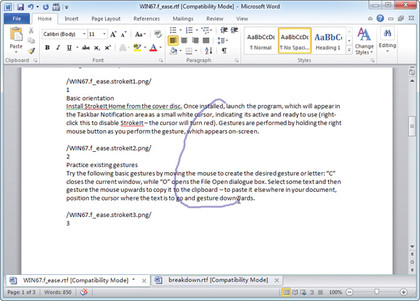
Try the following basic gestures by moving the mouse to create the desired gesture or letter: C closes the current window, while O opens the File Open dialog box. Select some text and then gesture the mouse upwards to copy it to the clipboard. To paste it elsewhere in your document, position the cursor where the text is to go and gesture downwards.
3. Learn new gestures
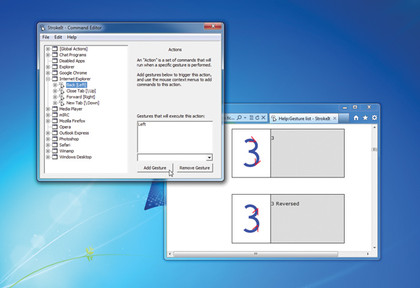
A number of gestures are already set up - to see these, click the StrokeIt Taskbar Notification area icon. Expand the [Global Actions] section to view what gestures are available for all applications and Windows itself. You'll also see sections relating to specific programs - the gestures contained here will only work in the application in question. Visit the StrokeIt Site for additional help with gestures.
4. Create your own
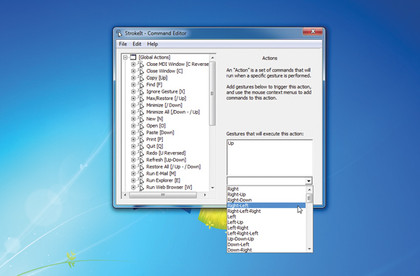
If you don't like the gesture assigned to a particular action, you can change it. Select the offending gesture, then click the drop-down arrow above the Remove Gesture button to choose another to replace it. Alternatively, create your own gesture from scratch - when the Unrecognized Gesture window appears, click 'New Gesture', give it a name and click 'OK'.
Make Windows more accessible
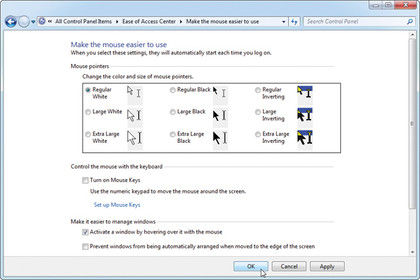
You might be forgiven for thinking the Ease of Access Centre (Accessibility Options in Windows XP) is solely for those with sight, sound or motor-related disabilities, but in actual fact you'll find lots of useful tweaks here that can make things easier for all users.
Access these options via the 'Start > All Programs > Accessories' menu. The simplest thing to do here is work your way through the options on offer - use the wizard to answer a few questions that will help Windows determine what settings to offer you, or manually go through all the available tweaks.
It's always worth looking at mouse and keyboard-related options to see if any of the tweaks offered sit more comfortably with the way you like to work. You can, for example, change the focus of a window simply by moving the mouse over it instead of pointing and clicking (select 'Activate a window by hovering over it with the mouse').
If you don't like the way that Windows automatically rearranges your program windows when they're dragged to the sides of the screen, then you'll find an option to switch that off here too.
If you have a headset or microphone, you might also like to experiment with using speech recognition to control certain aspects of your computer. Both Windows 7 and Vista have speech recognition built in and you can switch it on and set it up following the simple wizard that's accessible from the section about using your computer without a mouse or keyboard.