How to secure your Linux system
Linux security tips and tricks and you need to know
Think formatting a disk is enough? Think again
Removing a file from the disk seems like a simple operation: just right-click on the file and send it to the trash. Command line users may use the rm command do do the same thing.
Unfortunately, none of these methods actually deletes a file or a folder. They just hypnotise the filesystem to forget where a file is located in the disk. These newly liberated disk locations are then added to the filesystem's pool of free address, and can point to new files.
That works in theory, but in practice the humongous size of partitions means that the disk locations that hold the deleted file may actually harbour them long enough for recovery tools to reconstruct them.

That's where shred comes in. Shred overwrites a file's space on the disk to make sure the space contains only garbage. You might also want to use the --remove option to make sure it deletes the original file as well.
Shredding a file can be a lengthy affair, as it overwrites the location 25 times. You can manipulate the number of rewrites with the -n switch, like this:
$ shred --remove -n 5 -v top-secret.txt
shred: top-secret.txt: pass 1/5 (random)...
shred: top-secret.txt: pass 2/5 (ffffff)...
shred: top-secret.txt: pass 3/5 (random)...
shred: top-secret.txt: pass 4/5 (000000)...
shred: top-secret.txt: pass 5/5 (random)...
shred: top-secret.txt: removing
shred: top-secret.txt: renamed to 0000
shred: 0000: renamed to 000
shred: 000: renamed to 00
shred: 00: renamed to 0
shred: top-secret.txt: removed
Sign up for breaking news, reviews, opinion, top tech deals, and more.
Shred works well on devices like /dev/sdb, which negates the use of the --remove switch, because you wouldn't want to remove the device. There's a caveat here. Shred assumes the filesystem rewrites the file in place. This would render it useless on modern journalled filesystems such as ext3.
Shred also fails to wipe traces of the data being deleted in several places, such as the swap, RAM, and the filesystem journal. An effective and secure deletion strategy requires the secure delete tools.
Secure-delete
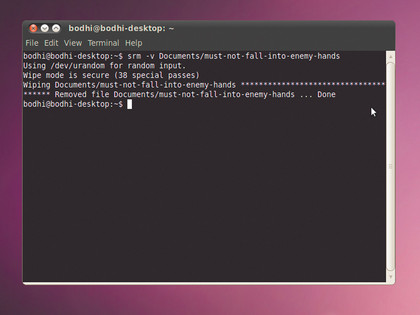
The secure-delete tools include srm to securely remove the files, smem and sswap to wipe traces of data from the physical and SWAP memory, and sfill to ensure the free space on the disk doesn't point to old deleted files. The tools make use of cryptographic algorithms especially designed to make sure deleted files are unrecoverable.
Once it's installed, make sure you remove the file or a directory with:
$ srm -v ../the-hole/eicar.com.txt
Using /dev/urandom for random input.
Wipe mode is secure (38 special passes)
Wiping ../the-hole/eicar.com.txt *********************************** *** Removed file ../the-hole/eicar.com.txt ... Done
Add the -r switch to recursively delete a directory. When you're done, make sure you wipe off residual traces from your RAM with smem, which may take a considerable amount of time depending on the size of the physical memory it has to wipe. You can speed up the process with the -l switch, which reduces the number of rewrite passes (this is less secure).
Top off the process by disabling swap with swapoff , wiping it clean with sswap , and then re-enabling it with swapon . The sfill command comes in handy when you are discarding a disk. Use it from a live CD on an unmounted partition to wipe the free space.
Remove junk
They might not be as bad as the other operating system, but all Linux distros tend to accumulate a lot of crud over a period of time. But why blame Linux?
The junk files are the legacy of the plethora of apps you have running on top of your kernel. You can pin their habit of collecting fluff to of the way the applications are configured to give you a better user experience. And not only do all those log files, the temporary internet files and the various app caches accumulate to take up a considerable amount of disk space, they pose a great threat to your privacy.
Instead of trolling through the filesystem and emptying the various tmp/ directories, use BleachBit. It's a one-stop shop for removing all the crud that the apps have preserved.

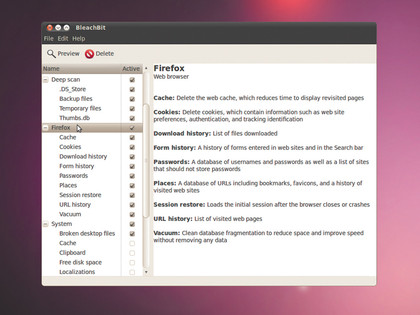
BleachBit has a set of about 70 pre-defined cleaners, each of which works on a particular app such as Firefox, Google Chrome, Adobe Reader, OpenOffice.org and more. The cleaners are tuned to wipe the dead weight off the applications and give them a performance boost.
The lightweight BleachBit is available in the repositories of all major distributions, though you might want to grab the latest build from its website. The project also releases bonus cleaner packs for older versions.
The BleachBit GUI is divided into two frames. On the left-hand side you select the apps that you wish to clean; this expands to give you more options specific to that app. In the right-hand frame, you get a brief explanation of each of these checkable options.
Get cleaning
To clean an area, such as Firefox's cache, simply click on the checkbox next to it. Some cleanup operations require you to trawl through a large location and involve more than a simple delete operation. BleachBit will warn you when selecting such a task that might take up a considerable amount of time, for example, wiping the swap memory.
Before you ask BleachBit to zap the useless files in the apps you've selected, use the Preview button to review the list of files it'll delete. If you encounter a file that you don't want to delete, such as the cache of a particular Firefox user, you can add it to a whitelist.
This is a list of files that BleachBit will not touch, even if the broader cleaner that they come under has marked them for removal. You can specify any files or folders to bypass under the Whitelist tab under Edit > Preferences.
BleachBit also has a command line interface. For example, the following command cleans cookies under Firefox and Google Chrome:
$ bleachbit --delete firefox.cookies google_chrome.cookies
Use the --preview switch to get a list of files before removal. The CLI makes BleachBit scriptable for automated daily runs.
To add a cron job to nuke regularly created files, such as rotated logs and cookies daily at 2.00 am, edit the crontab with crontab -e and add the following line:
0 2 * * * bleachbit --delete firefox.cookies google_chrome. cookies system.rotated_logs
If daily sounds too frequent, you should at least run the app before creating backups. You can also use BleachBit to speed up certain apps, house clean the distro by fixing broken shortcuts, delete language packs and empty physical RAM and swap memory.
Browse anonymously
Pull a Keyser Soze on the internet – make it think you don't exist…
On the internet, sometimes the best form of privacy is being anonymous. It's difficult for an attacker to get to you if they can't pinpoint you on the network. And no one covers your tracks better than the combination of Privoxy and Tor.
Tor protects privacy via a distributed network of relays run by volunteers spread across the world. This helps prevent anybody monitoring your internet connections from learning what sites you visit.
Tor works with web browsers, instant messaging programs and many other TCP-based apps. But the various app protocols and associated programs can be coaxed into revealing information about the user, which is where Privoxy comes into the picture. Tor depends on Privoxy and its filtering capabilities to enhance privacy.

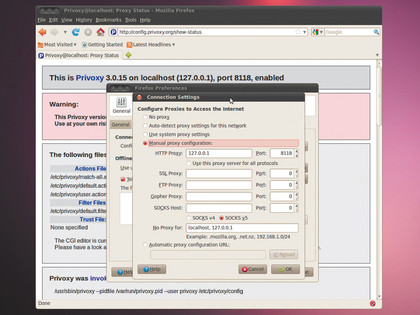
Begin by pulling Privoxy from your distro repositories, then head into your browser's advanced settings where you can change its proxy settings. Here just fill in 127.0.0.1 for the HTTP proxy, and specify 8118 as the port. That's all there's to it.
When you're done, start the Privoxy daemon with /etc/ init.d/privoxy start. You can now access Privoxy's interface from http://config.privoxy.org or http://p.p.
To hook up Privoxy with Tor, you first need to set up Tor's package repository. This is easily done by adding the following line to your Ubuntu or Debian installation:
deb http://deb.torproject.org/torproject.org main
Replace with the name for your distro, like karmic, or sid. Then add the GPG key used to sign the packages by running the following:
gpg --keyserver keys.gnupg.net --recv 886DDD89 gpg --export A3C4F0F979CAA22CDBA8 F512EE8CBC9E886DDD89 | sudo apt-key add -
If you use Yum, create a torproject.repo under /etc/ yum/repos.d with the following content:
[torproject]
name=Tor and Vidalia
enabled=1
autorefresh=0
baseurl=http://deb.torproject.org/torproject.org/rpm/
DISTRIBUTION/
type=rpm-md gpgcheck=1
gpgkey=http://deb.torproject.org/torproject.org/rpm/RPMGPG- KEY-torproject.org
Again replace DISTRIBUTION with the name of your Fedora or CentOS release, such as centos5 or fc13. Now fetch Tor via the package manager, which will also pull in additional packages like the Vidalia Tor GUI controller.
Make sure you don't install the Polipo web proxy app, since we are using Privoxy and the two might conflict because they operate on the same port.
The last step is to get Privoxy and Tor to talk to each other. For this just edit the Privoxy config file under /etc/privoxy and uncomment the following line:
# forward-socks4a / 127.0.0.1:9050
Also uncomment the following lines to make sure the local network is still reachable:
# forward 192.168.*.*/ .
# forward 10.*.*.*/ .
# forward 127.*.*.*/
Presto! Now all our internet traffic that passes through the Tor and Privoxy proxies is masked.
------------------------------------------------------------------------------------------------------
First published in Linux Format Issue 139
Liked this? Then check out 7 of the best Linux firewalls
Sign up for TechRadar's free Weird Week in Tech newsletter
Get the oddest tech stories of the week, plus the most popular news and reviews delivered straight to your inbox. Sign up at http://www.techradar.com/register
Current page: Securely delete files and browse anonymously
Prev Page Software firewalls and encryption
With almost two decades of writing and reporting on Linux, Mayank Sharma would like everyone to think he’s TechRadar Pro’s expert on the topic. Of course, he’s just as interested in other computing topics, particularly cybersecurity, cloud, containers, and coding.