How to take manual control of your camera
10 key camera settings that could turn you into an expert overnight!
Introduction
You can get some great shots with your camera left on fully automatic mode, and sometimes automatic settings can be real time-savers that let you concentrate properly on the picture.
But your camera is only a machine. It can calculate what it thinks is the right exposure, the best white balance setting and even what to focus on, but it doesn't really know what you want and it can easily get it wrong.
So by taking over some or all of the control yourself, you can get much better pictures. Not every camera offers all the manual controls in our list, but you don't need them all for every shot. Often, you can dramatically improve a picture with just one of them.
We've used a DSLR for our examples, and while lesser cameras might not offer the same manual control over shutter speed and aperture, say, you'll still be able to adjust the exposure, focus point and more, and this applies to point and compact cameras and even smartphones
You'll also find out some of the things your camera is doing behind the scenes, and why it's worth upgrading to one that offers more control if you decide to get serious about your photography.
Step 1: Image size and quality
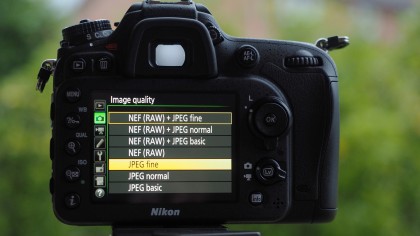
This is the first and most important thing to get right, and you'll find these settings on the camera's main shooting menu.
The first choice is only available on higher-end cameras like this Nikon DSLR – it's the choice between shooting raw (unprocessed) images you're going to process later on your computer, or regular JPEG images you can use and share straight away.
If you shoot JPEGs you need to pay attention to 1) the image size and 2) the image quality
1.The image size is the resolution of the final picture in pixels. Unless you definitely need only a small picture for Facebook or a web page, for example, you should always use the camera's maximum resolution. Otherwise, why did you pay all that money for a camera with all those megapixels?
2.The image quality setting changes the amount of compression applied to your pictures. If you really do need to reduce the size of your pictures to fit more on to your memory card, you could consider swapping from 'Fine' to 'Standard', but don't drop the quality to 'Basic' because it will start to show.
But really, don't start juggling the image size and quality settings to save space – please just go out and get a bigger memory card.
Step 2: The mode dial
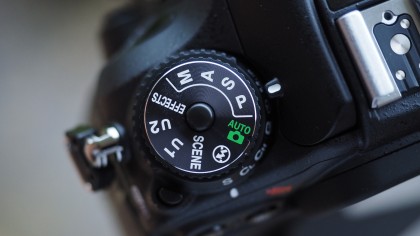
Almost all cameras have a mode dial for choosing the camera's basic operating mode. A simple point and shoot camera will typically have a green 'full auto' mode, often with a little green camera icon. In this mode the camera takes care of everything.
Usually there will also be a 'P', or 'program' mode. This gives much more control over the settings, but the camera still chooses what combination of shutter speed and lens aperture to use to get the right exposure.
On more advanced compact cameras, mirrorless cameras and DSLRs, you'll also get 'A', 'S' and 'M' modes. In 'A' mode you get to choose the lens aperture, then the camera sets a shutter speed automatically go give you the right exposure. In 'S' mode you choose the shutter speed and the camera automatically sets the lens aperture for correct exposure. In 'M' mode, you choose both the lens aperture and shutter speed and it's up to you to get the exposure right – though the camera will still advise you.
Simple point and shoot cameras don't have these advanced manual settings, but they do have 'scene' modes designed for specific subjects like action shots, landscapes and portraits. It's still just like shooting on full auto, but with the camera settings adjusted to better suit the subject.
Step 3: Shutter speed
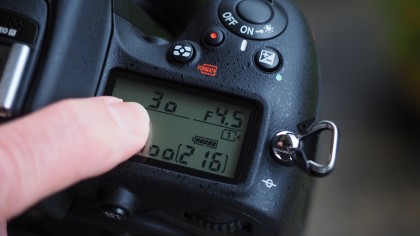
The shutter speed is one of the most important camera settings because it controls or prevents blur in the picture. The first and most important thing is to stop camera shake, and this means making sure the shutter speed doesn't fall too low. Even with an image stabilized lens, a shutter speed of 1/30 sec is marginal, and you need higher shutter speeds than this with telephotos.
You'll also need the right shutter speed to 'freeze' fast moving objects like racing cars or athletes – often 1/1000 sec or faster. At other times, you may want some deliberate 'creative blur'. For example, you'd use a slower shutter speed and 'pan' with your subject to keep a racing car sharp but blur the background.
You can control the shutter speed by setting the camera to 'S', or 'shutter priority' mode, if available, or by using 'M' (manual).
The camera will always tell you the current shutter speed as you line up a shot, either on a top-mounted LCD (on this camera), in the viewfinder or on the rear LCD display.
Step 4: ISO (sensitivity)
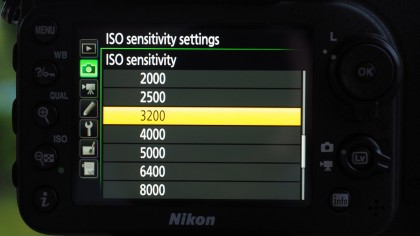
If you're shooting in dim light, the camera will need to use slower shutter speeds, which increases the risk of camera shake or subject blur. You can compensate by opening up the lens aperture to a wider setting, but you quickly reach a point where the shutter speed is too slow, even with the lens 'wide open'.
This is where you need a higher ISO, or sensitivity setting. This is like 'turning up the volume' to compensate for the low light level. The image quality starts to suffer – you lose some fine detail and get more digital 'noise' – but it's worth it to get sharp pictures.
You'll notice that we haven't talked about flash, and that's for two reasons:
1.Built-in flash is weak, harsh and produces horrible looking pictures. With today's high-sensitivity sensors you're better off leaving the flash switched off and increasing the ISO setting for more natural results. Many point and shoot cameras now have a dedicated 'flash off' mode on the mode dial.
2.Flash can be a very effective and creative tool, provided you use a powerful external flash fixed to the camera's hotshoe or fired remotely, but this is a tricky and technical topic that needs a how-to article of its own.
Step 5: Lens aperture
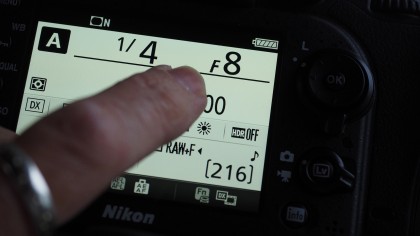
The lens aperture, or 'f-stop', is important for two reasons. On a simple level you can use it to balance up the exposure if you want a particular shutter speed. Let's say your camera indicates an exposure of 1/125 sec at f/8, but you actually want to shoot at 1/250 sec instead. This would reduce the exposure by 1EV (1 'stop' in old-fashioned terms), so you'd need to increase the aperture setting by 1EV to compensate – you'd need f/5.6 instead of f/8. In shutter-priority mode, the camera will make this adjustment automatically; in manual mode you'd have to do it yourself.
But the lens aperture also affects the depth of field, or near-to-far sharpness in your pictures. A wide aperture setting like f/2.8, for example, is great for portraits because your subject is sharp but the background goes out of focus. But for landscapes you need a small lens aperture, like f/11, so that objects near to the camera and the distant horizon are both sharp, even though they're far apart.
So if getting the depth of field right is more important than the shutter speed, you can set the camera to 'A' or aperture priority mode – it will automatically choose the right shutter speed to go with the lens aperture you've chosen.
Step 6: EV compensation
Not every camera offers a manual exposure mode, but every camera will let you override the exposure chosen by the camera. You do this with the EV compensation control, increasing the compensation to make a picture lighter, or reduce it to make the picture darker.
You need this more often than you think. First, there are those times when the camera's metering system has interpreted a brightly lit scene wrongly, so that you got a silhouette when you were expecting a backlight portrait, for example.
Second, and surprisingly common, are situations when you're photographing subjects which are intrinsically light or dark, like a wedding dress or a black cat. Your camera has no idea what it's looking at and just hopes everything is a kind of average grey tone, so this is where you need to take over to make white subjects look properly white, and black ones properly black.
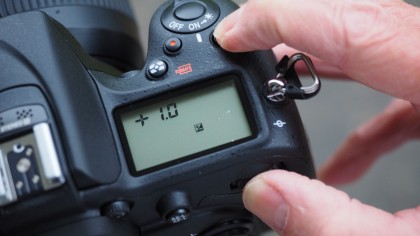
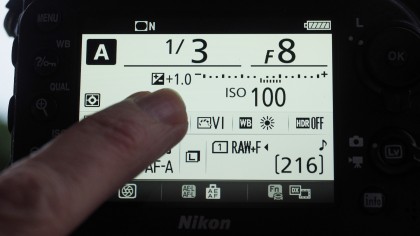
The details vary from one camera to another, but there's a universal +/- icon used by practically all of them. On this Nikon DSLR you hold down the EV compensation button on the top of the camera and turn a control dial on the back.
Our Nikon shows the compensation applied on its top-mounted LCD, but you can also see it displayed on the rear screen. Here, we've applied a setting of +1EV to make the picture come out lighter.
Step 7: White balance
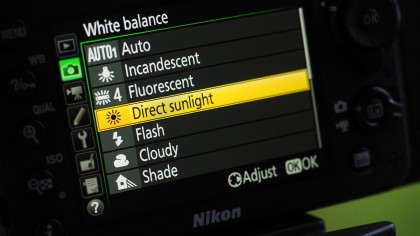
The camera uses white balance adjustments to counteract the color shifts you see under artificial lighting and sometimes in shady conditions outdoors. The physical camera settings don't change, but the way the image data is processed does. The camera uses the white balance setting to discard color data it doesn't need and modify the rest, so it's important to get it right.
Auto white balance works pretty well in mixed artificial light and daylight, but there are two particular situations where it can give the wrong effect.
1.If you're shooting landscapes, the color of the lighting is often an important part of the scene, not something you want the camera to correct, so use the 'Daylight' or 'Direct sun' white balance preset to force the camera into a fixed, neutral color rendition.
2.If you're shooting under fluorescent or tungsten lighting, the camera's auto white balance setting often won't apply a big enough correction and your shots will still look yellow. In these situations, use one of the camera's artificial light white balance presets.
Step 8: Drive mode
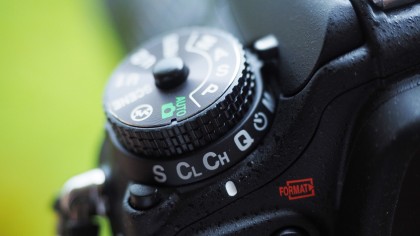
On a simple level, the camera's drive mode setting is there so that you can choose between single-shot photography or continuous shooting (burst mode), but makers usually include the self-timer option here and, in the case of this Nikon DSLR, a Quiet (Q) mode and a mirror-up (MUP) mode to reduce vibrations in macro photography.
Some cameras (like this one) offer a choice of continuous shooting speeds (CL – continuous low speed, CH – continuous high speed).
The self-timer, by the way, is useful for more than just selfies! If the camera's on a tripod to keep it still and steady, you don't want to jog it by pressing the shutter release button, and you may not have a remote release to fire it with. Instead, you can use the self-timer for shake free shots – you press the shutter button to start the timer, then step away and wait. Any shake introduced by pressing the button will have died down by the time the shutter fires.
Step 9: Focus mode
Autofocus modes on cameras can be very confusing! That's because there are actually two settings you need to be aware of, not one.
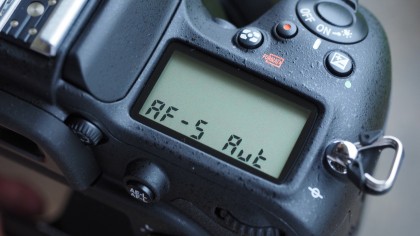
The first thing to check is WHEN the camera will focus. In single-shot AF mode, often labelled 'AF-S', the camera will focus when you half-press the shutter button and then wait for you to take the picture by pressing it the rest of the way. This is what you want for regular stills photography.
But in continuous AF mode, often labelled 'AF-C', the camera starts focusing when you half-press the shutter button, but carries on focusing all the time you keep it pressed, regardless of when or not you press it the rest of the way to take a picture. You use AF-C mode in the camera's continuous shooting mode, because it's designed to keep moving objects in focus while you shoot.
Some cameras offer an 'AF-A' mode which will try to choose the AF-S or AF-C modes automatically, depending on whether they detect movement in the subject – the trouble is that you're never quite sure what the camera is going to do, so we don't recommend it. The focus options on more advanced cameras will include an 'M' mode for manual focus.
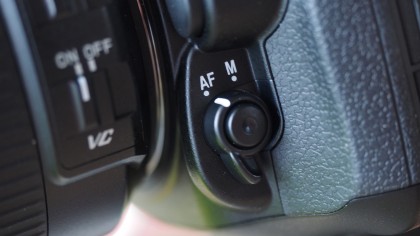
Some cameras offer these options on an external dial or switch, some offer them in the menus. On this Nikon, there's an Auto/Manual focus switch by the lens and you press the centre button and turn a command dial to choose AF-S, AF-C or AF-A focus mode.
Step 10: Focus point
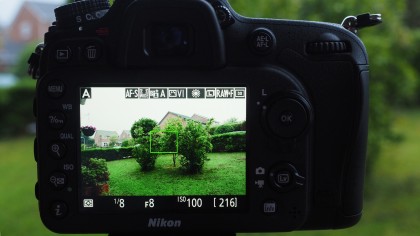
The last thing to check is WHAT the camera will focus on, and there's a choice here too. There will usually be an auto area AF option (or similar) where the camera chooses the focus point automatically. It will usually pick the object nearest the camera, and that's often the best choice, so it's handy if you're in a hurry.
But if you want more control you'll need the single-point AF mode (again, the terms vary from one camera to another). Here, you see a single autofocus point illuminated in the viewfinder or shown on the rear screen, and you can use the navigational thumbpad to change its position for shooting off-centre subjects.
Many cameras also offer a subject-tracking mode where they try to track moving subjects by moving the focus point. These are usually used in conjunction with the continuous autofocus mode and continuous shooting, or 'burst' mode.
As a rule of thumb, use auto area AF or single-point AF for single shots, and subject-tracking AF for continuous shooting.

Rod is an independent photographer and photography journalist with more than 30 years' experience. He's previously worked as Head of Testing for Future’s photography magazines, including Digital Camera, N-Photo, PhotoPlus, Professional Photography, Photography Week and Practical Photoshop, and as Reviews Editor on Digital Camera World.
Sign up for breaking news, reviews, opinion, top tech deals, and more.
You are now subscribed
Your newsletter sign-up was successful