


Setting up a new turntable and getting it spinning is one of life's great pleasures. Maybe you found an old stash of vinyl in the attic over the festive period, which feels roughly 229 days ago. Or maybe you just want to embrace the analog revival after swathes of bands (such as Massive Attack and King Gizzard & The Lizard Wizard) left Spotify in protest last year – either over continued low streaming rates (even as Spotify hikes its prices), or the prevalence of AI-generated songs vying for recommendations in the space.
Then again, maybe you just always wanted a turntable, and I love that for you. I personally think embracing the physical music format in a 2026 digital detox is a great way to enjoy music and support the bands we love.
And the good news keeps on coming, because I'm here to tell you that it's really not as tricky as you might think to set a turntable up. Whether you've just treated yourself to one of the best turntables your budget can stretch to in the January sales, or you want to breathe some life into an older plate-spinner that needs a little love, you got this. Just stick with me.
Some new turntables (and here I might mention the all-new Sony Bluetooth decks) come with Bluetooth connectivity for listening using the best noise-cancelling headphones and best Bluetooth speakers. And some also come with USB outs for ripping your vinyl to your laptop – because those records are precious, hard-to-replace physical presses, and a backup plan is good.
Yes, turntables do feature a few intricate, moving parts – and I get that it can be a little daunting if you're new to them. Don't worry though – luckily, you came here!
Some budget-friendly turntables come with much of what I'm about to run through pre-fitted and pre-assembled (or calibrated), so it'll become clear depending on the deck you have whether or not you even need to run through all these steps. That said, the further up the food chain you go, the more likely it is that you'll be setting a lot of things up to your own specific tastes. And this, friend, is peak hi-fi… you're gonna love it.
The main thing is: don't stress. It's easier than it looks at first, promise. Okay, let's get stuck in!

Turntable terminology – what's that bit?
Whether you need to assemble your turntable or not (and whether or not it's an automatic deck – which simply means the tonearm lifts and places itself before a record, rather than you doing it), it’s a good idea to become familiar with the components of your deck.
Belt drive / direct drive
Turntables typically fall into two categories: belt-driven and direct-driven. Belt-drive decks, as the name suggests, involve an independent motor offset from the platter, connected by a belt to spin your records. This thin belt is almost always made from rubber.
Direct-drive turntables simply have the motor located directly beneath the platter, rotating it, well, directly. So no belt. Make sense?
Which is best? Oh, that's a whole different piece, but direct-drive decks are often favored by scratch DJs (although the pricey Technics SL-1300G sits very much in the audiophile camp), while most budget decks I've tested are belt-driven.
Cartridge
The cartridge is that bit that lowers onto a record. It attaches to the end of the tonearm and houses the stylus (or needle), which tracks delicately through the physical grooves in your record.
There are two types of cartridge: moving magnet (MM) or moving coil (MC), but both are electro-mechanical devices that use magnets and coils of wire to generate a signal as the platter spins the record. The most obvious difference between the two types of cartridges is that moving magnets usually have a higher electrical output. This is because MM cartridges have a magnet on a cantilever moving within fixed coils, producing a strong signal (higher voltage) suitable for standard phono stages, while MC cartridges flip this, with lighter coils moving around a fixed magnet, resulting in lower output but often superior detail, dynamics, and frequency response.
What you need to know is this: more wallet-friendly decks usually come pre-fitted with a cheaper MM cartridge – and this is just fine. If your deck comes with a pre-amplifier inbuilt (more on this later) said pre-amp will be able to amplify the signal created by MM cartridges, but often not those low-output MC options, so you'll need a separate pre-amp for those.
Either way, the stylus is usually made from a tiny piece of diamond attached to a flexible metal strip, although materials like ruby, sapphire, boron, and even cotton fiber can be used as well.

Platter
You probably guessed this one, but the platter is the circular part of the turntable that spins. It's where where you place your record – and there's a spindle at the center, to match the hole in your vinyl. Most platters come with a mat made of rubber or felt to reduce vibration and protect your record.
Plinth
The plinth or ‘support’ is the base of the turntable. As well as providing something relatively weighty for everything to sit on (and sometimes housing amps and speakers, if it's a plug-and-play record player), the plinth is designed to dampen or absorb vibrations that might negatively affect sound quality.
Some turntables come with adjustable feet, which can help you set it up level (again, more on this later).
Tonearm
The tonearm is the part of the turntable that wakes up and gracefully glides across the grooves on the vinyl, either when handled by you, or like magic when you push a button. It needs to be carefully balanced with correct 'tracking weight' to ensure the stylus sits correctly in the groove without veering towards either side (or pressing too hard), but often with budget or beginner decks this is already taken care of.

Stay on the level
Lingo lesson over, let's get to it. First things first: work out where you're setting up your turntable. You want a flat, stable, low-resonance surface – a decent piece of furniture is ideal. For extra marks, use a spirit level to make sure your turntable's future home is perfectly level. Sometimes, turntables come with adjustable feet – because life isn't perfect and sometimes the floors upon which our hi-fi systems must live and operate are a tad uneven.
A key mistake I see a lot of people make (because manufacturers often photograph their turntable-and-speakers propositions thus) is putting your speakers right next to the turntable. You'll hear people talk about decoupling or 'not coupling up', but all they're really saying is 'isolate your hi-fi separates'. If you place your speakers away from your deck, on a different surface, you've done your best to avoid vibrations and feedback.
While I'm on the subject of bad vibrations: traffic – try to avoid it. Putting your turntable close to a window that looks out onto a busy road means adding ambient vibrations to the mix, which can negatively alter your turntable's performance. Also, if your other half regularly practices kick-boxing in the spare room, maybe avoid putting your turntable up against that particular wall.

Setting things up
Okay, relax. We don't need to rush this. Most decks come with a comprehensive manual, and while I don't know which turntable you have, almost all of them will need to be set up in this way. That said, when I set up the Sony PS-LX310BT it took me all of three minutes before I was listening to Prince on my Bluetooth cans – it just depends on how much has been done by the manufacturer before you get there.
Attaching the belt
Belt-driven turntable? You'll probably need to attach the belt to the platter and the motor pulley. To do this, lift up the dust cover (if there is one), take off the protective mat and remove the platter; turn it upside down and slip the belt around its underside.
Then place the platter back onto the spindle (the bit that sticks through the hole in your vinyl), and pull the belt through the little square opening in the platter.
You will need to hook the belt around the motor pulley. This can be a bit fiddly, because it's important that the belt is as level as possible, and definitely doesn't have any twists in it. But most belts will come with a small piece of ribbon attached, to help you pull it through the hole and attach it securely. It sounds daunting I know, but with the Sony deck I mentioned above I did it in around 60 seconds, Scout's honor.
Balancing the tonearm
Some turntables require you to do this, some don't. If you've already plugged your deck into power to make sure it fires up okay, make sure you unplug it before doing this step, so that your platter doesn't start spinning unexpectedly.
You'll need to use that small numbered wheel next to the tonearm for this. First, gently lift the tonearm from its rest, taking care not to drop it, because that could cause damage to the stylus. Once it's somewhere between the tonearm rest and the platter, lower it – there might be a lever to do this. Notice it lowers all the way down – because it's not yet balanced!
Now, the tonearm's 'level' height needs to be set in such a way that it's parallel to the surface of your vinyl when the stylus sits in the groove. You can do this by moving the counterweight at the back of the tonearm backwards and forwards until the tonearm sits level without your support. It'll look like it's floating – hurrah! Now, set the indicator at the front of this counterweight to '0', keeping the weight where it is and just moving the numeric dial part.
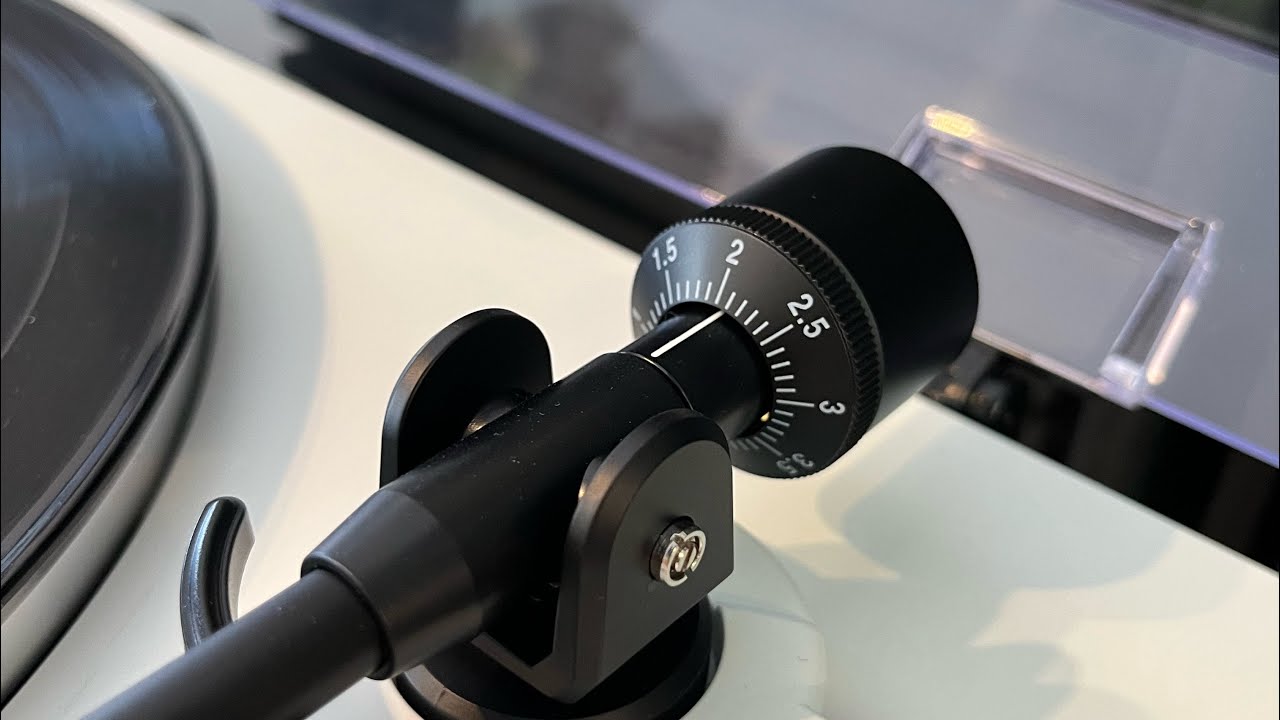
Setting the tracking weight and anti-skate
Your tracking weight (the amount of downward force the stylus places on the record) is now at 0g. So let's adjust the tracking weight so you can play records. The manual that comes with your turntable will list a recommended tracking force (usually this is between between 1.5g and 2.5g).
It's important to get this bit right; you might think that lighter tracking is better, but actually the opposite is true. You want the stylus or needle to stay in the record groove, because if it bounces around too much, it can a) wear out and b) damage your lovely LPs.
So, now you move both parts of this counterweight down the tonearm – the whole thing – so that the tracking weight gauge at the front and the counterweight itself sit at the recommended tracking force. On most tonearms you rotate the whole unit to set this, and line up the required number with the indicator line on the tonearm. Now, you'll see the tonearm lower gently; that's what it's going to do with your vinyl, because you care.
Once you're happy, place the tonearm back on its rest and set the anti-skate control dial – usually a little numbered knob on the outside of the tonearm, but it varies – to the same number you've just set the tracking weight to. This will stop the tonearm pulling slightly towards the center of the platter as it does its job. Further down the line, you might finesse this dial just slightly (some audiophiles say that simply setting the anti-skate to the same figure as the tracking force isn't always successful), but on most decks, I find it works just fine.
Balancing the tonearm is perhaps the most difficult part of this whole process to get right, so if you're in any way unsure, I'd also recommend watching this quick video, from Analog for Life.
Making connections ('Do I need a pre-amp?')
At this point, you're going to need to plug things in. Your analog turntable system essentially has four components. So far, we've been dealing with the first piece of the jigsaw and emphatically the star – your turntable. The second component is your pre-amplifier.
Got a new turntable? Chances are it'll have a pre-amp built in (often called a phono stage; look for a USB port or a switch labelled 'Phono/Line' – if you set the switch to 'Line' the audio signal from the deck will be amplified in-house to 'line level', aka 'ready for an amp'; set it to 'Phono' and you can use your own dedicated pre-amplification hi-fi separate). So, if you don't have an onboard preamplifier and you don't just want a Bluetooth turntable to listen via your Bluetooth speaker (or a works-with-Sonos deck for your Sonos speakers – yes, the Victrola Stream Carbon works with Sonos) you'll need to get one.
Third part of the puzzle? An amplifier (often called a power-amp or receiver). This powers your speakers and sends the audio over to them. And lastly, your stereo speakers. These babies use drive units to take the audio signal and push it out – into the air and into your ears.
Now, a lot of hi-fi products will bundle one, two, three or even all four of these components together to save you the hassle of acquiring them. Active and powered speakers – let me guide you happily to the excellent KEF LSX II LT here – already contain power amplification, so if your deck has a phono stage, you can wire it to your speakers using RCA to RCA (connect the red/white cables from the turntable output to the RCA input on the powered speaker) or RCA to 3.5mm (connect the RCA end to the turntable, and the 3.5mm jack to the AUX or 'Line In' port on the speaker). Both the turntable and the powered speakers need to be plugged into the wall for this system to work, and many new turntables come with bundled RCA cables.
Some power amps also have a built-in preamp. The easiest way to find it is to look for a dedicated 'Phono' input on the back. If you see that, your amp's got an inbuilt phono stage – hurrah!
And of course, record players are so called because they're a one-stop shop, with all amplification and speakers built in – one very decent example is the Majority Folio. Simply plug it into the mains, fire it up and get to spinning!
Just know this: you do need all four components in some guise for your analog turntable system to work, and for you to listen to vinyl. Got it? You're doing great.

Get to steppin'
You're ready to do this! Simply switch the turntable on, place a record on the platter and select the correct speed setting. There should be a button or switch on the plinth that allows you to do this – if you're playing a standard 12-inch you should select 33 RPM (revolutions per minute). For a seven-inch single, select 45 RPM.
Automatic deck? You may not need to do any of these steps other than press 'play'. The rest of us may need to raise the tonearm's cueing lever – the tonearm should now lift up. Then, align the tonearm with the outside edge of your record's grooves and lower the cueing lever until the tonearm gently drops and the stylus settles into the microgrooves of your vinyl.
And that's it – you should now be able to sit back and enjoy. Well done you!

Building your vinyl collection
My favorite part! This is why you got into this: you love music.
My advice here is always the same: while thrift stores are a great place to crate-rummage for hard-to-find and rare presses, our beloved bands usually aren't making a cent on the re-sale of that physical music product. So, I strongly encourage you to head out to your local record store. Yes, they still exist – they're like online stores but made of bricks, and you can take your purchases with you when you leave.
Another thing to get involved with? Record Store Day, an annual event that started in 2007 and now sees a range of special-edition record pressings go on sale at record stores on multiple formats, not just vinyl.
Oh, and why not consider a vinyl subscription service while we're at it? I used to help update this list of the best vinyl subscription services for our sister publication, What Hi-Fi?, but you can also buy new vinyl on Bandcamp.
The simple fact is that vinyl sales help the acts we love to keep making music. Why? The significantly higher profit margins per unit. Vinyl sales (especially when bought directly at gigs or through platforms such as Bandcamp), offer a sustainable income source that streaming, which pays fractions of a penny, cannot match.


Keeping things neat and pretty
I've written a dedicated separate guide to cleaning your turntable, stylus and vinyl that's got a lot of information on keeping things neat and pretty, but I wanted to use this section to make a big admission: I hate turntable dust covers.
You're meant to use them to keep pesky dust away from your turntable's delicate components, but for me this extra bulk – involving hinges and a big chunk of clear plastic – can also create vibrations and other nasty interferences. So I keep a microfiber cloth near my turntable at all times. Yes, but that is how I choose to live.
Also a word on your vinyl: try not to touch your records too much (always handle them by the very edges if you can), and do not stack them one on top of the other – always vertically, like books in a bookcase. Also, consider buying some decent inner sleeves to preserve them for the longest time possible.
And that's it, I'm done. I'm off to sit in my comfy chair with my cans on. I'm going to listen to Prince. Then, I might listen to Harry Styles. Whatever you're doing tonight, enjoy the music.

➡️ Read our full guide to the best turntables
1. Best overall:
Pro-Ject Debut Carbon Evo
2. Best cheap beginner deck:
House of Marley Revolution
3. Best budget Bluetooth deck:
Audio-Technica AT-LP70XBT
4. Best premium Bluetooth deck:
Cambridge Audio Alva TT V2
Follow TechRadar on Google News and add us as a preferred source to get our expert news, reviews, and opinion in your feeds. Make sure to click the Follow button!
And of course, you can also follow TechRadar on YouTube and TikTok for news, reviews, unboxings in video form, and get regular updates from us on WhatsApp too.
