


- Microfiber lint-free cloth
- Stylus brush
- Vinyl brush and anti-static brush
- Record cleaning solution (optional)
- 70% isopropyl alcohol (aka rubbing alcohol)
- Anti-static dusting spray
Ah, the physical, tangible music product! Vinyl's resurgence shows no signs of subsiding (and long may it continue), but every time a young member of your family puts a fingerprint over those glorious warm grooves there's a very small sonic outcome, isn't there?
The thing with even the best turntables is this: dust and dirt particles directly affect the sound. If your deck isn't singing quite as well as it used to – if you hear crackling noises, stuttering, or pops when spinning your tunes – it’s a sure sign that your kit needs a clean.
Fortunately, keeping your turntable spick and span is a relatively quick and wallet-friendly exercise, provided you do it fairly regularly (and very carefully – nobody wants this noble endeavor to turn into "how to break your turntable").
Why do you have to remember to clean the thing? Because vinyl records create static electricity as a result of friction – aka the needle tracking through your record's ever-decreasing circles. And the dust and dirt attracted by this static electricity can literally get into the grooves of your LPs, the belt drive of your deck, and of course your turntable's stylus. And this, listener, shall be relayed as audible pops or crackles.
To make things simple, we've organized this how-to into a quick bullet-point guide for a rapid spruce, followed by a longer, deep-clean option if you've not cleaned your plate-spinner in a little while – or you've noticed somebody else has been slacking.
Quick steps for how to clean your turntable, records and stylus
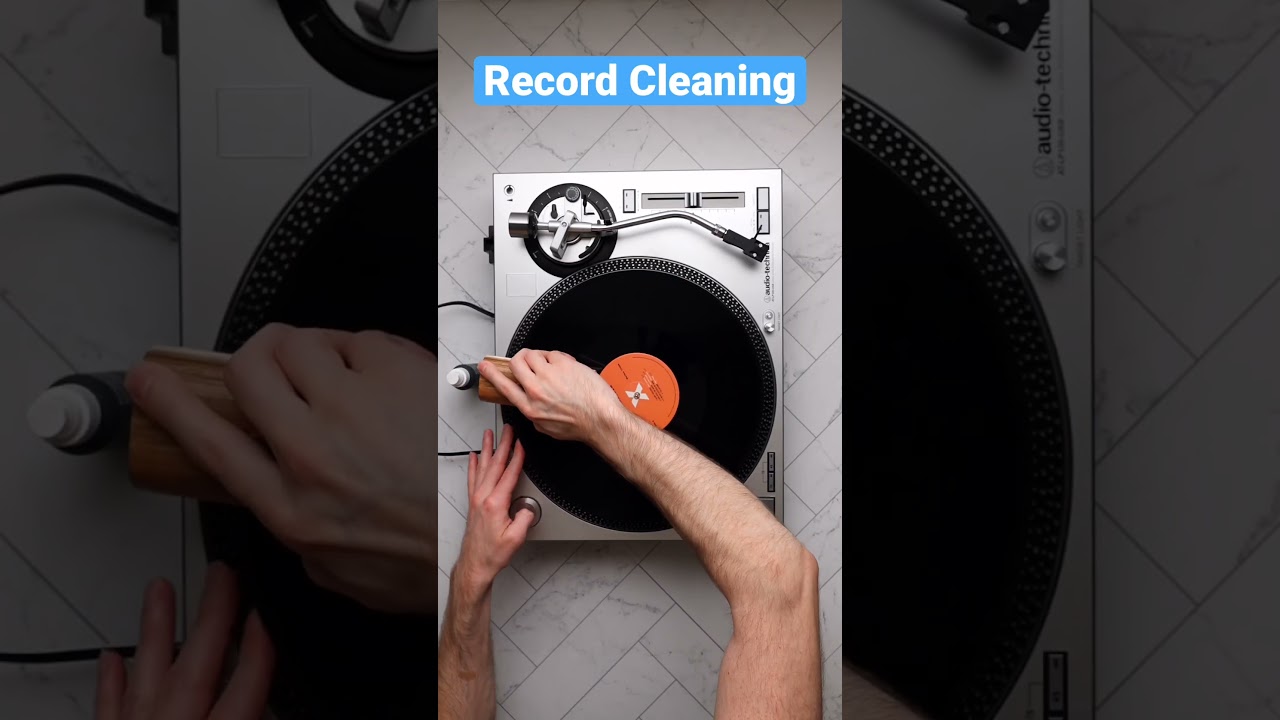
- Use the soft-bristled vinyl brush to remove dust and debris from your records, working from the outside in, in a circular motion (aka, follow the grooves)
- Clean the dust cover of your turntable with a soft, lint-free microfiber cloth and the anti-static dusting spray
- Pop the hood and carefully clean your turntable's platter and exposed parts with a fresh microfiber cloth dipped in just a little rubbing alcohol mixed with water, in equal parts
- Carefully clean the stylus by moving the stylus brush from back to front two or three times (the same way the stylus tracks through your records) over the needle to dislodge dust particles.
Step-by-step guide for how to clean your turntable, records and stylus
If you’ve got a particularly tricky deck to clean, you've just dug an old turntable or vinyl stash out of an attic, or you just really want to deep-clean your pride and joy properly, here's a more in-depth method for cleaning your turntable, vinyl records, and of course the headshell, stylus, and needle.
It's important to mention here that certain record presses, turntable designs (direct-driven or belt-driven, for example), tonearms, and their headshells do vary, and if in any doubt whatsoever, we'd recommend you consult the manual – the last thing you want to do is damage your precious analog system.
We also recommend opting for professional maintenance at least once a year. That way, the most delicate cleaning tasks can be performed by a professional.
1. Unplug your turntable and place a record on the platter to clean

An easy way to clean your records is to use your turntable. You'll want to spin the platter carefully by hand to clean your record using the vinyl brush (you can spray a little vinyl cleaning solution on this brush), steering clear of the very middle of the record.
Then, switch to an anti-static brush and slowly track this brush from outside to in – the same as your stylus would. We've linked a quick video below. Oh, and don't forget to do the flip side!
* Tip: when using a special vinyl cleaning solution like the one in the video below, make sure your record is completely dry when you're done to avoid any mold accumulating.
2. Dust the outer parts of your turntable with anti-static spray and a microfiber cloth

You know dusting? That. A simple, careful clean is the name of the game here. Personally, I remove my deck's dust cover completely when playing records (and I don't always replace it overnight between uses) because otherwise I hear the resonance echoed through the hood of my turntable when enjoying vinyl.
The point is, when cleaning said cover, I do the same – it's just easier to dust the thing with an anti-static dusting spray and lint-free microfiber cloth when it's not attached to the expensive and breakable parts of my deck.
Other external parts of your turntable to pay attention to will vary according to your player, but I like to carefully dust around the feet, the RPM switch, and the top of the tonearm – being careful not to upset the counterweight and headshell.
3. It's time to scrub the deck (so to speak)

This is where your rubbing alcohol comes in, diluted in equal parts with water. Now, liquids and electronics don't mix, so tread very carefully – you don't want any moisture going into the belt drive (which is likely made of perishable rubber) and onto the bearing, for example – but a little clean of the platter, tonearm, and any external nooks and crannies (around the counterweight, say) is what's needed here.
Again, if in doubt, avoid tampering – and never take rubbing alcohol directly to your vinyl. Depending on your deck and its assembly, you may feel confident removing the belt drive for a quick wipe down with a dry microfiber cloth, but many premium decks contain small parts that would be better left to a professional – and to avoid persisting problems, I recommend professional maintenance at least once a year.
As mentioned above, a separate cloth charged with your anti-static dusting spray can be run over the dust cover, feet, RPM switch, and such to keep dust particles at bay.
4. Use a stylus brush over the needle in a back-to-front motion

The key to this is that it's clean, dry, and hasn't been used for applying mascara any time recently. Some manufacturers suggest you completely remove the headshell (which contains the stylus) from your deck to better see what you're doing and avoid damaging the tonearm – but some (usually older) turntables come with fixed headshells, so it's important to know what you've got before trying to yank the whole thing off.
Certain manufacturers (such as Audio-Technica) sell stylus cleaning fluid that looks like a bottle of nail varnish with a small brush built into the cap, while other brands warn against any abrasive liquid on the needle, because it might dissolve the glue attaching it to the headshell. Again, read the manual and adhere to any instructions you find.
Either way, the gentle motion of brushing back to forward, from the base to the tip of the needle a few times, (the way your needle tracks through the record) should do the job.
Don't want to mess around with brushes? Another option is the Onzow Zerodust stylus cleaner, which looks like a cosmetic case containing eyeshadow but is actually a little dome of ultra-soft gelatinous plastic that you simply lower your stylus onto, lift and repeat until the needle is dust-free!
*Tip: what you really don't want, when using a brush over your stylus, is to go from side to side as this could alter the tracking of the needle – and that would not be good.
Useful tips

Some turntables come with specific brushes to aid with cleaning, but if yours doesn't and the various implements and solutions mentioned above amount to a fairly involved shopping list, you might like to consider a vinyl record and stylus cleaning kit – you may also find your deck's manufacturer sells kits specific to your model, so it's worth a quick Google search.
If your vinyl collection (rather than your turntable itself) is your chief concern, you may want to consider investing in a spin-clean vinyl washer which will do the job quickly and on both sides (more premium models are also available), but you don't have to purchase one of these – the steps above will get it done.
Lastly, make sure to store your records upright (like books on a shelf) rather than stacked one atop the other (like pizza boxes) to avoid damaging them. Keeping them in good-quality inner sleeves will deter those evil dust and dirt particles from getting into those grooves for a little longer too.
