Using a range of technology including 4G radio antennas and GPS, your iPhone nearly always knows where you are.
With the Find My Friends app, you can share your location with friends who are using an iOS device or signed in to the iCloud website on a Mac or a PC.
You can find out which restaurant or pub your friends have decided on, say, or see how far from home your partner is so you know when to start cooking.
Article continues belowThe Find My Friends app explained

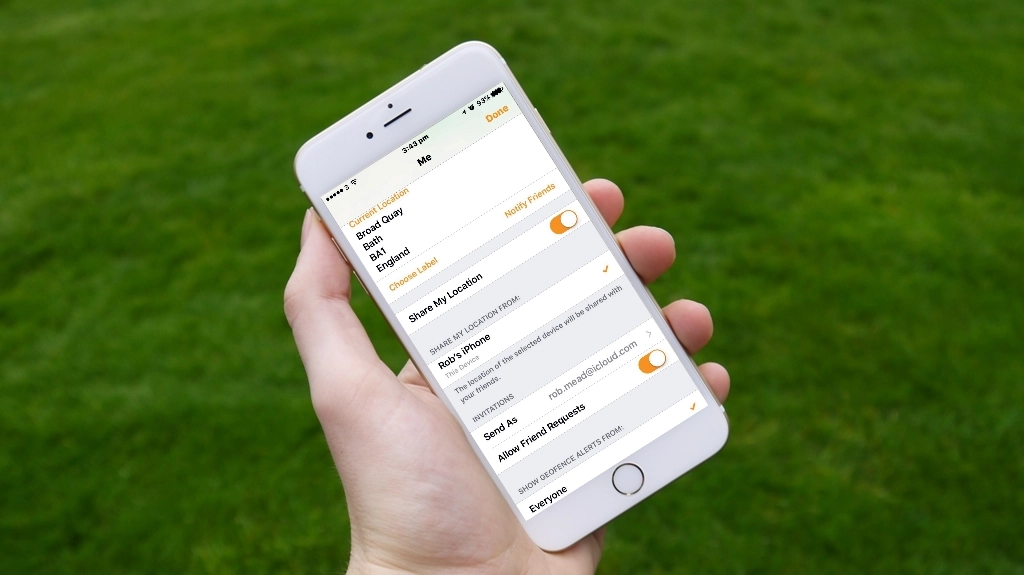
Name your location
At the bottom of the screen, tap the row that says ‘Me’ and lists your current location to reveal everything the app knows about you: where you’re located, whether you’re sharing that info, and who you’re sharing it with.
At the top of the screen you’ll see a live map view that shows your position, with the address below it. You can make the address more meaningful to you and your friends by naming it: tap Choose Label, then choose a preset on the next page – Home, Work, School, Gym or None – or tap Add Custom Label to create one of your own.

Share your location
Use this switch to quickly turn location sharing on or off. Just below this is another option: Share My Location From.
This is useful if you have more than one iOS device and want to associate them with different places – for example, a Mac at work, or an iPad at home.
You can see which device’s location is currently being shared as yours, as it’ll have a check mark to its right.
To change device, simply tap the one you want to use instead.

Invitations
When you invite a person to see your location, they receive an email from your default email address.
To use another address tap Send As to reveal a list of alternatives you can use: any that are already associated with your Apple ID, including any aliases that you’ve set up in the Mail web app at iCloud.com.

Close friends
You can be alerted when a person arrives or leaves a place. Under 'Show Your Geofence Alerts From', choose whether to get alerts about anyone who shares their location with you, or just friends you’re following.
How to share your and others’ locations with the Find My Friends app

1. Invite your friends
Tap Add, then Tap in the To field and type the email address associated with a person’s Apple ID, or their name – suggested contacts appear below – then tap Send.
Or, tap a nearby person’s face to share directly using AirDrop.

2. Sending and accepting
You’ll see a Request Sent message. Once the recipient accepts, you’ll be able to see their location.
To stop sharing your location with everybody, tap Me below the map and flick the Share My Location switch to its off position.

3. Notify your friends
Tap Me and then Notify Friends. Here, you can inform people of where you are now, or as certain events occur: that is, when you arrive or leave a specified location, and whether to do so just the next time or on an ongoing basis.

4. See where someone is
On the map, your location is marked with a blue dot. Tap a name in the friends list below to see where that person is, then tap Contact to message or call the person, or tap More and then Directions to plot a route to them.

5. Different map views
At the map with your list of friends you’re following beneath it, tap the map, and then tap the ‘i’ (bottom right) to reveal options that set the map’s presentation to either standard or satellite view, or a hybrid of the two.

6. Privacy settings
To stop a specific friend knowing where you are, tap their name in the friends list, then Contact, then Stop Sharing My Location.
If you want more flexibility, such as friends’ estimated arrival times, try Glympse.
- Enjoyed this article? Get more tutorials, guides, and tips on how to get the most from your Apple devices inside MacFormat. Take advantage of an exclusive offer in our sampler today.