How to create and share albums in Google Photos
Learn how to create and share albums of snaps in Google Photos
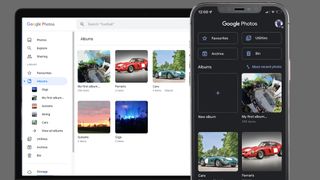
Looking to create and share albums in Google Photos? Google’s photo backup platform makes it a cinch to sort your snaps into custom folders. It also features a range of integrated sharing tools that allow you to easily send collections to friends and family.
One of the handiest organizational features of Google Photos is the option to create albums. These allow you to group particular photos from your library into custom collections in the cloud. From holiday snaps to portraits of a particular person, Albums in Google Photos work like a digital scrapbook of your favorite photos.
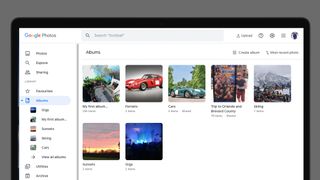
1. Click the 'Albums' tab in the 'Library' section. This is found in the left-hand sidebar (on the web) or in the bottom toolbar (on Android or iOS).
2. Click the 'Create album' option (top-right, on the web version) or tap the '+' icon in the 'New album' tile (on Android or iOS).
3. Name the album and then click 'Select photos' to choose snaps.
Albums in Google Photos can be clever, too: with a few quick clicks, Google Photos can automatically add images of specific people and pets into an album as you upload them. The backup platform also makes it simple to share albums: you can send a link that allows friends and family to view your albums, or you can invite them to contribute to an album with photos of their own.
Keen to create and share albums in Google Photos? The platform isn't the best photo organizer going - it's no Adobe Lightroom or even one of the best alternatives to Lightroom. But Google's service offers the essentials.
Whether you’re using the smartphone app or the web interface, our guide below will walk you through all of the key steps required to make photo folders in Google Photos – and how to share those cloud collections with loved ones.
What types of Google Photos album can you create?
There are two types of album that you can create using Google Photos: a standard album and a shared album. They work in very similar ways and share several traits, but also have one key difference between them.
Standard albums are private collections of images from your Google Photos library. Only you can see these albums, edit the description and add or remove photos. So standard albums are simply a way for you to organize your own Google Photos library.
Get daily insight, inspiration and deals in your inbox
Get the hottest deals available in your inbox plus news, reviews, opinion, analysis and more from the TechRadar team.
Shared albums work in a similar way, but they are collaborative. Whoever you share the album with will be able to see and download the images in the album. They will also be able to add their own snaps to the album, which makes them a great way to pool photos from a group trip or event.
What’s more, contributors to a shared album can ‘like’ individual images within the album by tapping the love heart icon. They can also leave comments on specific images by opening them, tapping the ‘Say something’ button and typing their thoughts into the sidebar. An overview of activity in a shared album can be accessed by anyone, simply by tapping the ‘View Activity’ icon on the main album page.
Whichever type of album you choose to create, any images included will also remain in your main Google Photos feed.
How to create a Google Photos album on the web
Creating an album in Google Photos has a simple premise: select images and group them together in a folder. But there are two ways to go about this. You can choose snaps first and create an album from the selection, or make the album before picking your favorite pics.
Method one: choose photos and create album
For the first method, follow these steps:
1. Head to the Google Photos web interface. On the main feed, hover your mouse over the thumbnail of an image you’d like to include in your album. A grey tick should appear in the top-left corner. Click this tick to select the image and it will be highlighted in blue. You can then repeat this for every image you’d like to add to the album.
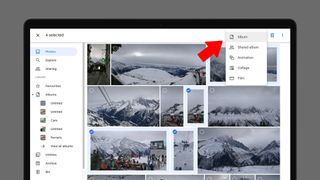
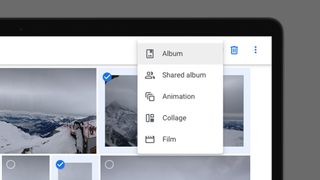
2. Once you’ve chosen all of the images for your album, click the ‘+’ icon in the top right corner of the window. From the drop-down list, you can then choose standard album or shared album (see above). Whichever you pick, you’ll be presented with the option to add those images to a new album, or an existing album (if you have any).
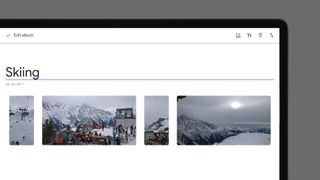
3. Click ‘New album’. On the next page, you’ll be able to give your album a title. Using the icons in the top-right corner, you can also add text to your album, give it a location and order the included photos by date. Alternatively, you can click and drag on individual image thumbnails to rearrange them. Once you’re done, click the check mark in the top-left corner and you’re away.
Method two: create an Album and add photos
The alternative approach is to create an album first. To do this, follow these steps:
1. Click the ‘Albums’ tab under ‘Library’ in the main sidebar. Click ‘View all albums’, then select ‘Create album’ in the upper-right corner. You’ll be given the option to type a title. You then have three choices. The first option is to click ‘Select photos’, then pick existing images from your Google Photos library to the Album.
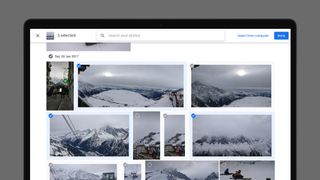
2. Or if you want to upload images straight from your computer, you can either drag and drop them onto the album creation page, or click ‘Select photos’, followed by ‘Select from computer’ in the top right. Any photos uploaded will be added to your library and the relevant album.
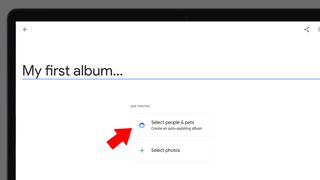
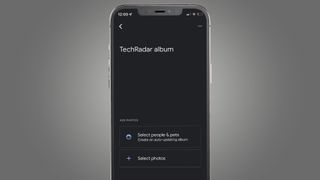
3. Want to create a portrait collection that updates itself? From the album creation screen, click ‘Select people & pets’ (above). You will be shown a gallery of faces which Google’s AI smarts have detected in your library.
4. Pick which people (or animals) you’d like to include, decide if you’d like to be notified when new photos are added, then click ‘Confirm’ in the top-right corner. Now, any time a snap is uploaded containing a face that Google recognizes as one you’ve selected, it will automatically be added to the album.
Whichever method you use to create an album, you’ll find the resulting collection under the ‘Albums’ tab in the sidebar.
After you’ve created an album, you can use both methods above to add additional images: either open up the album and click ‘Add photos’ to select more snaps from your library, or highlight images from your feed, click the ‘+’ icon and select an existing album from the list.
How to create albums in the Google Photos app
The setup is similar for creating albums using the Google Photos app for iOS and Android. You can select photos and add them to a new or existing album, or you can create an album then pick photos to fill it. Here's how to do both:
Method one: choose photos and create album
1. To choose your photos first, long-press on an image in the main feed to select it. Once it’s highlighted blue, tap on any further snaps you’d like to add to your album, then tap the ‘+’ icon (labelled ‘Add to’) in the toolbar at the bottom of the screen. As above, you can then choose to create a normal album or a shared album.
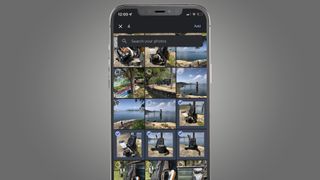
2. On the album creation screen, you’ll have the same options to type a title, add location information and rearrange images in the library. You can also tap ‘Add photos’ to choose additional images from your Google Photos feed to include in the album.
Method two: create an album then add snaps
1. Tap ‘Library’ in the bottom toolbar, then tap the ‘+’ thumbnail (labelled ‘New album’, at the top of the albums section, below). You’ll be given the option to name the album.
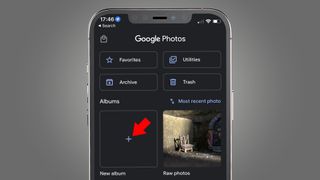
2. You can then either tap ‘Select photos’ to pick images from your Google Photos feed, or tap ‘Select people & pets’ to create an auto-updating album that features selected faces and animals, as detected by Google’s AI software.
3. You can make a shared album in the app by selecting ‘Sharing’ from the toolbar, then ‘Create shared album’ at the top of the screen.
As with the web interface, further photos can be easily added to albums in the app using the same two approaches. Either select images from the feed and tap ‘+’ to add them to an existing album, or go to the ‘Library’ tab, open an album, then tap ‘Add photos’.
How to share albums in Google Photos
Whether you’re using Google Photos on the web or through the app, there a few ways to share albums. The simplest is to open an existing album, then tap the ‘Share’ shortcut. This is in the top-right of the web interface and the top-middle of the smartphone app.
From the ‘Share’ screen, you have a few choices. You can invite Google contacts to contribute to the album. Alternatively, you can create a sharing link: click ‘Create link’ on the web or tap ‘Share to’ in the app. You’ll then be presented with a link which you can copy and share with anyone.
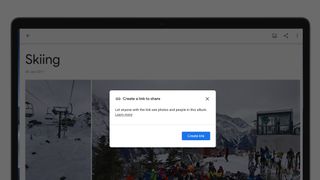
Depending on your device, you’ll also be shown further options to share your link through different social platforms. On the web interface, for example, you’ll be offered the choice to post the link via Facebook or Twitter. It’s worth remembering that anyone with the link will be able see all of the photos in an album. Based on your sharing settings (see section below), they may also be able to upload and comment on photos.
The other way to share an album on Google Photos is to create it as a shared album in the first place. Whether you select photos first or make the album first, when you get to the shared album creation screen, you’ll see an option in the top-right corner labelled ‘Share’. Tap this and you’ll see the same choices to share the album with Google Account holders or to create an open sharing link.
How to limit access to a shared album in Google Photos
Once you’ve shared an album, you can control the specific access rights that viewers and collaborators have. Open the album in the smartphone app or Google Photos web interface, then tap the three dots icon in the top-right corner. From the menu, select ‘Options’. You’ll then see a range of toggles, allowing you to individually disable certain settings.
From here, you can switch off the option to leave comments and likes. You can also turn off ‘Collaborate’, which means anyone with the link to your album will only be able to view it, rather than adding their own photos.
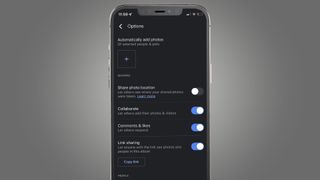
You can also disable link sharing altogether. If you do, any photos or comments added by collaborators will be removed, and anyone with the link will no longer be able to see the contents of your album.
Turning off link sharing won’t remove the access rights of Google contacts who you individually invited to view or contribute to an album. To make an album completely private, you’ll need to also remove them from the same options screen. You should see the icons and names of contributors under the ‘People’ section, below the sharing toggles. Select ‘More’ (with the three dots), then ‘Remove person’.
If you remove people from a shared album but leave link sharing active, it’s worth remembering that they will still be able to see the album if they have access to the link. If you want to stop a specific person from seeing an album, tap ‘More’ next to their name, then select ‘Block person’. This will remove any content that they’ve added and prevent them from seeing or contributing to the album.
Formerly News Editor at Stuff, Chris has rarely been able to resist the bite of the travel bug – so he now writes about tech from the road, in whichever Wi-Fi-equipped café he can find. Fond of coffee kit, classic cars and sustainable gear, if there’s one thing Chris loves more than scribbling, shooting and sharing his way around the world, it’s alliterative triplets.

