Survive the Zombie Apocalypse: recover lost data on Linux
Teach yourself the basics of Linux disk repair before the Zombies eat your brains
Sign up for breaking news, reviews, opinion, top tech deals, and more.
You are now subscribed
Your newsletter sign-up was successful

Unless you use the same password for all online and offline accounts (which we don't recommend), chances are that you may forget your obscure, intricately-crafted password. Or maybe you've arrived at the research facility, and the computers that store the procedure for synthesizing antidote, but the scientists aren't alive to tell you their passwords.
For crises like these, you need the Rescatux distro. The distro has the usual recovery tools to repair broken filesystems and bootloaders. But what sets this distro apart from others is its ability to change passwords on a Linux installation and regenerate a broken sudoers file.
When you boot the live distro, it'll automatically launch its custom rescue app, called Rescapp. This app has various buttons. When you click on the Password (+) button, the tool will ask you if you wish to change a password or regenerate the sudoers file. Both options will search for Linux installations on your computer, and then display the list of users on the distro you select.
If you are changing the password, the tool will prompt you to enter a new password for the selected user. If you are regenerating the sudoers file, the selected user will be added to /etc/sudoers. If the scientists were using old copies of Vista on their government-funded hardware (which is probably related to the dreadful outbreak in the first place), there are several tools that'll help you recover or reset the password on the Windows installation as well.
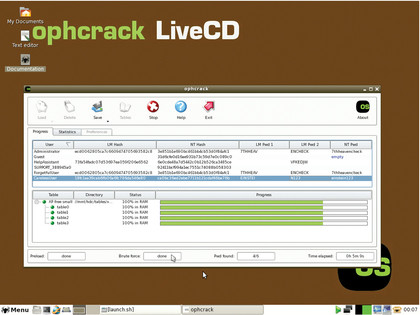
One of the easiest is Ophcrack. The best way to use Ophcrack is via its SliTaz-based live CD. The live CD is available in two flavours: one has tables that'll help you recover passwords from Windows XP and earlier distros, and the other does the same for Windows Vista and later releases.
When you boot either live CD, it'll automatically launch the graphical Ophcrack tool. It will discover and list all the user accounts on your computer and attempt to recover their passwords. Unless the password is fairly complicated, has lots of characters, or you're on a dated machine, the tool shouldn't take long to crack the passwords.
When it's done, the passwords are listed in the NT Pwd column. While this should work for most users, if it doesn't you can increase your chances of cracking the passwords by downloading and installing additional tables from Ophcrack's website.
Sign up for breaking news, reviews, opinion, top tech deals, and more.
Depending on which live CD you've downloaded, you'll either have the XP Free Small or the Vista Free table. Besides these, only the 703MB XP Free Fast table is available for free. The others can be downloaded for a fee, and can be used to crack passwords that aren't based on dictionary words, include special characters, German characters or numbers, and are of various lengths.
Resetting the password
If Ophcrack isn't able to crack your passwords using the free tables, and you don't want to cough up for the additional paid tables, you can use the Offline NT Password and Registry Editor to reset the password.
Before you proceed, however, be aware that resetting a password has some disadvantages compared to recovering a password. If you have asked Windows to encrypt your files with your password, resetting your user account will not let you decrypt those files. This is why you should first try to recover your password.
The Offline NT Password and Registry Editor is available as a 4MB Live ISO image. When you boot from it, select the partition that houses the Windows installation whose password you need to reset. Next, the tool asks you the location of the password registry.
After reading the password registry, the tool prints a list of users, and gives you the option to set a new password, wipe the password, enable/disable a user, or escalate their privileges to those of an admin. Just make sure you write the changes to the registry before exiting the tool.
Dedicated recovery tools

While TestDisk and Photorec will sniff out all sorts of files, the tools can sometimes be an overkill. If all you need to do is recover JPEGs or MOV files from a formatted memory card - perhaps to recover evidence of early infection in daytime TV presenters - you can use the recoverjpeg tool. You can install the tool from your favourite distro's repos.
To use the tool to recover images from a memory card at /dev/sdc, launch a terminal and enter:
sudo recoverjpeg /dev/sdc
The tool will store all the recovered images in the directory you have invoked it from.
Another useful tool is ntfsundelete, which is designed to recover files from an NTFS filesystem. Again, you'll find it in your distros repos. Assuming /dev/sda5 is your NTFS formatted partition, in a terminal enter:
sudo ntfsundelete /dev/sda5
This will display a list of files it has found. You can also use the -t switch to look for files modified in a specific time period. The command sudo ntfsundelete /dev/ sda5 -t 2d will look for files that were altered in the past two days.
The tool also has very flexible recovery options. This command will recover all PDF files and keep them in a recovered/ directory under your home directory:
sudo ntfsundelete /dev/sda5 -u -m *.pdf -d /recovered
Backup is a virtue
Despite all the excellent open source data recovery tools, there's only one sure shot way of recovering all your data - a backup. Although it isn't particularly time consuming, backing up data requires careful thought and preparation.
For starters, where do you store your data? Keeping it on another partition of the same disk isn't advisable - what if the whole disk fails? A copy on another disk is one solution. The kind of data also influences the choice of storage medium. Hard disks offer the best price-to-space ratio, and are also a convenient and readily-available option.
While flash drives offer portability, optical media is easily distributable, and online storage is globally accessible.
What to back up?
Some of us are more organised than others. So while the best strategy would be to keep all your data on a dedicated disk or partition away from all the other distro files, most of us will have data strewn all over the place.
Most desktop distros have dedicated directories to store your documents, downloads, pictures and videos. They also take the pain to ensure the bundled apps use these directories as the default storage location.
If you have been using these directories, you can back them up instead of the whole /home directory. Also, most apps create their own data repositories to store files. Many prompt you for the location, while some create them on their own. Check under their Preferences to search these out.
Point-and-click backup
There's no dearth of backup tools to choose from, but the best tool for a desktop user is Déjà Dup. It's a graphical front-end to duplicity that's easy to set up and has all the features you'd expect from a backup tool.
On some distros, such as Ubuntu, Déjà Dup ships pre-installed, while it's available in the official repos of most others. The tool has a very minimal interface so as to not overwhelm new users. But you'll need to configure the app before putting it into action.
Start by pointing it to the location where you want to house your backups. This can be a local hard disk, a remote location accessible via SSH or FTP, or a web-based storage service, such as Amazon S3 or Ubuntu One.
Next, you need to specify the list of directories you want to include in and exclude from the backup. By separating the two, Déjà Dup enables you to include a larger directory in your backup, such as a user's home directory, while giving you the flexibility to leave out certain parts, such as the .cache/ directory.
Lastly, you need to select a backup schedule to automate the process. By default, the tool will keep older backups forever, if you have the space on the backup location, but you can also specify a different time period depending on the criticality of the data.
When you're done, click the Backup icon to start the process. The tool will prompt you to enter a password to encrypt the backups. This initial backup may take some time, but subsequent ones are much faster because they are incremental and only back up data that has changed.
When restoring backups, Déjà Dup enables you to restore data to its original location or under a specific directory. You'll first be prompted for the password to decrypt the backups, and then shown a time-stamped list of backups to restore from.
Bare metal backup

While Déjà Dup is best for making targeted backups, sometimes you need to clone the entire disk. For situations such as these, where you need to replace your old disk with a new one, you need a tool that's capable of making a bare-metal backup of the disk.
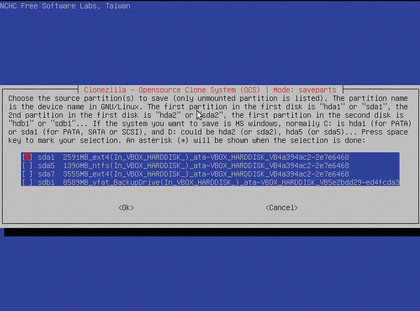
The most popular tool for such a task is CloneZilla. But for all the tool's flexibility, it can be quite intimidating for desktop users. If all you need is an app that'll help you swap the old disk for a new one, on the same computer, then Redo Backup and Recovery is the easiest tool to use for the job.
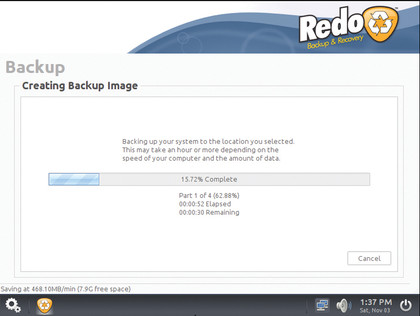
The tool is available as a live CD. When you boot the live CD, you only get two buttons - to Backup the disk or Restore the backup on the new disk. The backup process will begin by first scanning your computer for drives. You'll then be asked to select the one you want to back up. The tool will then show you the list of partitions on the disc. Make sure that all of the partitions are selected.
You are then asked to select a destination to save the cloned image of the disk. This can be another hard drive on the computer, or a USB drive attached to the computer, or a shared folder on another computer. On this destination disk, you'll have to create a folder and then select a name which will be appended to the various files created by the tool. That's all there's to it.
Depending on the size of the disk and the location of the destination, the tool can take several hours to complete. When it's done, remove the old drive and plug in the new one. Now boot from the live CD again, and this time click the Restore button. Now navigate to the .backup file you wish to restore from, either on a local disk or over the network.
The most crucial step in the restoration process is selecting the destination drive to write the image over. Pay attention when making a selection here, because the tool will erase existing content on the drive, including the MBR.
When it's done, the new drive will exactly mirror the old one. If the previous drive had multiple operating systems or distros, and had a working bootloader, so will the new one. If you have moved the image to a bigger disk, you'll have to use Gparted to reclaim the additional, unpartitioned space at the end of the disk.
Make crash-proof discs

Optical discs are commonly the preferred media for keeping backups. However, even when stored carefully, they'll eventually go bad. Making multiple copies of backup disks seems like an inefficient use of resources.
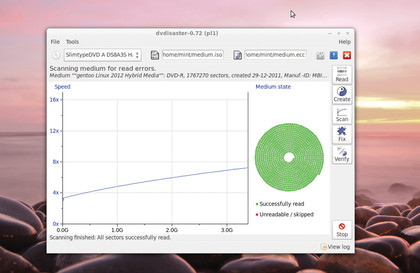
A better option is to use DVDisaster. The tool creates an error correction code (ECC) file from a healthy disk, which can be used later to recover data when the media is damaged.
DVDisaster works on ISO images. To image your disk, insert the disc into the drive and launch DVDisaster. Now click on the Image File Selection icon, type in a name for the ISO image and select a directory for it to be stored in. Lastly, click the Read button.
Now it's time to create an ECC file. DVDisaster supports two types: RS01 and RS02. We'd advise you to stick to the default RS01 method, and store the ECC file on a separate medium. Click the Create button to create and save the ECC file.
Using the default settings, the ECC file is about 15% the size of the ISO file. For better protection, head to Preferences > Error Correction and select the High option. This balloons the ECC file to about 35% the size of the image, but gives you a better chance of restoring badly damaged media.
Now, from time to time, scan the backup discs with DVDisaster using the Scan button after inserting the disc. If the scan reveals bad sectors in the media, it's time to recover the data.
For that, first create an ISO image of the damaged media using the same procedure as before. Then find the ECC file that you created earlier for the damaged media and point to it using the button for ECC file selection. With the image and ECC file in place, click on the Fix button, which reads and repairs the damaged image.
- 1
- 2
Current page: Recover lost data: Reset Linux passwords
Prev Page Recover lost data: get back your files
With almost two decades of writing and reporting on Linux, Mayank Sharma would like everyone to think he’s TechRadar Pro’s expert on the topic. Of course, he’s just as interested in other computing topics, particularly cybersecurity, cloud, containers, and coding.