How to boost your PC game graphics with Nvidia Control Panel

When you install the drivers for an Nvidia GPU, they come packed with a couple of weighty pieces of software - Nvidia GeForce Experience and Nvidia Control Panel. At a glance, GeForce Experience jumps out at you more with its bold interface and options to auto-optimise your games. But it’s the non-descript Nvidia Control Panel - which wouldn’t look out of place in Windows XP - that really lets you fine-tune your in-game graphics.
We’ll be taking a look at the 3D Settings section of Nvidia Control Panel, sifting through its glut of graphical tweaks to pick out the ones most capable of making your games shine.
The Basics
To get started, open Nvidia Control Panel, then under 3D Settings in the navigation pane select ‘Adjust image settings with preview’. In the preview pane that opens, select ‘Use the advanced 3D image settings’. This will allow any changes you make to take effect.
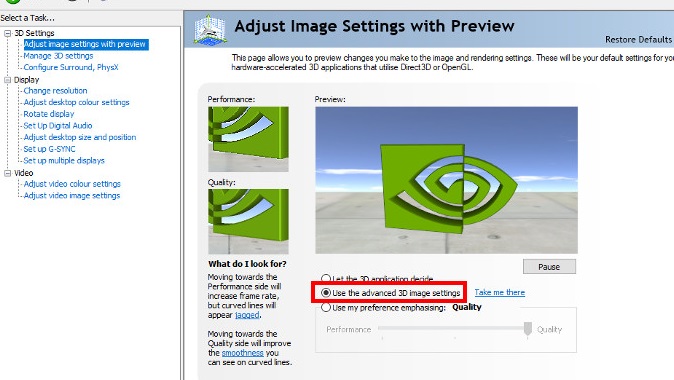
Next, go to ‘Manage 3D settings’ in the left-hand pane to open the 3D Settings box. This is where you’ll be making your graphical tweaks.
Most of the settings under ‘Global Settings’ are best left at they are. Shader cache, for example is best left on as it stores a game’s shaders on your hard drive, precompiling them and giving a small boost to loading times and performance (particularly in open-world games).
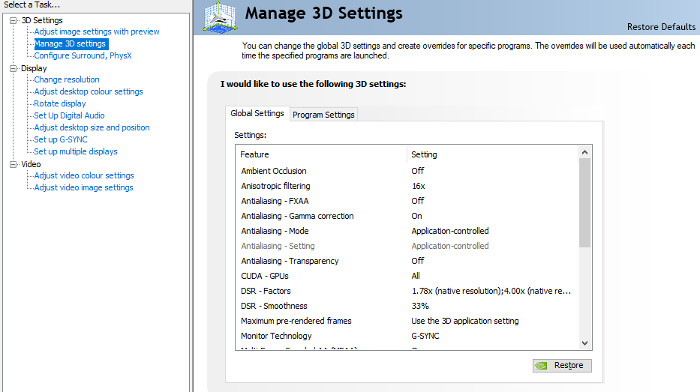
You may also be tempted to crank ‘Power management mode’ up to ‘maximum performance’, but this will make your GPU run loud and hot at its max clock speeds when gaming. It’s overkill, and bad for the longevity of your card. ‘Optimal power’ is a good balance between performance and power.
Many of the 3D settings in NVCP just don’t work universally enough or have a tangible enough impact to recommend. So if we don’t mention a particular option, just stick with its default settings.
Sign up for breaking news, reviews, opinion, top tech deals, and more.
Anisotropic Filtering (AF)
In first- and third-person games, you spend a lot of time looking at walls and floors at oblique angles, with the given surface stretching off into the distance.
The less texture filtering you have, the shorter the distance at which textures become blurred. It’s a bit like being short-sighted, but specifically for surfaces at angles.
This is ostensibly done to improve performance, but these days your average GPU should be able to handle 16x anisotropic filtering with little trade-off.
Look at the path in these two shots from The Witcher 3. With AF switched off, it’s just a few feet before the path’s textures become murky (marked by the red line). With 16x AF, it retains its nice crunchy texture much further into the distance.
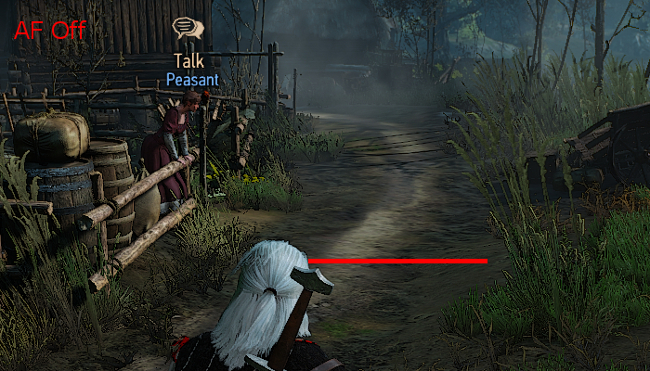
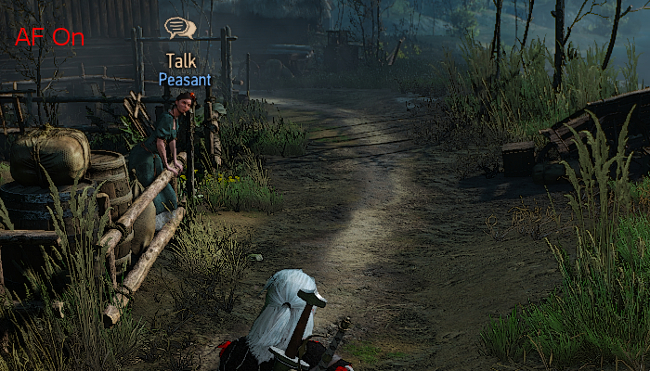
Looking at the list of NVCP’s 3D settings, you might also spot ‘Texture filtering - Anisotropic Sample Optimization’, which can improve performance when you have AF switched on at a small cost in filtering quality. Only use this if you believe that AF is having a negative impact on game performance.
NVCP’s anisotropic filtering can work better than in-game AF settings, but this isn’t guaranteed, and other times it’s of identical quality (The Witcher 3 and F.E.A.R being cases in point). So it’s best to compare the NVCP with in-game AF methods (if there are any), and decide for yourself which works best.
DSR
DSR, or Dynamic Super Resolution, is one of the most ingenious tricks added to Nvidia’s Control Panel in recent years. By ticking the boxes in 'DSR - Factors', you unlock higher resolutions for your games (so 1.75x and 4x on a 1080p display will unlock 1440p and 4k resolutions respectively).
Enable DSR - Factors under 'Global Settings', then go to your in-game resolution menu and you’ll see the higher resolutions listed.
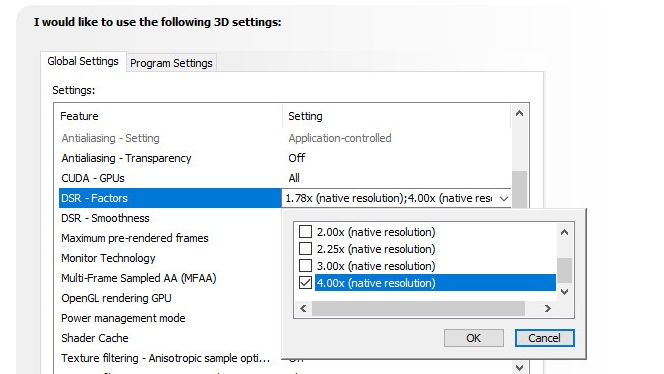
DSR renders the game at a higher resolution than your monitor’s native resolution, then squeezes it back down to fit you monitor, resulting in far fewer jagged edges and clearer textures. The catch is that DSR is just as strenuous on your GPU as if you were actually running that higher resolution, so expect big performance hits in more demanding games.
However, if you have a game that’s running at silky framerates on top settings - if you’ve got performance to spare, in other words - then it’s worth a go. It works for older games that don’t officially support anti-aliasing too, but beware of UIs in these games becoming extremely small at higher DSR factors.


These two images above from Dishonored 2 show a clear difference in texture fidelity on a 1080p display between no DSR and 4x DSR (4k, in other words). Everything in the image - from the painting of the gorilla to the flower in front - pops much more. The performance hit in this case was considerable however, knocking down the framerate from 75 to 30.
The 'DSR - Smoothness' option affects how much blur is applied to the image, offsetting any artifacting that may occur as a result of the forcefully downsampled resolution. We leave this at the default 33% in Global Settings, but you can tweak it on a by-game basis - lower will roughen edges, higher will blur the image.
Antialiasing (AA)
There are so many antialiasing options in the 3D Settings list that they can be overwhelming. Do they all work for all games? Can you switch them all on at the same time to turn your games into a veritable hotpot of velvety antialiasing?
The answer is ‘no’, on both counts. The compatibility of these AA options varies greatly from game to game, so to an extent it’s a case of just trying them out for yourself. We can help you get started though.
Antialiasing - FXAA: Provides a layer of smoothing over the the top of other AA methods, reducing the visibility of jaggies at the cost of blurring. Low performance impact.
It rarely works in modern games, but can look good in older games, particularly when combined with DSR. Some people complain that FXAA blurs the image too much, so it’s best switched on on a by-game basis.
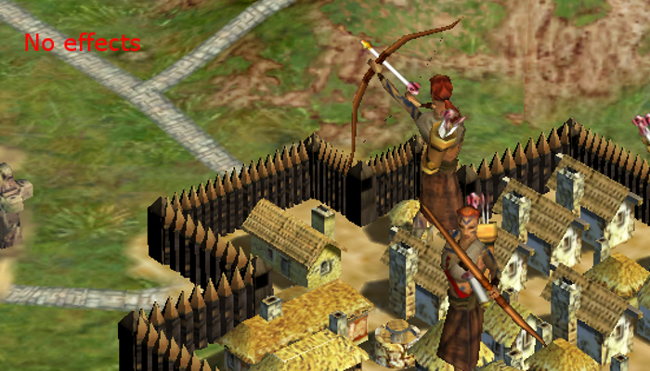
With no DSR or FXAA, Civ 4’s ageing graphics look jagged and shifting all over. The string of the bow is barely visible.
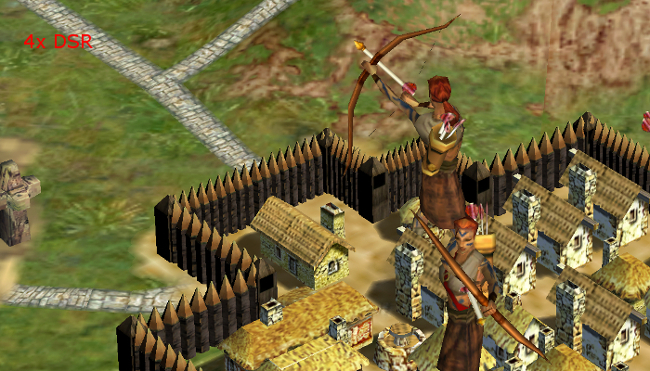
With 4x DSR, the jaggies are greatly reduced. Note also how the texture on the road is much clearer.
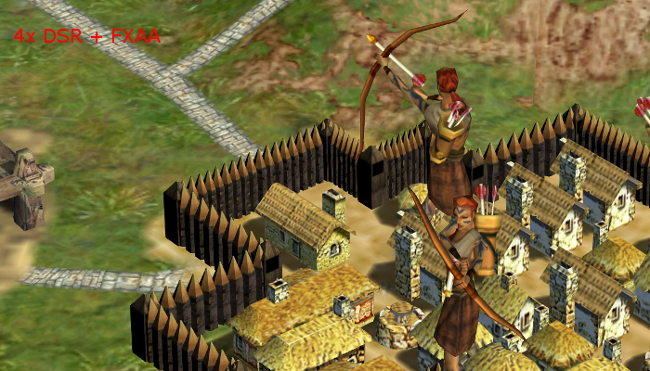
Add some FXAA, and the jaggies are all but gone. Look closely enough, and you you can just about see the entire string of the archer’s bow too. Impressive.
Antialiasing - Gamma correction: Largely outdated. Helps thin objects blend against contrasting backgrounds. Only affects older games with MSAA and CSAA. No harm in leaving it on on the off-chance it may help.
Antialiasing - Mode/Setting: Best left off in almost all circumstances. If a game has its own antialiasing options, then they will definitely do a better job than those in NVCP. You can try the ‘Enhance application setting’ option, but don’t expect miracles. The only time it’s worth trying to ‘Override’ application settings is when a game lacks its own AA options. Even then, these options aren’t guaranteed to work. The most universal form of antialiasing is DSR, so you’re better off experimenting with that than this.
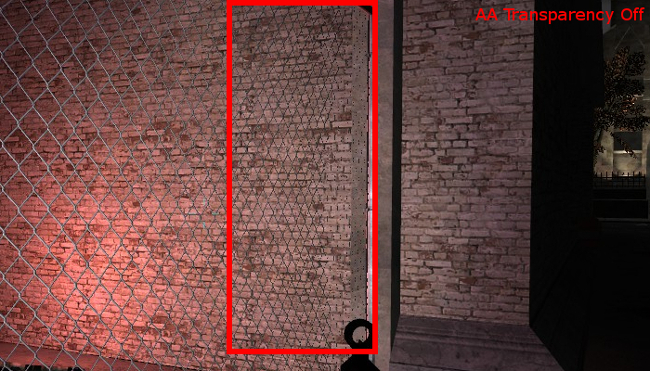
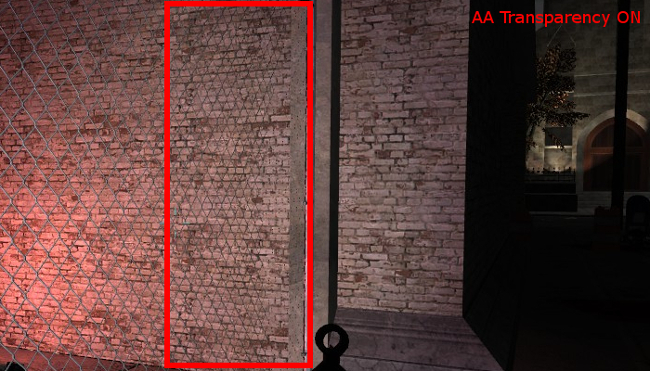
Antialiasing - Transparency: Smooths out edges on so-called alpha textures - textures with transparency effects like wire fences and masses of leaves on trees. Apply only to games where you have performance to spare (it’s unlikely to work with most modern games anyway).
In the images from FEAR below, you can see how AA transparency smooths out the jarring pixelation on the fence. What you don’t see in the images is that without transparency those pixels on the fence shift and shimmer obscenely. With transparency, the fence becomes nice and static. For older games, this effect is well worth switching on.
Multi-Frame Sampled AA (MFAA): A relatively recent effect for DX10 and more recent games. MFAA works over the top of MSAA (multisample antialiasing), improving its effects with little impact on performance.
The rough equation is that if you have 2x MSAA enabled, MFAA increases it to 4x, if you have 4x MSAA enabled, MFAA boosts it to 8x, and so on. It doesn’t work with all games, but you should keep it on in Global Settings as it might get your game a free graphical boost.
- Want a better graphics card? Here's our list of the best GPUs of 2018

Robert Zak is a freelance writer for Official Xbox Magazine, PC Gamer, TechRadar and more. He writes in print and digital publishing, specialising in video games. He has previous experience as editor and writer for tech sites/publications including AndroidPIT and ComputerActive! Magazine.