How to replace your laptop hard drive

There are generally three reasons why you'd want to replace your hard drive: your original drive has failed, you need more storage, or you're after a speed boost.
Other than drive failure, you need to look closely at the reason why you want to upgrade. While hard drive capacities have grown in recent years, external storage is easier to use, and you can get pocket-sized USB drives with huge capacities.
Newer drives are certainly faster, but most of that speed increase has come from changing from the old IDE interface to the newer SATA. There have also been advances in the speed at which the discs rotates, so it's possible that by buying a new drive, it will have a higher spindle speed, and therefore be quicker when it comes to reading and writing your data.
Before you contemplate changing your hard drive, you will need to do some preparation work. As laptops generally only have one hard drive, you will need an external drive so that you can back up all of your data.
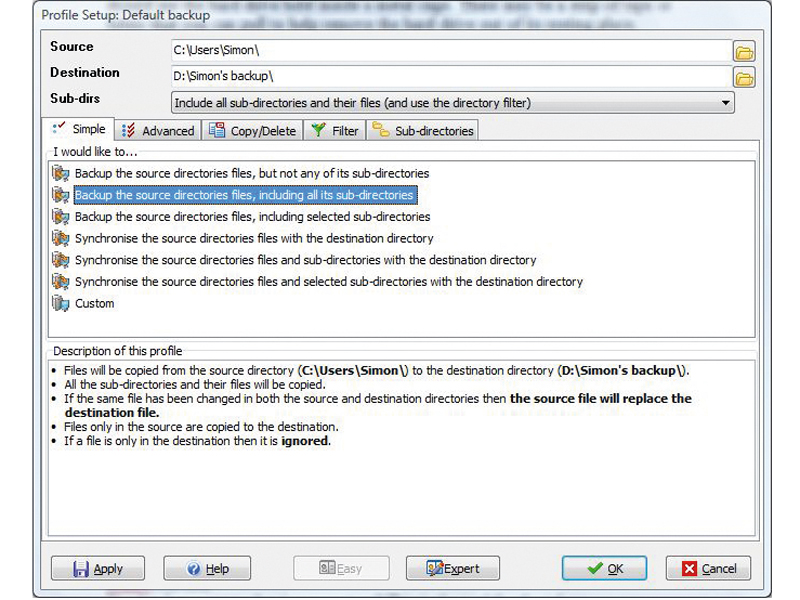
You can use the back-up utility in Windows, but a good, free alternative, is SyncBack. You will need to back up all your important files and folders, such as the contents of My Documents, your music library, email and internet browser bookmarks.
If you use free Mozilla Firefox and Thunderbird software for your internet browsing and email, then there is an excellent tool for backing up your browser and email profiles called MozBackup, which you can download from here.
If you use Internet Explorer, you can export your bookmarks as an HTML file, and Outlook Express users can back up manually by following the instructions found here.
Sign up for breaking news, reviews, opinion, top tech deals, and more.
Get prepared
Once your data is safely stored, you need to make sure you have everything else you need. Depending on whether you installed Windows yourself, or it came preinstalled, you will need your Windows install CD, or System Recovery disc, along with your Windows Product Key.
You will also need a drivers disc or, if you don't have one, find and download all the drivers you need for your laptop's hardware, such as chipset, graphics, etc. Also locate the installation discs and serial numbers for any other software you need.
An even easier way to migrate to a new hard drive is to create a full back-up image of your existing hard drive and simply reinstall it to the new drive. Two of the best imaging programs are Norton Ghost and Acronis True Image Home.
Before buying your new hard drive, you need to establish whether your existing hard drive uses an IDE or SATA interface. Your laptop manual should have this information, but if not you can use a tool such as Belarc Advisor which analyses your system and will tell you the make, model, type and capacity of your existing hard drive. Drives listed as SCSI are SATA.
Have a look at price comparison sites such as www.pricerunner.co.uk to get the best price on a new hard drive. You'll need to look for 2.5-inch drives and if you want the best speed, you should buy a 7200rpm drive, but these are currently only available on the SATA interface.
Once you have the new drive and you've backed up all your data, it's time to remove the old one. Turn your laptop over and have a look at the bottom of the chassis.
Each laptop is different, but the hard drive will generally be located behind a panel, held in place with screws. You may need to remove several panels, until you find the one containing your hard drive. See our three-step guide below above for more details.
Once you've removed the panel, you should see the hard drive held inside a metal cage. There may be a strip of tape that you can pull to help remove the hard drive. Check that it's not held in place by any further screws.
Gently remove the drive, ensuring you pull it out in as straight a line as possible. The hard drive connector has easily bent pins, so make sure you don't twist the drive as you remove it.
Your new drive
Once the drive is out, you'll need to remove it from the cage it was attached to, and then attach the new drive. Fit the new drive and replace the chassis cover panel. Your new drive will not be partitioned or formatted, so you will need to do this as part of the Windows setup.
Turn your laptop on and press the key needed to enter the BIOS set-up screen, usually DEL or F2. In the BIOS, check that the new drive is detected – if not, you'll need to refit it.
Go to the boot section of the BIOS and change the boot order so that your laptop boots from CD and then the hard drive. Save the settings, insert the Windows install CD or System Recovery disc and reboot your laptop.
Follow the instructions to set up Windows, or recover your system to its original factory install state. Once Windows is installed, you can go back to the BIOS and change the boot order to boot from the hard drive, so you can get straight back to work.
- 1
- 2
Current page: How to replace your laptop hard drive
Next Page Free software and step by step walkthrough