Shooting movies: a director's guide to Note 3 video
Make even the most seasoned moviemaker take Note…

Sign up for breaking news, reviews, opinion, top tech deals, and more.
You are now subscribed
Your newsletter sign-up was successful
It used to be that if a movie was shot on a phone, rather than a dedicated camcorder, poor quality and inferior results would be inevitable. But this simply isn't the case anymore.
The videomaking specs on the Samsung GALAXY Note 3 are easily as good as – and in many aspects, better than – those of a dedicated video camera. And the fact that you have the ability to shoot a movie in 4K on the GALAXY Note 3 is simply incredible.
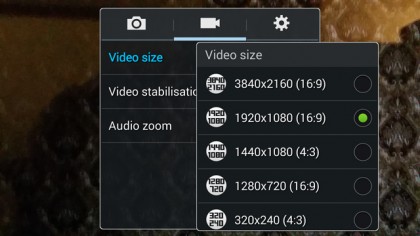
While 4K will future-proof your footage, though, there plenty more options available. You can opt for 1080p, which means super-smooth shooting at a quality that most HDTVs can handle, or turn the settings all the way down to 320x240, for footage you can share online effortlessly with minimal data usage.
With features such as Video Stabilisation and continuous autofocus as standard, you can't help but shoot good footage with your Note 3.
We are here to help you transform this good footage into great footage, though. Whether it is a fun holiday movie, or a couple of clips of the family you want to edit together, the following steps will add the polish you need to create better, more professional videos on your GALAXY Note 3.

1. Choose your image
The Samsung GALAXY Note 3 allows you to shoot footage at 4K quality. That's the new, better-than-HD standard that's set to surpass the Full HD that most televisions will provide today.
Head to your Camera icon and press Settings, then Video size, and here you will see your options. The lower the numbers, the lower the quality – so if you are thinking of playing your movies back on a TV, we wouldn't go lower than 1,920x1,080.
Sign up for breaking news, reviews, opinion, top tech deals, and more.

2. Keep it steady
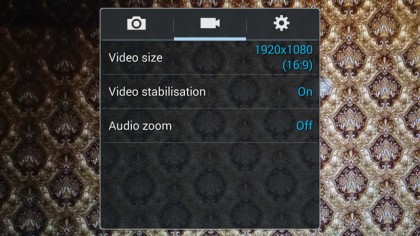
Unless you are using a tripod to carefully position a shot, most footage recorded on the GALAXY Note 3 will be handheld, so make sure that you have Video Stabilisation switched to on. This can be found in the Settings menu below the Video size option.
Add this and it will steady out your shots, magically getting rid of any shakes you may have from holding your device for long periods.

3. Guide and zoom
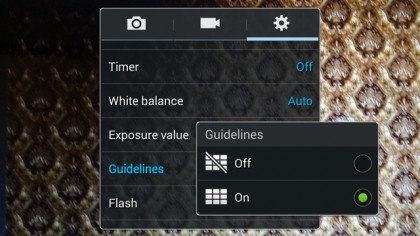
There is a little trick in the filmmaking world called the Rule of Thirds that, when used, will help you shoot better footage. Go to the video settings and turn Guidelines on.
You'll see a grid of nine boxes. Now, when you're composing your shot, if you put a particular point of focus, such as a face, on any of the intersecting lines then it will improve the 'look' of your movie. As a rule, never have your main object slap-bang in the centre of the shot – move it slightly to the side, along one of the vertical lines, for better results.

4. You're holding it wrong
Before you start shooting your masterpiece, you have to make a choice – to hold your device portrait or landscape – and then stick to it. If you change your shooting style midway through your movie then it will ruin your chances of creating anything worth watching, so think carefully before you begin about what will work best for your video.
Horizontal shooting is generally best as this is how a television plays back footage – and indeed, how we see the world. Record something vertically and you will have horrible black borders on the side of your movie when you watch it back.

5. Variety is the spice of life
When shooting footage remember to take a number of versions of the same shot, making sure that you get around 10 seconds of footage for each take.
Start with an establishing shot (this is the one that is furthest out and sets the scene). Then zoom closer in – this is your mid shot. Then find the most interesting area that you are filming for the close-up shot. Again, use the zoom for this.