How To Completely Customize Your Mac

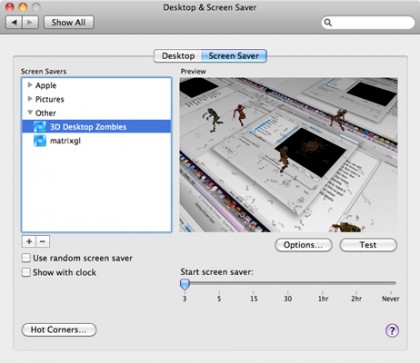
Tiny zombies beat flying toasters any day.
Click the “+” button below the sidebar to select other image sources, including a MobileMe gallery, an RSS feed, or a folder on your Mac. Choosing Browse Screen Savers used to take you to the Downloads page on apple.com just for icons and screen savers, but it’s gone now. The internet still holds lots of options, though, whether you’re interested in animated holiday or nature scenes, rampaging 3D zombies, or a good-old Matrix homage, you -- and your Desktop -- can stay covered.

Fact: Matrix screen savers make Sad Keanu smile.
Give the Finder a Makeover!
We all spend tons of time in the Finder, but that doesn’t mean it needs to languish in bland obscurity.
Finder windows. They’re not exactly your Mac’s sexiest feature -- but they are what makes a Mac a Mac, so you probably don’t give much thought to their functionality or style. But with a few simple tweaks, you can make your Finder windows stylish and turbocharged.

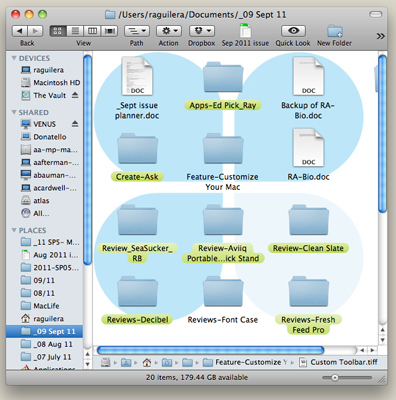
Turning down the opacity lets you read file names over your background image.
At the top of our list of favorite Finder tweaks is one of the simplest and least known. If you’re constantly navigating deep file structures to open the same file over and over, do yourself a favor and drag that file into the toolbar at the top of a Finder window. Now you can open that file with a click from any Finder window. This also works for folders and applications.
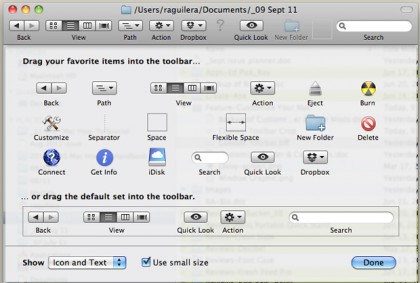
For better organization, Control-click on a Finder toolbar and choose Customize Toolbar. From there, you can rearrange file icons, add spacers to group things, and add extras like the handy Path button, which lets you quickly navigate hierarchies.

Customize your toolbar by dragging new buttons onto it.
Sign up for breaking news, reviews, opinion, top tech deals, and more.
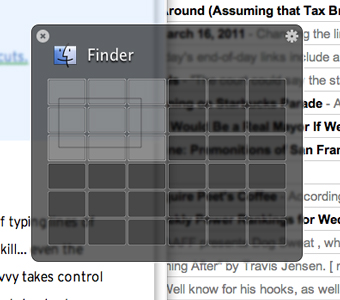
But Finder windows are kind of like M&Ms -- there’s no way to have just one. So you open another one…and another one…and another one. Before you know it, they’re multiplying like mogwai at a pool party. Rather than wasting your time dragging multiple windows all around, learn to manage them. Clicking the yellow button will minimize a window to your Dock, but a third-party window manager like Divvy ($14, mizage.com) or Cinch ($7, irradiatedsoftware.com) can seriously juice your Finder productivity. Cinch lets you quickly resize and position windows to full-screen or half-size, while Divvy lets you assign custom window positions to keyboard shortcuts. If simply managing Finder windows isn’t enough, you can replace the Finder entirely with Path Finder ($39.95, cocoatech.com) which adds tabbed windows and a ton of other enhancements for the Finder.

Divvy’s heads-up display lets you quickly define regions of the screen for window positioning.
If spending all this time staring at bland Finder windows leaves your eyes glazing over, try jazzing them up a bit. The Appearance pane in System Preferences gives you a whopping two choices for either blue or graphite windows, but you can add your own background graphics in a few simple steps:
1. Find a graphic you like and crank the opacity down to about 30 percent using an image editor.
2. Navigate to a folder and click View > As Icons.
3. In the View menu, choose Show View Options.
4. Under Background, choose Picture and double-click the empty square to choose your background image.
That image will now appear in only that Finder window, and you can set up as many custom windows as you like, but keep in mind that backgrounds are only visible in icon view. Enjoy!
Judge a ’Book By Its Cover
Stickers and skins can make your MacBook unique…but lasers are where the real action is!
Sure, Apple’s signature brushed aluminum is slick, but how do you tell your Mac apart in a sea of silvery-gray? You could go the colored-case route, but for something a little more unique, we found plenty of ways to make your Mac show more of your true colors.
The easiest (and least permanent) way to customize your hardware is with decals. Gelaskins offers a huge variety of “skins” for all kinds of devices, including Macs. At $29.95 a pop for laptops, Gelaskins aren’t cheap, but they’re made from durable vinyl, feature bright, full-color graphics, and fit your Mac like a glove…provided you can master the somewhat challenging installation. They’re easy to remove when your tastes change, and if you’re careful, you can actually reapply a Gelaskin if you change your mind again. Gelaskins can even custom-print a skin from your own artwork if you want to be absolutely sure that your MacBook is one of a kind.