Best Linux apps for managing your media
Organise and edit your music, movies and photos
Take those video files off your phone and do something useful with them
There aren't many people who are especially keen on messing around with video. It's often a convoluted and processor-intensive task that's reserved for those with a particular talent or purpose. But like digital photos, digital video has become ubiquitous for all the same reasons.
Which is why, as loathsome as it can be, there's no escaping video processing and editing.
Android phones are the perfect example. They're an open platform based around lots of the same technologies we use on our Linux desktop, and yet the video format they produce is invariably closed and difficult to convert.
Most will create a either an MP4 or a 3GP file, both of which are subsets of the MPEG4 format. But support for either on your desktop isn't great. At the very least, you'll need to install potentially patent-infringing packages, such as FFmpeg and the bad plugins package within Ubuntu, but it's also likely you'll need to mess around with some conversion application before you can see your masterpiece.
There are many conversion tools that can take one format and create another, but one of the best and most reliable we've found is Handbrake. It was developed for copying DVDs, but it's an excellent video converter, regardless of the source.
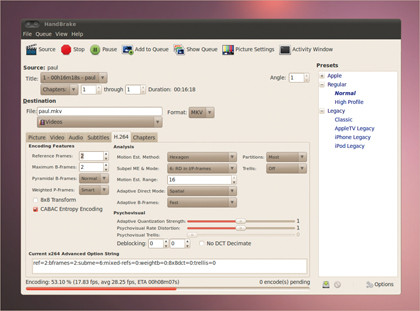
Handbrake only supports a limited number of formats built around MPEG4, but that works in its favour, because the output it creates is generally excellent. There hasn't been an official build of Handbrake for Linux for some time, but fortunately there are community-developed builds for both Fedora and Ubuntu.
Sign up for breaking news, reviews, opinion, top tech deals, and more.
With Ubuntu, for example, you can add John Stebbins' PPA repository to your package manager, and look for the handbrake-gtk package. Installing handbrake-gtk will grab everything you need to get started.
From the main window, use the Source button to locate the file you want to convert. Then choose a profile from the panel on the right. While most of these deal with Apple hardware, they will all create widely compatible MPEG4-format videos.
You can customise both the video and audio options in the specific tabs in the main view. Use the Target Size to ensure the resulting file is of a reasonable size. We've found the MKV container, rather than MP4, provides excellent compatibility with Linux for both video and audio.
Editing crash course
The big difference between a casual mobile phone video and a more professional one is that the latter often has the luxury of multiple takes. If you look at a typical action movie, each shot might only last a couple of seconds, whereas home videos are often constructed from a single, long take. This is because making multiple shots requires planning and the skill to make logical cuts, as well as to knit them together.
The best app to do this that we've found is OpenShot. It's a non-linear editor, which means you can edit your files in-place, quickly previewing the output before settling on a final composite and creating the finished video. If you've used a commercial application such as Adobe Premiere, you'll know how OpenShot works.
First, you add your clips to a pool, which in OpenShot is the Project Files section in the topright. You then drag these in order on to one of the two timelines at the bottom of the window.
The top 'lane' takes priority, so if two clips are played at the same time, the video from the top will display in the Preview panel. But the audio from the two will be mixed together unless you disable the sound for one of the lanes or clips with the speaker symbols.
In essence, you construct videos by dropping clips into the timeline, using the Cut and Resize tools to trim them down to the useful bits, and building a story from their sequence.
When you're happy with the results, use File > Export to create the final movie by selecting a profile from the dropdown for your target format. You can choose between high-def, DVD, mobile and web profiles, for example, followed by specific targets, such as NTSC-DVD or the Nokia N900.
Seamless fades
Switching between streams is fine for quick videos, but if you've got more ambitious plans, you might want to add blended transitions and effects to the cuts. OpenShot is also good at this, as you can see from the variations listed in the Transitions and Effects tabs in the main view.
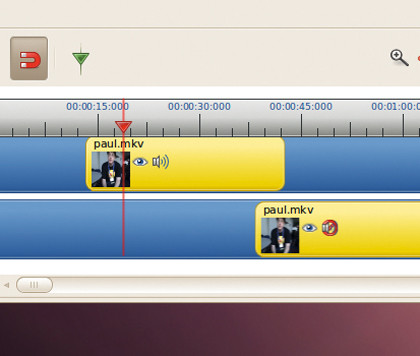
To add one to your project, drag its icon on to the timeline. A transition will attach itself to the border between two video tracks, illustrating the two streams it will use as the source and destination, while an effect will seemingly disappear without trace. You can resize and move a transition to the point where you want the two videos blended, and when you press Play, you'll see a real-time preview of the transition in action.
A transition also has properties, and these can be edited by right-clicking its block and clicking on Properties. To change the properties of an effect, right-click the video clip you dropped the effect on to.
If you select Properties, you can change things such as the speed and length of a clip, but you can also alter the effects applied to a clip, and each effect's own properties. These can be found in the last tabbed page of the window, and it's also from here you can change the order in which the effects are processed, and remove those you don't need. Too many will slow down your system.
Finally, no video is complete without introductory text and a credit screen. OpenShot's Title Editor, in the Title menu, can create these for you. You can choose from a massive library of background patterns in the top-right drop-down, before adding text using the Create New Title button.
With the title created, you can edit the text, change the font and adjust the colours. Clicking Use Advanced Editor will even open your creation in Inkscape, if you've got it installed. When you click Apply, an SVG version of your image is added to the Project Files view. There's no reason why you couldn't create your titles using Gimp or Inkscape and import the files just as you would a video.
When you drag them to a video timeline, they're given a default duration of seven seconds, but this can be changed from the clip's Properties page. You should also see that many of the titles include an alpha channel, where the video from a lower timeline is visible through the various elements of the illustration.
A title can be processed in the same way as a video clip, which means you can use transitions and effects to blend your words into the video. This is where you may need more than two tracks, especially if you start blending effects with titles and two video streams. Use the Plus symbol to add more, then export the whole project as a complete video.
Step by step: Creating transitions in OpenShot
1. Overlap clips

For one clip to blend into another, you need two of your clips to overlap. To achieve this, just drag the clips along the timeline.
2. Drag a transition
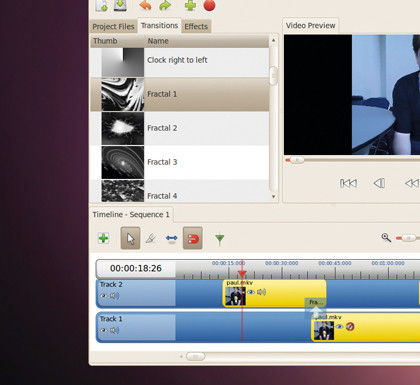
Drag one of the transitions from the list to the area where the two clips overlap. You can preview the effect by clicking Play.
3. Update Properties
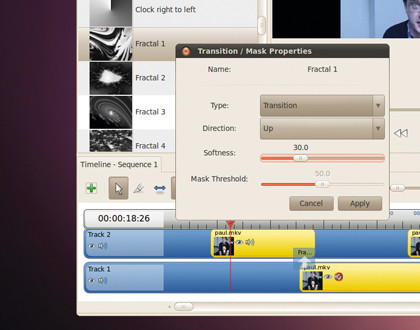
To change the duration and parameters of the transition, right-click and select Properties. You can also use the Resize tool here.
Current page: Manage your movies in Linux
Prev Page Manage your photos in Linux Next Page Mange your music in Linux
 Become a TechRadar Insider


