Best Linux apps for managing your media
Organise and edit your music, movies and photos
Sign up for breaking news, reviews, opinion, top tech deals, and more.
You are now subscribed
Your newsletter sign-up was successful
Introducing Shotwell, the new kid on the photo management block
We've got used to the idea of owning large collections of digital photos, whether they've come from your friends, your camera or your mobile phone. They often languish forgotten and unloved somewhere deep in the depths of your hard drive, only ever seeing the light of day when someone asks for a particular photo. But it needn't be that way.
There are several fantastic applications that can take much of the tedium away from managing large numbers of photos and turn them into productive and well-organised collections. For a long time, the default application for such trickery was F-Spot. But in future versions of both Ubuntu and Fedora, F-Spot has been superseded by an all-new, slimline and speedier application called Shotwell.
This means that now is the perfect time to get re-acquainted with both your photo collection and a new management program. However, before you start, we'd recommend finding a newer version than the 0.5 iteration provided by Ubuntu's 10.04 package repository, because these offer essential features, such as zoom, which aren't found in the earlier version.
At the time of writing, the latest is 0.7, which also supports imports from F-Spot. Shotwell can add photos from your camera directly, or you can point it at the location of your current collection, from which it will build its own library.
Choose File > Import From Folder for the latter option, and then go and make a fresh cup of coffee, because the process can take a while, depending on how many snaps you've got. But what you pay for in terms of a slow import, you reap in usability speed.
Speed dating
Sign up for breaking news, reviews, opinion, top tech deals, and more.
Click on the Photos label in the top-left of the side panel, and you'll instantly be presented with thumbnail views of every photo in your collection. You can quickly scroll through the complete list, change the size of the preview, or double-click on any image to see a larger version.
You'll find that Shotwell has automatically sorted your collection into dates, and split these into what it calls 'albums'. Clicking on either a year, month or day in the left panel will now show either a thumbnail preview of one of the images from the album, or the photos it contains.
Most photos aren't taken in ideal circumstances, especially if you're using a compact camera or a phone. This means there's often a lot you can do with software to improve the appearance of a photo that's too dark, or lacking contrast.
Shotwell has an effective enhancement tool, for example, which performs an automated contrast and brightness adjustment to bring out more of the detail in your images. Just select the Magic Wand icon in the toolbar when your photo is selected.
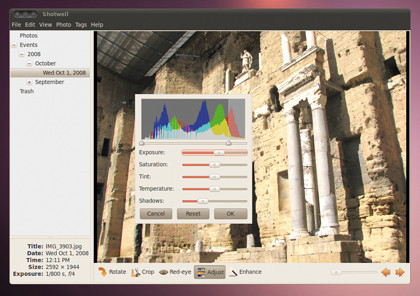
Alternatively, you can manually improve your photos by clicking the Adjust button.
Enhance your shots
This will open a window with a large histogram at the top and several sliders beneath. This histogram is a way of illustrating where the red, green and blue colour information falls within a brightness scale, with dark on the left and bright on the right.
If you find a lump of image information on the left and very little to the right, for example, then your image could do with ramping up the Exposure slider. With each increase, you should see the colour data in the histogram move to the right. You can even maximise the range of colour and contrast within the image by adjusting the sliders beneath the histogram. Any gaps to the left or right, for example, can be cut out.
However, if these areas contain any colour information, cutting them means you'll be losing detail within the image. If dark areas in your photos aren't as black as they should be, the equivalent peaks in the left half of the histogram aren't climbing high enough, so reduce the level of the Shadows slider.
You can also adjust the separation of the colours using the Tint and Temperature sliders, which can help combat the effects of indoor lighting and reflections.
Finally, the Saturation slider can either add more colour to your photo, or reduce it to a black and white image.
Red eye removal
Photos are for sharing, and you don't want to share images that suffer a common fault, such as glowing red eyes in your beloved offspring. It wasn't so long ago that removing the offending colour required some adept digital manipulation skills and a complicated piece of software. Fortunately, there have been numerous attempts over the years to make the removal process effortless, and Shotwell gets as close as any.
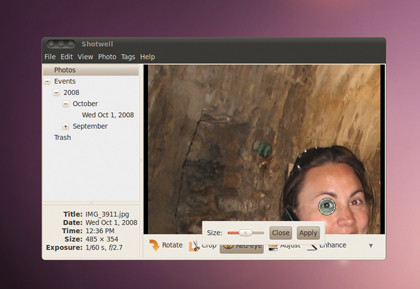
Select the problem photo, and you'll see the Red Eye icon appear in the lower toolbar. Click this to enable the process. Earlier versions of Shotwell provided no further options, other than a small round selection tool to position over the offending area.
The most recent iterations, however, enable you to change the size of this circle. This is a big improvement, because any area that isn't part of the red eye problem will also have much of its colour information removed, which can result in giving your subject what looks like a black eye.
For this reason, you should make the selection area as small as possible, move it to the exact area of your photo containing the red, and click Apply. You can always undo this if you make a mistake. This being the age of social networking, sharing your photos no longer means printing them out and putting them in the post, or even creating a website to share with your friends and family.
Most people now prefer to upload their images directly to one of the more popular photo sharing sites such as Flickr, Picasa and Facebook.
Share and share alike
These sites have the advantage of being available from anywhere without necessarily costing you any money, and you can still control who has access to your shots. Shotwell is one of the better applications for easily uploading your images without worrying about the details.
This functionality sits quietly behind the Publish entry in the File menu. When you click it, another window appears, enabling you to choose which online service you'd like to use for sharing your snaps. You'll then need to step through an embedded browser page, where you authenticate Shotwell's access to your chosen account.
After you've done this bit, Shotwell will be able to upload images with no further user interaction. With Flickr, for example, you only need to choose the resulting image size and your privacy settings before the image appears online.
Handily, Shotwell will even inform you of your remaining bandwidth allowance for the current month.
Step by step: Export to Flickr
1. Publish
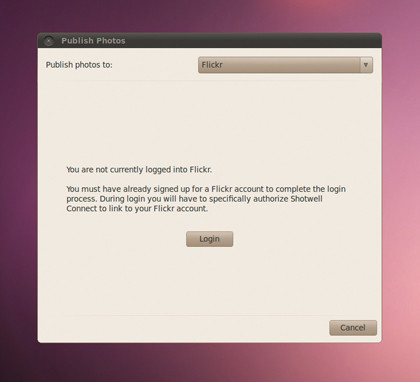
Select your photo, then click Publish in the File menu. Choose Flickr from the drop-down menu that appears and click Login.
2. Authorise
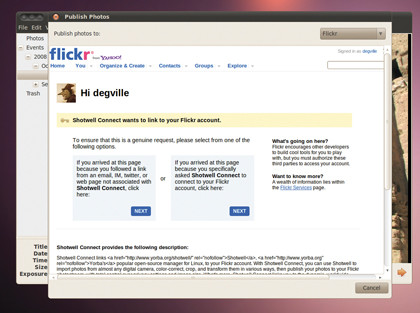
Shotwell will open an embedded browser window – use this to authorise the application to access your Flickr account.
3. Upload
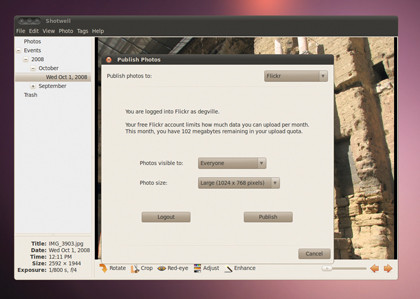
Choose the format and the size you wish to upload your photo as. With a free account, the smaller the photos, the more you can upload.
Current page: Manage your photos in Linux
Prev Page Burning media in Linux Next Page Manage your movies in Linux