How to wipe a hard drive in Windows 10 and macOS
Wondering how to wipe a hard drive in Windows 10 and macOS? Our easy-to-follow step-by-step guide will help you get the job done in record time

If you've been trying to figure out how to wipe a hard drive in Windows 10 and macOS, rest assured, you'll find everything you need to know in this guide to help make completing this task an absolute breeze.
Did you invest in the best computer a few years ago but have decided to sell it? Are you a fan of the best MacBooks and Macs but want to give away your older Apple design so that you can treat yourself to a new model? If your answer to either of these questions is yes, you're going to want to erase your hard drive first.
Even if you've already erased your data and deleted all those private files, you'll still want to wipe your hard drive completely before you hand it over to someone else. Not only will this get rid of any trace of your history on that particular hard drive, but it'll make it almost brand-spanking new, which will make it operate like one of the best hard drives for whoever is getting your computer.
But, passing on your computer is just one reason you might want to learn how to wipe a hard drive in Windows 10 and macOS. It could also be that you're simply wanting to free up space for yourself or set your hard drive up to work with a different file system.
Whatever the reason, we're here to help and the good news is, the process couldn't be easier or more straightforward. While it can get more involved depending on how secure you want your erased data to be, the steps below will walk you through the different options. So, without further ado, here's how to wipe a hard drive in Windows 10 and macOS.
How to wipe a drive in Windows 10
When it comes to how to wipe a hard drive in Windows 10 and macOS, we're going to talk you through the process for the former first and get to the latter a little bit later on in this piece.
The steps you'll need to take to wipe (or format) a drive in Windows 10 will vary depending on whether the drive is simply used for storage or used for your active Windows installation.
Sign up for breaking news, reviews, opinion, top tech deals, and more.
We'll go over the former first, but afterward we'll explain how to wipe the drive you have Windows installed on.
The quickest way to format a drive is available right in the "This PC" window.
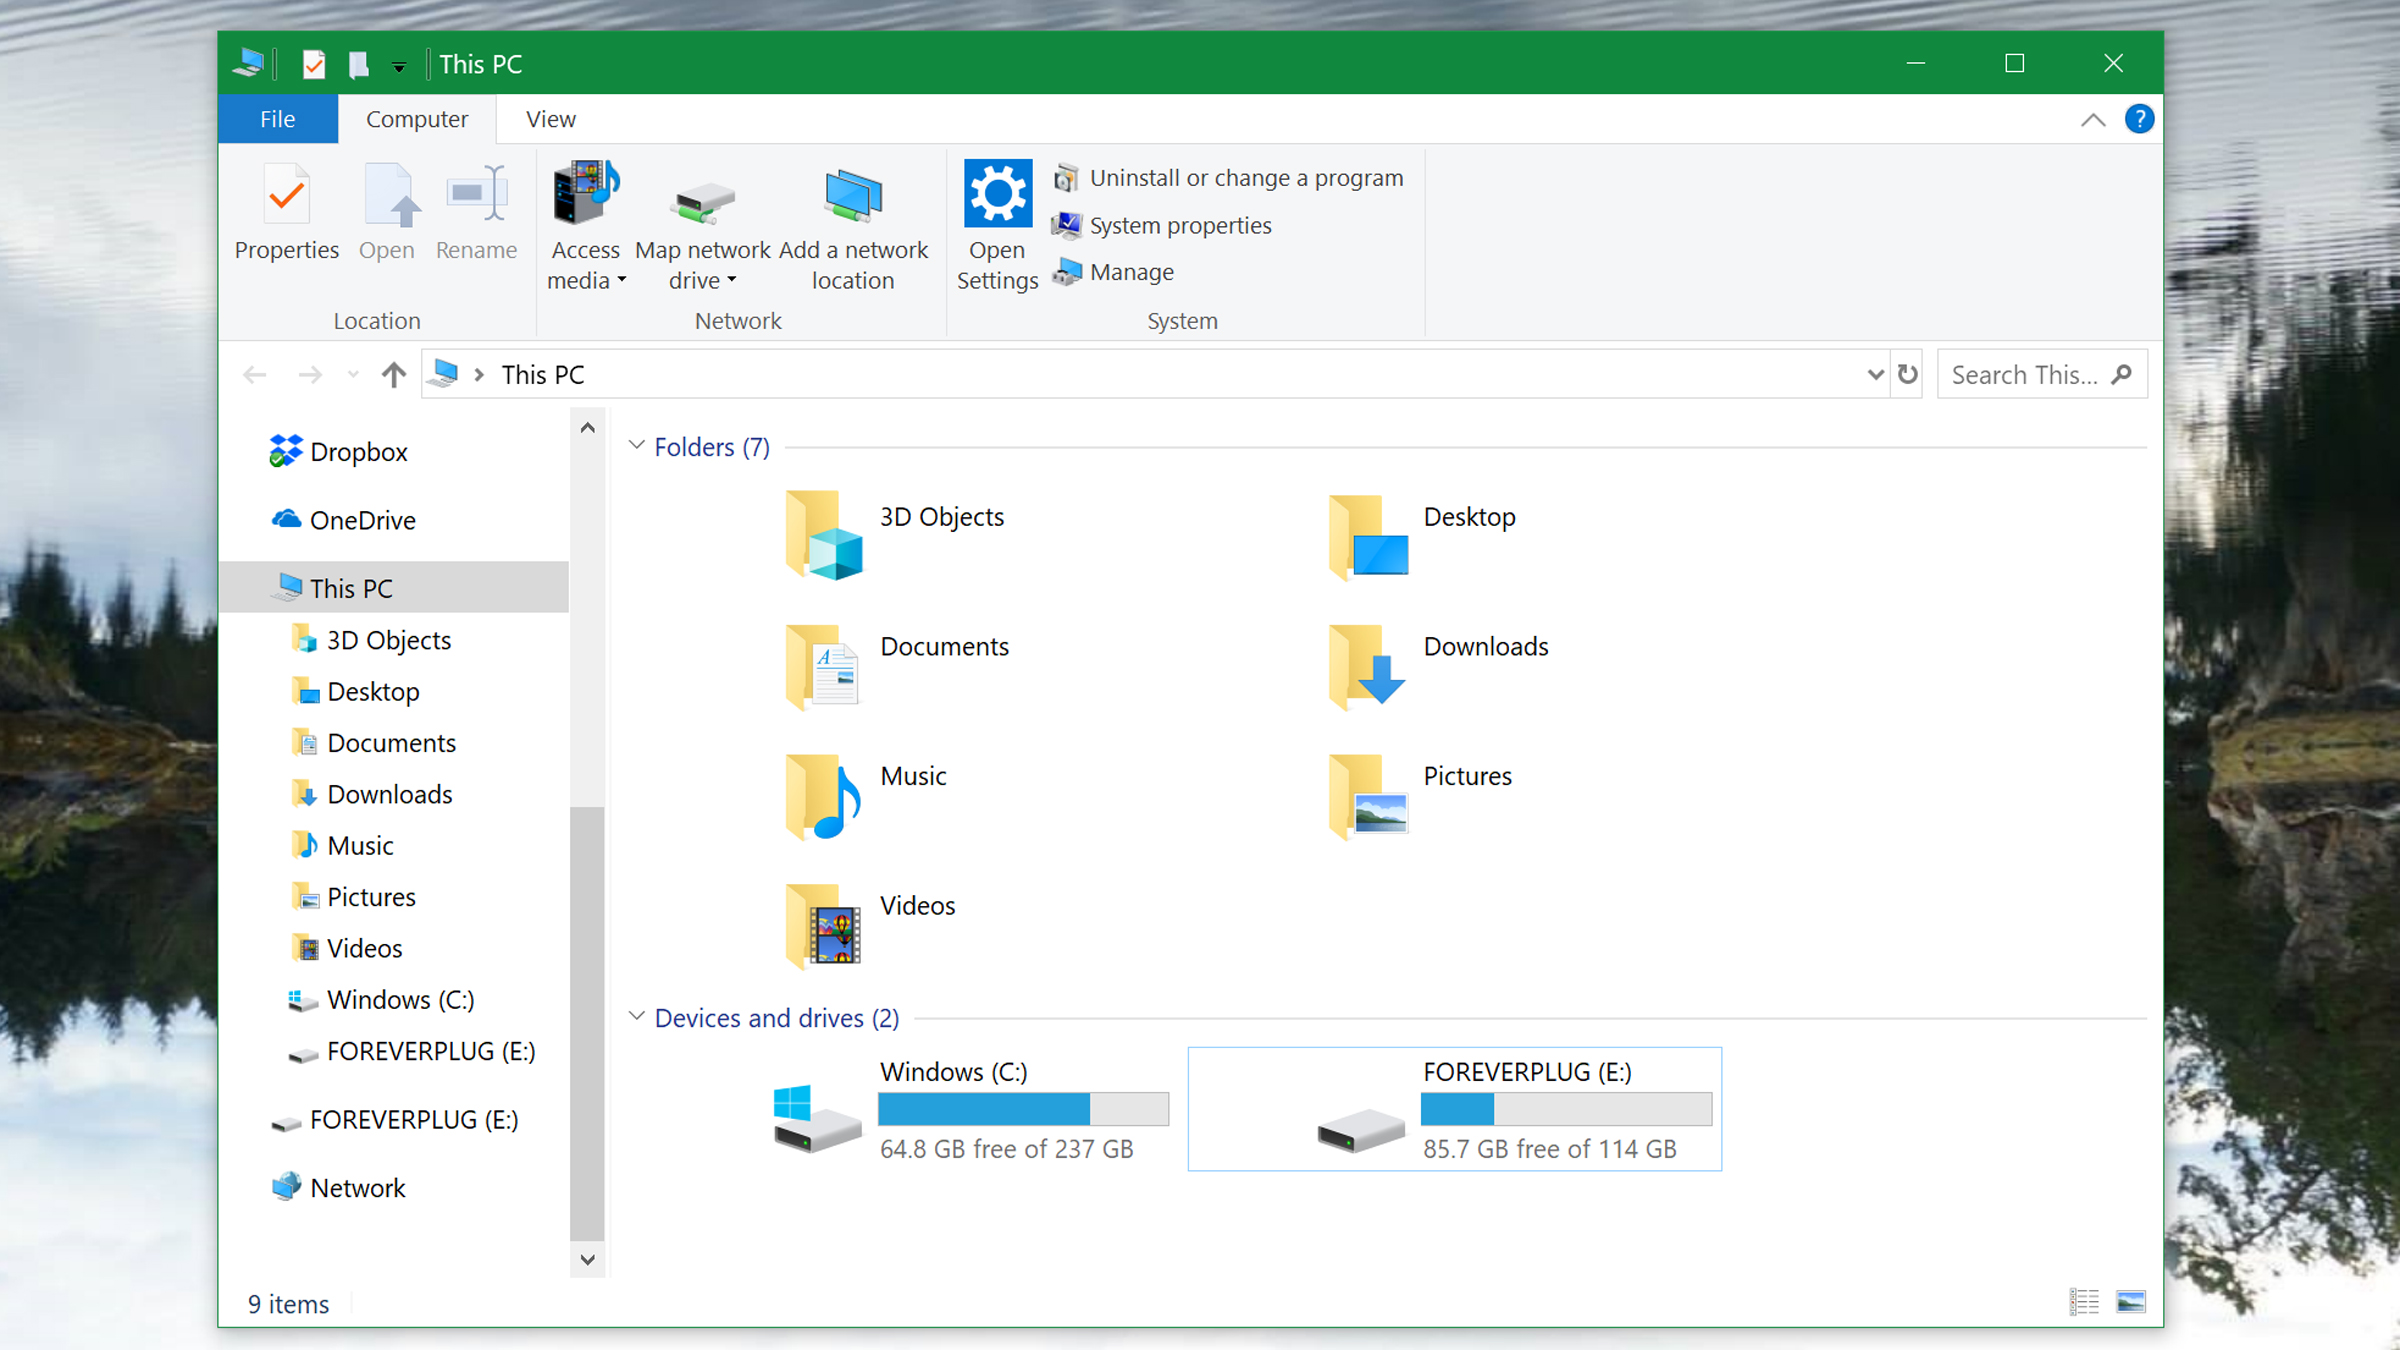
Step one: Open "This PC" by opening the Windows search, typing "This PC" and pressing Enter.
This will open a new window that shows some of your computer folders and the drives that are connected to it.
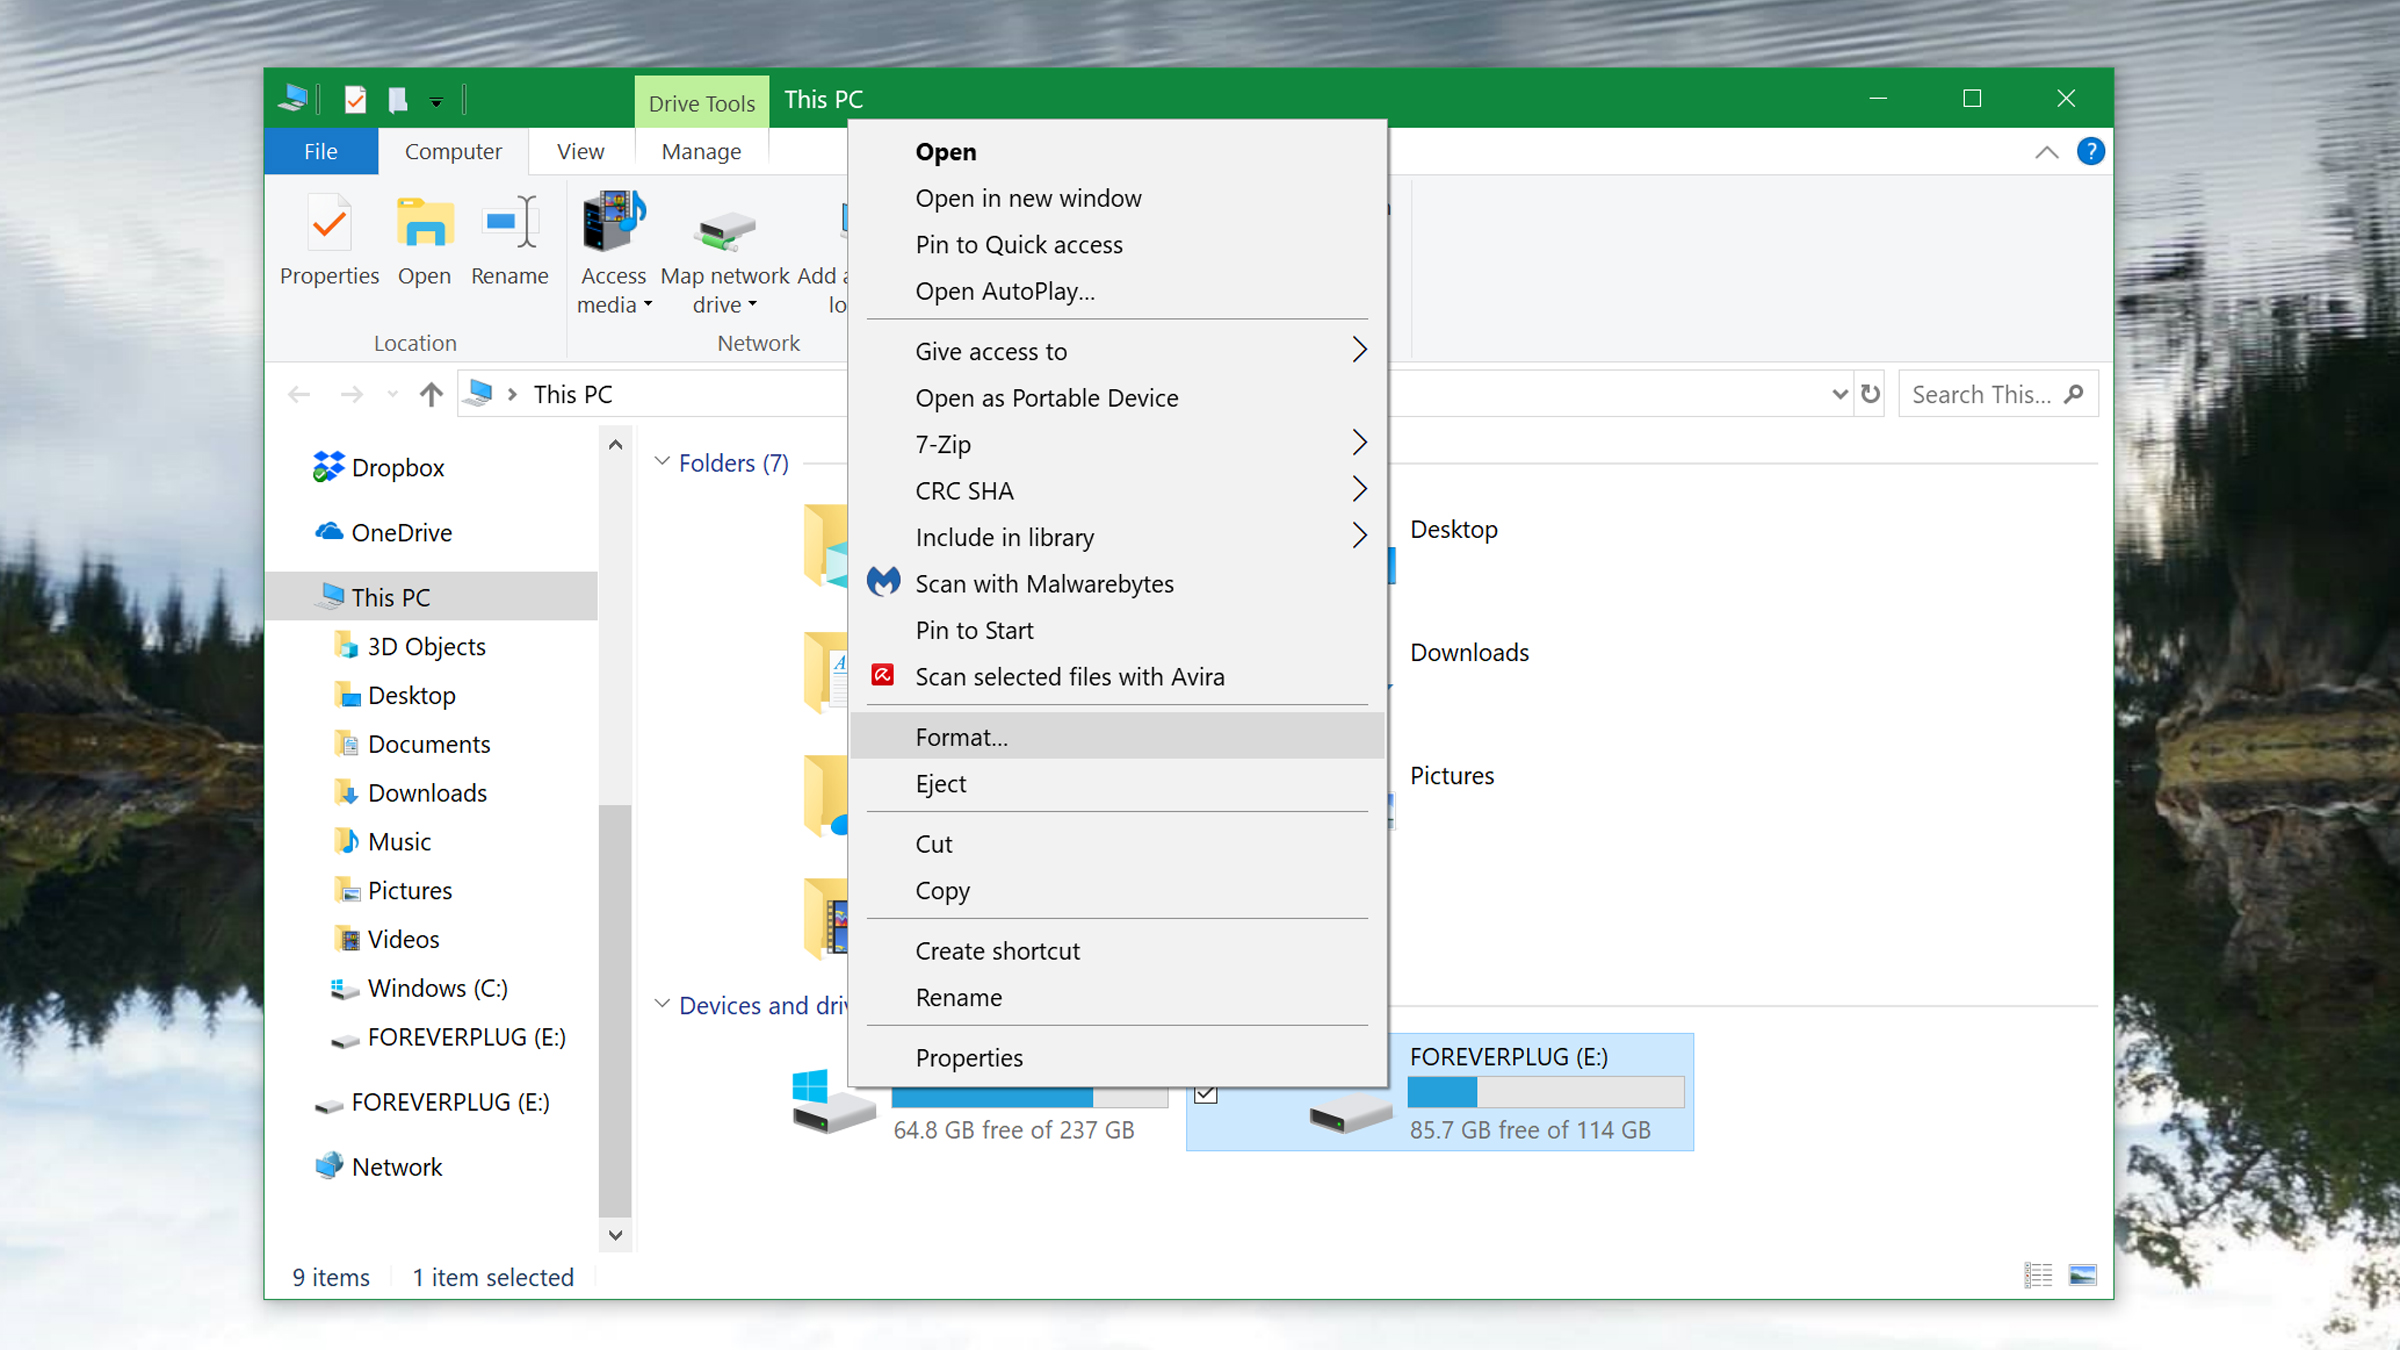
Step two: Right click on the drive you want to wipe, and select Format.
The formatting menu will open up. This gives you several option for how to clear the drive and the option to name the drive after formatting, and the way you want to set it up for new data after the format.
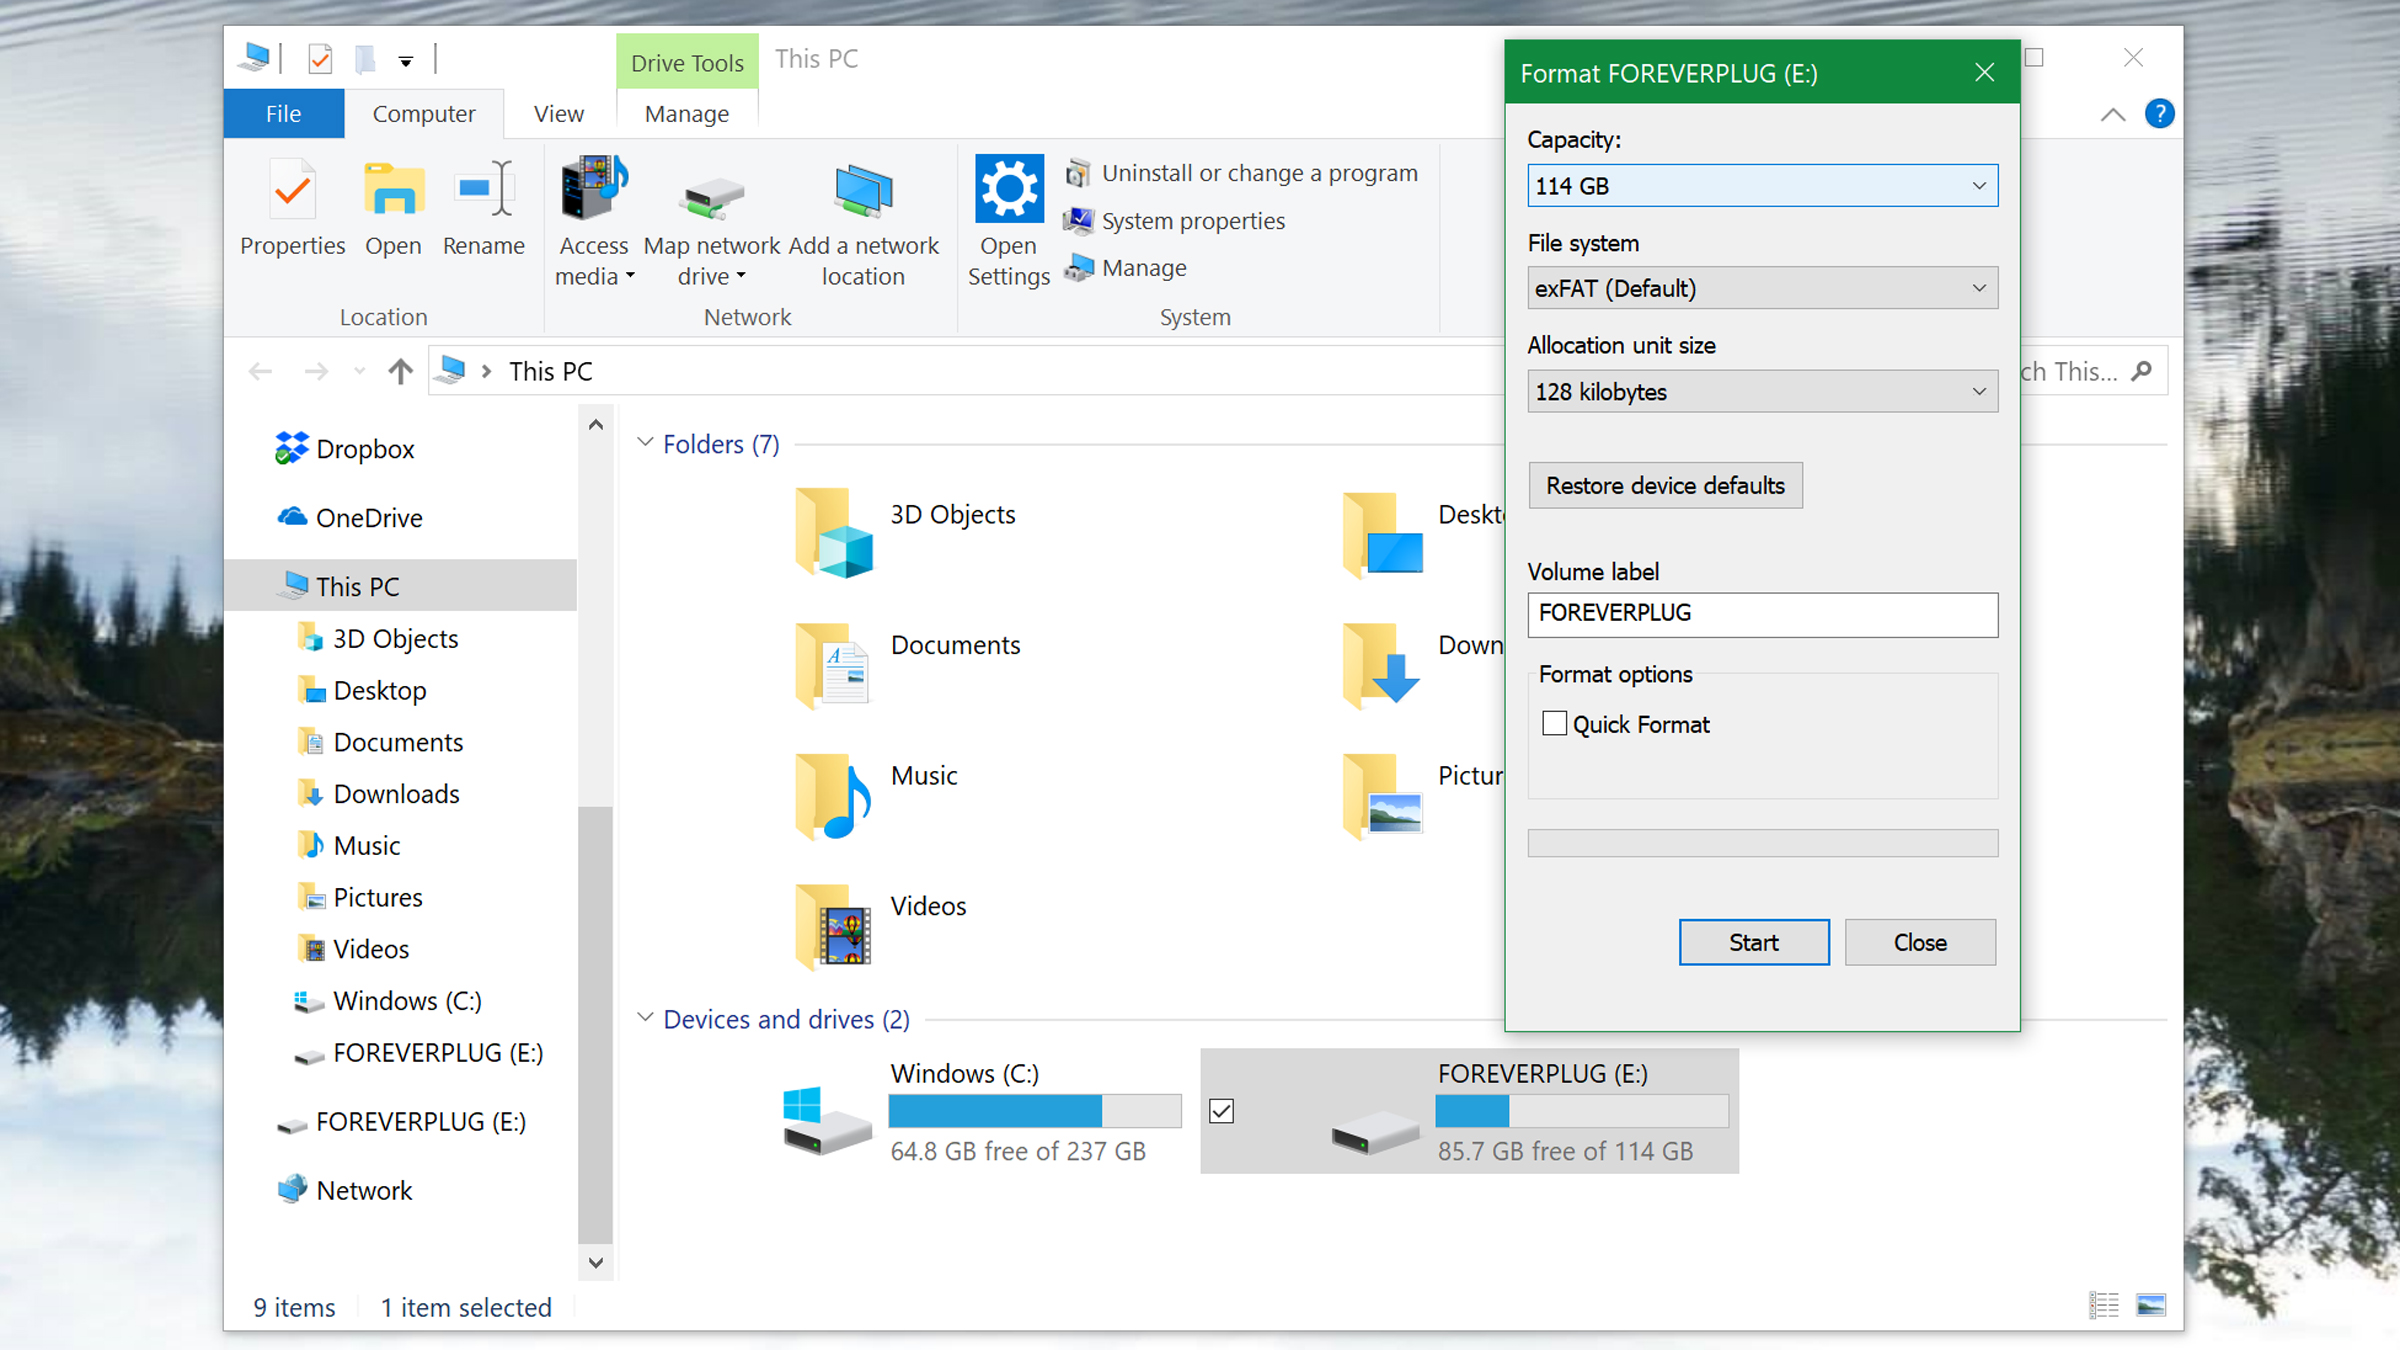
Step three: Choose your format settings and press Start to wipe the drive.
If you plan to continue using the wiped drive, you have the choice to use the "Quick Format" option, which will be a faster choice but offers less security. A quick format will not remove any of the data, it just will remove the means of identifying where the data is stored, letting it all be overwritten as the drive is used.
If you want to be sure the data on the drive is erased completely, do not check the "Quick Format" option. According to Microsoft Support, in Windows Vista and all newer versions, the format tool will erase data by overwriting it with zeroes.
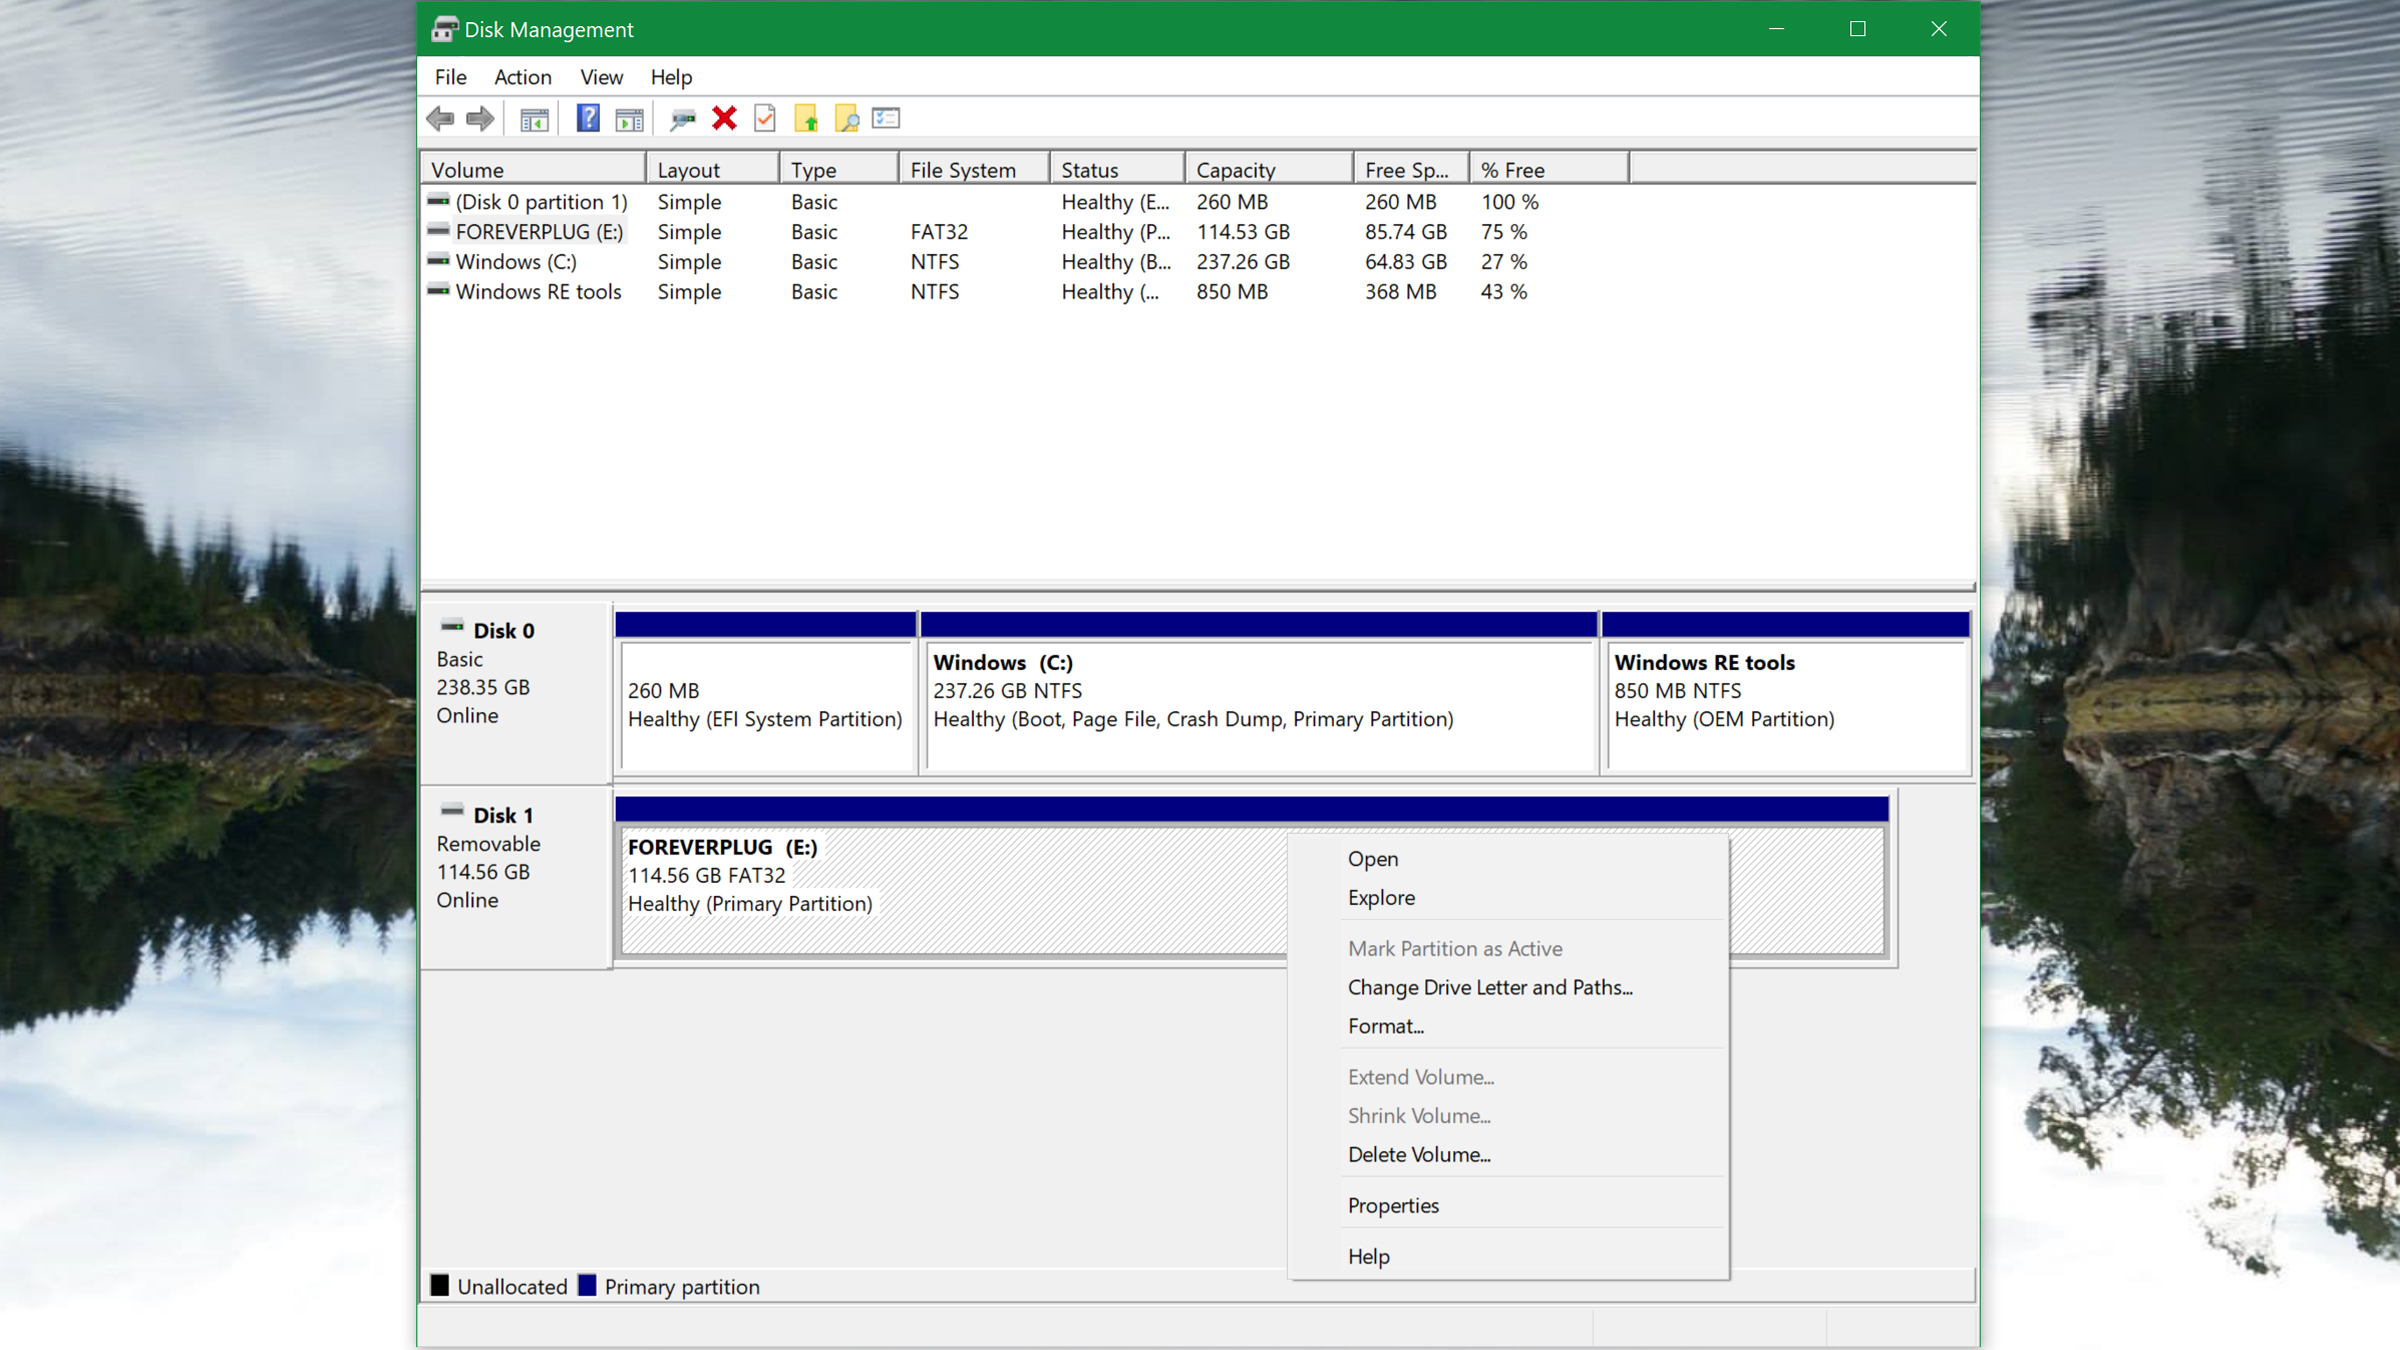
Alternative method: You can also format a drive in Disk Management (press Windows Key + X and then select "Disk Management"). Here you'll see your drives and their partitions. Right click on the drive or partition you want to format, and select "Format". Again, note that a quick format is not as secure as a normal format.
How to wipe your main Windows 10 drive
If the drive you want to wipe is where your Windows 10 operating system is installed, you won't be able to format it using the above steps. Instead, you'll need to perform a system reset (not to be confused with restarting your computer).
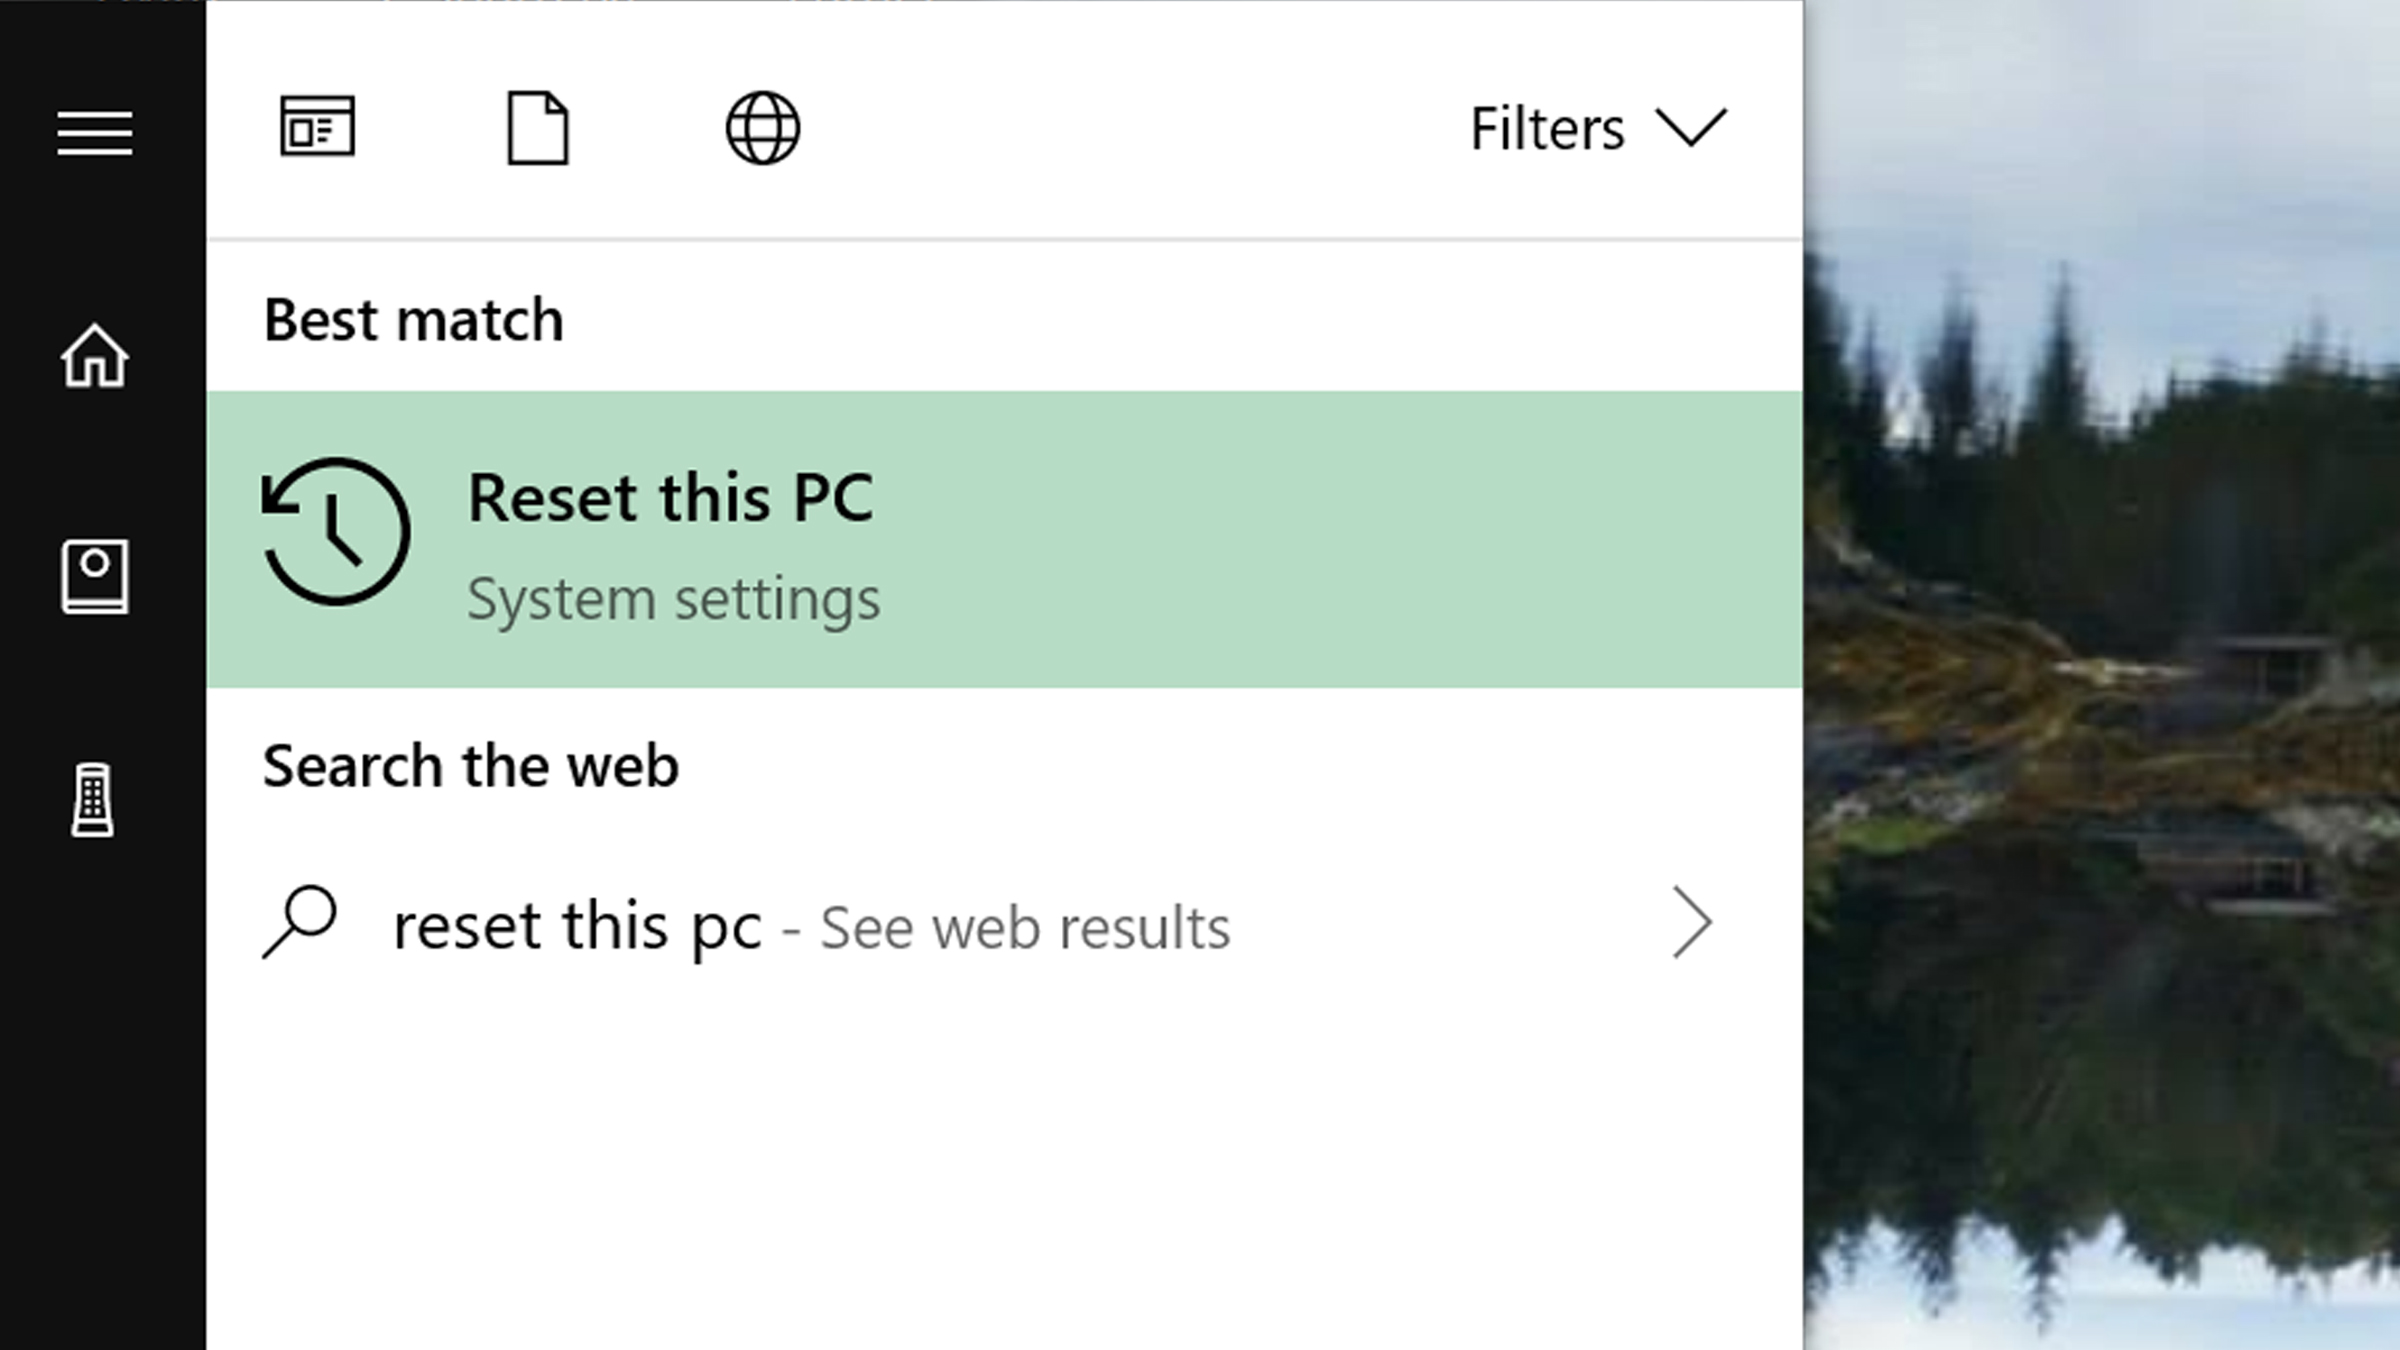
Step one: Type "Reset this PC" into the Windows search bar and hit Enter. This will take you to the menu for resetting and restoring your computer.
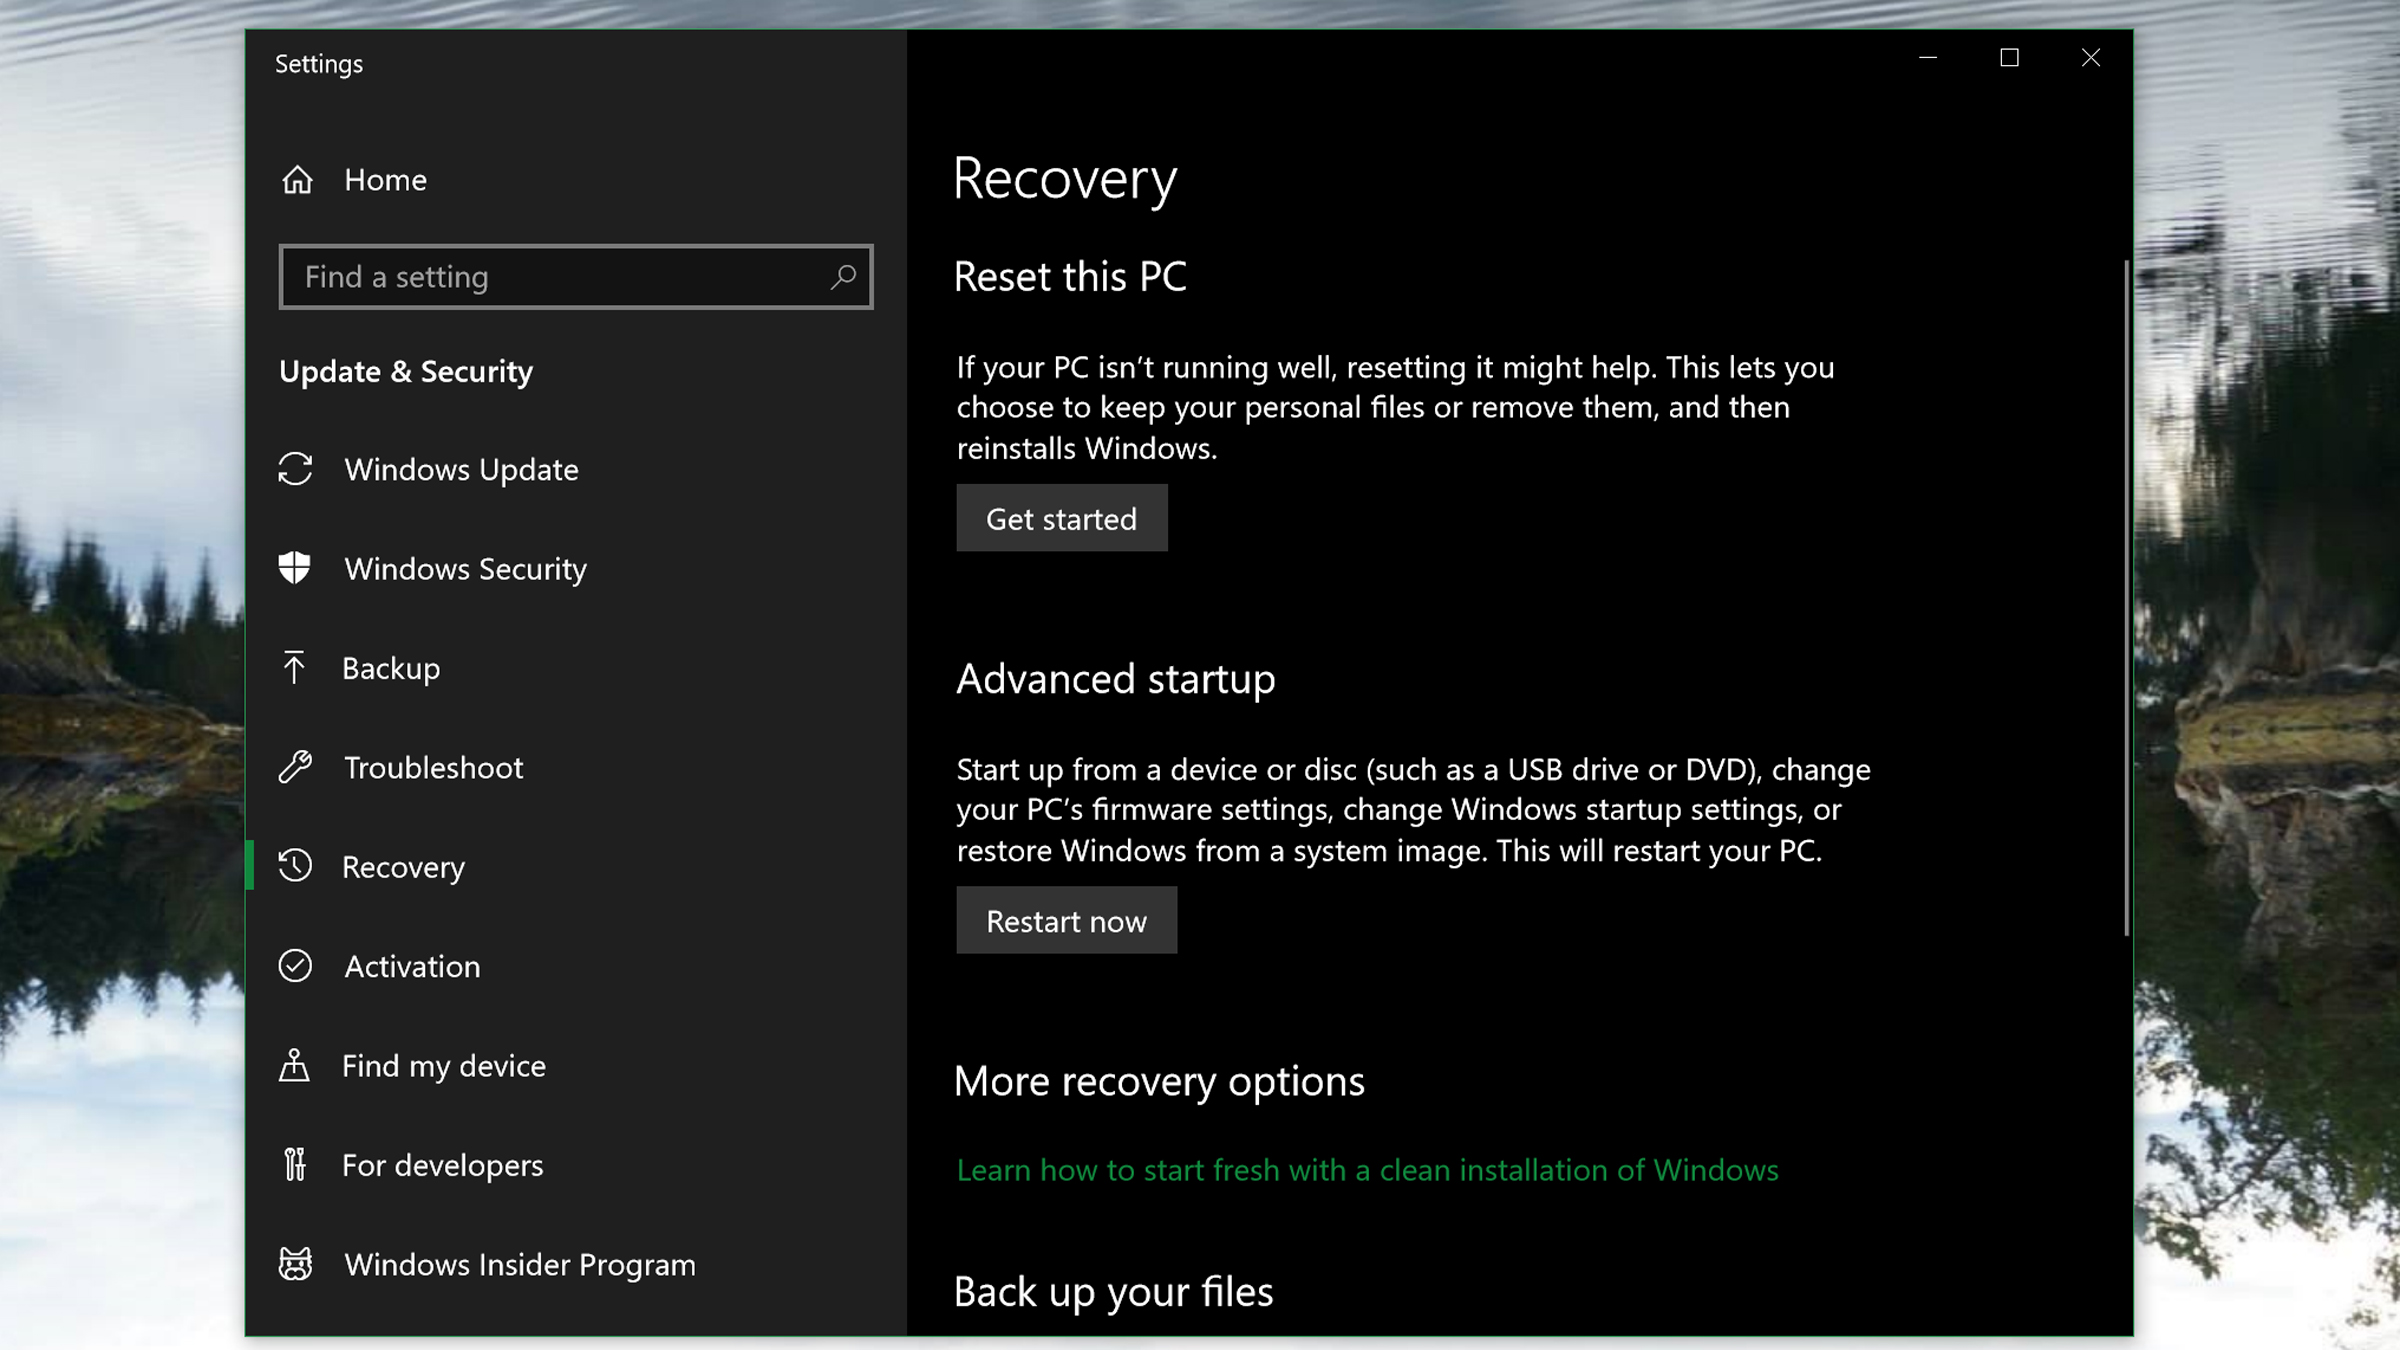
Step two: Select "Get started" under the Reset This PC section. In the new window, select "Remove everything."
This will begin the process of wiping all of your personal files, apps and Windows settings from the computer. If you have other drives installed in the computer, it can wipe them as well.
How to wipe a drive in macOS 10.14 Mojave
When it comes to how to wipe a hard drive in Windows 10 and macOS, the process for macOS is no harder than Windows, though it will be slightly different depending on the type of drive you plan to wipe.
To start, you'll need to use the Disk Utility. (Note: If you want to erase your Mac's primary drive, you'll first need to open macOS Recovery by rebooting the Mac and holding Command + R while it powers up, before the Apple logo appears, then selecting Disk Utility from the macOS Utilities window that will appear.)
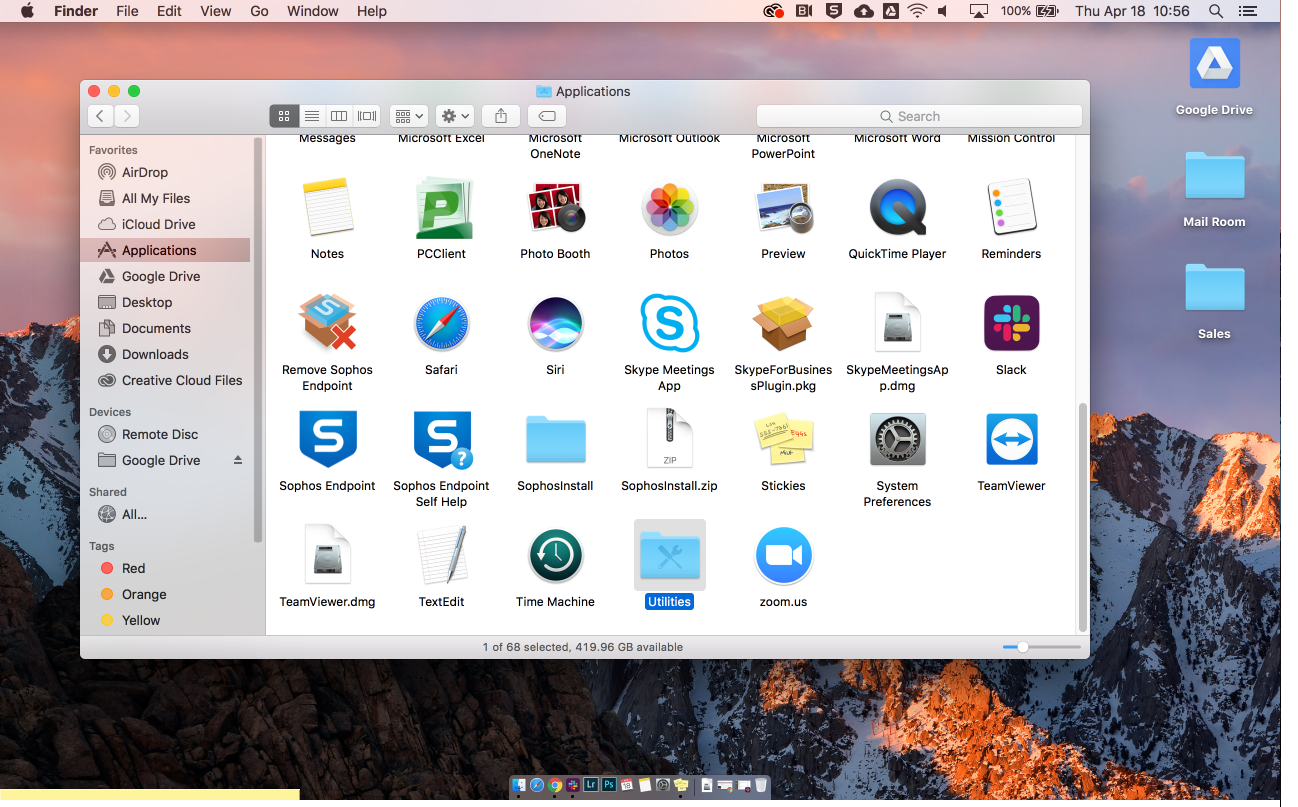
Step one: Open your Applications folder in Finder, then the Utilities folder and find and open the Disk Utility.
This will open a new window that shows you your Mac's storage media. If your drives are not displayed, select the View drop-down menu, and choose "Show All Devices."
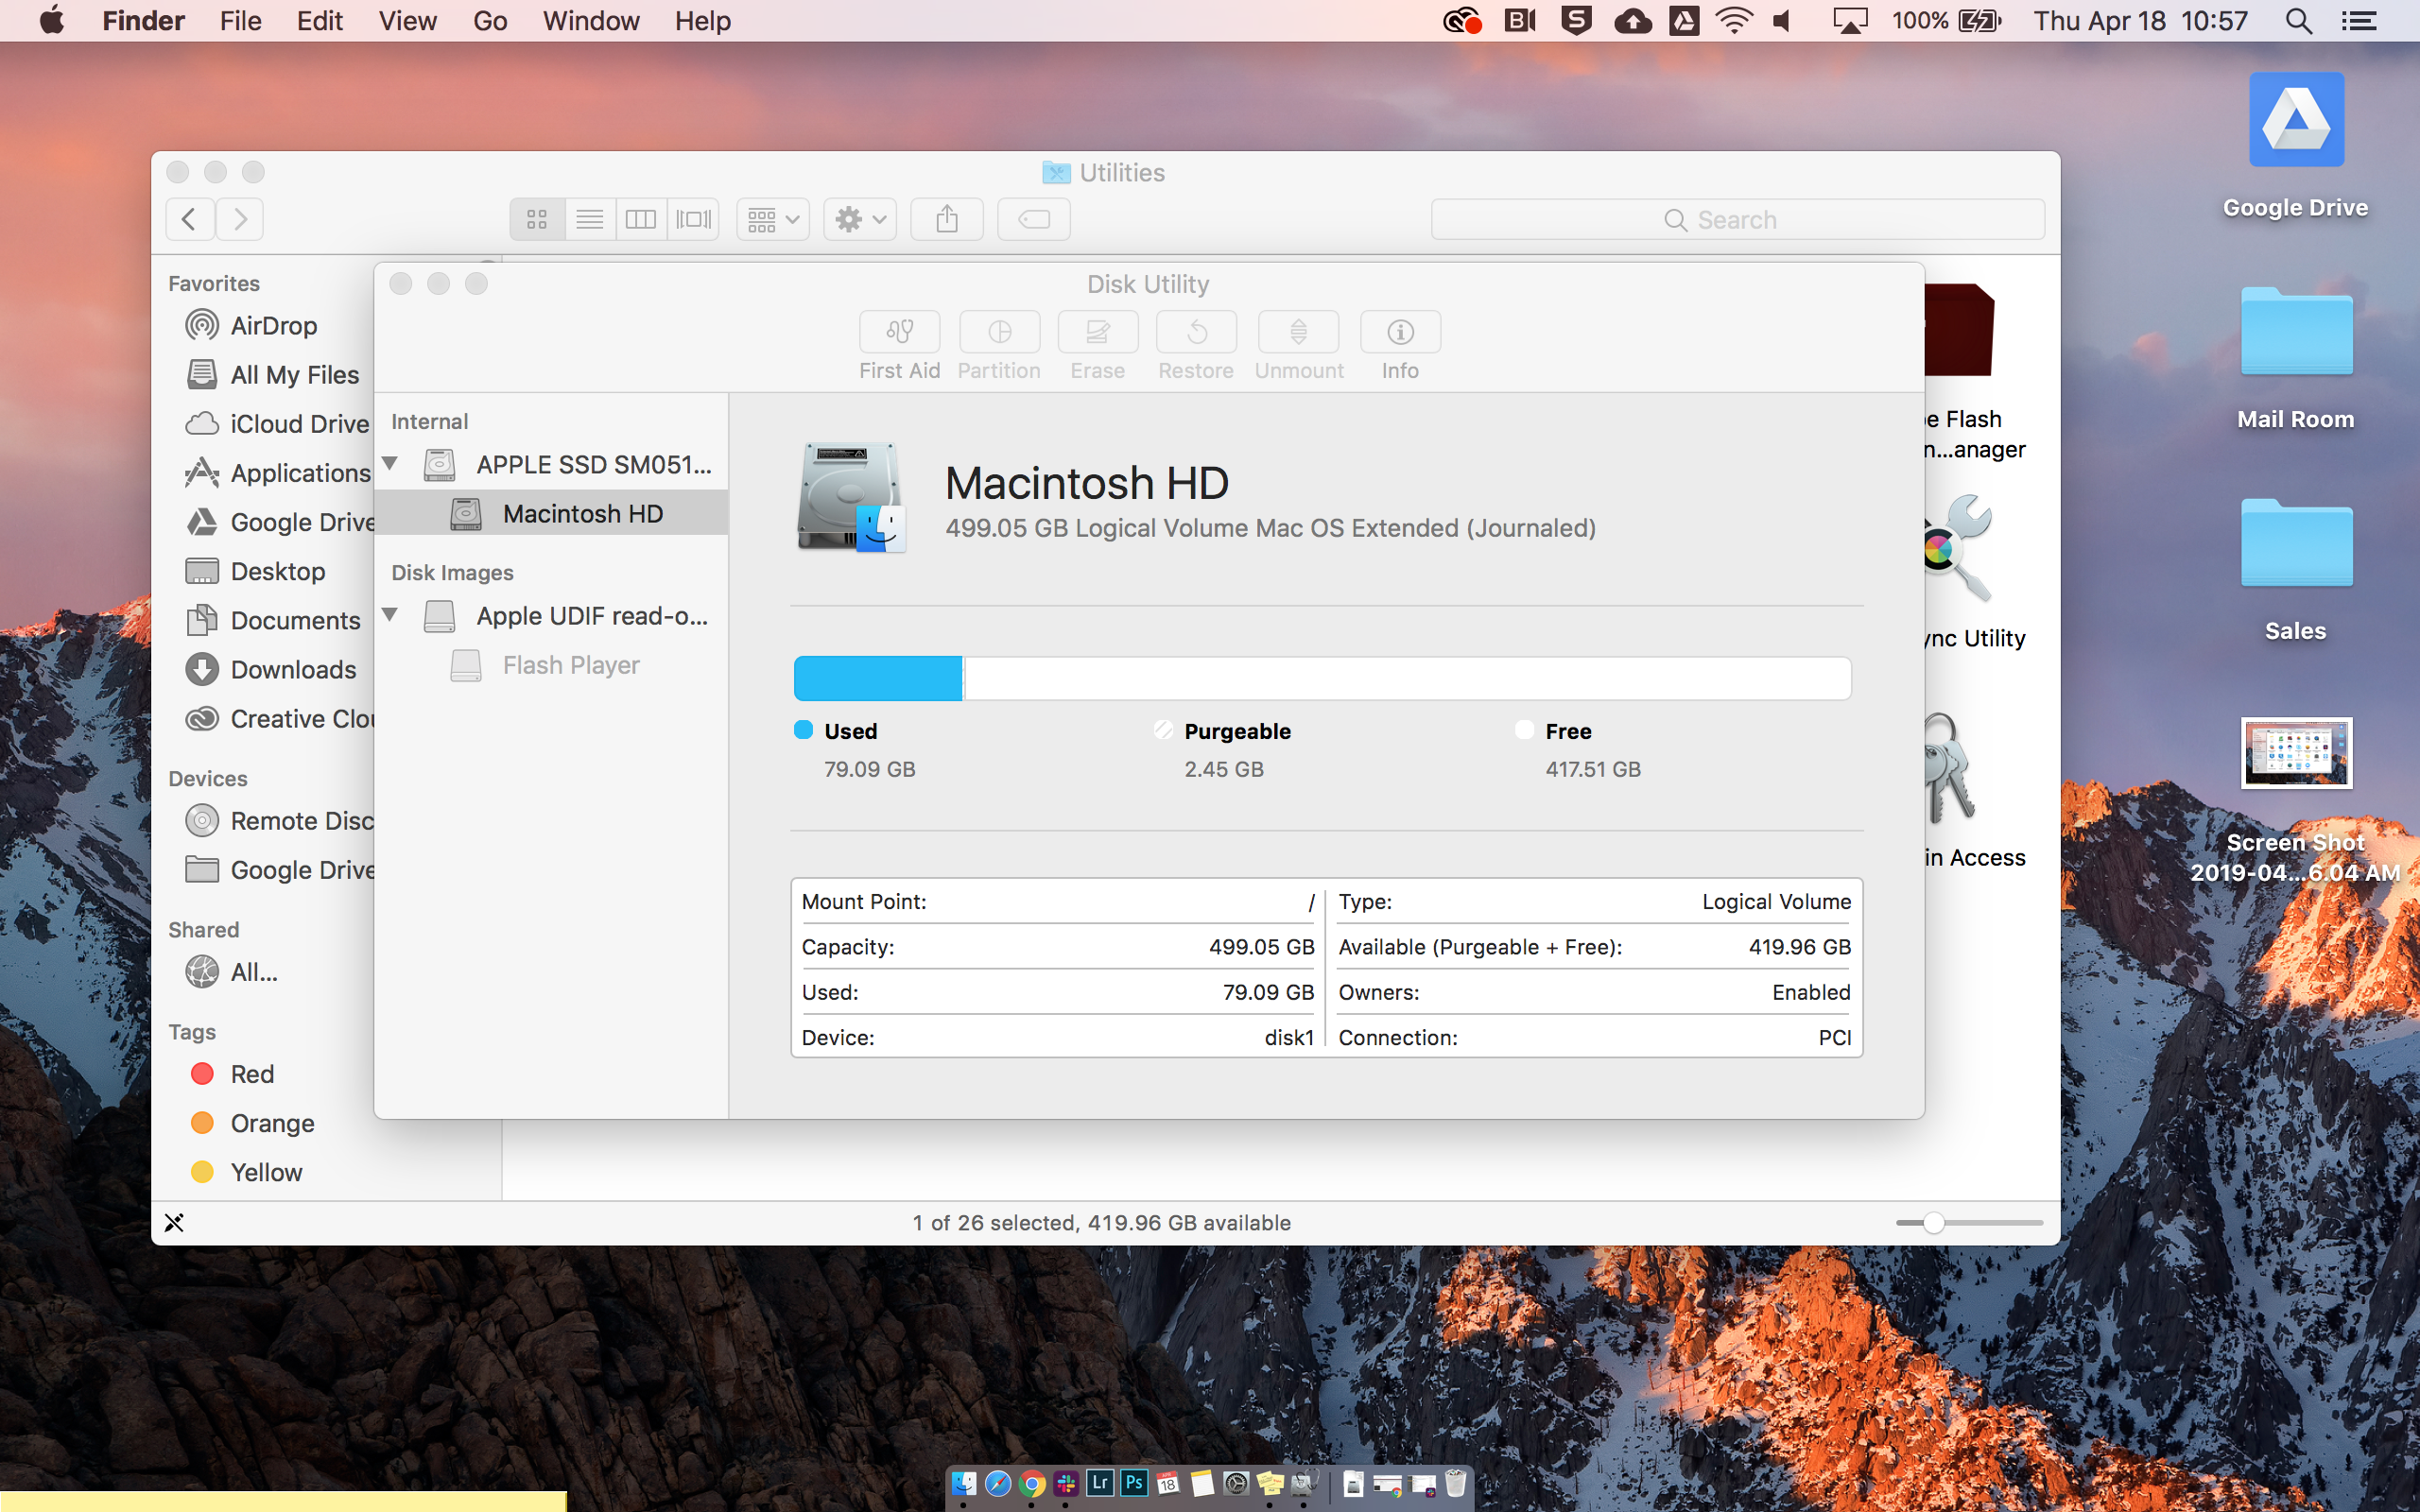
Step two: Select the drive or volume you want to erase, and then press the Erase button at the top of the Disk Utility window. Choose a new name and format for the drive.
This will present you with any options available for wiping the drive. The options may be different depending on whether the drive is a hard drive or solid state drive. With a hard drive, Disk Utility will offer a Security Options slider, which can be moved to the right to ensure all the data is overwritten multiple times. This option isn't available for SSDs.
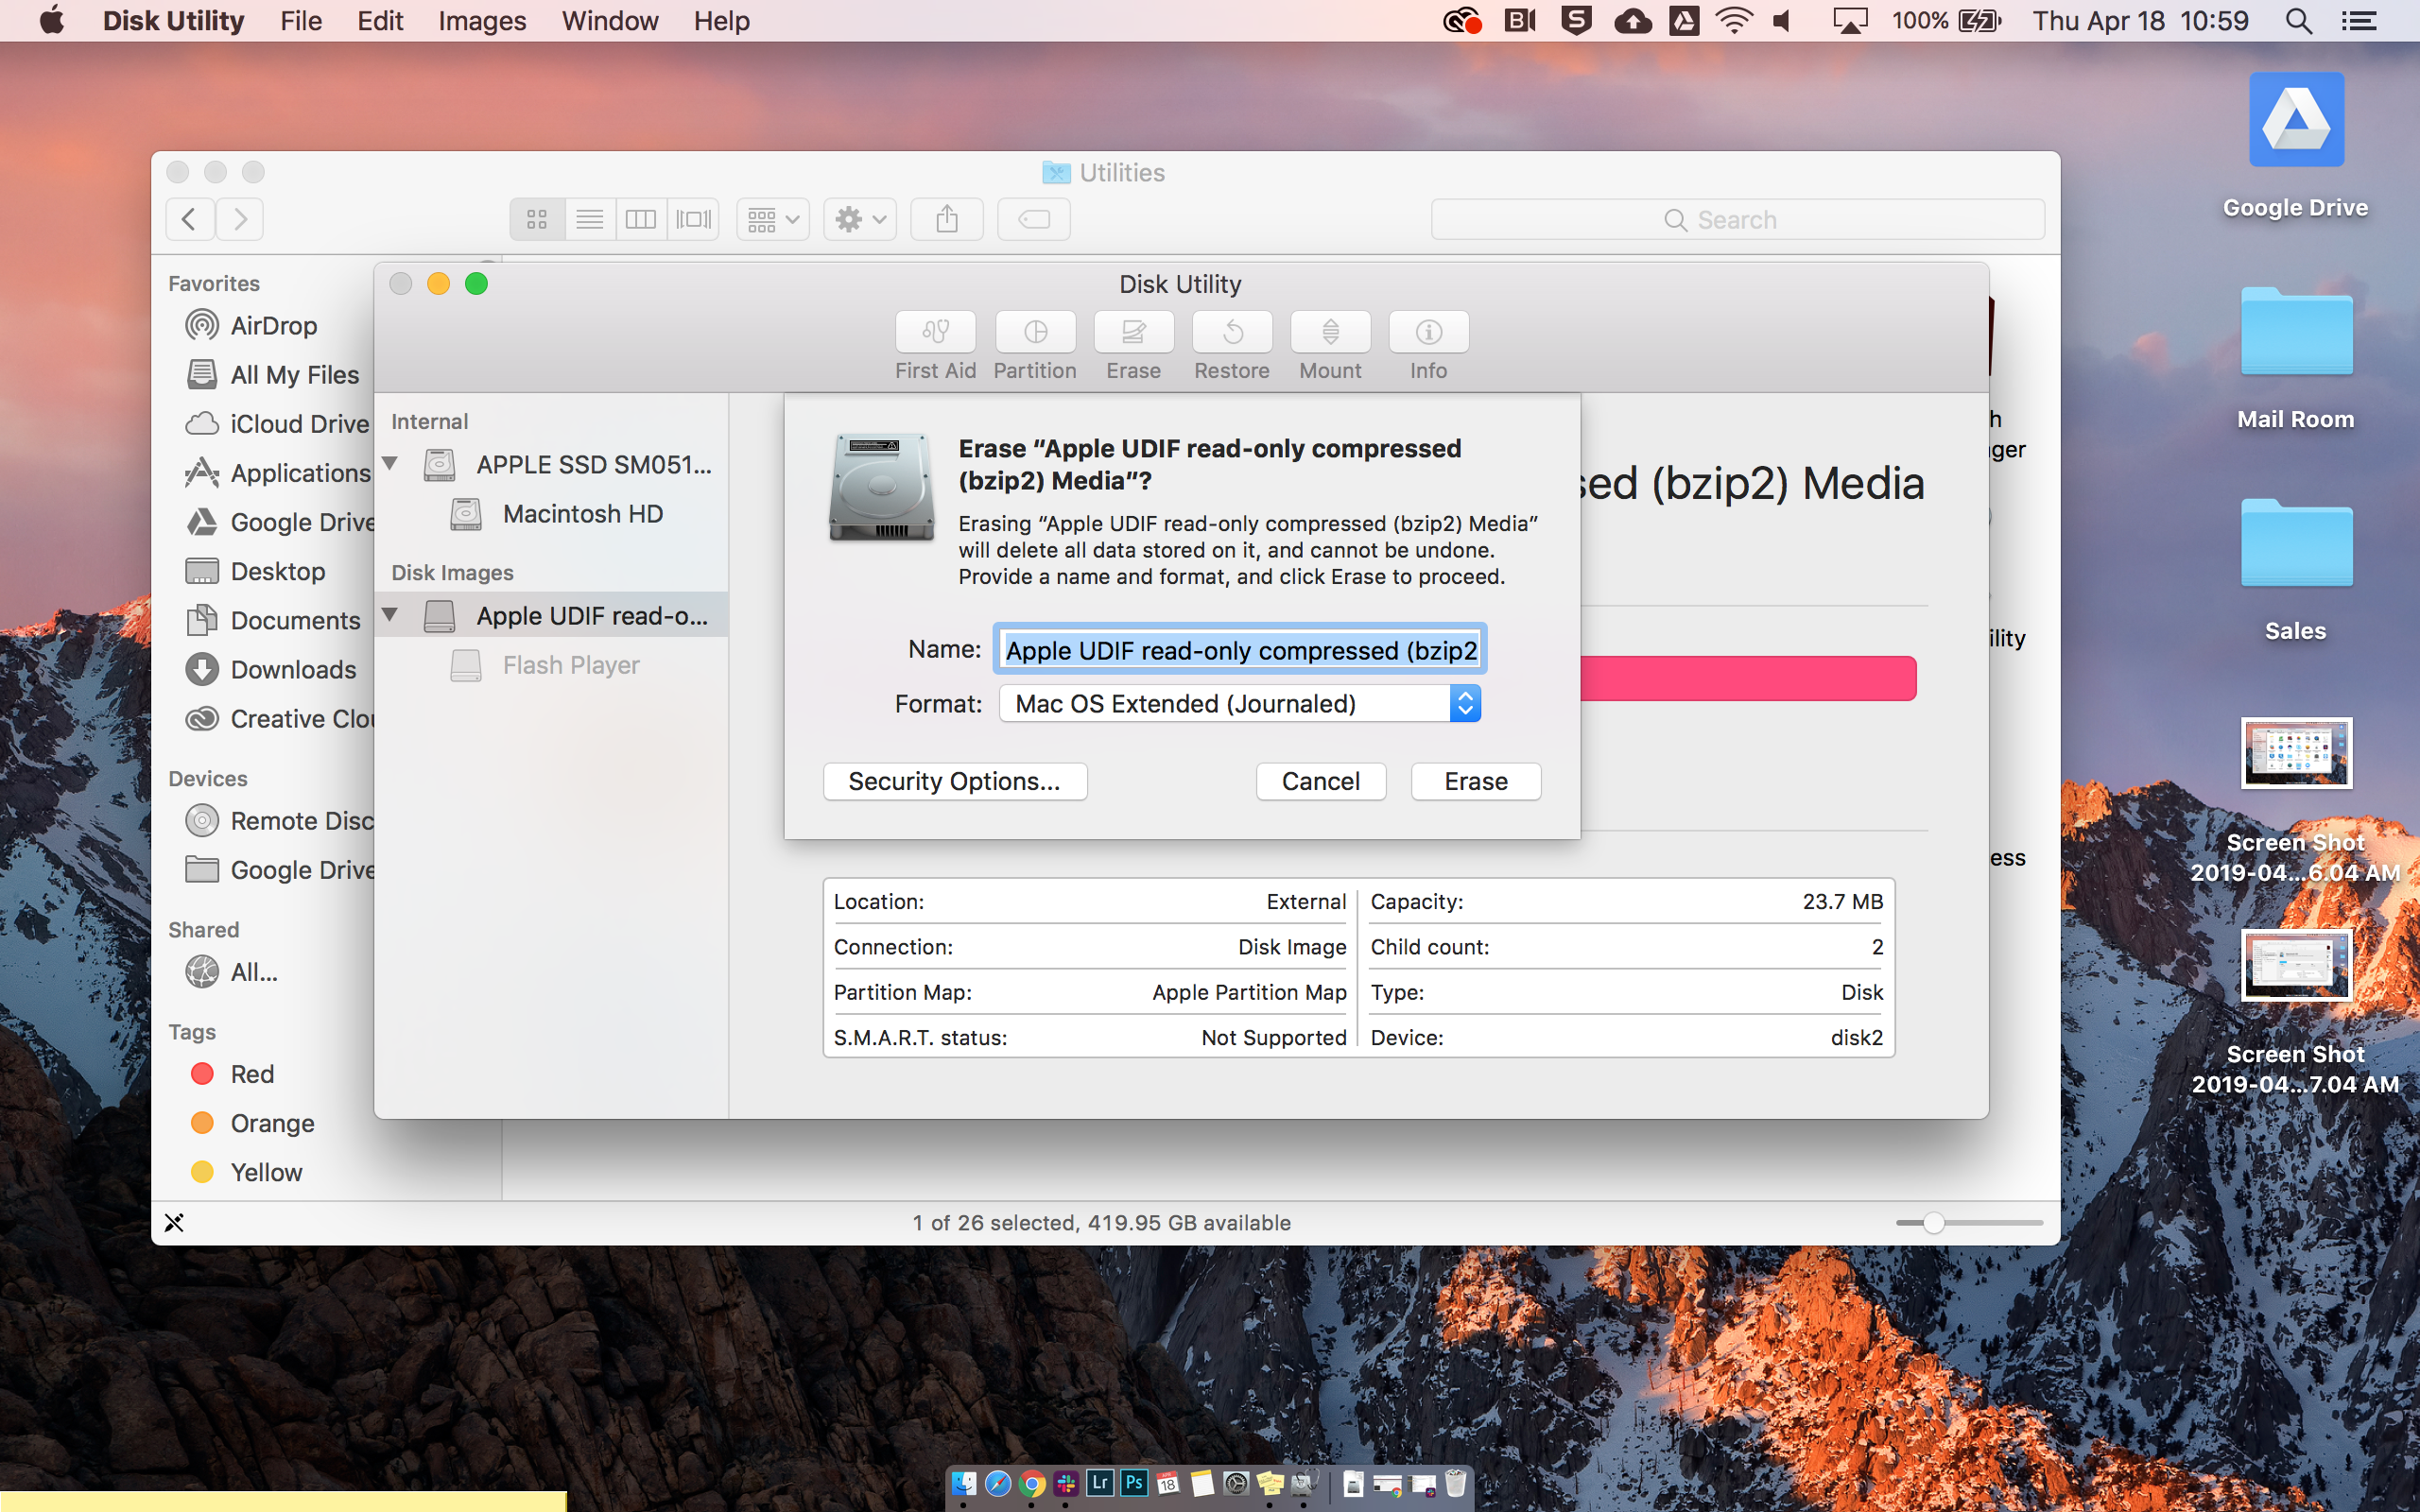
Step three: Click Erase at the bottom of the pop-up window to begin the process of wiping the drive.

Over the last several years, Mark has been tasked as a writer, an editor, and a manager, interacting with published content from all angles. He is intimately familiar with the editorial process from the inception of an article idea, through the iterative process, past publishing, and down the road into performance analysis.