No matter how long you have been using computers, the chances are at some point you will have lost some valuable data. And, in the first of what will become an increasingly tenuous excuse to use some pictures of zombies, the chances of data loss rise when you're under attack from the undead.
If you are a relatively new user, chances are you will have botched up a regular disk cleanup task and accidentally deleted important files, or zapped memory cards without first transferring the images to a more permanent medium. Don't blame your inexperience - it happens to the best of us.
In fact, more experienced users make the most severe mistakes, such as messing up the partition table, wiping the MBR, or even worse formatting the wrong partition.
There is one simple solution - backups. Yet, despite the desktop distros making the process of taking regular automated backups completely painless, most of us only think of backups after deleting non-backed-up data.
That said, there are still lots of tools that'll help you out of a sticky situation. In this feature, we'll look at free software that'll carve data out of dead disks, repair your broken bootloader, restore deleted files and even entire partitions.
If you dual-boot into Windows, we'll show you how to reset forgotten Windows passwords, and keep the installation free of viruses and other nasties.
The success of these recovery tools depends on various factors, and is no match for a backup. Which is why we'll also talk about tools that'll back up your data and help you bounce back from data catastrophes.
Fsck things first

Although filesystems have improved over the last decade, sometimes all it takes to mess up the hard disk is a misbehaving application that leaves you no option but to forcibly restart the computer. (this could also happen, for example, when you're fleeing from zombies and have to pull the plug out of your computer without shutting it down properly).
On restart, when your Linux distro detects an unclean shutdown it automatically launches the fsck filesystem check utility to verify the consistency of a filesystem. In many situations, that should do the trick. But sometimes, depending on factors such as the age of the disk, the filesystem, and the task that was interrupted, an automatic check wouldn't work.
In such a case, the distro would ask you to run the fsck tool manually. Although you can run fsck from the maintenance mode with your filesystem mounted as read-only, it's best to run fsck from a live CD without mounting the partition. You'll find fsck in almost every live distro, including the Redo Backup and Recovery distro.
To check a specific filesystem, say /dev/sda6, launch a terminal and enter sudo fsck /dev/sda6. fsck internally uses the respective filesystem checker command and will give you an error when it doesn't find a filesystem checker for the filesystem being checked.
When called without any switches, the command will check the filesystem and ask you whether it should fix problems if it encounters any. Although you can use the -y switch to automate the process, it can potentially make some data irrecoverable depending on the errors in the filesystem.
One of the most common filesystem errors that fsck will stop at is a corrupt superblock. Since a filesystem cannot be used without a healthy superblock, there are several different backups of the superblock in different locations.
Enter sudo mke2fs -n /dev/sda6 to find out where the superblocks are kept (beware, missing out the -n may wipe your hard drive), which should be listed at the bottom of the output, such as:
Superblock backups stored on blocks: 32768, 98304, 163840, 229376, 294912, 819200, 884736, 1605632, 2654208
Now use any of these addresses to replace the superblock of that partition, such as sudo e2fsck -b 32768 /dev/sda6, and you're good to go.
If the damaged filesystem is an NTFS partition and you can't boot into Windows, you can fix it using the ntfsfix utility. Ensure the partition isn't mounted and then run ntfsfix /dev/sda1, where /dev/sda1 is the Windows NTFS formatted partition. This utility will check and correct some basic NTFS faults, but more importantly it will schedule an NTFS consistency check for when you reboot into Windows.
chroot into a broken system
Sometimes, all the tools you need to repair a Linux distro are within the distro. But the one thing you don't have is access to the system. Maybe you have damaged Grub or accidentally removed important packages that won't let you boot into the distro. That's when you need chroot. It's a neat little tool that ships with every distro and gives you root access to an unbootable system.
Using chroot, you can boot from a live CD and then run programs as if you were actually booted into the broken system - a little like the way in which a genetically modified virus from outer space can take over a human brain.
To use chroot, boot from any live distro, launch a terminal and become the root user, now assuming /dev/sda1 houses the unbootable distro:
# mkdir /broken
# mount /dev/sda1 /broken
# chroot /broken
From this point on, any command you run, or any file you edit is actually being executed on your broken system. So, you can reinstall Grub to the MBR after installing Windows by running update-grub, or remove unstable packages, or undo any other changes that could have broken the system.
Mirror mirror on the wall

While fsck should fix most unmountable disks, sometimes the problems are more severe. Dying hard disks don't make for a pretty sight. Even more so if they've got some valuable data on them - such as the location of a top-secret research facility that you need to get to in order to find an antidote for the strain of zombie infection.
In such a case, the best thing you can do to recover your data is to minimise using the dying disk. So, instead of getting the disk to cough up your data, which will put it under more stress and push it over the hill, you should immediately make a mirror copy of the disk. You can then use the data recovery tools on this copy instead.
Under normal circumstances, we'd recommend using the venerable dd command to copy the disk. But dd is designed to quit as soon as it encounters any errors, and wouldn't be of much help to us on our malfunctioning disk.
This is where GNU ddrescue comes in. It works like dd and makes block-level copies of a disk. Unlike dd, however, GNU ddrescue skips over the bad block and copies the good blocks first.
You need a healthy drive to copy your rescued data to. It could be an external USB drive or an internal one. Also, make sure that while this disk is mounted, the troubled drive isn't. Now enter:
sudo ddrescue /dev/sda1 /media/backupdrive/sda1.image /media/backupdrive/logfile
This will back up the sda1 partition on the failing drive to the sda1.image file on the device mounted at /media/backupdrive. The logfile records all activity in a log file, which is useful for resuming from where it left off if you interrupt the copy process.
Once you have a good image of the disk, you can ask ddrescue to re-read portions of the disk it couldn't read earlier.
sudo ddrescue -r 3 -C /dev/sda1 /media/backupdrive/sda1.image /media/backupdrive/logfile
With the -r option, you are telling ddrescue the number of times it should try to read the data when it encounters an error. This will put the failing hard disk under stress, which is why you should only run it after you have one good image of the disk.
Thanks to the log file, ddrescue will only try to fill in the gaps and not attempt to read the good portions again. Also remember that, although ddrescue can back up an entire drive with multiple partitions into one image file, you'll save yourself a lot of trouble by rescuing individual partitions in different image files.
Once you have imaged all the partitions of the disk, you can attempt to recover data from them. Depending on how effective ddrescue has been, it can even recover complete filesystems. So once you have the image, you should first check it with fsck, such as:
sudo fsck /media/backupdrive/sda1.image
When it's done, mount the image as a loopback device:
sudo mount -o loop /media/backupdrive/sda1.image /media/sda1imge
Now have a look at /media/sda1image, and you should find all your data in there!
If that doesn't work, it's time to call in the experts. Foremost and Scalpel are file carving utilities that can extract files from disk images. Both utilities hunt for files using the headers and footers of the different file formats, but the latter is considered more efficient. You'll find both in the official repos of most distros.
Foremost is the simplest of the two to use:
sudo foremost -t all -i sda1.image -o rescuedfiles
The command will search for all file types Foremost can understand in the sda1.image file and save them under the rescued-files directory.
Before you can use Scalpel, you'll have to edit its configuration file /etc/scalpel/scalpel.conf and uncomment all the file types you want to recover. Save the file and run:
sudo scalpel sda1.image -o rescued-files
Recover deleted files
The tools we've seen up to now are used to recover files from damaged disks. But you can't always blame data loss on a hardware failure. A clumsy operator - for example, one who is in the early stages of zombie infection and losing control of fine motor skills - can be just as harmful. So now let's look at tools that can restore accidentally deleted files from otherwise functional disks.
Before we get started, you should understand how the filesystem handles files. When you delete a file, it isn't zapped out of existence. Instead, the filesystem marks it as deleted, and makes the space it occupies available to other files. This means that until another app uses that space, the original file is still there, and can be retrieved by file recovery tools. For this reason, it's important that you minimise, if not cease, interactions with the disk on which you have deleted files.
Perhaps the most comprehensive open source file recovery tool is PhotoRec. It can sniff the most common image formats and can additionally pick out files in various formats, including ODF, PDF, 7ZIP, ZIP, TAR, RPM, DEB and even virtual disks. The tool works on all sorts of disks, including hard disks and removable media such as USB disks. In addition to reading unbootable disks, PhotoRec will recover files from partitions that have been formatted and reinstalled into. It ships along with the TestDisk tool that we'll look into later, and it's in most recovery distros.
Although PhotoRec is a command-line application, it breaks the process of recovering files into steps, much like a wizard. When you launch the tool, it will first ask you to select the disk and then point it to the partition that housed the lost file, and also specify its filesystem. It'll then ask you if you want it to search only the free unallocated space or the entire partition.
You'll also have to point it to a folder where it should store the recovered files. Depending on the size of the partition, PhotoRec can take quite a while to complete. By default, it looks for files of all the formats it supports, but you can limit the filetypes to recover using the File Opt option.
Once PhotoRec is done, you'll discover gazillions of weirdly-named files of all different formats under one directory. PhotoRec names them as it finds them, leaving the sorting to you.
Just like with files, it doesn't take much effort to corrupt a healthy disk. A wrong keypress (this is particularly likely if you find that a reanimated corpse has gnawed off part of your finger while you were distracted by getting PulseAudio to work) in fdisk or Gparted can wipe the MBR, or banish a partition to oblivion. And as with files, the situation is salvageable, more so if you stop using the disk straightaway.
Using TestDisk

TestDisk is the best tool to fix partition tables and put non-bootable disks back into service again. Using TestDisk is quite similar to PhotoRec.
When launched, it first asks you to create a log (which will come in handy for later analysis if the recovery fails), and then displays a list of all the disks attached to the computer. After you select the disk on which you've lost a partition, it'll ask you to select a partition table type, such as Intel, Mac, Sun and so on.
Next, you are shown the various TestDisk recovery options. Select the default Analyse option, which reads the partition structure and hunts for lost partitions. It then displays the current partition structure. Now select the Quick Search option to ask TestDisk to look for deleted partitions.
Depending on the age of your disk, TestDisk might display several partitions. To figure out which is the correct partition that you want to recover, look for the partition label listed at the end of each entry in square brackets. If that doesn't help you, press 'P' on a selected partition to see a list of files that TestDisk has found on that partition. Repeat this with all partitions until you find the right one.
When you've found your partition, it's best to copy over the data just in case TestDisk is unable to restore the partition. To do so, press 'P', and then with the 'a' key select all files. Then press 'C' to copy the files, which will ask you for the location to save the files. When it's done copying, press 'q' to return to the list of recovered partitions and press Enter to continue to the next step in restoring the partition.
TestDisk displays the partition structure again, this time with the missing partition accounted for. Select Write to save the partition table to the disk, and exit the program. If all goes well, when you reboot your partition will be restored.
Understand partitions
To successfully use TestDisk, you should first understand how disks are partitioned. A partition table contains four slots of 16 bytes each, which limits the number of primary partitions per hard disk to four. Typically, one of the four partitions is marked as extended, and contains a number of logical partitions.
You can have three primary partitions (sda1, sda2, sda3) and a fourth extended partition that contains several logical partitions (sda5, etc). When you're hunting for partitions, you'll find some that overlap others, or are beyond the boundaries of the partition table. Sometimes, TestDisk will complain because it sees a primary partition in between logical ones, which isn't possible.
When TestDisk can't place a partition, you'll not only have to find the correct partition, but also identify it as primary or logical. Just keep the following in mind. The first primary partition generally starts at cylinder 0, head 1, sector 1. If you have more primary partitions, they'll start at a non-zero cylinder (like 625), head 0, sector 1. On the other hand, logical partitions start at a non-zero cylinder, head 1, sector 1.
Dig deeper

Although we hope TestDisk works for you as we illustrated in the previous section, there are times when it wouldn't. This is where the advanced options come into play.
Sometimes, TestDisk will detect deleted partitions but fail to identify their type. When it finds a partition, TestDisk displays the type of partition in the first column, where you'll find a * for a bootable partition, P for primary, L for logical and E for extended. You can use the left and right arrow keys on a highlighted partition to change its type.
There are a couple more partition options available at the start of the recovery procedure, right after you've selected the type of partition table on the disk. Immediately below the Analyse option is the Advanced tab, which lists some advanced filesystem tricks. With the Type option, you can change the format of the partition, which is useful when a partition you want to recover has been reformatted.
Then there will be times when TestDisk's Quick Search option won't be able to find all of your missing partitions. That's when you need the Deeper Search option, which scans each cylinder and also queries the backup's boot sectors and superblocks to find more partitions.
Don't be surprised if it discovers more partitions than you had on your disk to begin with. Most of them are just ghost images of partitions that once existed - not all will be recoverable, and many will occupy the same disk space.
In the list of partitions found, the ones highlighted in green are recoverable because they exist in the backup boot sector or superblocks. The issue is with partitions that occupy the same space. As with Quick Search, once TestDisk finds partitions you can use the 'P' key to list files on the selected partition. One or more of the duplicates won't display any files, and will complain that the filesystem is broken.
Mark the broken filesystems as Deleted (D) and continue until you've found all the deleted partitions.
Boot camp

There are several ways to lose the Grub bootloader. Perhaps your PC has succumbed to the deadliest zombie infection of all - a Windows installation!
Although installing Windows after Linux will surely wipe the MBR, sometimes an esoteric Linux distro can also take over the MBR and prevent you from booting other operating systems.
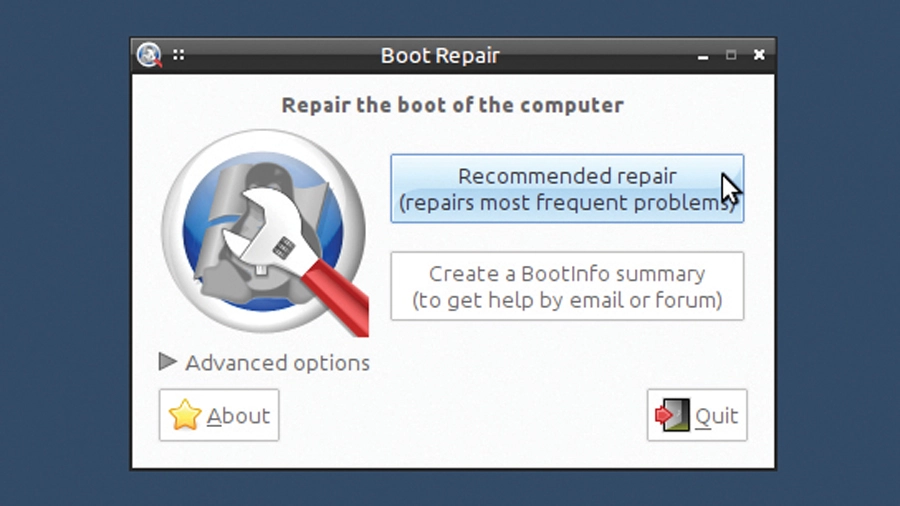
There are various methods to repair a damaged MBR, the simplest being the graphical Boot-Repair tool. You'll find it in most system rescue distros.
The tool is designed to automatically fix most common Grub issues with a single click. Furthermore, it'll also be of use to advanced users who want to tweak the finer aspects of Grub, such as passing additional kernel options, or changing the boot order or timeout, or the default OS to boot.
When you launch the tool, it'll check for and install updates over the internet if a connection is available. It'll then scan your disks and the partitions on them. When it's done, it'll display a simple graphical interface with a couple of buttons.
For most users, the Recommended Repair button will do the trick. Optionally, you can use the Advanced options pull-down and modify various options of the Grub installation. Then click on the Apply button. In either case, after it's done restoring Grub, the tool will display a URL to a diagnostic report of your computer. This will come in handy in case the tool hasn't worked and you need to ask for help on your distro's forum.
You can use the Create a BootInfo summary button to generate this report before repairing Grub. At the end of the report, it'll list the actions the tool will perform to repair Grub on your computer.
