
 Become a TechRadar Insider


There's been a lot of fanfare about iCloud, Apple's free online storage system.
It doesn't just allow you to back up your iPhone, iPad or iPod touch; iCloud keeps your vital data in sync between multiple devices, be they Macs, Windows PCs, iPhones, iPads or iPod touches.
How to set up iCloud on your Mac
01. Check you're up to date

You need to be running the latest version of OS X Lion to take advantage of iCloud. Choose About This Mac from the Apple menu: if it says you're on version 10.7.2 or later, you're good to go. If it's 10.7.1 or 10.7, click Software Update… to get the newest version.
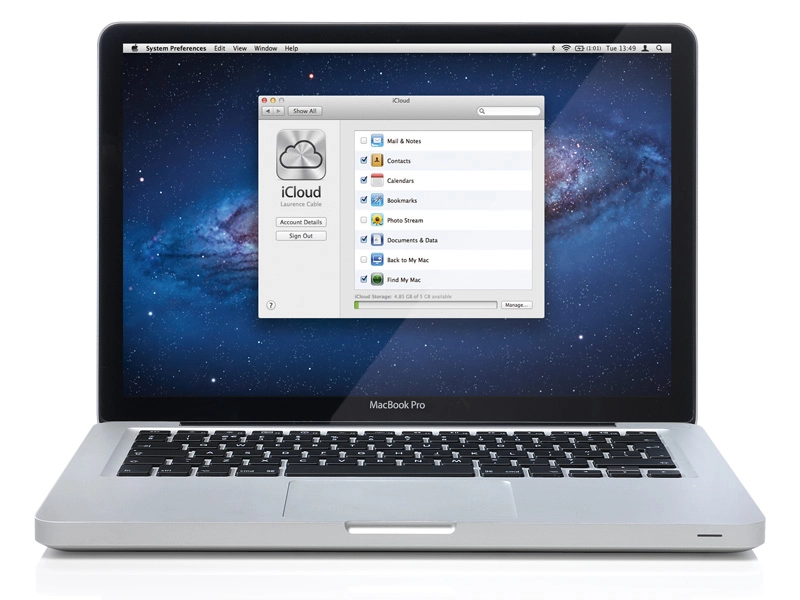
02. Enable iCloud

All your important iCloud settings are in Apple > System Preferences > iCloud. Type your Apple ID and password into the boxes and click Sign In. You can't fine-tune things at this stage: we suggest you tick both boxes, but you can always manually add or remove elements later.
03. Allow location use

If you're using Google Sync, this has to be switched off. If you're happy with this, click OK. You'll now need to authorise Find My Mac to access the location of the computer. Go ahead and click Allow, and you'll be taken to the main iCloud settings screen.
04. Fine-tune things

You can now turn sync services on and off. Tick or untick the boxes as you wish. You may see an exclamation symbol next to the Find My Mac entry: if so, click More…. In our case, we needed to enable Wake for network access in Energy Saver.
05. Buy more storage

You get 5GB of free iCloud storage. But as you add more things to it, you may find the capacity bar at the bottom filling up. To buy more storage, click Manage…, then Buy More Storage…. An additional 10GB costs £14 a year, 20GB is £28, while 50GB is £70 per annum.
How to find a lost Mac
01. Sign into iCloud.com

Provided you've set up Find My Mac as above and it's connected to the internet, you'll be able to pinpoint where it is in the world. On the iPhone, iPad or iPod touch, download the Find my iPhone app. On a Mac or PC, go to www.icloud.com and click Sign In.
02. See it on a map

Type in your Apple ID and password and press Return. Then click Find My iPhone: a map will load with your registered devices shown as pins. To see where a device is, click its name in the panel on the left. If it can't be located, you'll be shown when and where it was last sighted.
03. Remotely control it

If you're concerned your Mac has fallen into the wrong hands, or have simply misplaced it, click the 'i' next to its name on the map to see your options. You can make it play a sound, send a message to appear on its screen, or you can remotely lock or wipe it.
--------------------------------------------------------------------------------------------------
First published in MacFormat Issue 242
Liked this? Then check out iCloud: everything you need to know
Sign up for TechRadar's free Week in Tech newsletter
Get the top stories of the week, plus the most popular reviews delivered straight to your inbox. Sign up at http://www.techradar.com/register
Follow TechRadar on Twitter * Find us on Facebook * Add us on Google+