When I go on holiday, I always take pictures of buildings in the places I visit. It doesn't matter where I travel to, there's always some beautiful architecture just waiting to be appreciated and photographed.
The problem is, to get a whole building in a shot, you either have to move further away than you'd like, or point the camera upwards in an effort to get the top in as well as the bottom.
When you do the latter, the verticals in the photo converge upwards and the building appears narrower at the top than at the bottom.
One solution to this issue is to use a wide-angle lens, but this isn't without its own problems: this type of lens will tend to include more of the foreground, even as it provides a better shot of the building. The better answer is to use either a view camera or a tilt-shift lens on a DSLR.
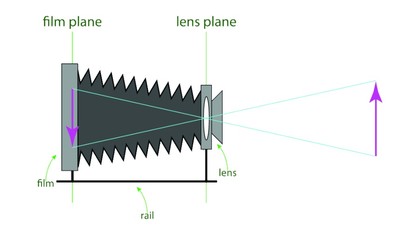
Back in the very early days of photography (and even today with specialist cameras), the camera itself was a very simple affair comprising two standards or planes – one holding the film plate (and a ground glass viewfinder) and the other holding the lens. In between the two was a bellows that didn't let in light.
The standards were mounted on one or more rails so they could be moved closer to or further from each other to focus the image, and to provide other options like perspective and depth of field.
Figure 1 illustrates the basic setup.
Sign up for breaking news, reviews, opinion, top tech deals, and more.

Notice that the image is seen upside down in the viewfinder. DSLRs reverse the image so that the view you see through the viewfinder is the same way up as the real view.
Rise and fall
Since the bellows were flexible and the lens and film standards were separate, these view cameras could provide a whole set of effects that are hard to produce with modern point-and-shoots or DSLRs.
The first of these were shift movements. The lens could be raised or lowered (known as rise and fall), or moved from side to side (the traditional shift), all while keeping it in the same plane.
Modern tilt-shift lenses on DSLRs provide much of the same functionality, but they are specialised pieces of equipment and are generally very expensive compared to normal prime or zoom lenses.
The rise movement on a view camera is important for architectural photography.
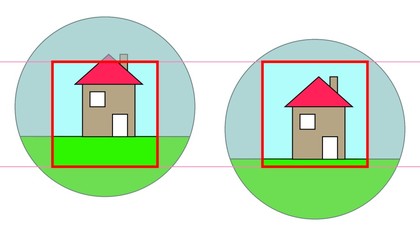
To properly use the rise shift, the image circle of the lens must be larger than the rectangle covered by the film. The image circle is the area of the film plane formed by the cone of light that comes through the lens.
The majority of the image circle is masked off, leaving just a rectangle that exposes the sensor of the camera (or the frame of film). If the camera's lens is shifted, a different part of the light cone exposes the sensor or film frame.
If the image circle is small enough, the film frame will not be fully exposed to the light and you will get the effect known as vignetting, where the photo fades and darkens towards the edges and corners.
Figure 2 shows what happens with rise shift.

In the first image (I've flipped the view so we're not looking at it upside down), we see the normal state of affairs: the image circle encompassing the film frame with the top of the building cut off. The foreground is also prominent.
The second image shows the effect of the rise shift: the film frame is in the same place (we're moving the lens up and down, not the film standard), but the image circle has moved down. A different part of the view is captured by the film: the one that contains the top and bottom of the building.
I'm sure you can imagine the issues posed by vignetting if the image circle were smaller than the one shown.
On reflection
Side-to-side shift movements are used when photographing reflective surfaces.
One way to photograph paintings that are behind glass is to deck yourself out in black and keep the camera behind a black curtain with only the lens poking through so that only black surfaces are reflected (just try that in the National Portrait Gallery).
Another is to photograph the painting from a slight angle, making sure that the incident light is behind you so that reflections go away from the camera, and then fix the perspective in your favourite photo editing program (Photoshop has such a feature).
Alternatively, you can use a left/right shift movement to remove the reflection of the camera using the same technique as for architectural photography.
Tilts and swings
The other main set of possible movements with a view camera are called tilts and swings, known collectively as tilt.
In normal use, the axis of the lens is perpendicular to the plane of the film or sensor. Even shift movements obey this simple rule.
The result of this is that the sharp focus of a photo is a plane parallel to the film. The wider your aperture, the more obvious this sharp focus plane is.
In Figure 3, I took a photo of the word 'tilt' in the Oxford Modern English Dictionary at an angle with the aperture wide open to illustrate the focus plane.

There are four planes here: the plane of the sensor, the plane of the lens, the focus plane (which is parallel to the first two), and the plane of the page in the book (at an extreme angle, almost perpendicular to the first three planes).
Notice how the focus tapers off quickly the further or closer the text is to the camera.
With a tilt movement, the lens is tilted up or down with respect to the film plane – they are no longer parallel. The plane of the lens now intersects the plane of the film – usually below the camera.
More importantly, from some simple geometric proofs known as the Scheimpflug principle, the focus plane – the part of the view in focus – also tilts (geometrically it intersects the previous two at the same position).
In fact, by varying the tilt, you can bring nearer and farther parts of the view into focus at the same time (the effect on Figure 3 would be to bring all of the text into focus).
Notice though that this is not the same as increasing the depth of field by reducing the size of the aperture; this is a totally different effect, although a photographer can balance the need for smaller apertures to increase the depth of field by using a tilt movement.