


You could be forgiven for thinking that CDs and DVDs are outmoded technologies. With flash memory getting cheaper and the cloud becoming ever more pervasive, storing data on circles of plastic-coated aluminium seems little better than chiselling ones and noughts on slabs of stone.
But it's not that simple. How will the cloud help if your PC won't boot? Is a thumb drive any use if you want to play a movie in your vintage DVD player?
Like it or not, CDs and DVD still have their place in the world. They're cheap, easy to make and can often work as a brilliant bridging mechanism between different devices and data formats.
Here are 12 disc burning tips to help you squeeze more data onto a disc, burn audio discs and more.
1. How to make a data disc
Windows' own data disc burning routines can be slow and frustrating, and don't always produce a disc that can be read by other devices. You're better off using a dedicated disc-burning program like CD BurnerXP or ImgBurn.
These make burning data to disc simpler, and avoid the need to cache the whole disc contents to a temporary folder in the process.
If you're using CD BurnerXP, launch the program and choose 'Data disc'. Browse to the files or folders you want to include and drag them onto the lower pane. Check the indicator to see how full your disc is. Click 'Burn' to write your files to disc.
In ImgBurn, choose 'Write files/folders to disc', then drag the files you want to burn into the left-hand pane. Click the 'Build' button and the program checks your compilation, offering corrections to make the disc compatible with most devices. It can also verify the data on the disc after burning it.
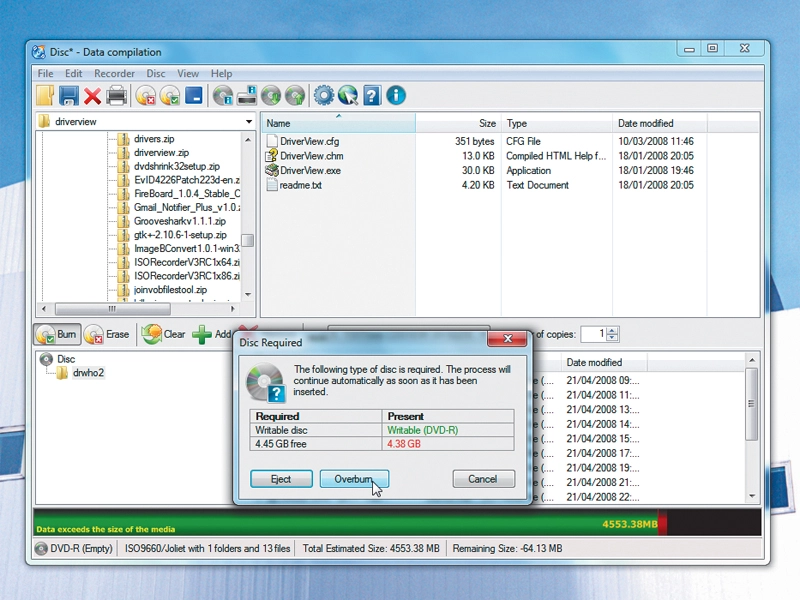
2. How to overburn a disc

Launch CD BurnerXP, insert the disc you want to write to, and add the files or folders you want to burn. If the data size exceeds that of the disc by only a small amount, click 'Burn' and then choose 'Overburn' when you're warned about the mismatch.
If the disc burns successfully, test it to see that all the files have been transferred. The smaller the overburn, the less likely you are to have problems.
3. How to burn a secure disc
The simplest way to encrypt files on a disc is to use TrueCrypt. Select 'Create volume | Create a file container | Standard TrueCrypt volume'. Choose 'Select file' and browse to where you want to store the container file. Enter a filename and save it. Provide your password and opt to format the volume.
You can mount it using TrueCrypt with your password, and use it to store sensitive files. Once you've added your files to this volume, burn the container file to disc using your disc-burning software.
4. How to make a bootable DOS disc
You might want to create a DOS boot disc if you have old games that only run under DOS. To do so, you need a PC with a floppy drive and a DOS boot disk, which you can download from www.bootdisk.com.
Use ImgBurn and choose 'Mode | Build'. Put your DOS boot floppy into the floppy disk drive. Choose 'Advanced | Bootable disc' and select 'Make image bootable'.
Choose 'Floppy Disc 1.44MB' as the emulation type and select your floppy drive under 'Extract boot image'. Add any other files you want to include. Insert your CD and click 'Burn'. Boot from this disc and it acts like the A: drive.
5. How to burn dual layer discs
Burning data to a dual-layer disc works in much the same way as creating a data disc, as long as you use a disc-burning program that supports dual-layer burning, and have a dual-layer capable disc and drive. However, if you want to create a video disc, you'll need to decide where the layer break comes, because there will be a slight pause here during playback.