
 Become a TechRadar Insider


Sometimes you can't avoid shooting a subject in front of a background that's not particularly interesting, and one way of making such backdrops less distracting is to shoot with a wide aperture setting, creating a shallow depth of field to blur the background and let the eye focus on your subject. Alternatively you can make a Photoshop cut-out of the person and drop them into a more interesting setting!
To do this you will need to use Photoshop's tools to select, copy and paste a person into a more attractive location. However, creating a convincing composite can be a challenge, especially if the subject is standing against a detailed background (find out how to fix background distractions in Photoshop).
You'll find that bits of unwanted background will cling to the subject's outline - especially in areas of intricate detail such as hair. In the process of removing the background you can lose some of this edge detail, making the subject look obviously like a Photoshop cut-out.
The improved Refine Edge command in Photoshop CS5 includes powerful tools to help you modify an initial selection and retain delicate details, notably the Smart Radius option, which adjusts the width of the radius over which refinements are applied depending on the degree of detail, and two brushes for adjusting the radius in particular areas.
We'll show you how to use these tools to transplant a city-dwelling subject into a more flattering and attractive location, and how to fine-tune the results of the Refine Edge command still further by using Layer Masks and Blending Modes.


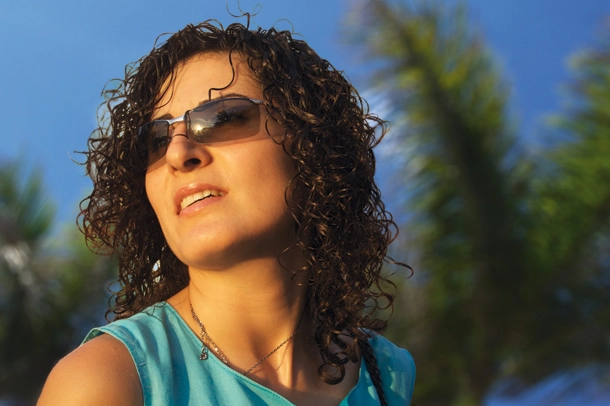
Step 1: Make a selection
Open your original image of your person - here we've used a photo of a woman in front of a distracting background and an image of palm trees against a blue sky, which is our desired background.

Take the Quick Selection tool from the Tools palette. Tick the Auto Enhance box in the Options bar to give your selection a smoother, less blocky edge. Brush over the woman to 'paint' a selection marquee that snaps to her outline. Don't worry if bits of background hiding in her hair get selected, or if fine edge hairs are excluded from the selection - you can tidy up these problem areas later.

Step 2: Launch Refine Edge
Click the Refine Edge button in the Options bar (or go to Select>RefineEdge). In the Refine Edge dialog, open the View menu and choose On Layers to view unselected areas as transparency. Tick the Smart Radius box, and set Radius to 2 to start refining the edge. Set Smoothness to 9 for a less blocky edge. At this stage some wisps of hair will be missing from the selection, while you'll see bits of unwanted background.

Step 3: Fine-tune the radius
Click the brush icon next below the Hand tool and choose the Refine Radius tool. In the Options bar set Size to 60. Brush around the edges of the hair to add missing strands to the selection, and brush over bits of visible background to remove them. If you remove hairs or reveal bits of background, switch to the Erase Refinements tool and brush over those areas to restore them. Set Contrast to 16%, Shift Edge to +20 and Output to New Layer with Layer Mask.

Step 4: Edit the Layer Mask
Click OK to create a duplicate layer with a mask based on the refined selection. Take the Brush tool, set the foreground colour to white, click the mask to target it and carefully paint in missing hair detail. Tap the left square bracket key to reduce the brush size while you work, and the right square bracket to increase the size. To hide background pixels that are still visible press X to switch to a black brush.

Step 5: Add a new background
Now open your desired background image (in our case, the palm trees), go to Select>All and then Edit>Copy. Switch to the image of your main subject (in our case, the woman), go to Edit> Paste to add the palm trees as a new layer, and drag it below the 'Background copy' layer in the Layers palette. To mimic a shallow depth of field go to Filter>Blur>Lens Blur. Under Iris, Set Radius to 75, under Specular Highlights, set Brightness to 25 and Threshold to 235. Add some grain by setting Noise Amount to 1. Click OK.

Step 6: Remove white fringes
Drag the 'Background copy' layer onto the Create new layer icon to duplicate it, and change the 'Background copy 2' layer's Blending Mode to Darken. This will keep the dark hair visible while causing lighter background pixels to vanish. Click on the original 'Background copy' layer's mask. Set Opacity to 100%. Spray a black brush tip around the hair's outline to hide it. This will reveal the fringe-free hairs from the 'Background copy 2' layer.
Final Photoshop Tip
It can be a real challenge to restore a subject's hidden hairs when painting on a mask. However, if you Shift- click on the Layer Mask you can temporarily disable it (you'll see a red cross), revealing the original image. Take a small white brush and carefully brush over any hair strands you want to restore. Click on the mask again to turn it back on and those hairs will now have become more visible.
READ MORE
10 things photographers can do to stop wasting pictures
20 tips for faster photo editing
44 essential digital camera tips and tricks
Download free photography cheat sheets