OS X and iOS backup: the ultimate guide
Apple provides all the tools you need...
We increasingly rely on our Macs, iPhones and iPads to store all of our personal data. Everything from holiday photos to contacts, financial records and movie projects are kept on our Apple devices. And for the most part, this is fine.
The problem arises however when something unexpected happens. A computer crash, a phone dropped in the sink or a theft, for example. It's always been important to keep regular backups of your data but these days it's inexcusable not to do so, especially since Apple has done everything it can to make the process as easy as possible for you.
iOS devices
Let's start with backing up your iOS device, since a phone is perhaps more likely to be stolen or dropped than a Mac. This applies to iPads and recent iPods as well, since they all use a variation of the same operating system.
The first thing to do if you haven't already is to upgrade to iOS 5, which anyone with an iPad, iPhone 3GS or newer can do for free. There's a very good reason for doing this, and it's that iCloud is integrated into the system.
iCloud is Apple's backup system for iOS devices, and every user gets 5GB of online storage space, which can be upgraded if you need more. Your account is linked to your Apple ID and when you set up your device for the first time, you will be asked if you want to use iCloud (you should answer in the affirmative).
iCloud for iOS is designed to be almost invisible, and once activated it will back up your device's data and settings whenever it is plugged into the power, locked and connected to a Wi-Fi network. This is the situation most people's phones are in when recharging at home, so you don't have to do anything special to make it happen.
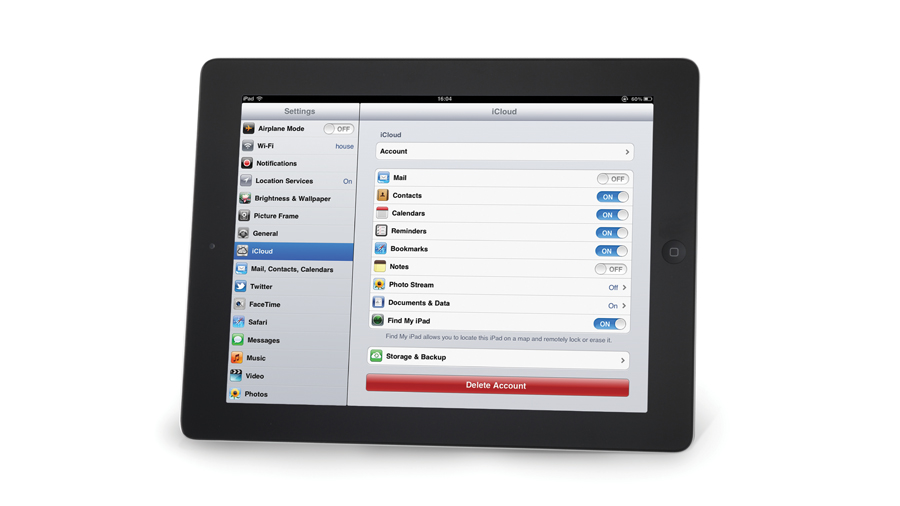
If you go into Settings > iCloud on the device, you can turn iCloud backup on if it's not already on, and view and manage your storage levels. 5GB should be enough for most people, as contacts and emails don't take up a lot of space.
Sign up for breaking news, reviews, opinion, top tech deals, and more.
If you start to back up photos and apps you might start to run low on space, though there is the option to selectively include or exclude these things from a backup. There's even a Back Up Now button to do a backup manually, and if you have more than one device you'll see them all listed in this section.
iCloud is also used to host things like Photo Stream, which automatically uploads all photos taken on one device and makes them available on your others, if it is switched on. It's a brilliant 'fire and forget' backup solution because it works by itself, and if you get a new, replacement device you can restore all the data from the old one down from the cloud by linking the new device to your Apple ID.
iTunes backup
Another way to back up your iOS devices is to connect them to your Mac using their USB cable and waiting for them to pop up in iTunes, then right-click on the device and choose Back Up and also Transfer Purchases to copy downloaded apps, movies, music and books. This creates a local, physical copy of the data from the device, which some people like to have as it doesn't rely on being online.
You can also choose to sync the device wirelessly with your Mac, which has much the same effect, only it doesn't require a USB cable to be connected. If you go to the Summary tab in iTunes for your device, you will see the option to back it up either locally or to iCloud. The two are not mutually exclusive, so you could perform a local backup of a phone for example, then switch to iCloud for all subsequent backups.
One particularly good thing about iCloud backup is that it doesn't matter where you are, as long as you are on a wireless network. So you can still back up while you're on the road or on holiday, without needing access to your Mac. Imagine an unfortunate situation where your phone or iPad was stolen: as long as you had backed it up recently, you could restore everything back onto a new one wirelessly.
Mac in the cloud
So you've switched on iCloud for your iOS device, but what about your Mac? If you're on OS X 10.7.3, you can use iCloud there too.
In System Preferences you can go to the iCloud tab and enter the same Apple ID you used with your other devices, and access the same iCloud storage account. You'll see the option to turn on backup for Mail, contacts, calendars, bookmarks and documents and data.
The last option backs up documents created with Apple's iWork apps, though not documents created with third-party apps. The idea is that by activating these, you can maintain the same settings across your Mac and all your iOS devices.
So if you add a bookmark on your Mac, it will appear on your iPhone. Add a contact to your iPad and after the next backup, it's on your Mac.
You can be selective too, so you could for example choose not to back up mail from your Mac, but to back up everything else.
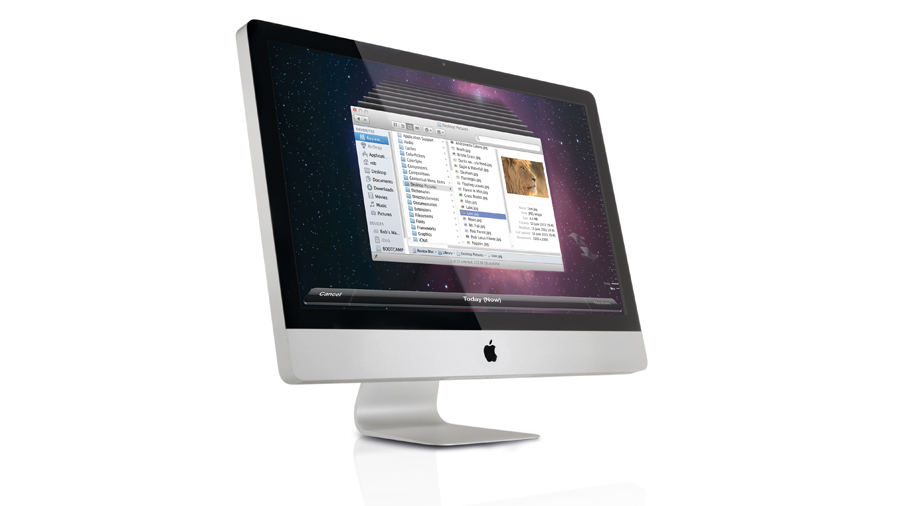
iCloud is excellent but it doesn't deal with more substantial backups for your Mac, it's really more of a synchronisation tool. Luckily, Apple provides Time Machine, a powerful backup system that is a part of OS X 10.5, 10.6 and 10.7. Again, it's so simple to use that there's no excuse not to use it and to risk losing data in the event of an emergency.
Time Machine not only creates full backups of your system, it also works incrementally, so that only files that are new or altered since the last backup will be copied. This saves a lot of time and disk space, and avoids the unnecessary duplication of data.
Time Machine can back up to any hard drive, so it's worth investing in an external USB 2.0 model with a decent capacity of 500GB or so: these are surprisingly inexpensive. Simply connect the external drive, go into Time Machine's preferences and specify the drive as a backup drive. Choose any items that you want to specifically exclude from the backup (perhaps downloads that you are going to delete soon) and then press Go.
On first run, Time Machine will create a full backup of your entire Mac, right down to the system level. In the event of a catastrophe, you can simply boot this or another Mac from the system DVD or use Lion Internet Recovery, connect the backup drive and choose to restore the whole system back to your Mac.
This is a much more comprehensive backup technique than burning to DVD. Why? Because it takes a working snapshot of the whole system. If you ever need it, and people sometimes do, a full Time Machine backup is a lifesaver.
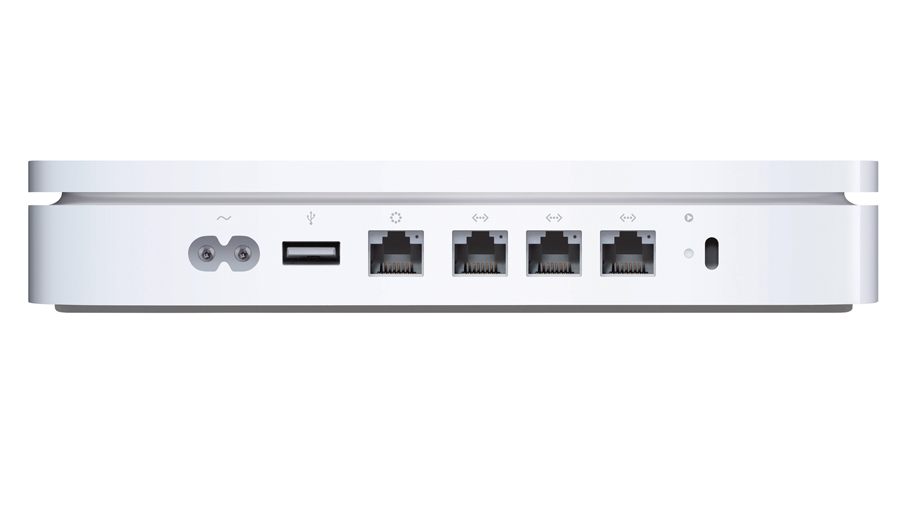
It works with any hard drive but Apple makes the Time Capsule, a combined high speed Wi-Fi base station plus a large hard drive, which is designed to work seamlessly with Time Machine. The advantage it has is that it works wirelessly, so your backups can be performed automatically in the background without you needing to connect a separate hard drive.
Imagine backing up several Macs in a house to one, centrally located wireless backup drive. This is what you can do with Time Capsule.
Back to the future
There are quite a few Macs still out there that are not running OS X 10.5, which is the first version that included Time Machine. For those users, most of whom are on 10.4, as well as for anyone who prefers an alternative to Apple's own tools, there are other ways to back up your Mac.
Carbon Copy Cloner, available free from www.bombich.com, has evolved into a very capable backup solution, with many more options than Time Machine.
On one level, it's able to create complete, bootable backup disk images of your entire system - great for taking snapshots. Let's say you have a Mac working beautifully but want to try a major system upgrade. Taking a copy of the working system means that in the event of a disaster, you can easily revert back to it.
It's also a handy tool for installing the same setup on lots of Macs at once, which IT admins often have to do. Get the system working on one Mac, create an image then distribute it across a network.
Carbon Copy Cloner is also adept at incremental backups, and like Time Machine only backs up files that have changed since the last backup. It also supports scheduling so it can run without you having to tell it what to do, and has the ability to back up across the internet.
Another excellent third-party Mac backup tool is SuperDuper!, which is available from www.shirt-pocket.com.
Drag and drop
On a more basic level, you can simply drag and drop folders from your Mac onto external hard drives or burn them to DVD using the Finder or a dedicated utility like Toast. This doesn't do any clever version checking like Time Machine, but it's quick and easy, and lets you perform a quick 'safety' backup without including any files that you may not need to back up.
It's common practice amongst professionals to regularly duplicate a folder of work to a new drive while a project is ongoing, just for peace of mind. Even something like a power cut which causes your Mac to suddenly shut down can cause loss of data, and if it's been a day since your last Time Machine backup, you might lose all of today's work.
You probably shouldn't let backing up take over your life, but it's good to be on top of it nonetheless.
Alternative services
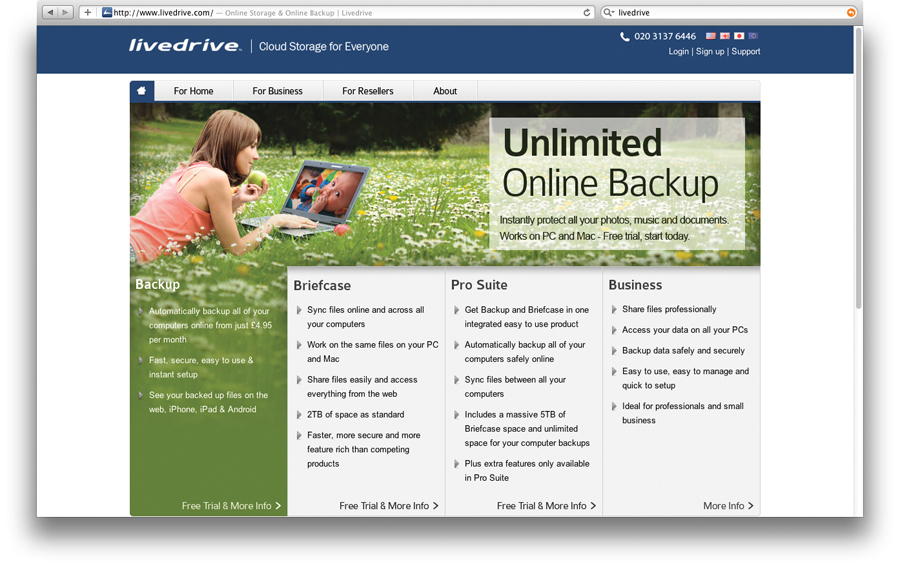
There are alternatives to Apple's iCloud for the Mac too, though none which integrate at a system level, even though many do have dedicated apps rather than needing to be run from a browser. Some of the best include Backblaze, Carbonite, Livedrive, Mozy and CrashPlan, and they all work in broadly similar ways. There's also Dropbox, which isn't technically a backup solution, though you can use it as a limited kind of backup tool.
These online backup services are generally fairly inexpensive and offer differing levels of free and paid storage, plus 'watch folders' to upload data automatically, and the ability to restore files and folders back to your Mac. They often also have companion iOS apps so you can synchronise data across your devices.
Online backup is still limited compared to local, hard drive-based backup, where you might have backups running to hundreds of gigabytes; and online systems are better suited to files, pictures and media than backing up entire systems. Between all these backup options there's sure to be one that suits you, so make sure you're backed up and up to date today!
How to use iCloud to back up your iOS device
1. Turn it on
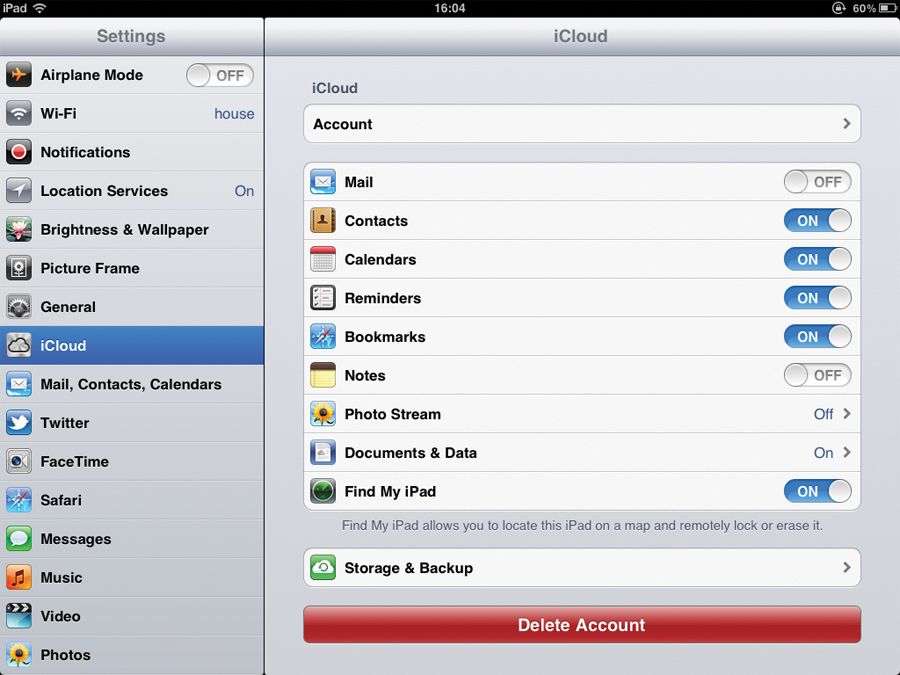
Go into your device's Settings app and locate the iCloud section therein. If you activated iCloud during setup of the device, it should already be on. If not you can switch it on from here. You will need to be on a wireless network to complete the next steps.
2. Choose components
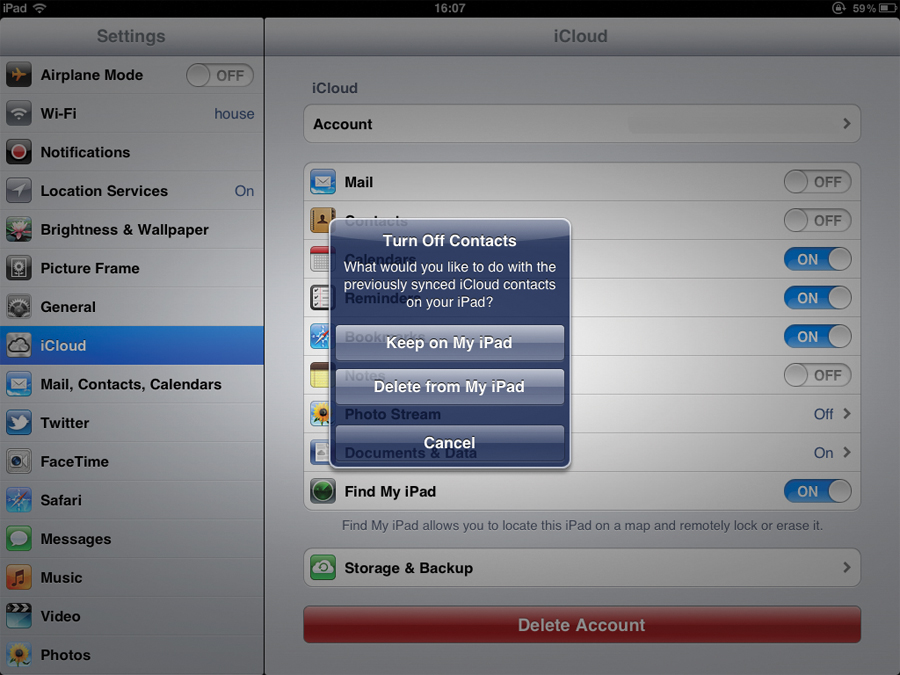
From this menu you can choose what to back up and what to omit (if anything). Most things use relatively little space, though Photo Stream can use up more if you have a lot of photos. Find My iPad/iPhone is great if you're prone to losing things.
3. Manage Storage
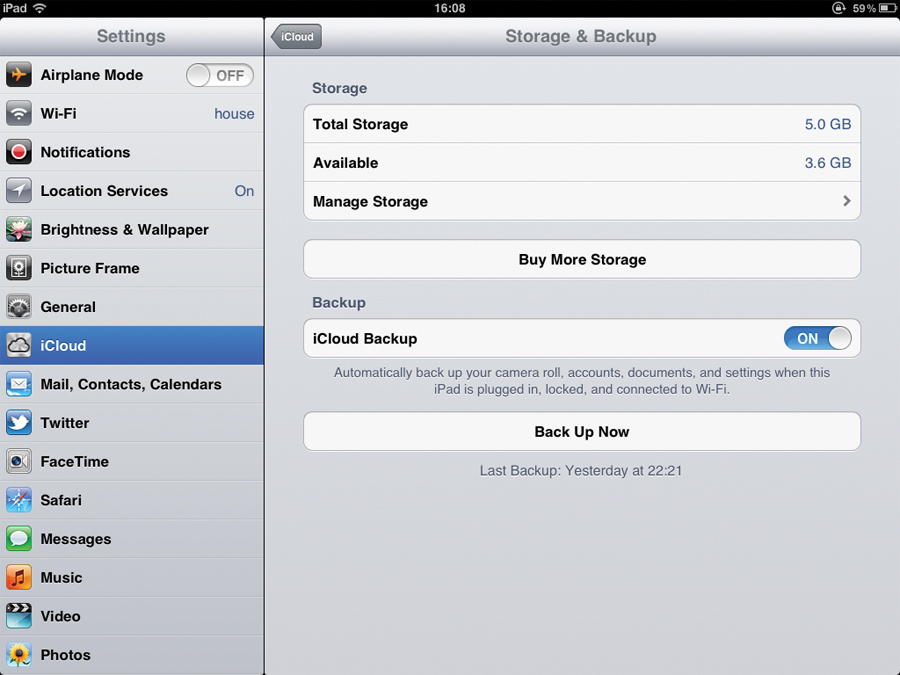
Tap the Storage and Backup option and you'll be taken to a new section. At the bottom there's a Back Up Now button which you can tap to force a backup. You can also switch iCloud backups on or off from this screen. The totals at the top tell you how much space you have left.
4. View the details
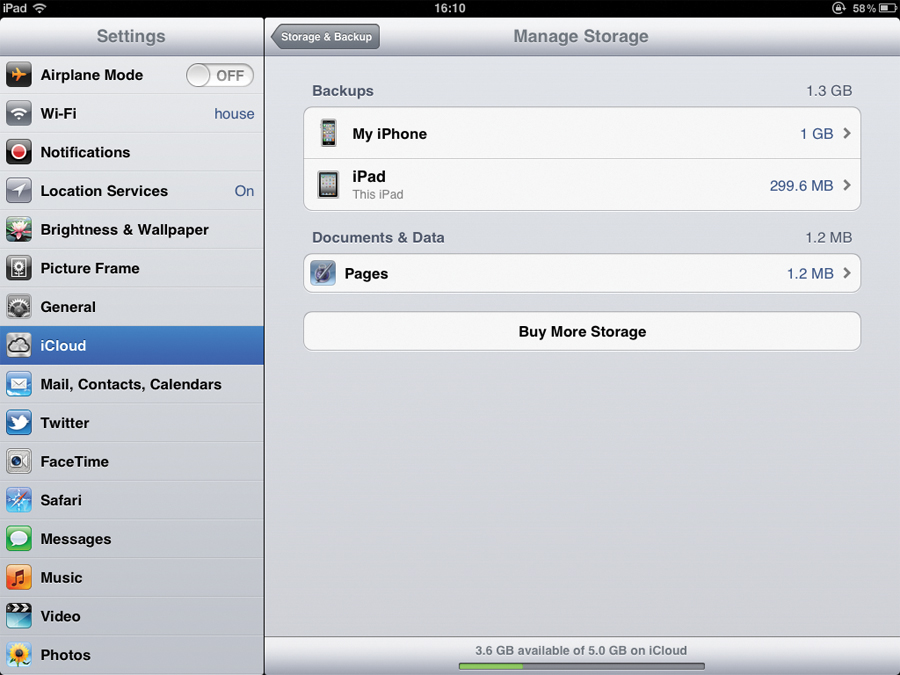
Tap the Manage Storage option to be taken to a screen showing the devices associated with your Apple ID, along with how much space they're using. Any iWork-compatible documents that have been backed up will also be shown.
5. Change the settings
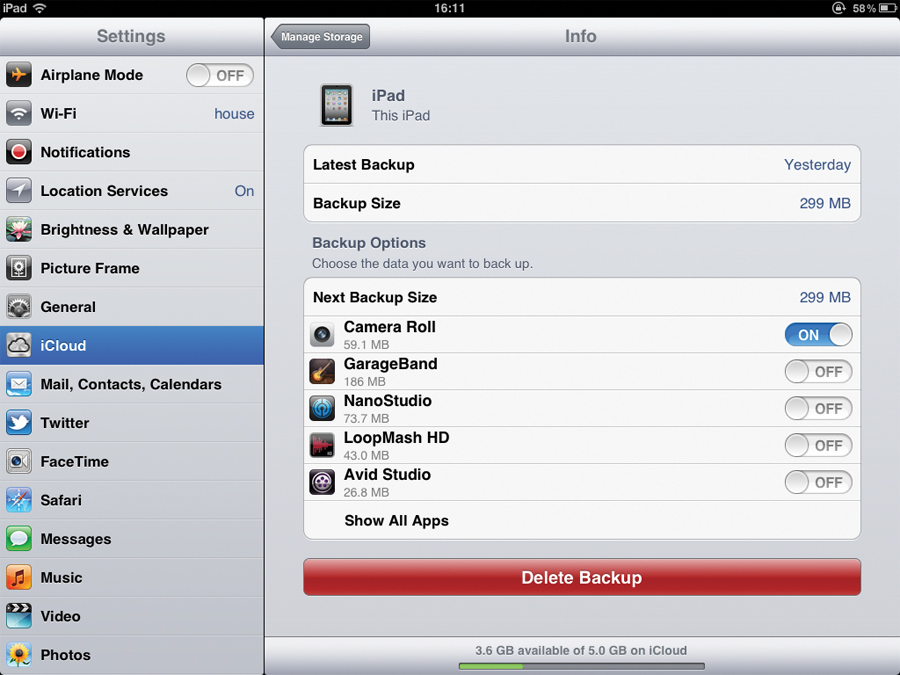
Tap a device to load its backup plan. The most recent backup is shown at the top, and the total backup size online. Underneath is a list of apps in size order, largest first. You can see I have chosen to omit some of the larger ones.
6. Select apps
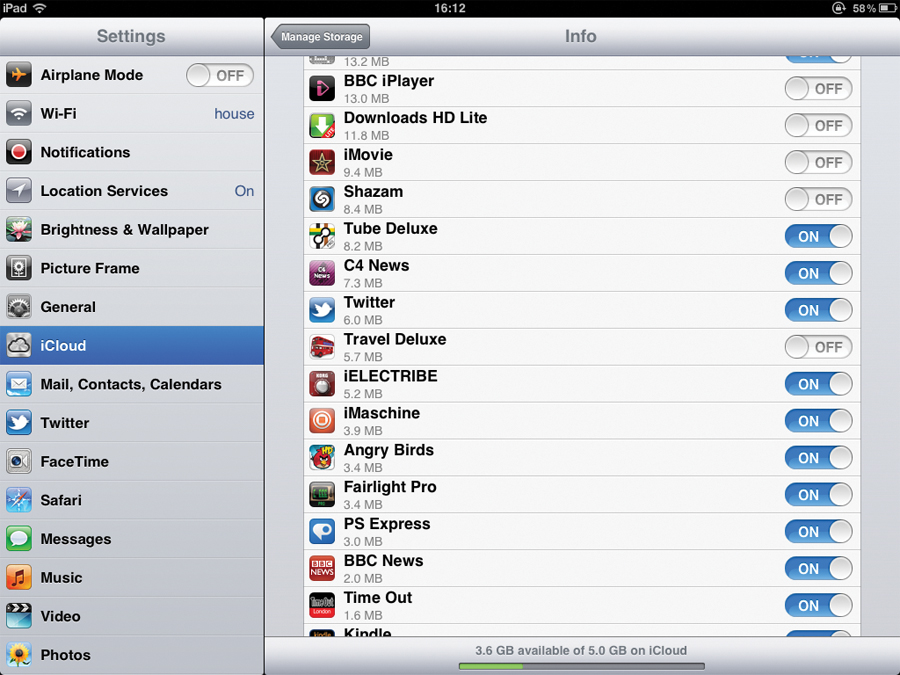
Tap Show More Apps and you'll see a list of apps on your device, and you can choose to set each one to back up or be left out. Apps can be re-downloaded in emergencies, though you may lose settings if they were not backed up.