 Become a TechRadar Insider


Your iPhone's camera is capable of taking amazing shots, but the fun doesn't end there: you can apply a variety of adjustments and effects to liven up your pictures. Photos in iOS 8 has a bunch of new editing tools and holds its own against costly desktop editing apps.
The tools you're likely to use most often are crop-and-rotate and, for portraits, Remove Red-Eye. You may also find the Auto Adjust option handy: one tap of this can improve many images.
How to edit photos quickly
Edit and Auto Enhance
Open Photos to review the shots you've snapped, tap on one, then tap Edit (top right). The editing options appear; their location will vary depending on whether your iPhone is in portrait or landscape mode. Often the most immediately useful is Auto Enhance (the magic wand icon). Tap this and Photos attempts to improve the color and contrast of your photo.

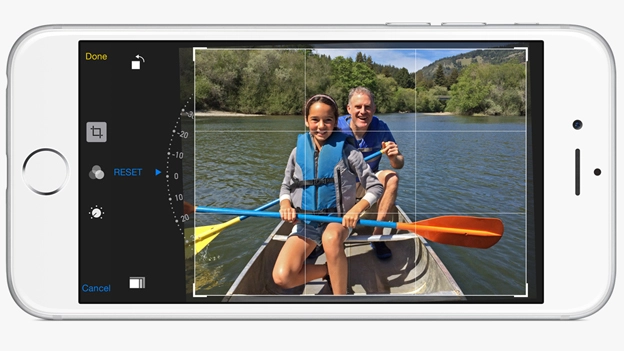
Crop and rotate
Tap the Crop tool. If Photos detects a line in the image that it thinks should be horizontal, it automatically rotates the shot. You can fine-tune by using the wheel, or undo by tapping Reset. To crop, drag the white frame border or its corners, or tap the preset icon to select a fixed aspect ratio. A rule-of-thirds grid appears to help you perfect the composition.

Using Photo Filters
Use Photo Filters to add instant effects. Tap the filters icon to reveal a row of effect previews. Tap each in turn to see how it affects the image. Tap Done to finish. You can remove an effect by tapping its preview again or tapping None, and add further adjustments afterwards. You can revert to the unedited shot at any time, even if you've closed and reopened it.

How to add advanced effects
Remove red-eye
Red-eye (caused by reflected camera flash) can be a problem in portraits. Photos has a built-in red-eye removal tool, which will appear if the app detects a face in shot. Tap the tool (the eye-shaped icon), then tap on each affected eye. Sometimes you need to tap a few times for Photos to locate the red-eye; it can help if you pinch to zoom in first. Tap Done.

Adjustments
The new adjustment options offer both simple and advanced modes. Tap the dial icon, then tap the option you want to adjust (Light, say). You'll see a spectrum of small preview images. Drag this either way to apply the adjustment (lightening or darkening the image, increasing or reducing color saturation and so on). Tap Done to apply or Cancel to reject it.

Expert editing
Want more control? Tap the arrow next to Light, Color, or B&W (or the menu icon with three horizontal lines next to any spectrum of previews) to reveal further controls. Tap an option, such as Highlights, then use the slider to adjust that specific setting. Tap the menu icon to return to the full set of controls. These make it possible to fine-tune images with precision.

How to use extensions in Photos
Install and activate
Extensions are a new addition to the Photos app, and they change everything. First you need to install a photo-editing app that supports extensions - we're using Camera360 Ultimate. After installing the app, open Photos, pick a shot and tap Edit. Now tap the Extensions icon (the circle with three dots in it), tap More, and switch on your chosen extension app.

Access Extensions
Your chosen app now appears in the list that pops up when you tap Extensions in Photos. Tap it (you might have to OK an alert the first time) and you'll see a bunch of new editing options, depending on the extension app you've chosen. In Camera360 there is a Blur option: tap this and choose the circular Blur icon. Tap the tick icon to apply the effect to your shot.

Add Effects
Continue adding effects with Camera360. When finished, tap Done to return to Photos, then Done again to save all your adjustments (including those added using Camera360). Tap and hold one finger on the image to view the original, so you can compare it with your edited version. To remove all edits, tap Revert, then Revert to Original. You can do this at any time.
