How to manage power options in Windows 11
Power management for desktop and laptop users
Microsoft has always given Windows users a good deal of control over how their computer uses power, and this is something that continues with Windows 11, which you can now download and install.
While managing power consumption may be something that you most readily associate with laptops and a desire to maximize battery life, power options can also play an important role for desktop users.
Desktop user may not have to worry about how long a battery is going to last, but Windows 11's power option remains important.
As well as making it possible to reduce your electricity bill by using Sleep mode to reduce power consumption after a period of inactivity, the setting you have in place can also play an important role in security.
What you see when you're managing power settings will depend on whether you're using a laptop or a desktop PC.
Here we take a look at the options that are available in both scenarios. We'll start by looking at what you'll see on a desktop computer as there are far fewer options to consider.
One difference you'll notice straight away is that on a desktop system, you manage things through the 'Power' section of Settings while on a laptop is it called 'Power & battery'. Let's take a look and see what options are available.
Sign up for breaking news, reviews, opinion, top tech deals, and more.
- Windows 11 is finally updating its biggest load of trash feature
- Google Chrome will look a lot like Windows 11
- Windows 11's new look will evolve over time
1. Get started
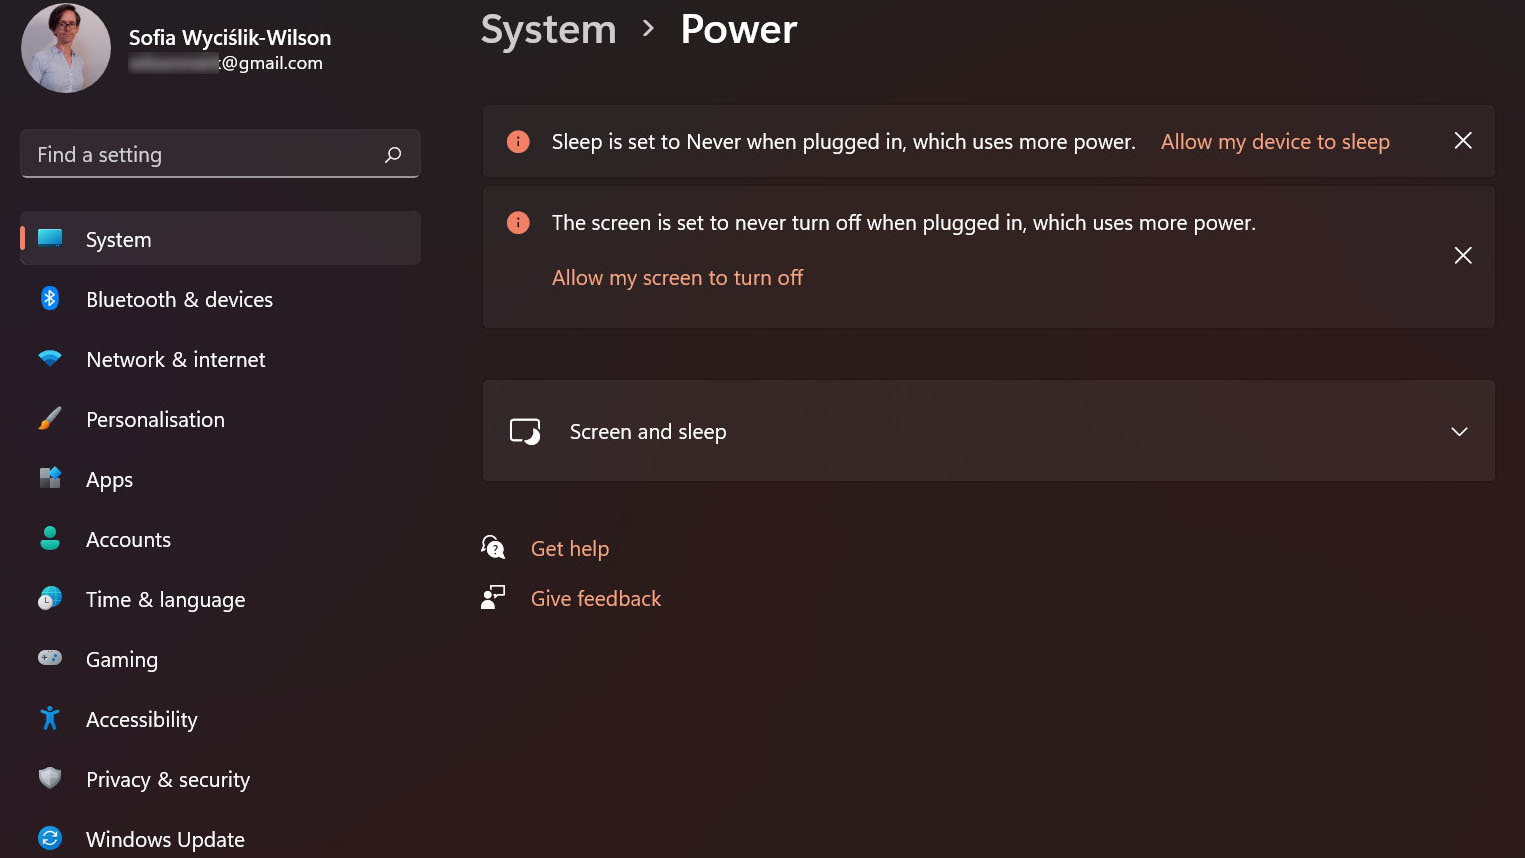
Open Settings either by right clicking the Start button and selecting 'Settings' from the context menu, or using the Win + I keyboard shortcut.
Click the 'System' link to the left of the window and then move to the 'Power' section. You may well find that Windows 11 offers you some tips at the top of this section – you are free to click the links contains in these advisory boxes to accept the recommendations, click the X to the right to dismiss them, or you can opt to simply ignore them.
2. First power settings you should change
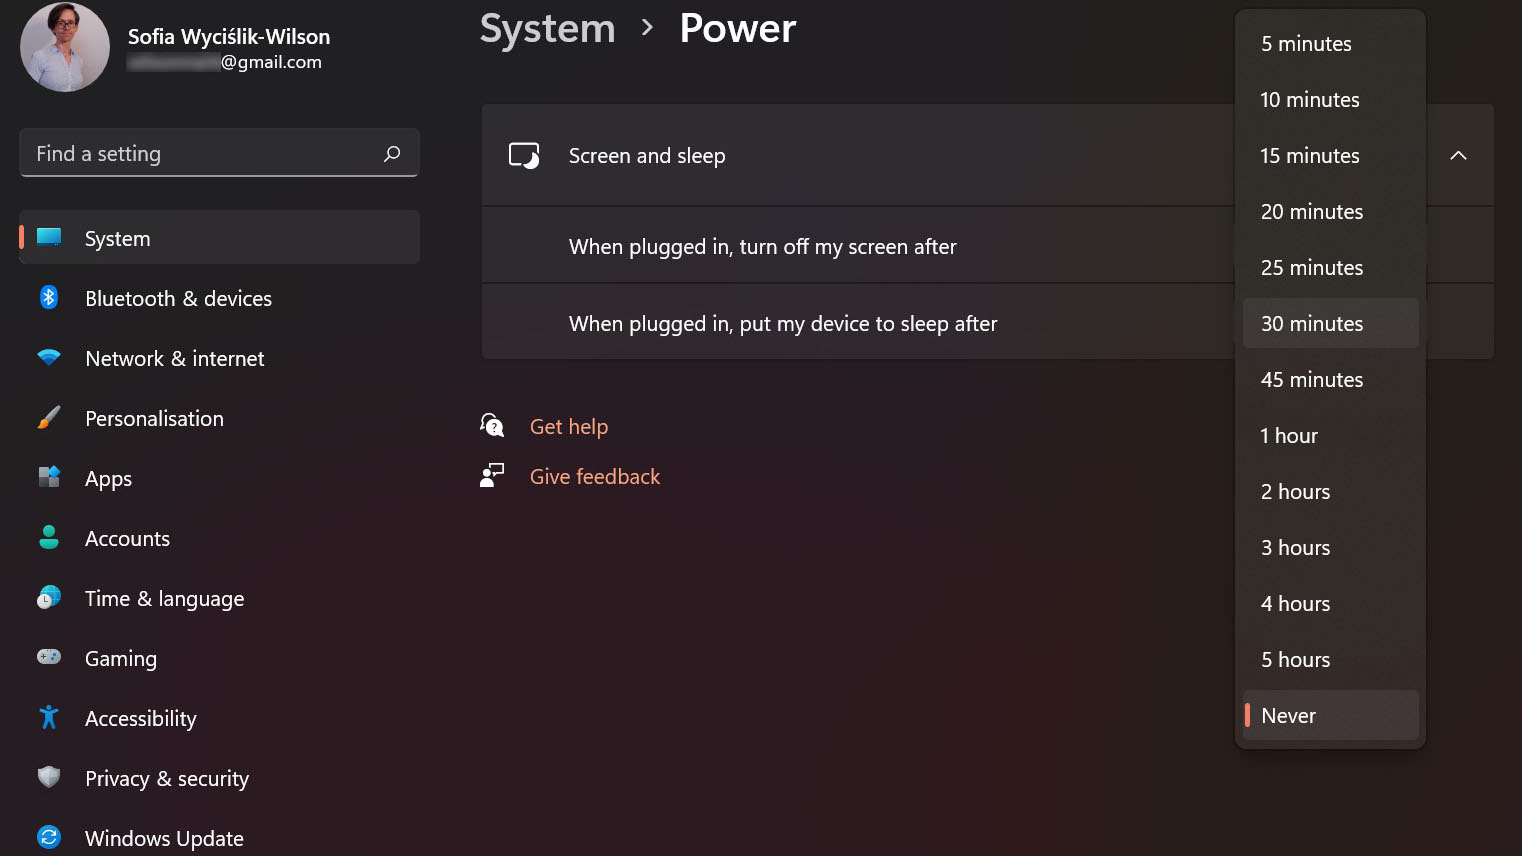
The limited number of options you can configure for a desktop PC can be seen if you expand the 'Screen and sleep' section. Here you will find two drop down menus, the first of which is labelled 'When plugged in, turn off my screen after'.
You can use the drop-down menu to choose how long Windows 11 should wait before switching off your monitor.
The second drop-down menu is labelled 'When plugged in, put my device to sleep after', and this is a great way to not only reduce power consumption, but also increase security, as your computer will ask you to sign back into your account when you want the computer.
In both cases, there are lots of pre-configured options to choose form, ranging from a minute to five hours. If you want to keep your screen and computer powered up at all times, just select the 'Never' options.
3. Detailed info
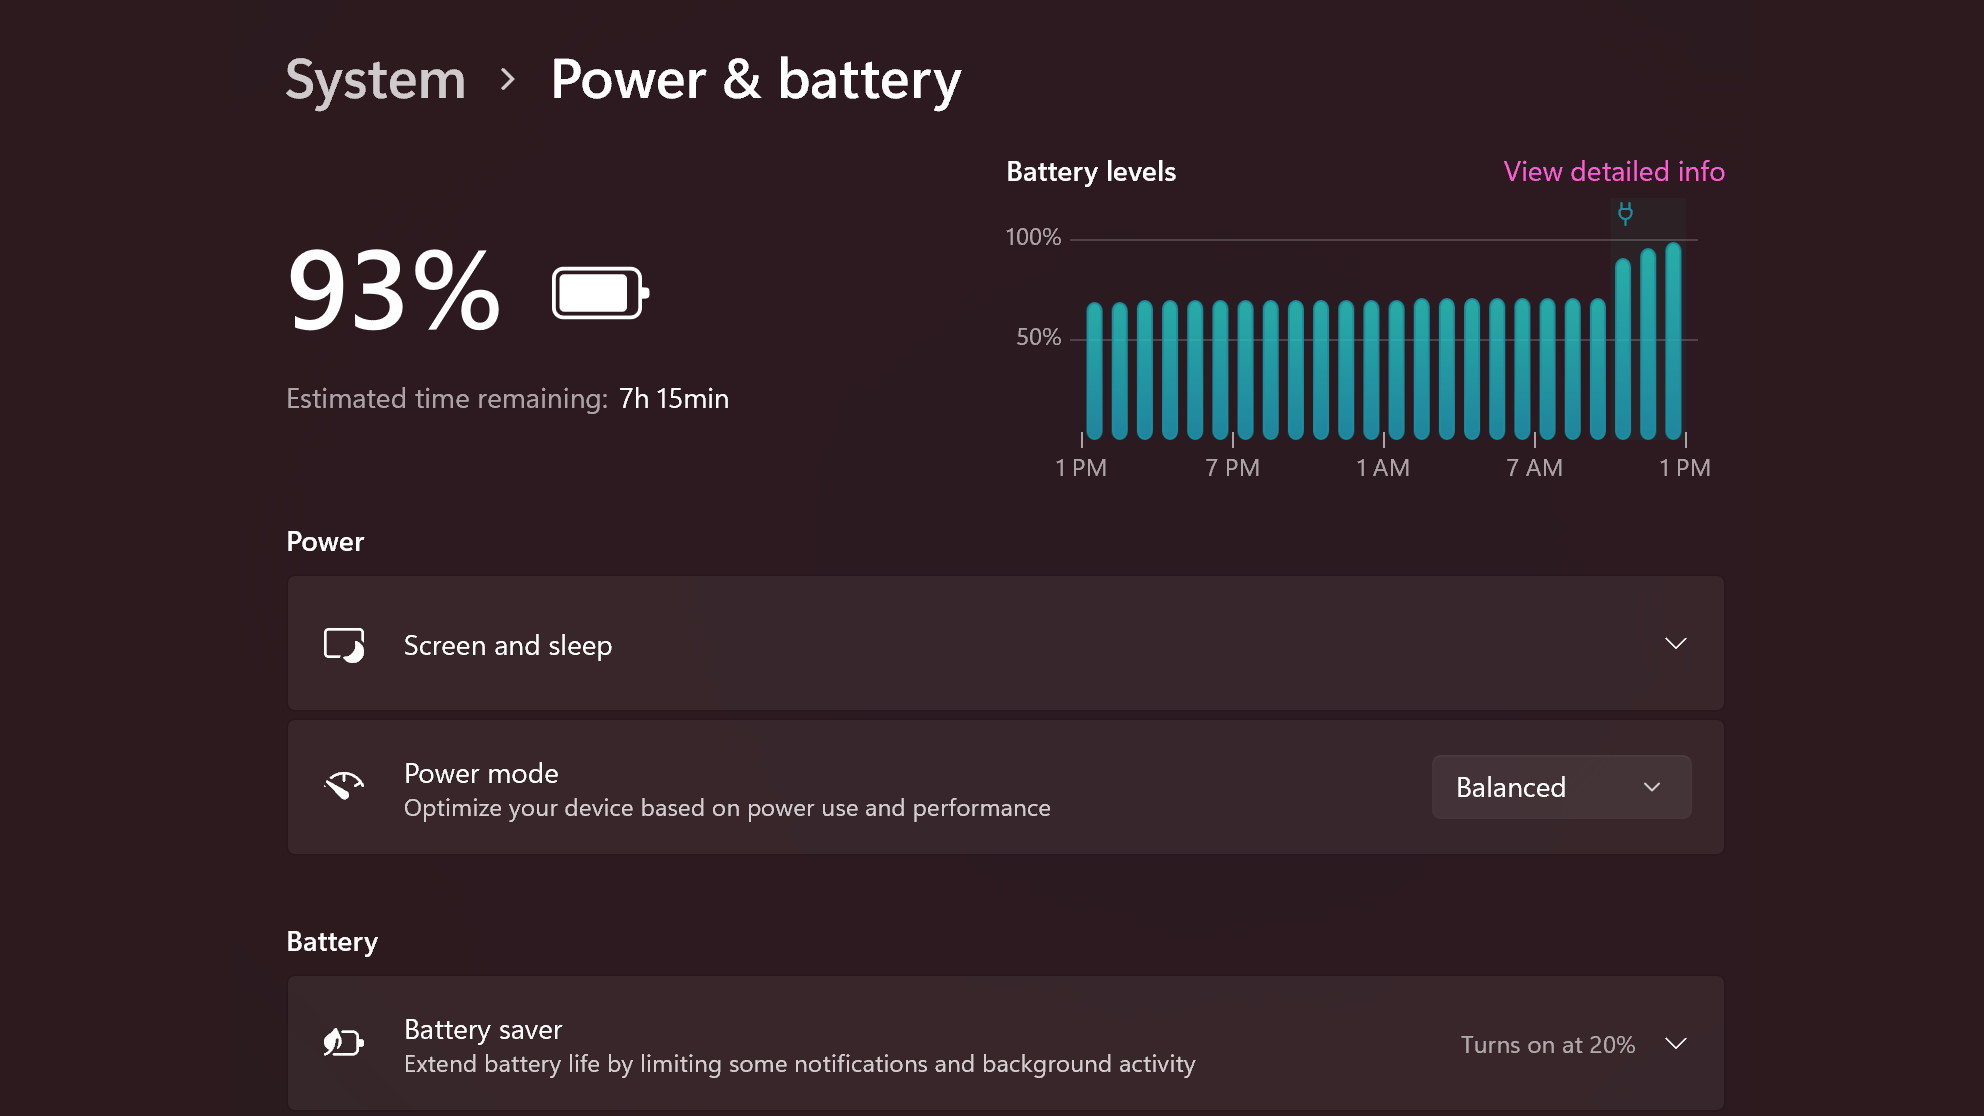
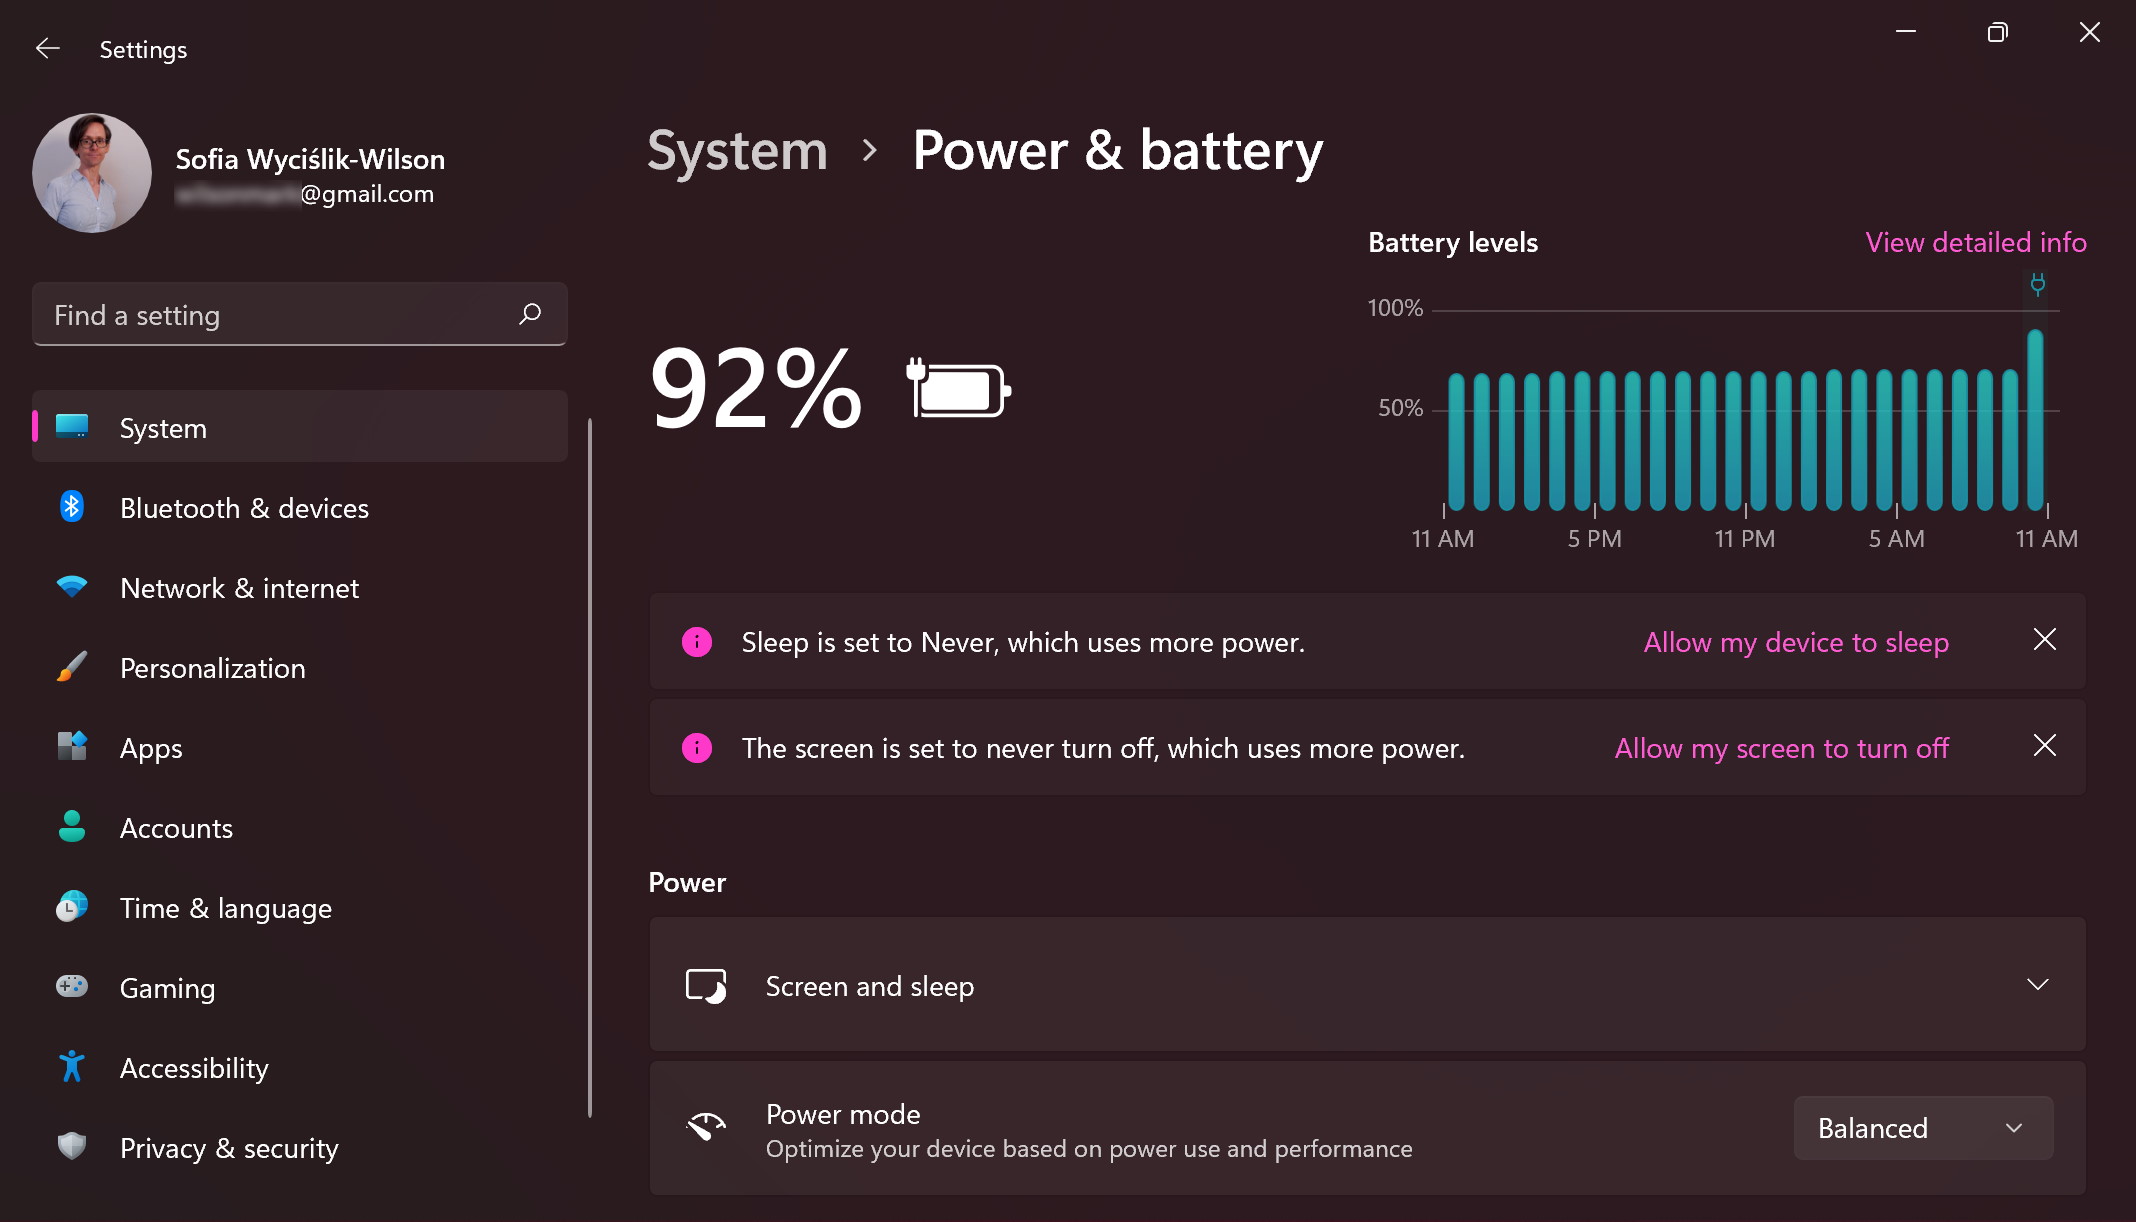
On a laptop, things are slightly different. If you head to 'System' within Settings¸ you will find a 'Power & battery' section, and this includes far more options than the 'Power' section for desktop users.
You'll notice that the very top of this section shows you not only the current level of your laptop battery, but also a graph showing how this has changed over the last 24 hours. More information is available if you click the 'View detailed info' link.
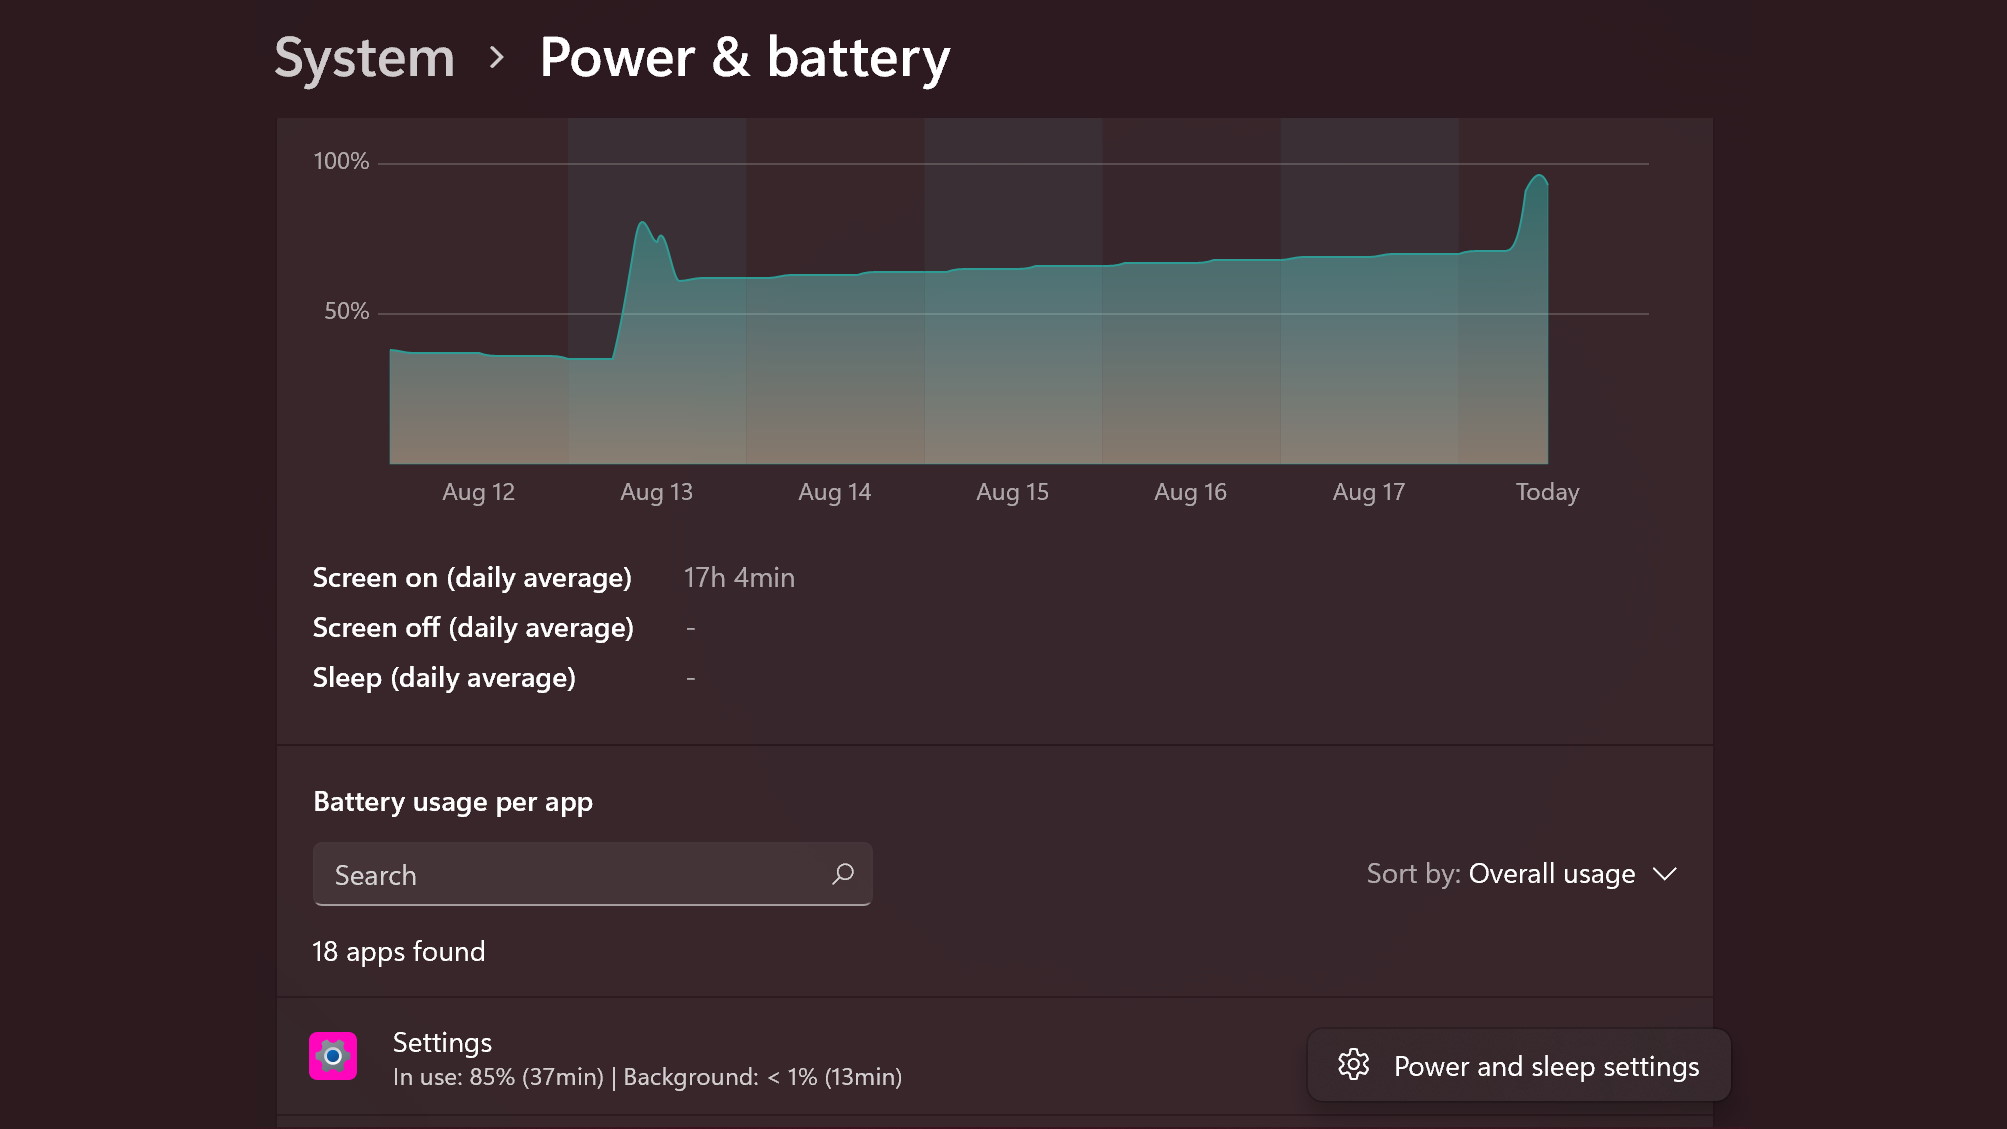
4. Check which Windows 11 apps are using up your battery
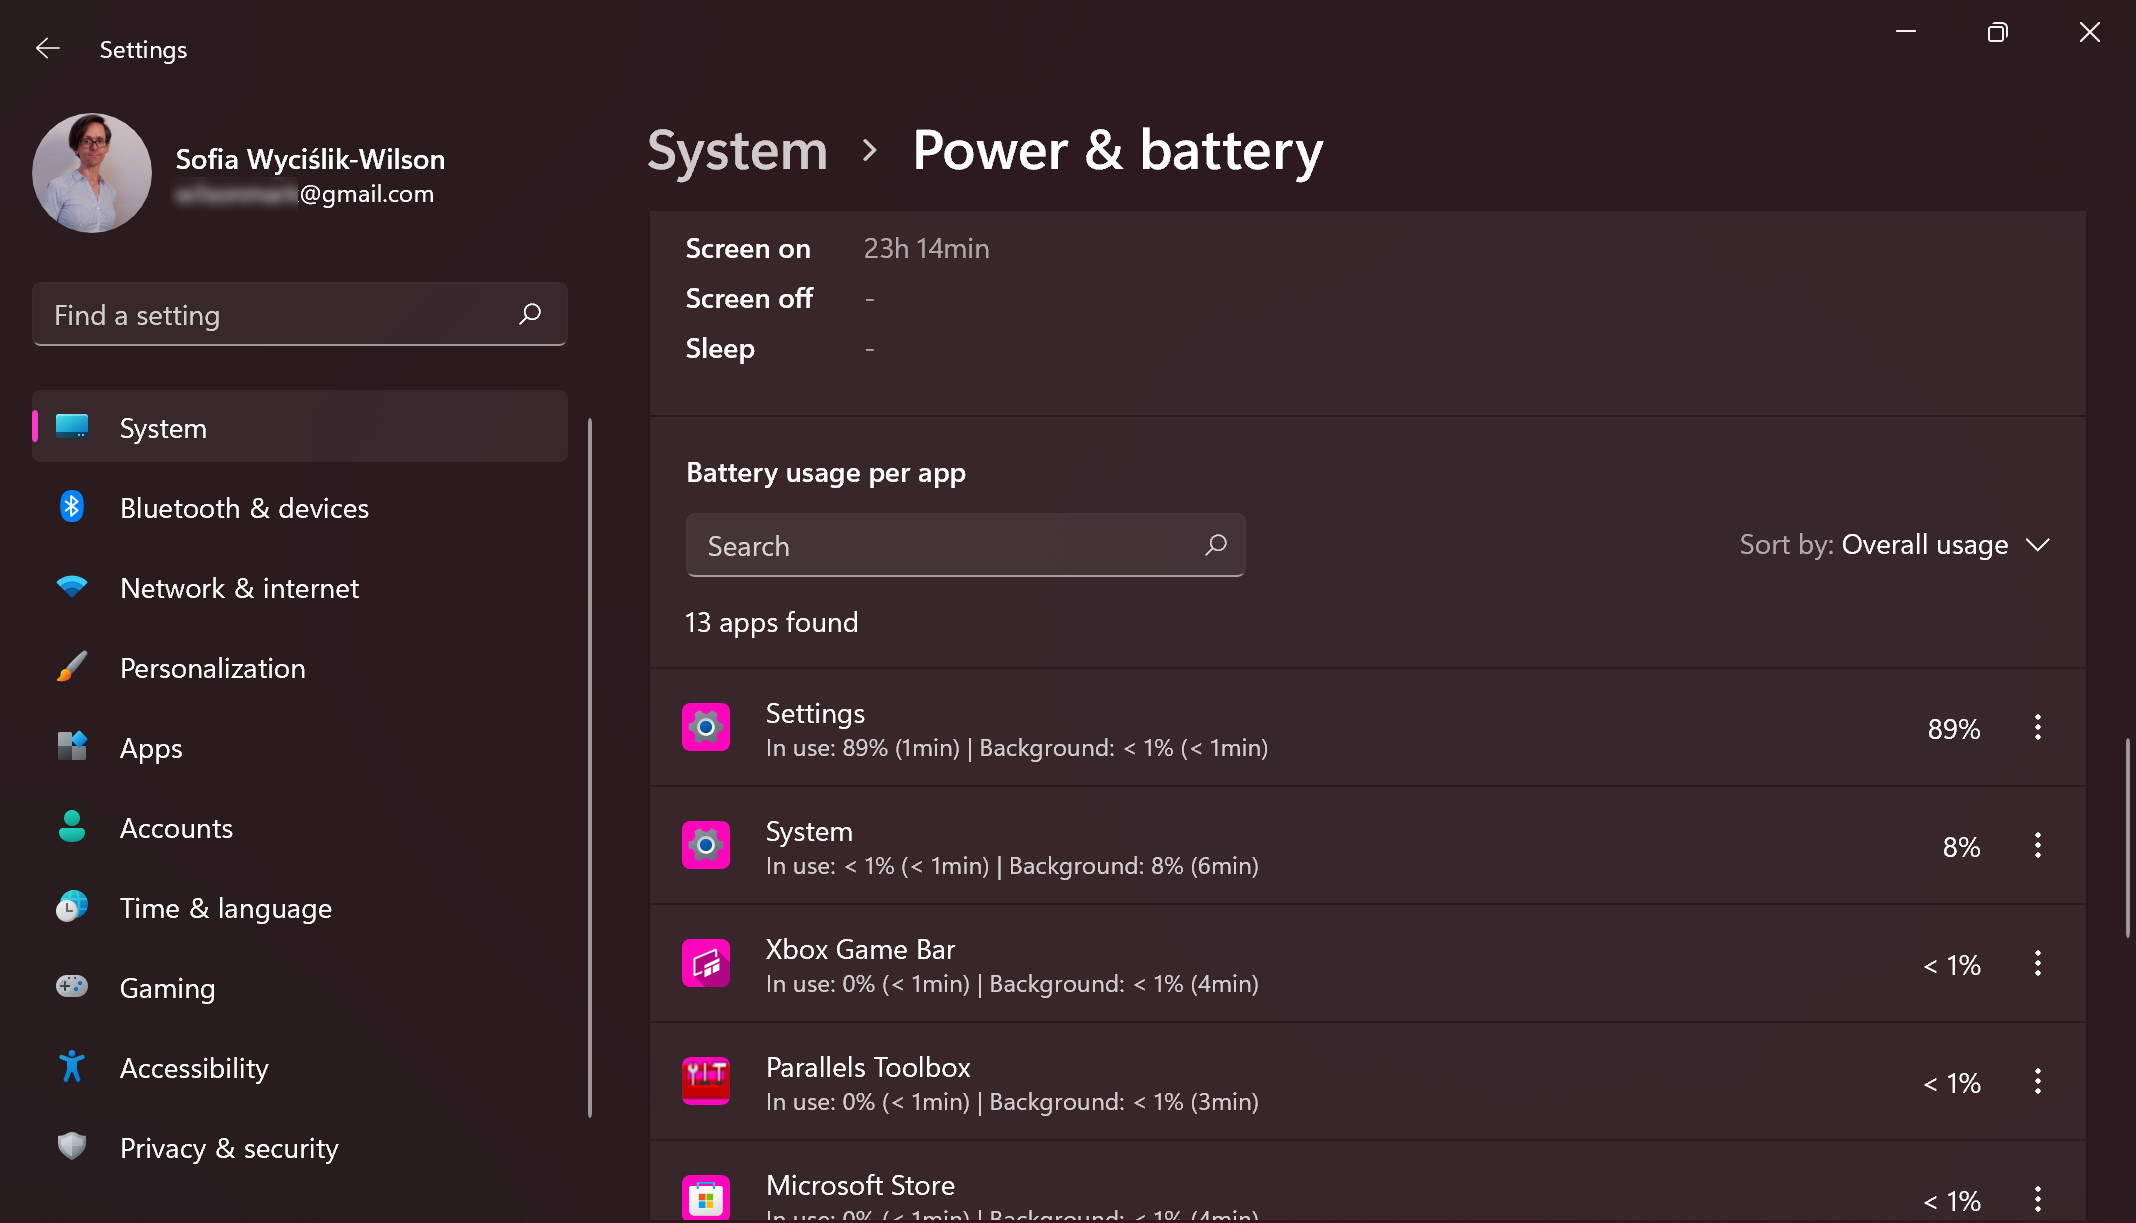
In the list that's displayed, you can see all of the apps you have installed on your computer along with details about how much time you have spent using them and, importantly, how much battery they have each used up.
In addition to seeing how much battery power each app has used, you're also provided with information about how much of this has happened while the app has been running in the background.
Using this data, you can make informed decisions about whether to keep particular apps running all the time, or to close them when they're not needed – or, indeed, switch to more power-efficient alternatives.
5. Sort the apps
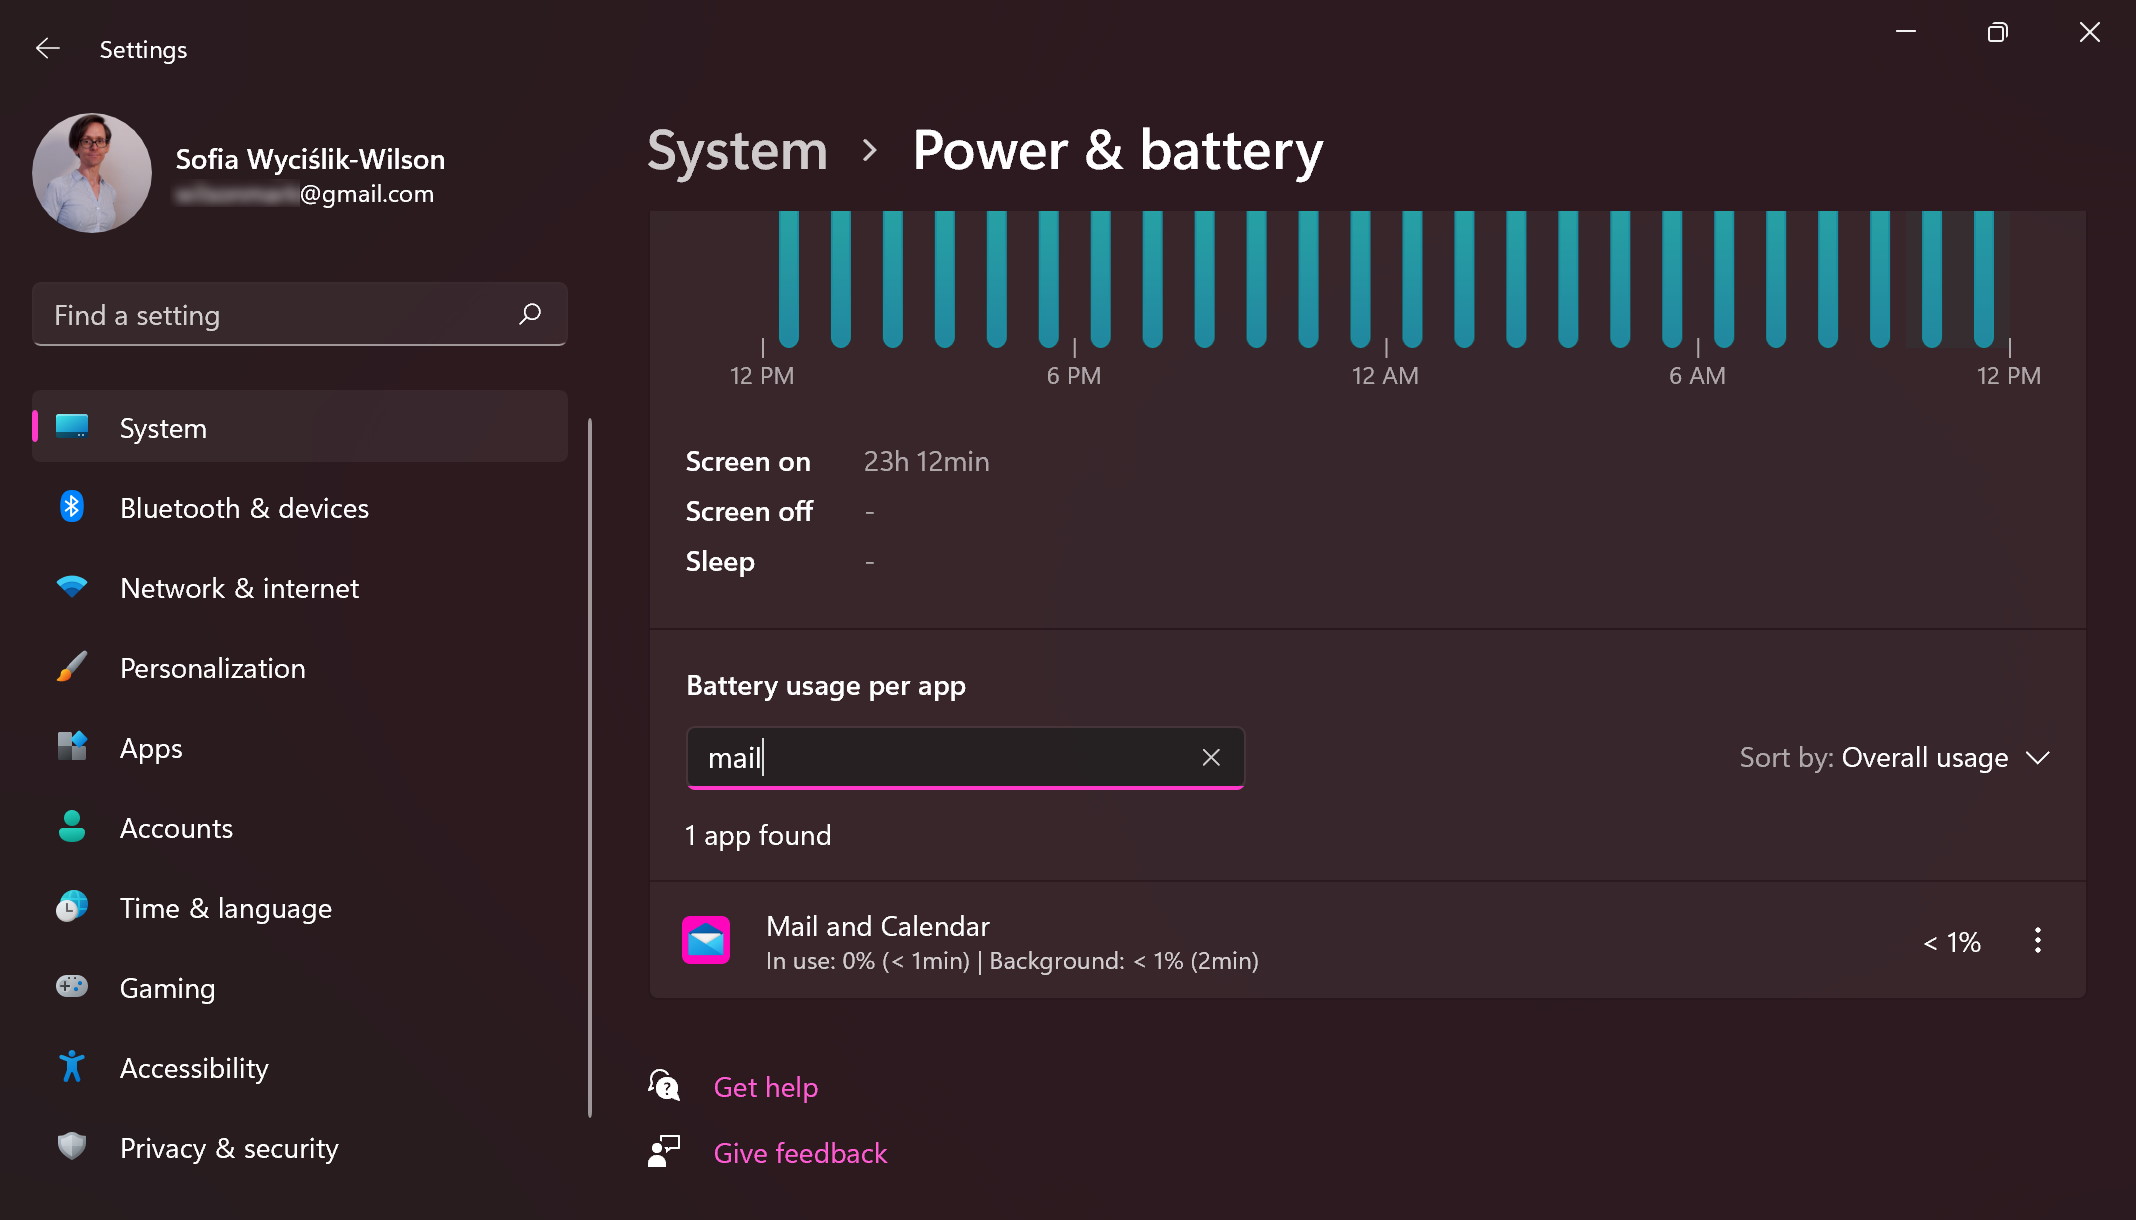
To make it easier to find out information about the power usage of a particular, you can use the 'Sort by' drop-down menu to change how apps are listed, so you can view them in alphabetical order if you prefer.
Alternatively, you can type the name of an app into the search box to jump narrow down what is displayed in the list.
6. Take action
If you are concerned about how much battery life is being used by a particular app when it is running in the background, there are steps you can take.
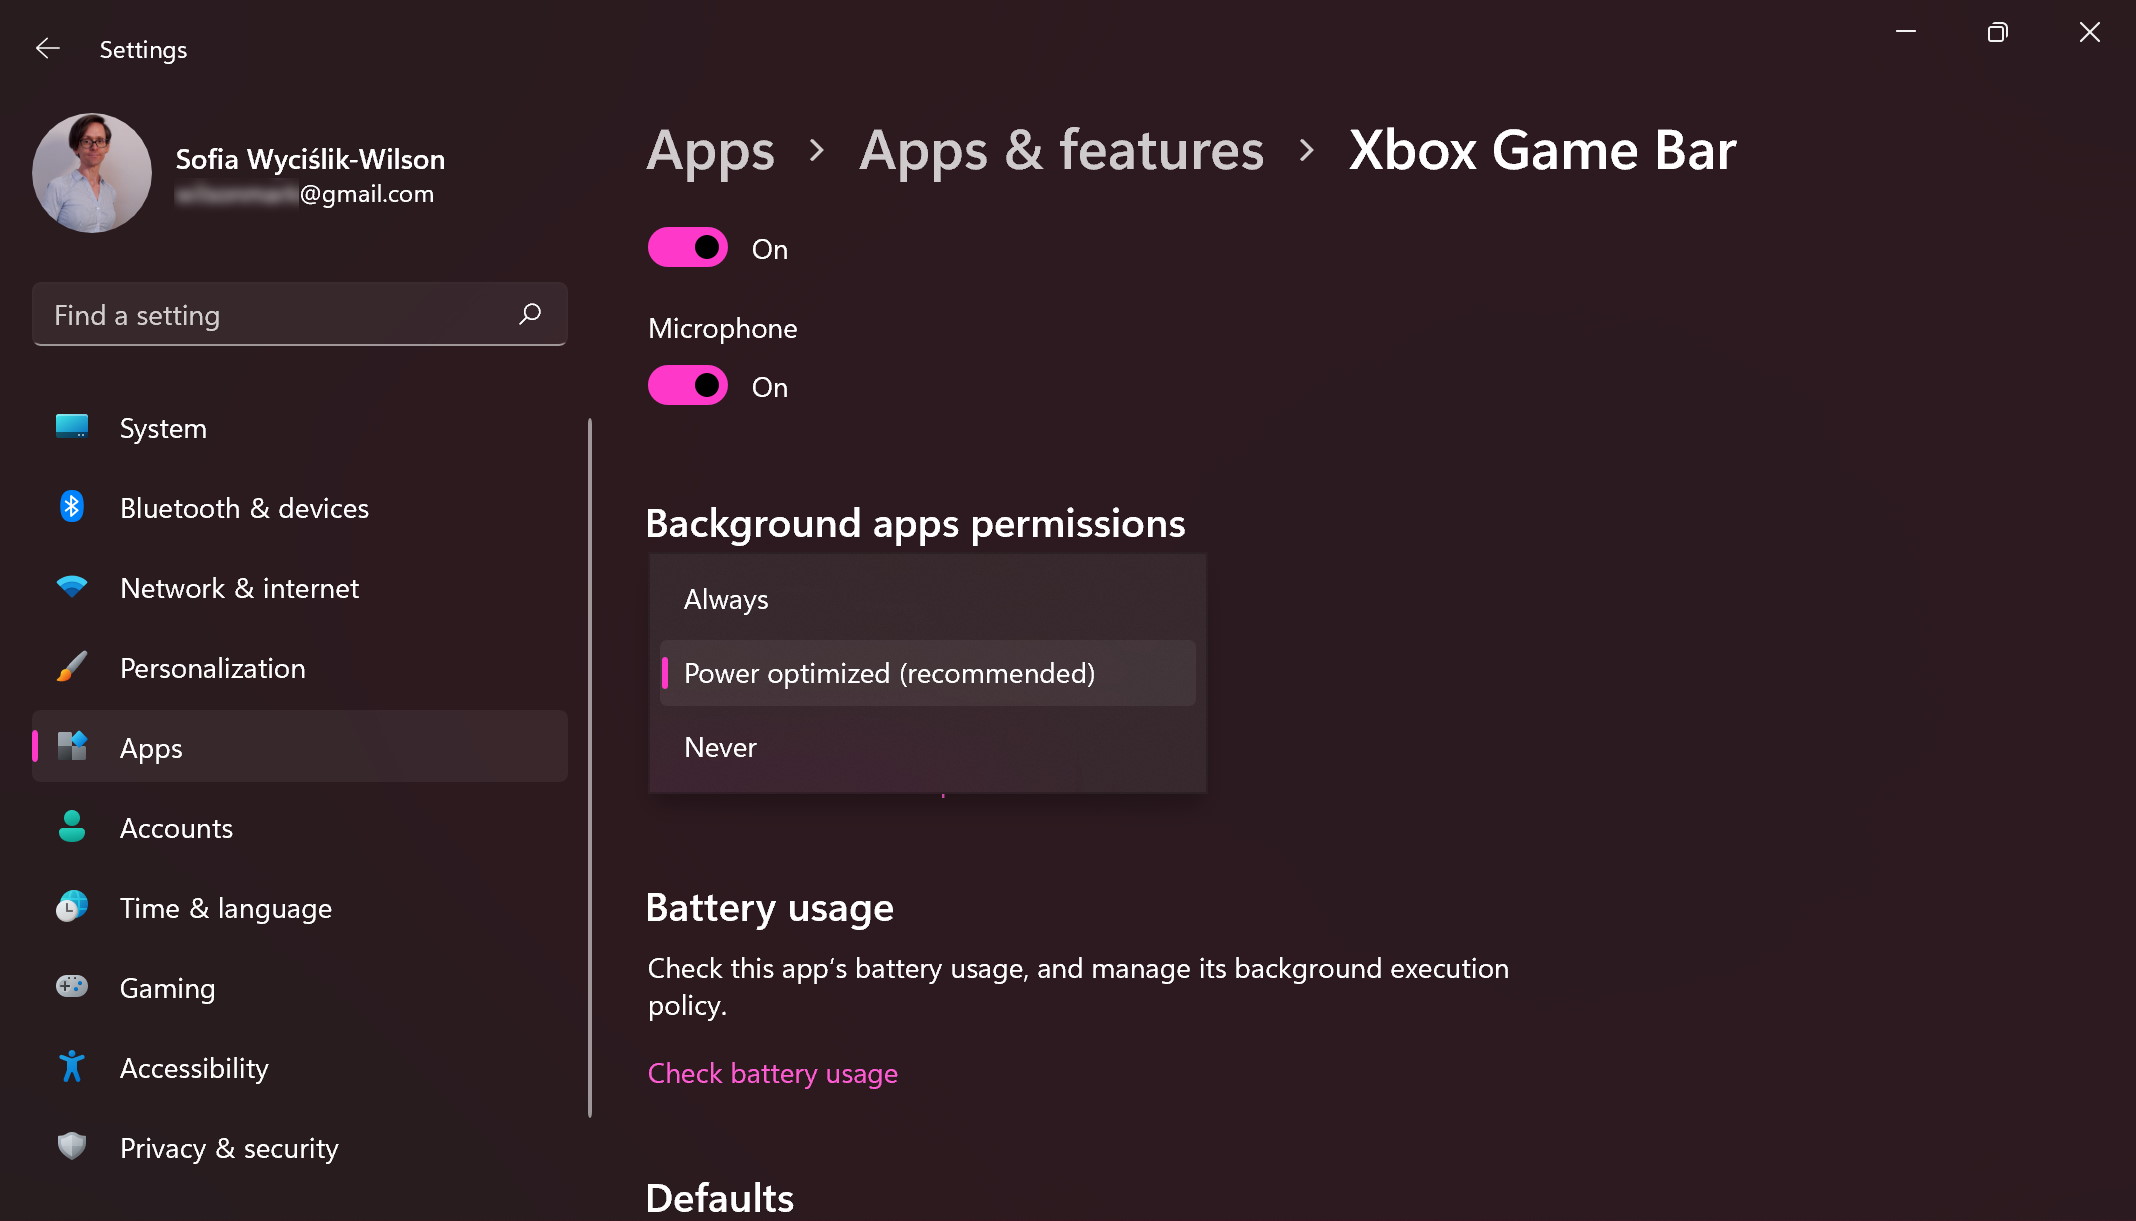
Click the three dots to the right of an app listing and select 'Manage background activity'.
Go to the 'Background apps permissions' section and use the drop-down menu to indicate whether you are happy for a particular app to run in the background when it is not being actively used.
Please note that disabling certain apps from running in in the background may have unwanted side effects.
7. Pick your settings
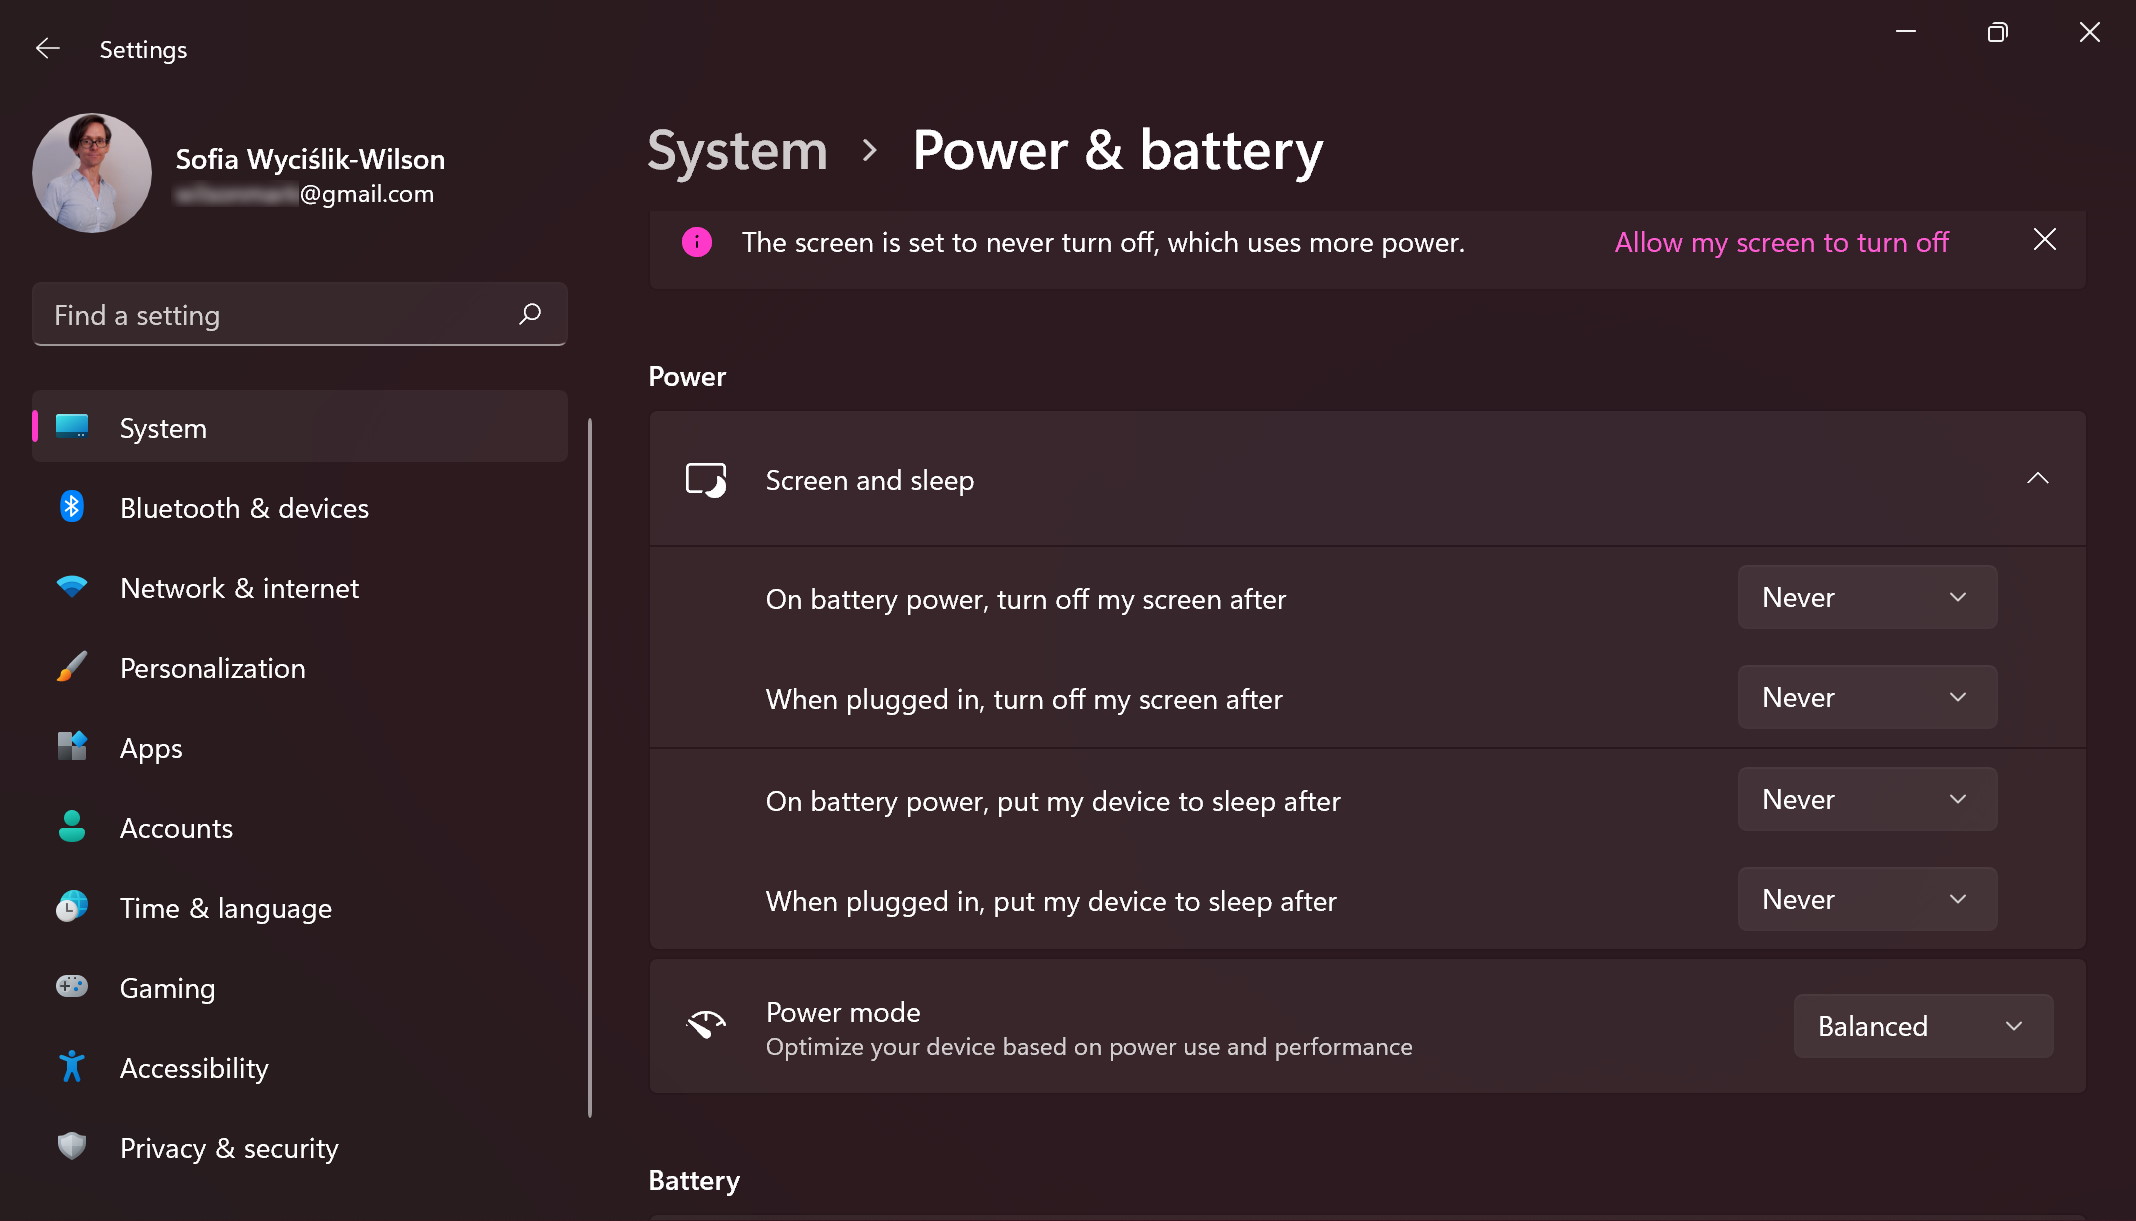
As on a desktop computer, laptop users may well see recommendations about power settings and these can be followed, ignored or dismissed as you feel appropriate.
Back in the 'Power & battery section', expand the 'Screen and sleep' section, and you can use the four drop-down menus to choose when your laptop display should be switched off, and when your computer should be put into sleep mode.
You can have different settings in place for when your laptop is plugged in and when it is running on battery power. For example, you can choose to have your computer sleep after 30 minutes when using battery, but never to sleep when plugged in.
8. Pick a power mode
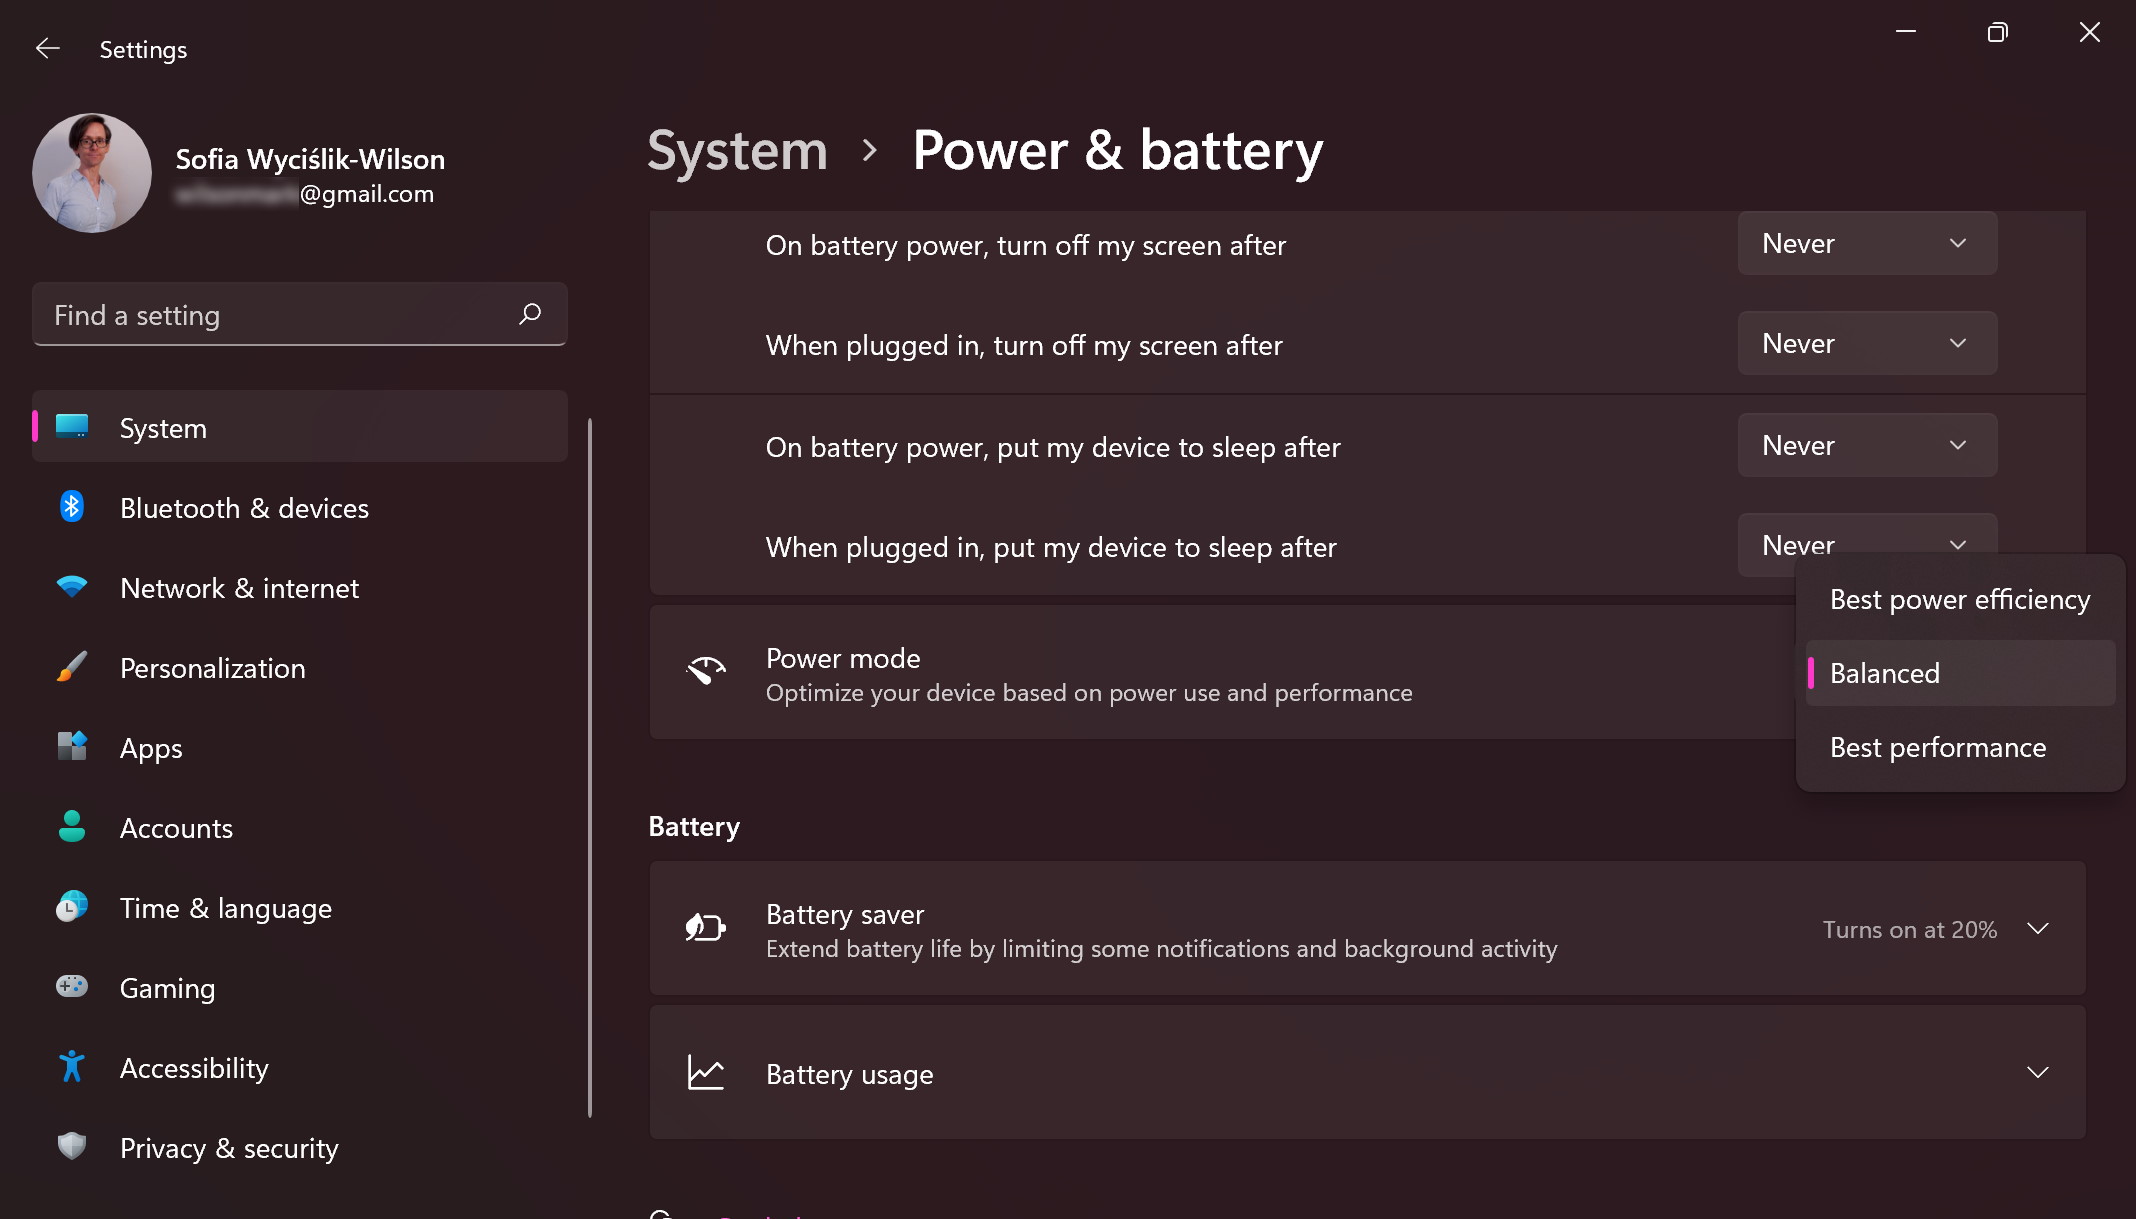
Next up is the Power Mode settings which give you a quick and easy way to balance battery life and system performance.
Use the drop-down menu to choose between 'Best power efficiency', 'Balanced' and 'Best performance' as you see fit.
You may need to experiment to see what works best for you, and there is nothing to stop you from switching between settings depending on the task you happen to be using your computer for.
9. Battery settings
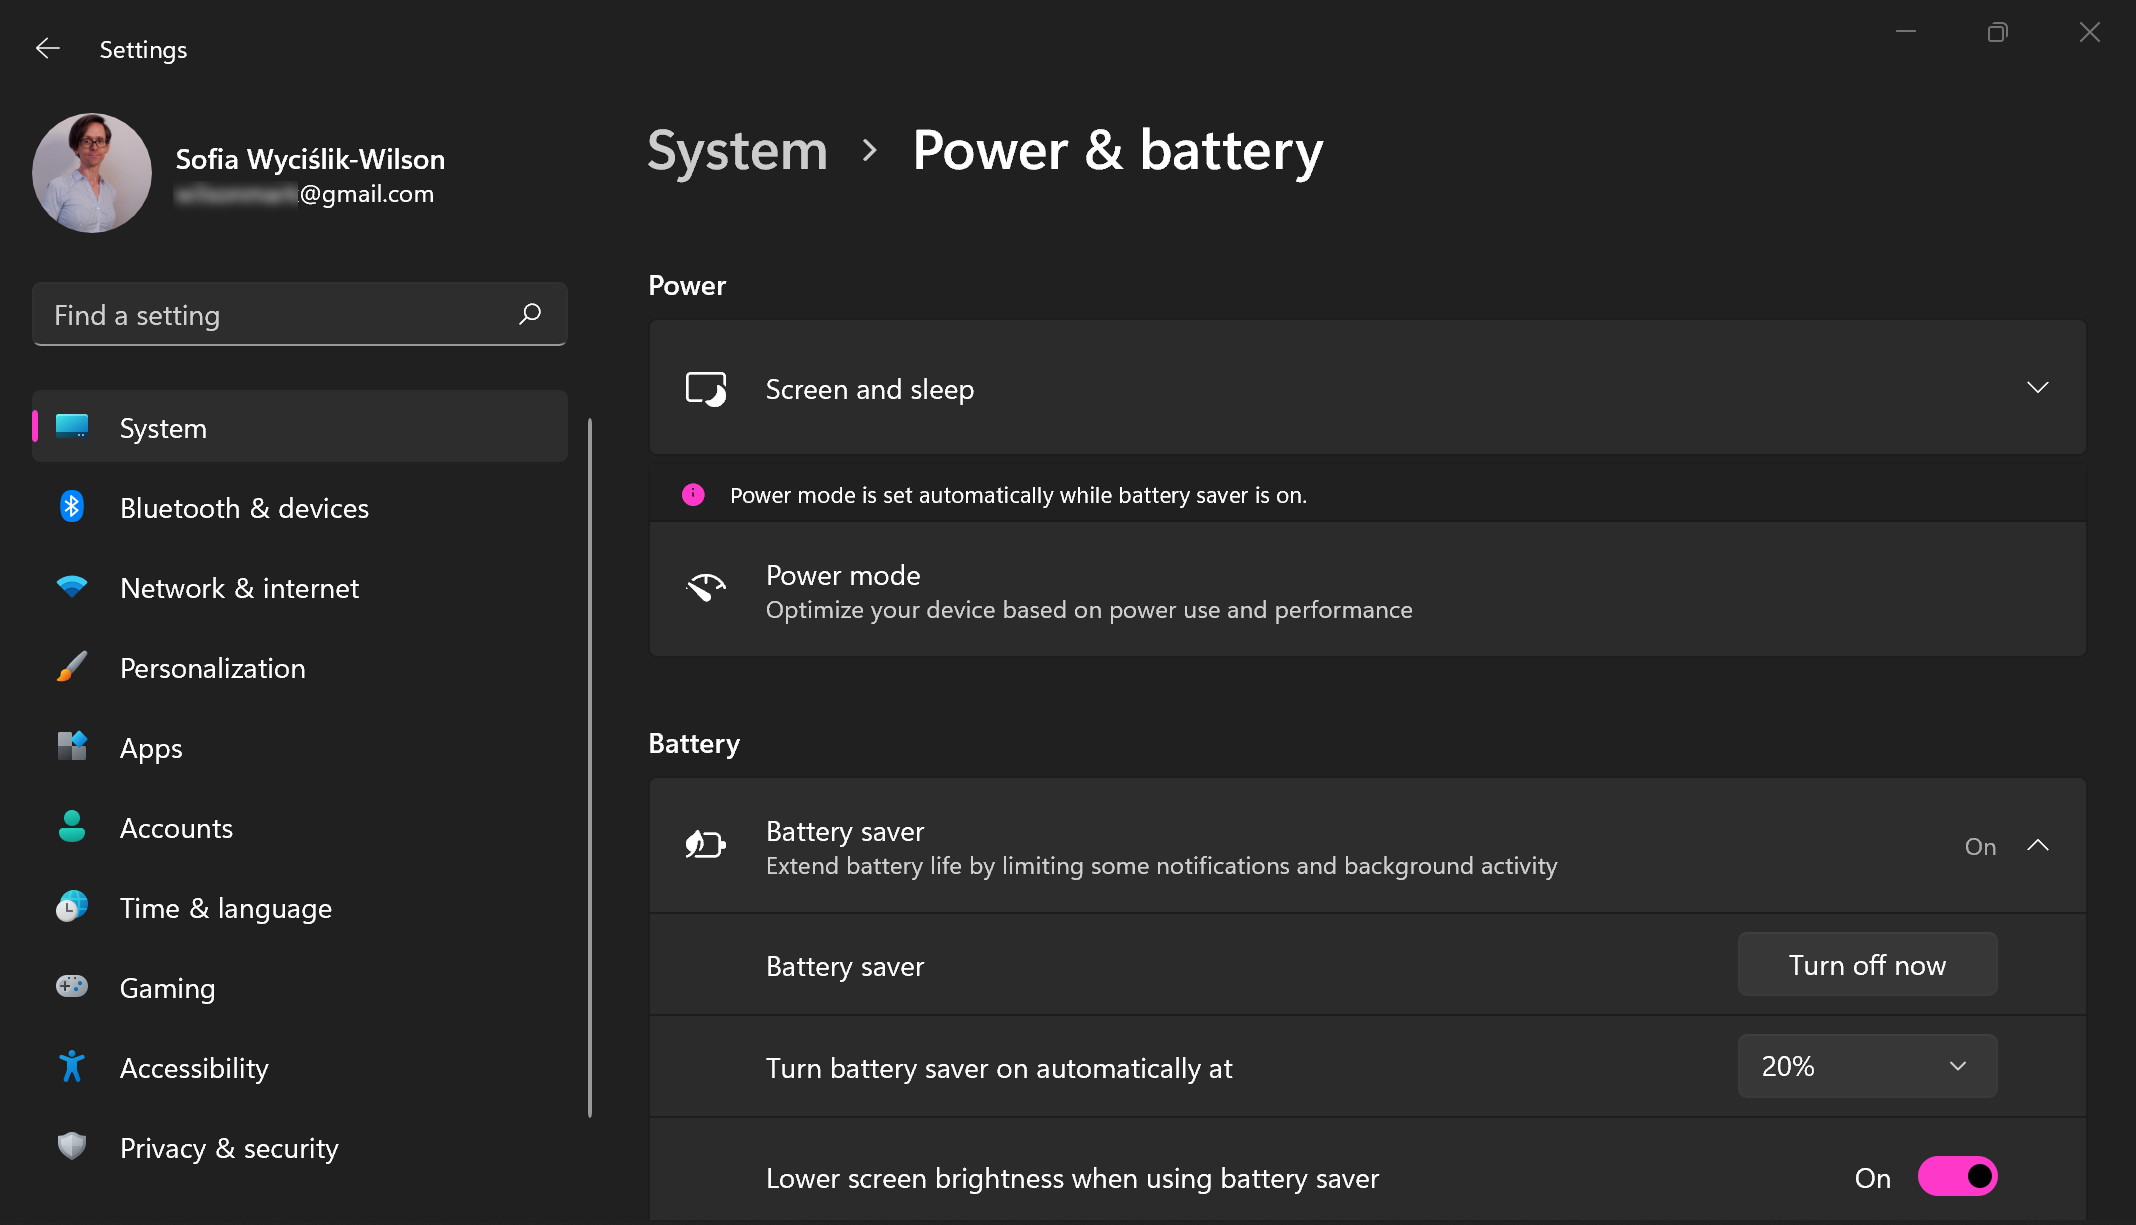
In the Battery section, you can control the 'Battery saver' setting which can help your battery last longer by reducing notifications and background activity when your laptop is not plugged into the mains.
When you are running on battery power, you can force Windows 11 into Battery Saver mode by clicking the 'Turn on now' button next to this option – the battery icon in the taskbar will change as a visual reminder that the mode is active. To switch back to normal power mode, simply click the 'Turn off now' button.
10. Make it automatic
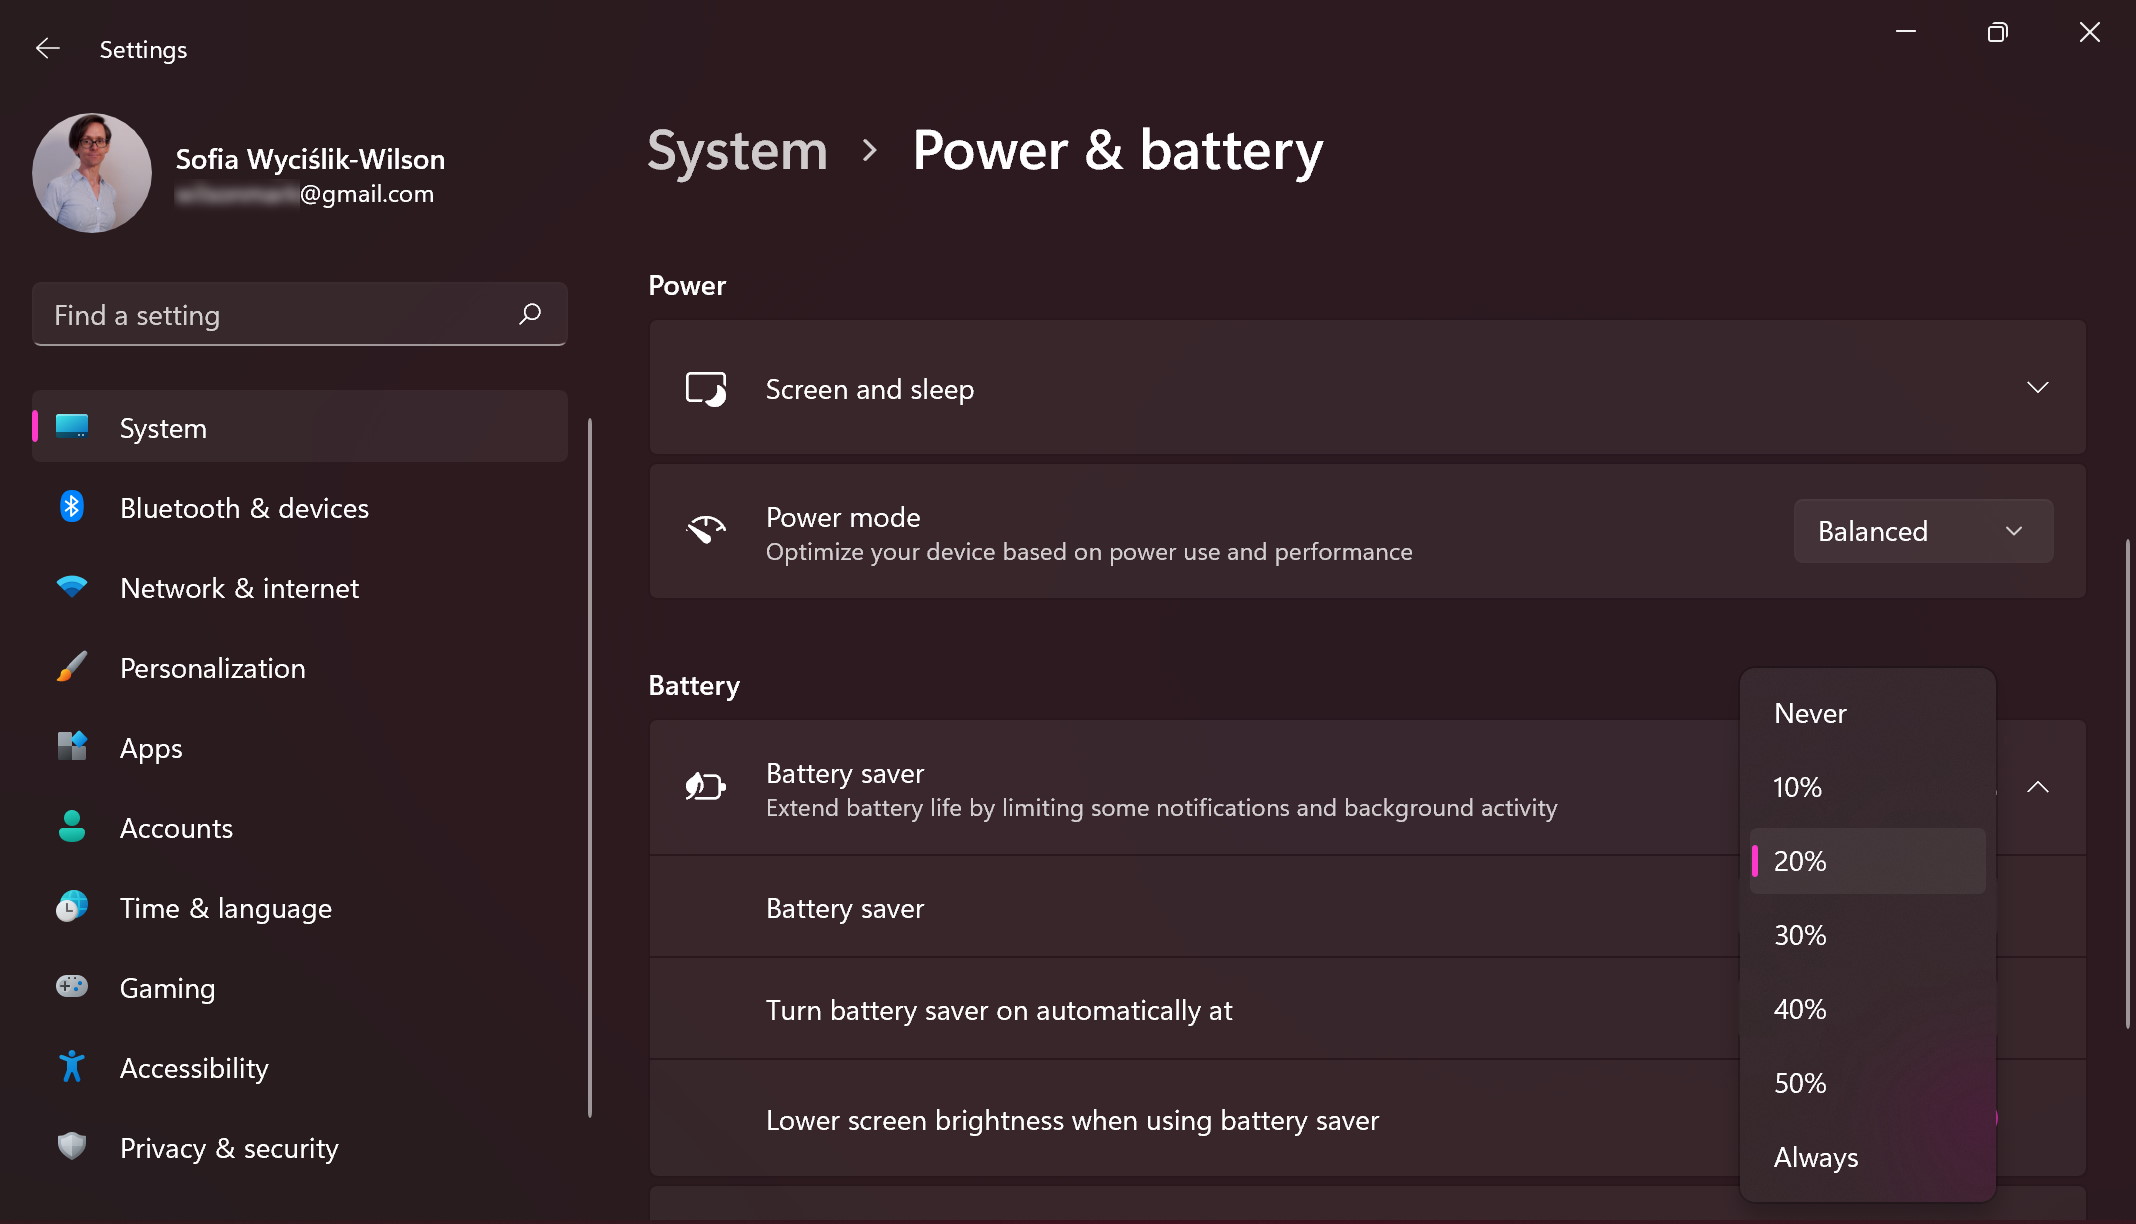
While it is handy to be able to manually turn Battery Saver mode on and off, it makes more sense to have Windows 11 take control of things automatically according to how much battery power your laptop has remaining.
In the 'Battery' section use the drop-down menu next to 'Turn battery saver on' automatically at to select a battery percentage at which it should kick in. Below this, you can help to further increase battery life by enabling the Lower screen brightness when using battery saver option.
- Check out our Windows 11 review

Sofia is a tech journalist who's been writing about software, hardware and the web for nearly 25 years – but still looks as youthful as ever! After years writing for magazines, her life moved online and remains fueled by technology, music and nature.
Having written for websites and magazines since 2000, producing a wide range of reviews, guides, tutorials, brochures, newsletters and more, she continues to write for diverse audiences, from computing newbies to advanced users and business clients. Always willing to try something new, she loves sharing new discoveries with others.
Sofia lives and breathes Windows, Android, iOS, macOS and just about anything with a power button, but her particular areas of interest include security, tweaking and privacy. Her other loves include walking, music, her two Malamutes and, of course, her wife and daughter.