How to use Linux Commands
Getting started
We store data in a variety of ways. On our hard disks, on optical discs (CDs and DVDs) and on removable devices such as USB sticks and external hard drives. In Windows, each would be given a drive letter, starting with C (A and B were reserved for floppy drives.
You may see words such as partition and filesystem bandied about, so let's clarify them before we go any further. A disk is divided into partitions, separate physical areas each used to store data. Hard disks always have partitions, even when it appears you are using the whole disk, as in a Windows C drive, but there is a distinction.
Removable devices such as USB sticks may or may not have partitions – most do. The only types of media that are never partitioned are floppy and optical discs.
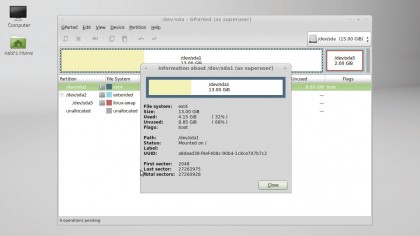
Each partition contains one filesystem. A filesystem is a means of storing files, directories and their associated data – it organises the ones and zeros stored in the device's memory into useful objects. It is important to understand the differences between these terms before we continue, even though they are often used interchangeably.
Types of filesystem
There are several different filesystems supported on Linux. A native filesystem is one that is designed for use with Linux or other Unix-like systems. The most commonplace of these is ext4 (along with its predecessors ext3 and ext2 that are still in use).
There are other native filesystems such as reiserfs, BTRFS and XFS. Why do we have these variants? Because not every system has the same needs; a mail server needs to store many thousands of small files, a database server works with a smaller number of much larger files, and requires access to random points in those files.
A laptop's filesystem needs to be resilient to unplanned shutdowns, such as when a battery fails. So we end up with different filesystems for different purposes, although for general use ext4 does a fine job. In fact, the enhancements to ext4 over ext3 mean it works well in a wider variety of situations and is a sensible choice for a standard desktop or laptop system.
Sign up for breaking news, reviews, opinion, top tech deals, and more.
Non-native filesystems are those developed for use with other platforms, but supported in Linux. The most notable of these is FAT, the default Windows filesystem for many years and still the standard choice for USB sticks, camera memory cards and other removable media.
Also supported to a certain extent are the newer exFAT and NTFS filesystems from Microsoft and Apple's HFS and HFS+ filesystems. The collection of supported filesystems is rounded out by the likes of ISO9660 and UDF, used by CD and DVD media. Most of the time, you don't need to worry about the type of filesystem used on a media device, just plug it in and the Linux kernel recognises the filesystem in use.
Mounting a filesystem
Making the contents of a filesystem available to the OS and user is called mounting. In Linux, each filesystem is mounted at a particular point within the filesystem hierarchy, known as the mount point.
The root filesystem, the one containing the core OS components, is mounted at /, the root of the filesystem tree. Many distros use a separate partition and filesystem for the user's home directories; it separates the OS from the user's files so you can update, re-install or switch the OS without affecting your personal files.
Users' home directories reside at /home/username, so a separate home filesystem would be mounted at /home, the mount point for the home filesystem. This directory must exist on the root filesystem but is usually empty – as soon as the home filesystem is mounted, its contents appear at /home.
Anything that was there before is no longer visible, but is still there and will reappear when home is unmounted. There are three main ways to mount a filesystem: at boot, manually or automatically. The system filesystems, such as / and /home, are mounted automatically at boot, using information stored in the filesystem table /etc/fstab – remember, /etc is where system settings are stored. Here is a typical fstab entry for mounting the a partition:
/dev/sda2 /home ext4 defaults 0 2
Each filesystem's entry is on a single line, with six fields:
1. Device name: Linux disks are named sda, sdb and so on, with the partition's number added to the disk's device, so /dev/sda2 is the second partition on the first disk.
2. Mount point: Where the filesystem is to be mounted – it must exist.
3. Filesystem type: It is possible to use auto here and let the kernel figure it out for you, but with a fixed disk it makes sense to be specific.
4. Mount options: The keyword defaults means use whatever is standard for that filesystem. Specific settings can be given here, separated by commas.
5. Dump: Used for a particular type of backup, normally left at zero.
6. This is used by fsck to set the order in which filesystems are checked when booting. Set to 1 for the root partition and either 2 or 0 for others – 0 means do not check.
Mounting manually is done with the mount command:
sudo mount /dev/sda4 /mnt/backup -t ext4
The first two options are the device and mount point, -t specifies the filesystem type; if you omit this, auto is used. You can also use -o to add other options, such as: sudo mount /dev/sda4 /mnt/backup -t ext4 -o noatime
The noatime option is often used in fstab to improve performance; it reduces the number of writes to the disk by only recording when files are modified, not simply read. If a device is listed in fstab, you need only give either the device or mount point, and mount will take the rest from fstab:
sudo mount /dev/sda3
or
sudo mount /mnt/music
We have used sudo in all of these examples because mounting is generally only permitted by the root user. This behaviour can be changed for mounts listed in fstab by adding user or users to the options:
/dev/sda3 /mnt/music ext4 users,noatime 0 0
Now any user can mount this with:
mount /mnt/music
The difference between user and users is that with the former, only the user who mounted the filesystem can unmount it. Speaking of unmounting, that is done with the umount command, followed by either the mount point or device.
This command also accepts multiple paths to unmount several at once:
sudo umount /mnt/music /mnt/photos /dev/sda5
Creating partitions and filesystems
Partitioning a drive is normally done by a distro's installer, but there are graphical and command-line programs to work with partitions and filesystems. At the command line, fdisk and gdisk are the standard Linux commands, the former working with old style MS-DOS partition tables, while gdisk works with the newer, more reliable and flexible GPT partitions.
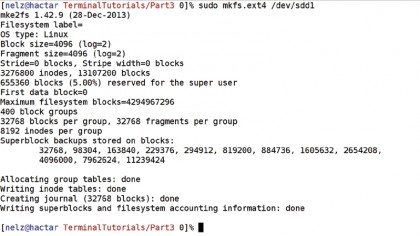
They work in much the same way. See the step by step guide for more information. Once you have created partitions, you need to make filesystems on them, which is done with the mkfs range of commands. These all have names of the form mkfs.FSTYPE, such as: sudo mkfs.ext4 /dev/sdb1
There are different options you can use for each filesystem type, depending on that particular filesystem's features, so you will have to consult the man page for that flavour of mkfs to see what you need, although they all have sensible defaults.
There is also a generic mkfs command that takes a -t option to specify the filesystem type, but the versions with the filesystem added save having to remember the exact name. The main ones you will need are mkfs.ext4, mkfs.ext3 and mkfs.vfat, with the last one being used for OS-independent media, such as flash drives.
Step-by-step: Partition a disk
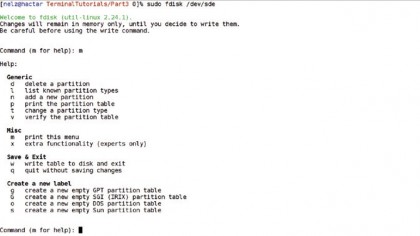
1. sudo gdisk /dev/sda
You need to use fdisk for hard drives partitioned with the old MBR system (gdisk will warn you if this is needed). You must give the name of the drive, then press [m] in fdisk or [?] in gdisk for a list of all the main commands.
Any changes you make here stay in memory and are only written to the disk when you press [w].
2. Create some partitions
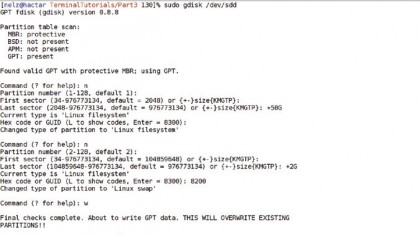
Press [n] to create a partition – you normally can press [Enter] to accept the defaults for partition number and start point. The default end point is the end of the available space – if you want to use a specific size, enter + followed by the size you want, for example+50G.
For anything but a Linux partition, you should give its type; entering L lists them.
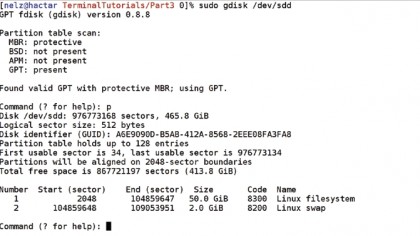
3. Show the partition layout
Press [p] to list the current partition layout, either the existing layout from a freshly loaded disk or the layout you have created in fdisk/gdisk. Make sure everything is as you want before you use [w] to commit to the disk, as there is no going back from [w].
Until then, you can make further changes or press [q] to abort without writing anything to disk.
Current page: Linux Commands: Disk management
Prev Page Linux Commands: Apt-get Next Page Linux Commands: Archiving your files with Tar