Why you can trust TechRadar
The secret of Lightroom's success is the way that it combines powerful image cataloguing features with powerful editing tools. It's not just a raw converter. As well as adjusting contrast, dynamic range, exposure, white balance and a whole host of other global image properties, it can apply localised adjustments to specific areas of a picture.
Where you might use an adjustment layer and a mask in Photoshop to darken a sky, for example, you can use the Gradient Filter in Lightroom. There's also a Radial Filter for creating highly controllable vignette effects and subtly 'relighting' your pictures and a manual Adjustment Brush for painting over areas you want to modify.
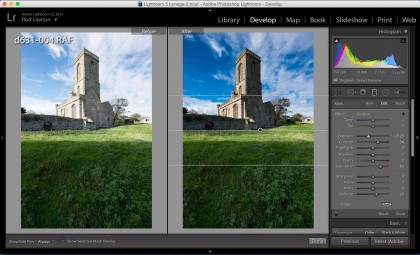
But Lightroom adds two important modifications. First, it's now possible to manually mask out areas modified by the Gradient and Radial Filters. This is really important because sometimes you'll have buildings or other objects jutting out into a darkened sky – and you don't want these objects darkened by the Gradient Filter. It's a common problem that now has a solution.
Second, it's now possible to move the 'pins' created by the Adjustment Brush. Previously, these were placed permanently at the point where you started brushing, and the only way to alter the area affected was to brush in new areas or erase areas you wanted left alone – the pins themselves were immovable.
Now you can simply drag the pins to new positions. It doesn't really change the way the Adjustment Brush works – it doesn't make anything possible that wasn't before – but it does make using these brush adjustments simpler, quicker and much more intuitive.
Filter masking in action
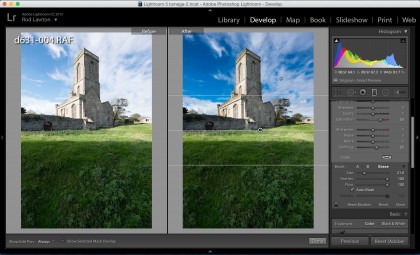
The new Filter masking tools are really simple to use because they're just an extension of the familiar Adjustment Brush tools. Now, when you use the Gradient Filter to darken the sky, you'll see a new 'Brush' tab alongside the Mask options. When you click this the panel expands to show the brush tools, where you can set the Size, Feather and Flow options for the brush.
There are two sets of brush settings, 'A' and 'B' for fast switching if you've got a tricky job that needs different brush types, and an 'Erase' option. This is what you use to mask out areas of the image that you want the Gradient Filter to leave alone.
Sign up for breaking news, reviews, opinion, top tech deals, and more.
If you check the 'Auto Mask' box it become simpler still, because now the brush will automatically follow well-defined object outlines, like buildings jutting up into the sky.
The same applies to the Radial filter, so that once you've used the filter to create the broad lighting effect you want, it's a simple matter to brush in additional areas manually or erase the mask where needed.
Adjustment Brush changes
Lightroom's Adjustment Brush is a deceptively powerful tool. At first sight it seems quite primitive because you simply drag the brush tool over the parts of the image you want to change – it looks a million miles from the sophisticated and precise selection and masking tools in full-on image-editors like Photoshop. Actually, though, it works rather well. Many of the enhancements you need to make to photos require a subtle blending-in of effects, not hard-edged selections – and if you do need to follow a hard edge, the Auto Mask option does a pretty good job.
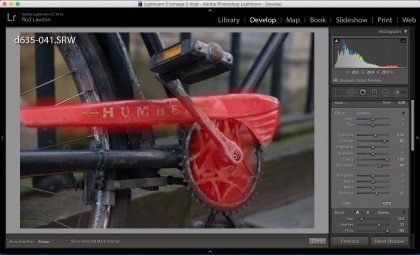
The point about Lightroom's Adjustment Brush is that all these adjustments are non-destructive. You can go back at any time to add to the mask, erase parts of it, tidy up edges and so on.
Once the mask is created, you can adjust the Exposure, Contrast, Highlights and Shadows, Clarity and more, and these adjustments are non-destructive and permanently editable too.
Lightroom is less sophisticated and powerful than Photoshop in a host of different ways, yet in others it offers a fresh and clever approach that you kind of wish you could use in Photoshop. (Actually, you can – you'll find the same tools in Adobe Camera Raw and the ACR filter, but not in the main interface.)
Current page: Filter masking and brush changes
Prev Page HDR Merge and Panorama Merge Next Page Face detection and collection filtering
Rod is an independent photographer and photography journalist with more than 30 years' experience. He's previously worked as Head of Testing for Future’s photography magazines, including Digital Camera, N-Photo, PhotoPlus, Professional Photography, Photography Week and Practical Photoshop, and as Reviews Editor on Digital Camera World.


