How to set up your first server
From switching on to configuring
Most servers are given a generic name, but this can be changed to something that will match any naming convention you have in mind (especially true when this server is the first of many). Renaming is the first option on the Server Manager window.
To change the server name, click on the existing one in the Server Manager app. When the System Properties comes up, click on the "Change" button. Type in a new name in the box and click on "OK". You will have to restart after doing this.
5 – Configure Server IP address
If you don't use DHCP – the protocol for configuring devices connected to a network – for this server, you have also to set a static IP address, default gateway and domain name system. To do this, this click on "Ethernet" and the Network Connection windows will open.
Double click on the adaptor you wish to change IP addresses to bring up the
information page. Then click on "Properties" and double-click on "Internet Protocol version 4". You can then type in all the IP address information for the server.

6 – Managing remotely with Remote Desktop
If you put your server in a fairy inaccessible place, administrating it at the actual machine itself may not always be possible. Setting up Remote Desktop means that you can control the server from another computer inside or outside the office.
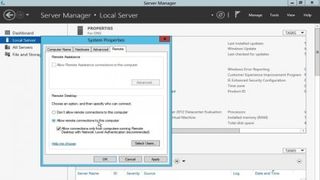
In Server Manager, click the Disabled link next to the Remote Desktop entry. In the Server Manager Remote page, choose the radio button next to "Allow Remote Connections to this Computer".
Get daily insight, inspiration and deals in your inbox
Get the hottest deals available in your inbox plus news, reviews, opinion, analysis and more from the TechRadar team.
To add extra users so that they can access the server, click on the "Add" button.

7 – Keeping your server updated
Updates on Windows come thick and fast, so it's a good idea to make sure that your server stays up to date with as little input from yourself as possible.
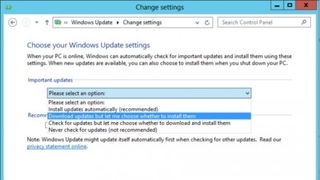
From the Server Manager app, click on "Not Configured" next to Windows Update, following which the Windows Update window will appear. Then click on the "Turn On Automatic Updates button. The server will automatically begin downloading and installing updates to be applied to your machine.
You can also set this to "Download updates but let me choose whether to install them". That gives the administrator the chance to install updates during planned downtime.

8 – Activate Windows Server 2012
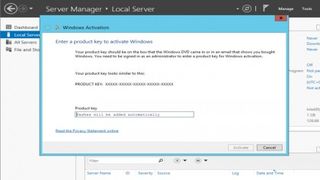
Lastly, in Server Manager you can activate the server. Click on the option to do so and then enter the product key that came with the software. Once this is done, your server is configured and ready to go.
For more information, why not chat online with a Dell expert. Click here.
Most Popular


