Sharing with your Mac, iPhone and iPad: the ultimate guide
Why keep all your data on one Mac or iPad?
Sign up for breaking news, reviews, opinion, top tech deals, and more.
You are now subscribed
Your newsletter sign-up was successful
Not too long ago, people tended to own one computer on which they would store all their data, occasionally moving it around using floppy discs, CDs or USB memory sticks. And although we're only a few years down the line from those times, the concept of stuff living on a single machine now seems very outdated.
As technology has developed rapidly, the ways in which you can transfer, share and send files have become many and varied. The rise of the internet is the biggest factor in allowing this to happen, providing an increasingly fast and easy way to send documents, pictures, music and even movies between devices and around the world.
Faster home broadband connections are at the point where uploading stuff no longer takes hours, and a good 3G connection when you're on the move can be just as effective for sending and receiving files.
Networking computers used to be a real hassle, but with modern operating systems, it has become far easier. AirDrop in OS X 10.7 is perhaps the ultimate expression of simple file sharing, a system that doesn't even require the two Macs sharing files to be on the same wireless or ethernet network.
Sharing media has become simple too, with apps like iMovie and GarageBand allowing direct uploads to popular streaming sites, and iTunes Home Sharing and Match giving you much more flexible access to your media at home or on the move. Read on to find out how sharing data can free you from your desk…
Sharing at home
There are lots of ways to share files at home, and it's easier than you think...
Sharing your data across a home network has been possible for a long time, but it's only in recent years that it has become really simple, at least if you're using Macs. We'll skip past the old-fashioned methods of using USB memory sticks or burned DVDs to move stuff; although these are still possible, they're quite labour intensive.
Sign up for breaking news, reviews, opinion, top tech deals, and more.
These days, it's all about being networked, and the most common way to network computers is using Wi-Fi. There's a good chance you're on wireless broadband at home anyway. And even if your computer connects to your modem using an Ethernet cable, you can still share its wireless connection (and even its broadband connection) to other computers over Wi-Fi.
To do this you go into the System Preferences > Sharing tab and switch on Internet Sharing. To share files between computers, you can create a network on one computer from the AirPort menu and then join that network from the other computer. Neither computer has to have an internet connection for this to work, as you can achieve the same thing by connecting the two machines using an Ethernet cable.
On supported models you can even use FireWire Target Disk mode by connecting two Macs using a FireWire cable and booting one while holding the T key. This boots the 'slave Mac' as a hard drive on the host Mac and only supports the dragging and dropping of data from one to the other, so it's a basic but effective way of connecting the two.
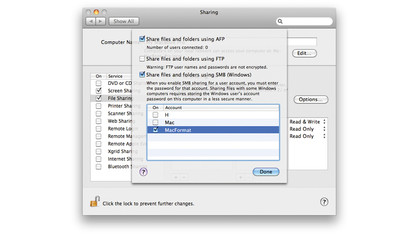
To share files on a Mac you need to go into System Preferences > Sharing and make sure the File Sharing service is turned on. This means the computer will appear in the sidebar of other Macs on your network and broadcasts itself as an available device.
Also in this window you'll find a list of shared folders you can edit and add to. By default, each user's Public Folder is shared and when someone connects to it over a network they'll see its contents as well as being able to drop items into the Drop Box folder. They can't see the contents of the Drop Box, so it's a secure way for people to transfer stuff to you without altering the contents of the folder afterwards.
For each shared folder you'll also see a list of users, and what their access permissions are for that folder. By default, you have ownership of folders inside your Home directory but you can choose to assign other users from your Address Book with specific access, setting them up a password. So if you wanted a friend to be able to access and edit a certain folder on your Mac, this would be how to do it.
Under the Options menu in the File Sharing section you also have the option to turn on file sharing over FTP in addition to the default AFP protocol. If you activate the third option, SMB, you can share files and folders with Windows PCs on a network. Windows uses different file sharing protocols to the Mac, so switching on SMB should ensure that your Mac communicates with any connected PCs and broadcasts itself properly to them.
If you're running a mixed network and need to move files between Macs and PCs, turning on SMB sharing is a must. You may also find that you need to go into your AirPort preferences and find the WINS section, then add your Mac to a Windows workgroup, which will probably be called MSHOME or WORKGROUP. You can find this by going to My Computer > Properties > Computer Name on the PC. It might take a little work, but it should get you sharing between platforms.
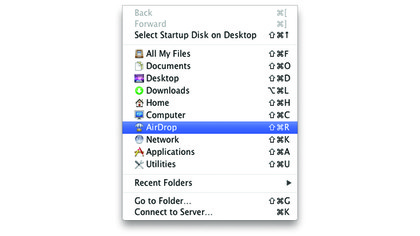
Dragging and dropping files and folders between Macs is also possible using AirDrop if you're running OS X 10.7 on both machines. This uses 'invisible' networking with no setup to discover other AirDrop capable Macs in range and make them visible to you in the Finder sidebar. Drag and drop files to a user's picture to share them.
Oddly though, Apple only enables AirDrop on specific, newer Mac models. This is because it uses special features of certain wireless chips, and can work between Macs even if they aren't connected to a network.
As annoying as this is, if yours is not supported, there is a workaround as long as you're running 10.7. Open the Terminal application and type: defaults write com.apple. NetworkBrowser BrowseAllInterfaces 1.
Then quit Terminal and log out and back in again. You should now see AirDrop in your 'Go…' menu. The difference is that it will only work when both Macs are on the same network.
If you have an Apple TV you can stream your iTunes library to it to view on your TV. Third-party apps such as StreamToMe and Air Video can stream from your Mac to an iPad with live video conversion, so there's no need for an Apple TV.
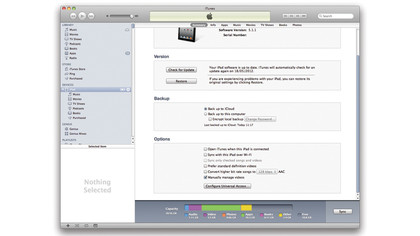
Using the iTunes File Sharing section, you can share media between your Mac and your iPad outside of Apple's syncing system by dragging and dropping movies, photos and other things directly to an app. You can copy movies that are not in iTunes-friendly formats directly to an iPad. You can drop AVI movies and various others without having to convert them to M4V or MP4 format first. Various iPad apps can do this, including VLC, AVPlayer HD, CineXPlayer, Movie Player and GoodPlayer.
How to set up file sharing at home
1. Turn on sharing
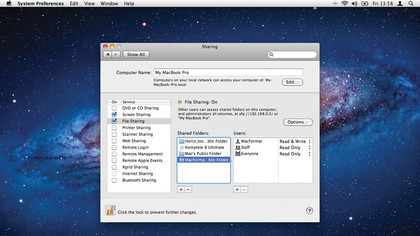
Go into the Sharing section of System Preferences. Locate the File Sharing option in the list of services and click its tick box to make sure it's switched on. You can give the computer a unique name in the box at the top - this is what will be broadcast across your network.
2. Add extra folders
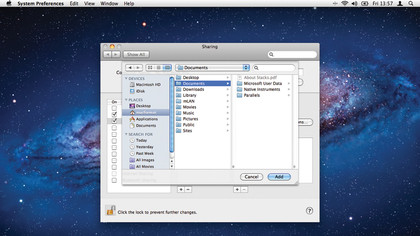
Click on the plus icon underneath the list of shared folders and you can choose any folder that you own to share with other users. By default your Public Folder is shared and users will be able to place things in the Drop Box. To create more shared folders, add them here.
3. Set a password
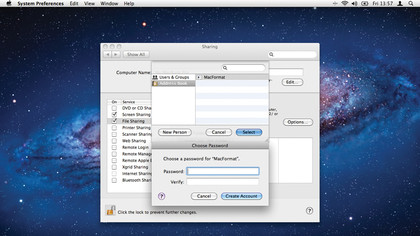
In the list of users to the right, click the plus icon to add a new user. If you select an Address Book entry you can set a password for that user and create an account on the local machine for them. With this information they'll be able to access your shared folders.
Sharing with iTunes
As the centre of your digital hub, iTunes lets you share in different ways...
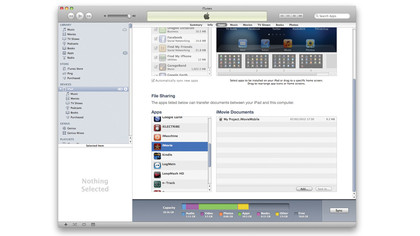
Apple's iTunes has come a long way since its early days as a simple jukebox. Now it lets you purchase, play and share all your music and movies in a multitude of different ways. It's grown to support all of Apple's iOS devices as well as integrating with iCloud, adding internet storage to its list of capabilities.
If you have an iPad you can connect it to your Mac using a USB cable. Then in iTunes, go to the device and find its Apps tab. Scroll down and you'll see a File Sharing section where various apps are displayed; these are the apps that can swap data with your Mac. It's possible to drag and drop items out of the list to your Mac, or into the list to copy them to your iPad.
If you're running iOS 5, this whole process also works wirelessly if you have enabled Wi-Fi sync in iTunes. At a basic level, iTunes stores all its data inside a single folder on your hard drive, which by default, is located inside your Home directory in the folder Music/iTunes.
Inside this folder it keeps everything, from music and movies to books and mobile apps, as well as your master library file, artwork and backups of your iOS devices. It's important to activate iTunes' option to copy all music to this root folder, so it's not scattered randomly around your hard drive (from previous occasions when you may have dragged and dropped music into iTunes). You can find this in iTunes' Preferences > Advanced section.
It is possible to share an iTunes library by moving it from this directory to an external or networked hard drive so that it can be accessed from different Macs. After copying the whole iTunes folder, go into the Advanced preferences again. In the iTunes Media Folder location box, click to navigate to the folder's new location, which can be over a network as well as on a local hard drive.
On other Macs on the network, hold down the Option key while starting iTunes and from the chooser, select Choose iTunes Library, then navigate to it. You only have to do this the first time you want to use the shared library.
It's possible to share and stream media across your home Macs even without physically moving iTunes' library, using Home Sharing. This feature can be switched on in iTunes' Advanced menu and you'll be prompted to enter your Apple ID. After this, iTunes will broadcast itself to other copies of iTunes on the same network.
If you sign in on those Macs using the same Apple ID, you'll be able not only to play music and videos from the library, but drag and drop them to that Mac's library as well. The ability to physically copy files rather than just streaming means you can sync the files to different iOS devices. The fact that you have to use a single Apple ID for Home Sharing means that piracy is not really possible, but within the confines of a single house, your music and movie collections can be used more flexibly.
If you don't want to use Home Sharing, iTunes has a simpler sharing service, in the Preferences > Sharing section. Activate this and you can share either the whole library or selected playlists locally, with optional password protection. An Apple ID sign-in isn't required, but this service only allows streaming, not physical copying.
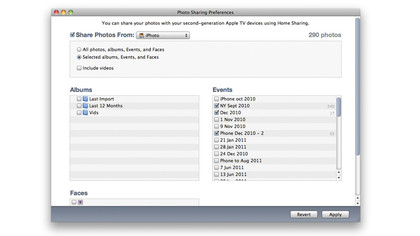
Go into iTunes' Advanced menu and you can choose to turn on Photo Sharing from iPhoto to your Apple TV using Home Sharing, and also share any videos that are present in your iPhoto library. If you activate Photo Library sharing from iPhoto, it shares to other copies of iPhoto on the local network.
Control your syncs
As we've mentioned, it's possible to move data between Macs and iPads via the traditional USB cable approach, or wirelessly if you're running iOS 5. Some people still like to use Apple's syncing system, which automatically synchronises music, movies, apps and other media when the two are connected. You can control what syncs by going to the device in iTunes and selecting what to include.
One of the benefits of syncing like this is that iTunes can choose music for you and transfer it. Others prefer to manually manage data since it offers rather more control, letting you drag and drop from iTunes to the iPad. Select the device in iTunes while it's connected, go to the Summary tab and scroll to the bottom. Activate manual management of music and videos - if you're using Apple's iTunes Match service, you'll only be able to manually deal with videos because your music is delivered from the cloud.
Since iOS devices have lower storage capacities than Macs, syncing whole libraries doesn't make much sense if your music and movie collections are large. In these cases, either choose to sync specific playlists, or use manual management to keep control of how much stuff is being fired over so as not to fill up your iPad.
There's also an option in iTunes' Summary tab to compress media prior to transfer. 'Convert higher bit rate songs' will shrink larger file sizes prior to copying, and 'Prefer standard definition videos' will transfer a lower resolution copy where available, both of which will use less space on the iPad.
How to turn on iTunes Sharing
1. Open the Preferences
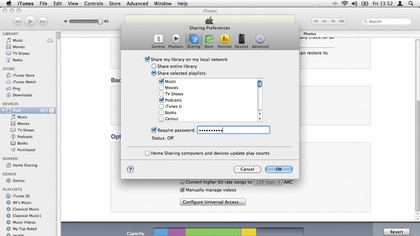
In iTunes, go to the Preferences section and locate the Sharing tab. Click to turn on sharing and select either the whole library or specific playlists within it. You can also set up a password: those who know it can stream music across the network to their copies of iTunes.
2. Turn on Home Sharing
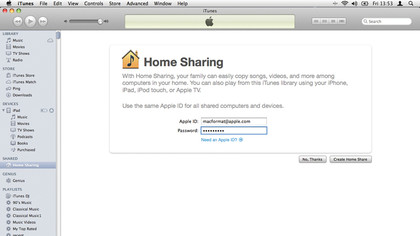
Go to the Advanced menu in iTunes and choose to Turn On Home Sharing. You'll need your Apple ID and password. With Home Sharing activated on another Mac on the local network, a user will be able to drag and drop music and movies from your library to theirs.
3. Move the library folder
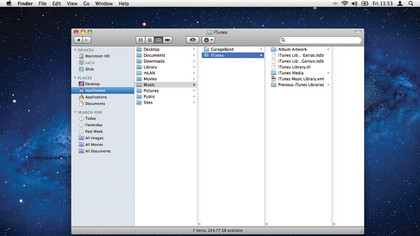
Go to your Home directory and find the Music > iTunes folder. If you have set iTunes to always copy new music into the library folder, this will contain all your music as well as the master library file. By copying this folder to an external drive, you can free up disk space.