


If you’ve been wondering how to overlay one image onto another directly on your iPhone, you’ll be glad to know that it’s now possible thanks to the iOS Shortcuts app.
iPhones are some of the best phones available, in large part due to Apple’s powerful operating system. With the addition of Shortcuts in iOS 13, Apple devices allow users to set up quick commands that execute a more complex series of actions - including overlaying one image onto another.
Now, gone are the days you’ll need to rely on one of the best photo editing apps to superimpose photos. Plus, with the addition of iOS 16’s Lift Subject from Background feature, this shortcut provides an excellent way to make quick social media posts, memes, and edits.
There are a few steps you’ll need to take to set up the shortcut before you can overlay your photos, but once these are done you’re set up for whenever you next need the feature. Below is our step-by-step guide for how to download and use the shortcut.

Steps for how to overlay images on iPhone
- Create a new shortcut and turn on the Share Sheet setting
- Add two 'Select Photos' actions, one 'Overlay Photos' action, and one 'Save to Camera Roll' action
- Change the variables within the Input and Overlay actions
- Head to your Camera Roll and test it out
Tools and requirements
- An iPhone with iOS 13 or above installed
- The Shortcuts app
Step-by-step guide
1. Open the Shortcuts app and add a new shortcut
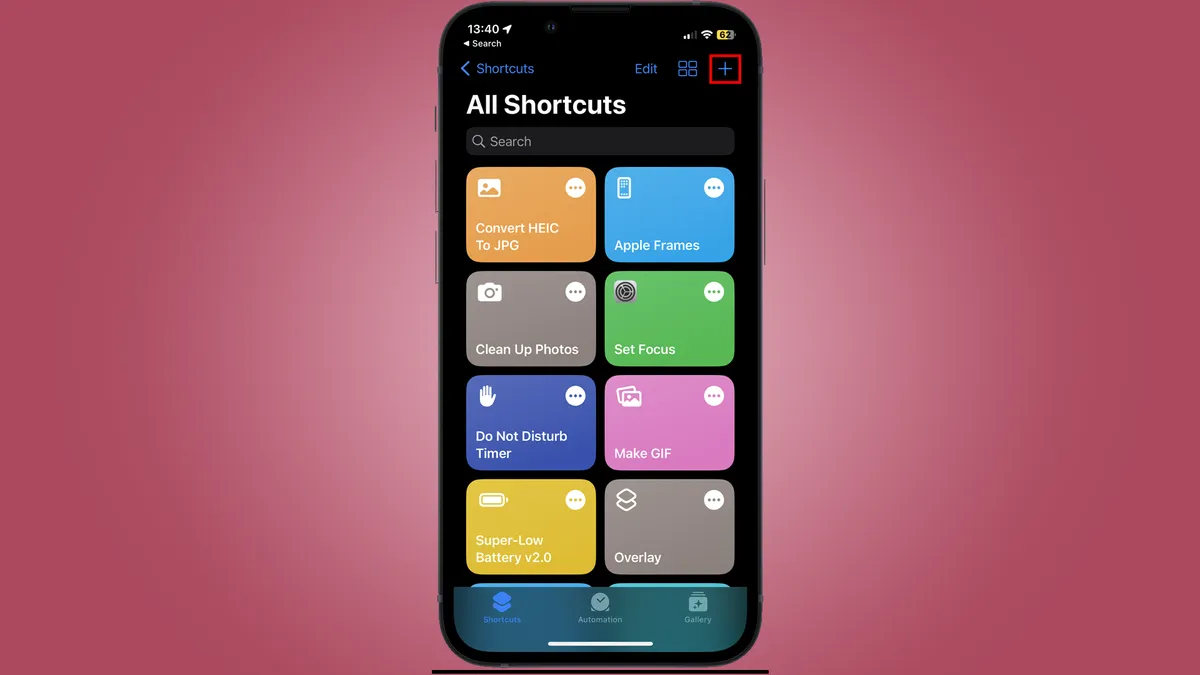
Provided your phone is running iOS 13 or above, Shortcuts should come preinstalled on your iPhone and can be reinstalled from the App Store if you’ve deleted it.
Once you’ve opened the app, press the ‘+’ symbol in the top right corner to create a new shortcut
2. Turn on Show in Share Sheet

Click on the ‘i’ symbol in the toolbar. A settings page will pop up from where you can toggle the option to show the shortcut in your Share Sheet.
This tells your iPhone where it is fetching image data from and provides you with quick access to the overlay tool.
Once selected, press Done.
3. Select file formats

When you return to the new shortcut page, you’ll now see an action has been added to receive media from the Share Sheet.
Tap where it says ‘Any’/’Images and more’, and turn off every media format except for Images and Media.
Once selected, press Done.
4. Add two Select Photos actions

From the new shortcut page, select Add Action or click directly on the search bar at the bottom of the page. Type ‘Select Photos’ and select the action.
Add another Select Photos action, following the above instructions.
5. Add the Overlay Image action

Once again, you’ll need to add an action, but this time you should instead type ‘Overlay Image’ into the search bar.
Select the corresponding action.
6. Select an image variable for the overlay

Tap the first ‘Images’ variable in your overlay action, and from the menu choose Select Variable.
A blue bar should appear on the top of your screen that reads ‘Select a Magic Variable.’ Tap on the first Photos label after your first Select Photos action.
Repeat this step for the second ‘Images’ variable in your overlay action, this time tapping on the second Photos label after your second Select Photos action.
7. Add the Save to Photo Album action

We’re nearly done - now, you simply need to click into the search bar one final time and search for ‘Save to Photo Album’ before clicking the corresponding action.
8. Rename your shortcut

Tap the name of your shortcut and Rename it - whatever you call it will appear in your Share Sheet, so it’s likely best to stick with ‘Overlay’ or ‘Superimpose’.
8. Head to photos to test it out

Open your Photos app and find your two photos. Tap on the Share Sheet button (the box with an arrow pointing up and out of it) and you will be prompted to select your first photo. The first one you select will be the image going on top, and the second the bottom. Next, select your second photo.
If you want to overlay a selection of a photo, you’ll need to use the Lift Subject from Background feature by pressing and holding over the subject, tapping ‘Share’, and saving this as a separate image.
10. Reposition and size your overlay

You’ll next be taken to an image editor where you can resize and reposition your overlay. Once you’re done, press done and the image will be saved to your Camera Roll.
Final thoughts
And there you have it - your easily overlaid images! While the shortcut setup is a little fiddly, especially if you’ve not used the Shortcuts app before, it’s pretty foolproof, and once done you can overlay images to your heart's content.
It’s a little surprising that this feature is buried into the Shortcuts app rather than being an inbuilt function of the Share Sheet, especially as shortcuts do sometimes inexplicably malfunction, making for a much less smooth user experience than what Apple’s inbuilt operating system features provide. Still, it’s better to have it in some form than not at all.
However, we've seen some user complaints about the complexity, and we're inclined to agree that Apple's Shortcuts workaround to superimposing images on an iPhone feels like the kind of thing that should have been a b-side iOS update years ago. If it's too much hassle, we'd recommend checking out the best iPhone photo editing apps.
If you still prefer using a computer to edit or are using one of the best cameras instead of your iPhone, why not check out our guide to the best free photo editors for PC and Mac, or read up on how to edit images in Google Photos?
