


The Apple iPhone has largely resisted cluttering its default camera app with too many features, but that changed last year with the arrival of a series of presets called Photographic Styles.
They first landed on the iPhone 13 series as one of many across-the-board camera improvements, but are now also on the much more affordable iPhone SE (2022). That means Photographic Styles are now more accessible than ever, but should you use them? And if so, how do you get the most out of Apple's latest camera feature?
We've put together this handy guide to answer those questions and more. Styles can be found in the standard Photo mode of the iPhone’s native camera app, and there are four different presets to choose from – with each being even more customizable, depending on your own personal preference.

Unlike traditional filters, you can use them at the point of capture – which means using them every time you take a photo, as long as you remember to switch them off when you don’t need them. By default, the camera is automatically set to Standard, which Apple says produces a “true to life” appearance.
The other four Styles give a more enhanced or stylized look, and are similar – but not the same – as using typical filters that you might find in other apps or software such as Instagram or Lightroom. Here's everything you need to know about Photographic Styles, along with some tips on how to use them to give your snaps more impact.
Which iPhones have Photographic Styles?
Styles are available on the iPhone 13 series, where they were first introduced in 2021. That means you’ll find them on the iPhone 13, the iPhone 13 Pro, the iPhone 13 Pro Max and the iPhone 13 Mini.
They’re also now available on the new iPhone SE (2022). As this is the smallest and cheapest iPhone to date, it means Photographic Styles now aren't just exclusive to those with larger budgets, but are available to a whole new audience.

So far, Photographic Styles haven't been added to older iPhone models such as the iPhone 12 Pro via a firmware upgrade. It isn't impossible, but Apple may well keep the feature as a point of difference between its older and newer models.
Naturally, we can expect that any new iPhone models, like the rumored iPhone 14, are likely to include Photographic Styles going forward, too.
Photographic Styles vs filters: what’s the difference?
Given that Photographic Styles seem a lot like filters, is there any benefit in using them over something you might otherwise find in apps such as Instagram or Lightroom?
Yes, in some situations. The important difference is that these styles are added at the point of capture, rather than retroactively, and also tap into Apple's computational processing. This means your iPhone is capable of applying Styles intelligently for the best possible results. For example, a Style won’t necessarily be applied to all parts of the image if could make a skin tone look strange.
By contrast, digital filters are usually applied unilaterally and can require more work to make them look natural. Applying a filter at the point of capture can also save you time, compared to spending time editing your shots.

You can also customize Styles to enhance or change them, depending on your own personal preferences or how well they might work with a given subject. We have a lot more detail on this further down in our 'how to master Photographic Styles' section.
That said, despite their smarts, Photographic Styles are relatively modest compared to many filters, in terms of their variety and impact. They give a reasonably subtle effect when compared to the default 'Standard' option, which may or may not be what you're after. Apple describes its four options as follows:
- Rich Contrast: Darker shadows, richer colors, and a stronger contrast create a dynamic look.
- Vibrant: Wonderfully bright and vivid colours create a brilliant yet natural look.
- Warm: Golden undertones create a warmer look.
- Cool: Blue undertones create a cooler look.
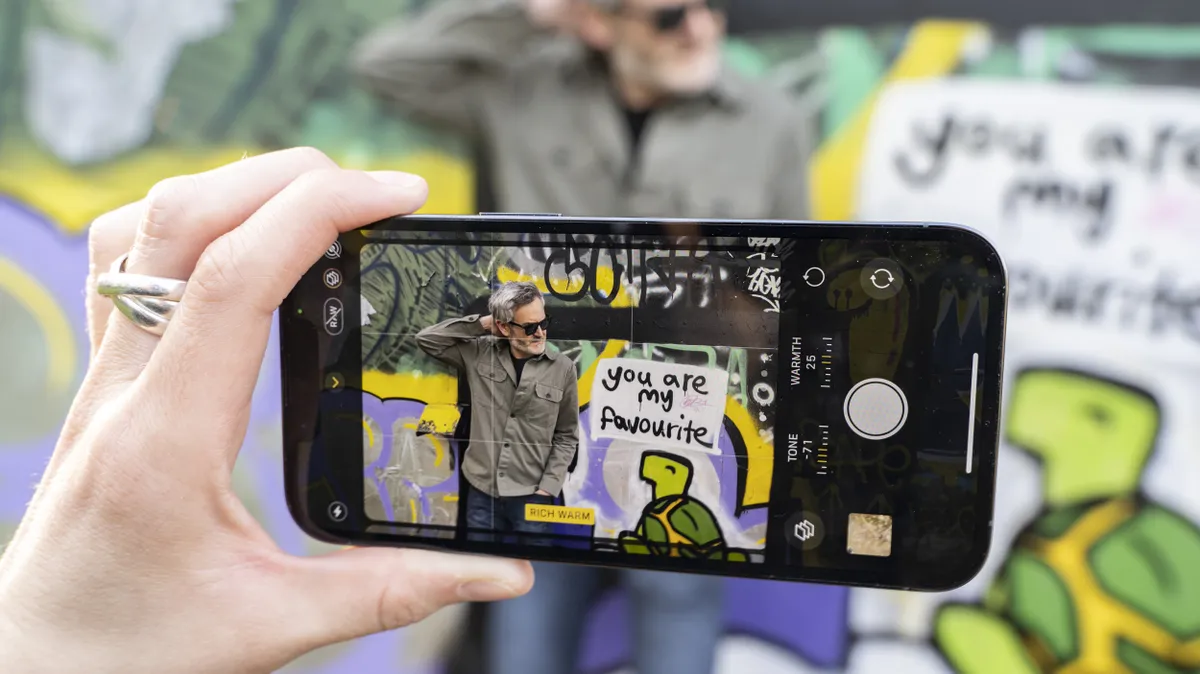
How to use Photographic Styles
Photographic Styles are simple to use. You’ll find them in the native camera app, either by swiping up from the main window, or giving the small arrow at the top of the screen a quick tap.
Tap the icon marked with three squares and you’ll then have the option to swipe between the different Styles available – starting with the Standard default option, moving through to Rich Contrast, Vibrant, Warm and Cool.
It’s important to note that you can’t use Photographic Styles when shooting in Apple’s ProRAW format, so that must be switched off. You will be able to record Live Photos using Styles though, so that can be on or off depending on your preferred way of shooting.
You’re now free to use the Styles on your subject – here are some tips to help get you started with them.
1. Do some early experimentation


Before you start applying them to all your photos, it pays to spend a little time getting to know the different Styles to see how each looks. After all, photography is subjective and you might want to make tweaks to Apple's defaults or use them in unusual ways.
The easiest way to experiment is simply to swipe between them, taking pictures and noting the differences. Remember that different subjects might see the Styles applied slightly differently, so it’s worth trying a variety of different subjects.
Taking images with each of the Styles applied gives you scope to choose your favorite later, and build some muscle memory for applying the ones you prefer in particular situations.
2. Make adjustments to get a customized look


If you like the Styles, but want more control over how your finished image looks, you can make adjustments to better suit your tastes. As you swipe through the different Styles, you’ll see underneath the Style’s name are sliders for adjusting Tone and Warmth.
As soon as you touch these sliders, you’ll be creating a custom preset, that will stay adjusted until you either change it again or reset the filter. It’s worth moving these sliders up and down to see how they affect your image, with the preview being displayed in the composition window as you do it.
You might notice that the name of an individual Style changes as you adjust these sliders – for example, add in some Warmth to Vibrant and it’ll now be called “Vibrant Warm” instead.
3. Try Styles for portraits (but not in Portrait mode)

One of the best applications for Photographic Styles is portraits. As we mentioned, your iPhone will apply these intelligently and should keep Skin Tones looking natural, while boosting other aspects of the scene, such as the background or the clothes that your subject is wearing.
A great example of this is Rich Contrast, which adds some lovely extra punch to your portraits, giving them a subtle but noticeable lift that can take them from good to great. Try pushing both the Tonal slider and the Warmth slider to make an even bolder difference to your portraits.
It’s worth making these changes in small and incremental steps, adding +5 or -5 here and there to see how it impacts the image, rather than going from one extreme or the other. One important note, though: Photographic Styles can’t currently be used in the dedicated Portrait mode, unfortunately.
4. Discover the best Styles for the right subjects


You’ll probably soon find that different Styles suit different subjects, which is something that you’ll learn by experimentation – and will likely also come down to personal preference.
We’ve found that Rich Contrast works well for landscapes, Vibrant is good for typically bright subjects such as flowers, Warm is great for sunsets and sunrises, while Cool is ideal for urban landscapes and low light shots.
That said, try using Styles that you might not think would work to experiment with the results – Cool, for example, can give an unusual look to a typical landscape.
It’s worth being mindful of going too overboard with certain Styles and adjustments. For example, adding in too much Warmth can tend to look overly vivid and unnatural and therefore less appealing in most situations.
5. Remember to reset and remove


Since Styles cannot be removed once you’ve captured them, it’s important to remember to switch them off when you don’t want to use them – otherwise you’ll find your Camera Roll is full of 'Cool' shots that you probably didn’t intend.
To stop using them, simply tap the three-squares icon at the top of the camera screen at any time and swipe back to 'Standard'.
It’s also worth resetting any adjustments you’ve made using the Tone and Warmth sliders, especially if you’ve made quite dramatic changes – a reset icon can be tapped to quickly go back to the default settings.
- Check out our guide to the world's best photo editing apps
