How to use Nvidia Broadcast to perfect your stream and videos
Use Nvidia Broadcast to perfect your stream and videos without spending a penny
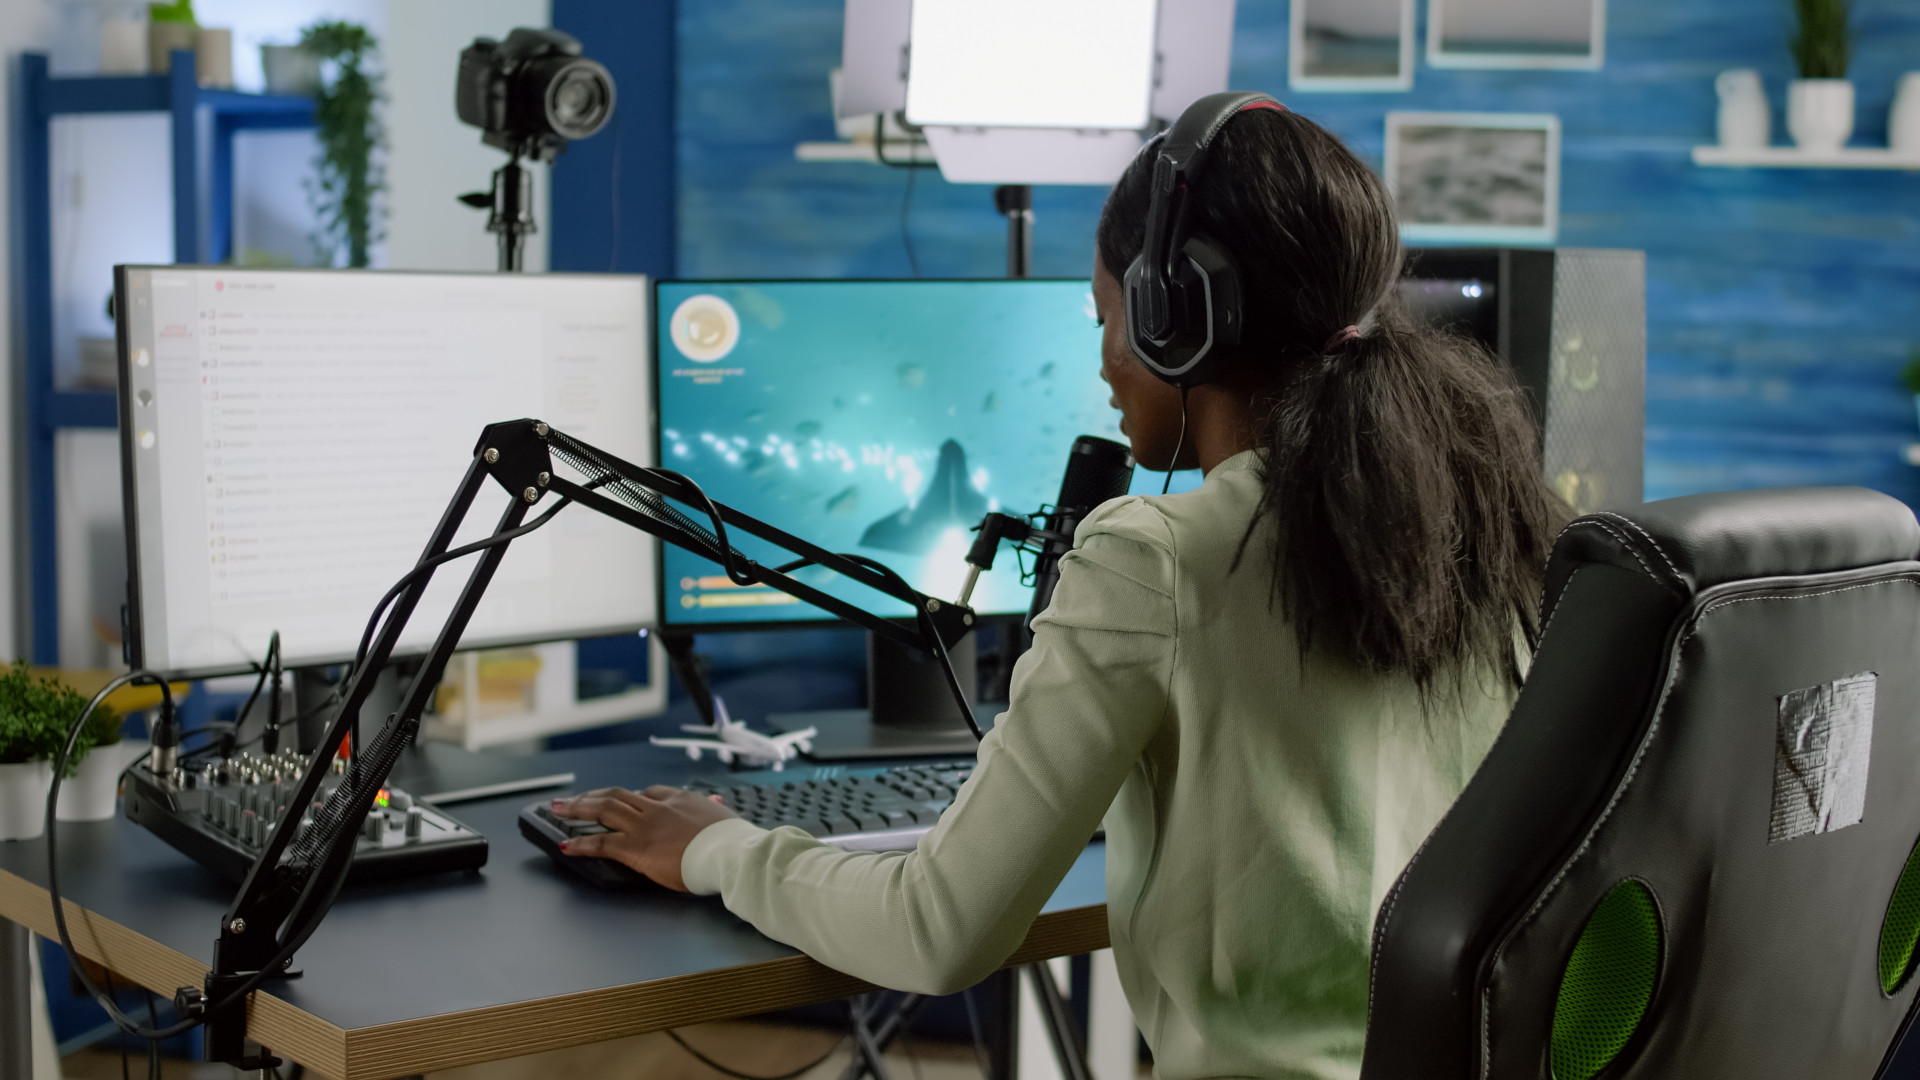
Once you know how to use Nvidia Broadcast to perfect your stream and videos, you’ll notice a clear improvement in your output, whether you’re hopping on a quick Zoom call or streaming games using OBS.
Nvidia Broadcast comes with a range of effects to improve your microphone, speakers and webcam, giving you noise cancellation, background blurring, auto-centering, and more effects all driven by artificial intelligence (AI).
Best of all, this app is completely free and very simple to use. Unlike some apps that cram as many tools and features in as possible, Nvidia Broadcast focuses on the essentials, putting key effects within easy reach. It’s not a full-fledged video-editing suite, but if you just want some lightweight effects that instantly perk up your video and audio, it’s just the ticket.
Here, we’ll show you how to set up and use Nvidia Broadcast, including how to integrate it into other apps. Whether you’re video-conferencing, streaming, or something else, you’ll notice the improvement right away.
Tools and requirements
- The Nvidia Broadcast app for Windows 10 or later
- An Nvidia graphics card (GeForce RTX 2060, Quadro RTX 3000, Titan RTX or later)
- A connected microphone and/or a set of speakers or headphones and/or a webcam
Quick steps
- Choose to adjust either your microphone, speakers or camera using the tabs at the top of the app
- On your chosen tab, select your device in the list of options, then pick an effect from the dropdown menu below
- Click the toggle to enable the effect, then click Add Effect
- In your preferred video-calling or streaming app, chose Nvidia Broadcast as your microphone, speakers and camera
Step by step guide
1. Get your microphone ready
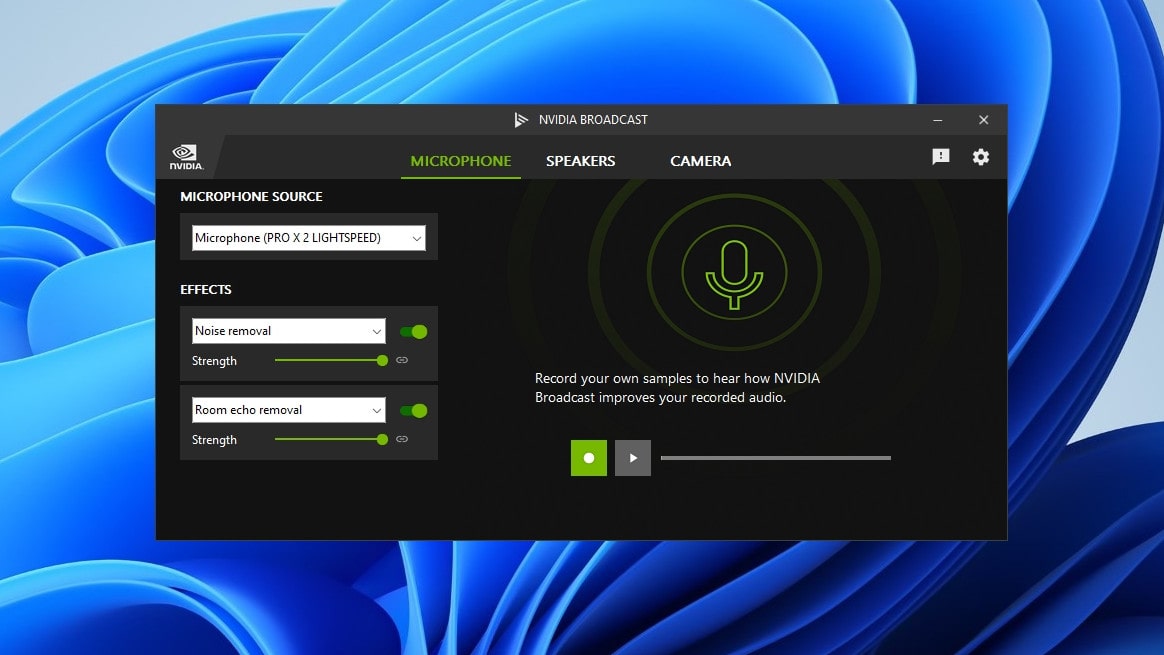
Install Nvidia Broadcast, then open the app. You’ll see three tabs along the top: Microphone, Speakers and Camera. Click Microphone.
From here, select your desired microphone from the Microphone Source dropdown box.
Below this box is another that allows you to choose which effects will be applied to your mic.
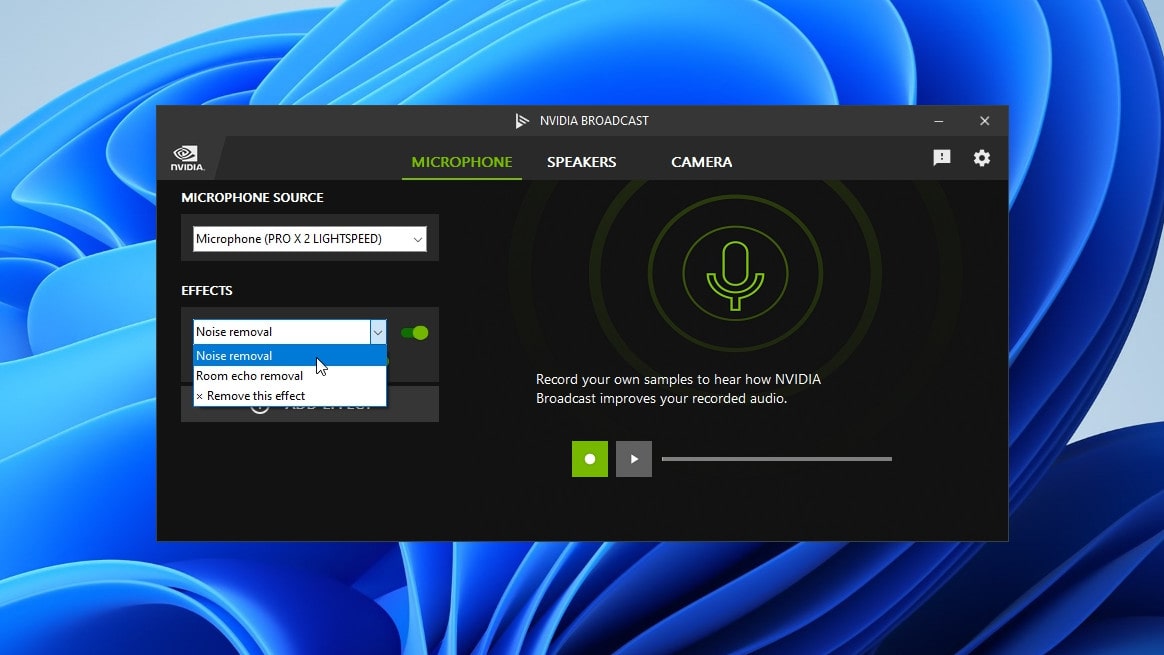
In this example, we’re going to choose Noise removal. Click the toggle next to this option to enable it (simply picking an option from the menu doesn’t enable it without this toggle being switched on). Below this is a bar that lets you adjust the effect’s strength. Move it to your desired position. When you’re happy with the effect, click Add effect.
You can now add subsequent effects in the same way.
On the right-hand side, you can test your microphone with the effects applied to see how much difference they make.
Sign up for breaking news, reviews, opinion, top tech deals, and more.
If you want to get rid of an added effect, choose Remove this effect from the dropdown menu and it will be deleted automatically.
2. Set up your speakers
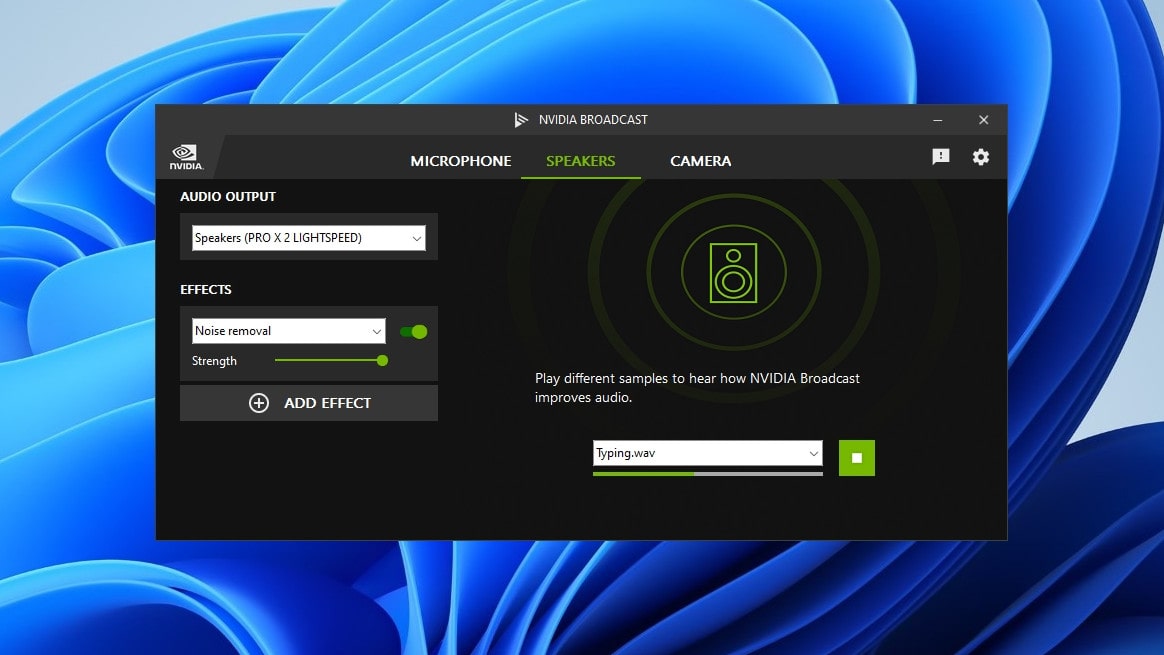
Click the Speakers tab at the top of Nvidia Broadcast and pick your primary audio output device from the dropdown menu.
You will likely have similar options as on the Microphone tab. In our testing, for example, both our microphone and our speakers had tools to remove noise and lessen room echo.
Make sure to enable each effect and click Add effect before moving onto the next one.
Like with the microphone effects, the Speaker tab has a section on the right that shows you what difference the tools make. In this instance, you can listen to some sample audio with the effects applied.
3. Pose for the camera
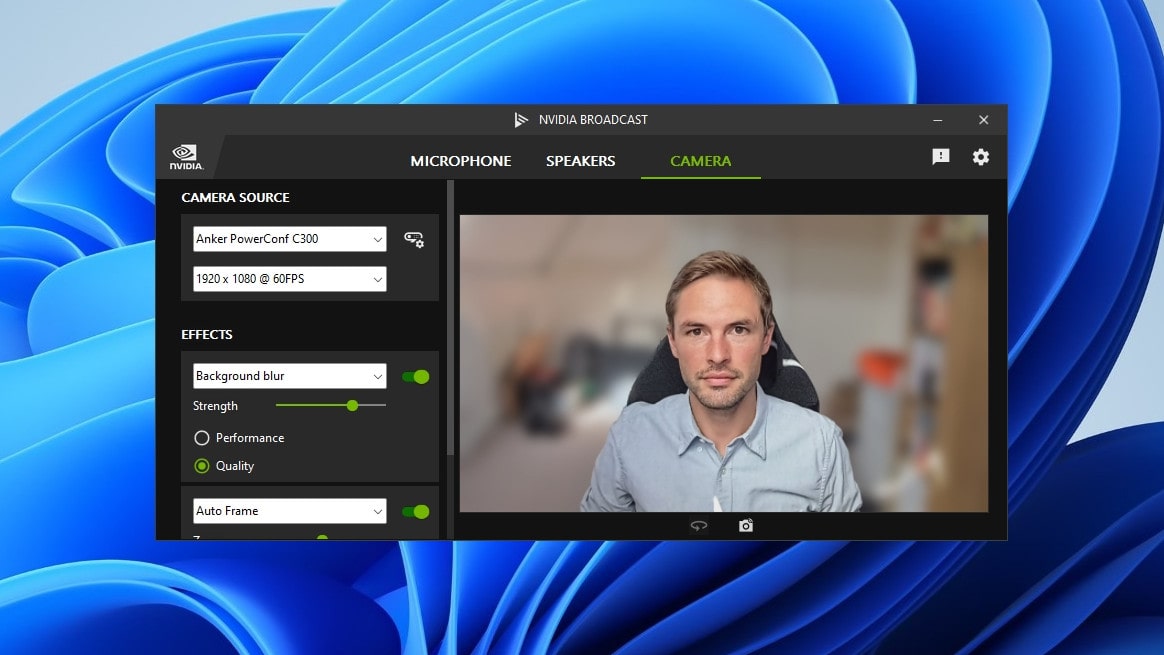
Now click the Camera tab and select your webcam from the top dropdown menu. Click the button to the right of your camera’s name and you can adjust its output settings, such as brightness, saturation, white balance and more.
If your webcam can work at different resolutions and frame rates, you’ll see a second dropdown menu beneath the name of your camera. Pick a resolution and frame rate combination from here.
The Camera tab has a lot more available effects than can be applied to your microphone or speakers. You can blur your background, replace it with an image, or remove it entirely (which is ideal for streaming overlays). Nvidia Broadcast can automatically frame you in the center of the picture, and add a vignette around the borders of your video feed. Many of these effects let you choose between quality and performance presets.
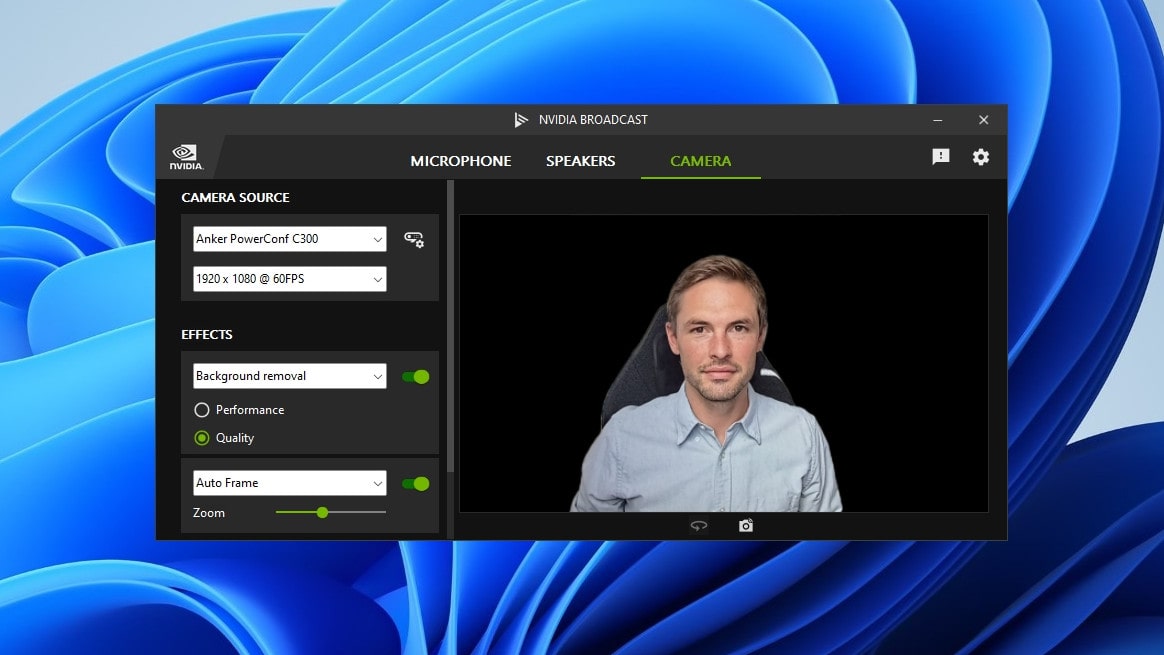
There are also a couple of beta features, which might be a little more unstable. These include a noise removal tool and one that simulates eye contact by making it appear you are looking directly into the camera, even when you are not.
As with the previous tabs, make sure you enable the toggle next to each effect you want to add, then click Add effect.
On the righthand side of the Camera tab is a live feed from your webcam. Beneath this, click the rotation button to flip your video horizontally, or click the camera icon to capture an image from the feed.
4. Using Nvidia Broadcast in other apps
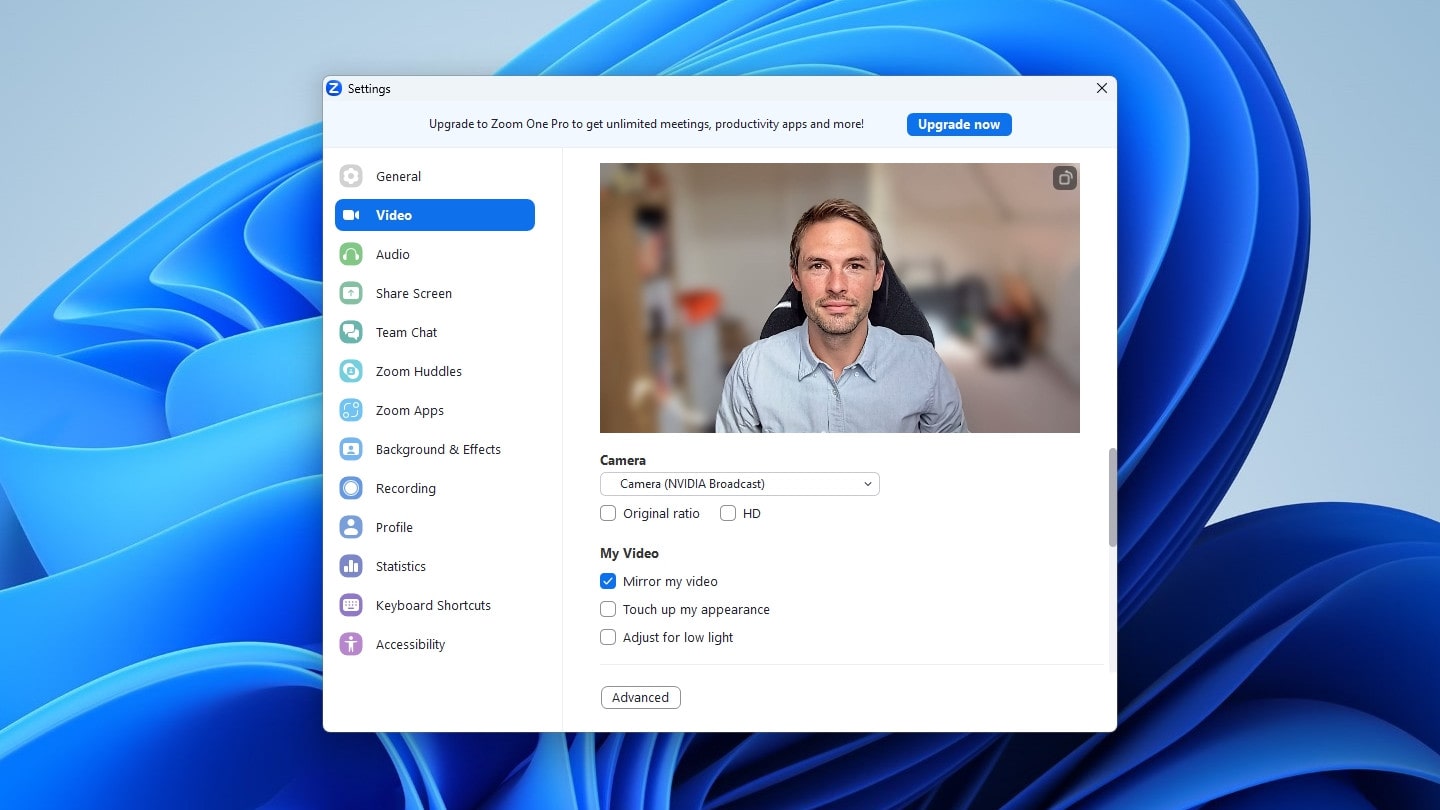
Now that you’ve settled on the effects that you want to apply, you need to make sure other apps – like Zoom or OBS – actually use them.
To do that, open your video app of choice. In this instance, we’ll use Zoom.
Go to the app’s settings. Under the audio input option, pick Nvidia Broadcast instead of your microphone. Do the same for audio output.
You’ll also need to select Nvidia Broadcast as your webcam under the app’s camera options.
If you have enabled video or audio effects in your video app – such as background blur or audio noise removal – you should disable them in the app so that they don’t clash with the effects applied by Nvidia Broadcast.
Note that you should ensure that your speakers are set as the default output device in the Settings app under System > Sound, rather than Nvidia Broadcast. Only set Nvidia Broadcast as the desired output device in third-party apps like Zoom and Discord, otherwise all audio types (such as music or videos) will have Broadcast effects applied to them.
Final thoughts
Nvidia Broadcast is a simple, no-frills app that is very easy to use and tweak. Despite its unassuming appearance, though, it is full of handy tools that can quickly tune up your audio and video. It’s an ideal companion for both video-calling apps and streaming programs.
Of course, it’s not much use if you have an older Nvidia graphics card or one made by a different manufacturer. In that case, you might want to try one of the best video-conferencing apps or one of the best free streaming apps instead.

Alex Blake has been fooling around with computers since the early 1990s, and since that time he's learned a thing or two about tech. No more than two things, though. That's all his brain can hold. As well as TechRadar, Alex writes for iMore, Digital Trends and Creative Bloq, among others. He was previously commissioning editor at MacFormat magazine. That means he mostly covers the world of Apple and its latest products, but also Windows, computer peripherals, mobile apps, and much more beyond. When not writing, you can find him hiking the English countryside and gaming on his PC.