
 Become a TechRadar Insider


Using photos from your iPhoto library in other applications is fairly straightforward. Just drag them from the iPhoto window onto the app, into a document window or onto the Desktop.
What you'll get is a copy of the file in its original format – unless, that is, it's a raw file, in which case iPhoto will produce a JPEG conversion.

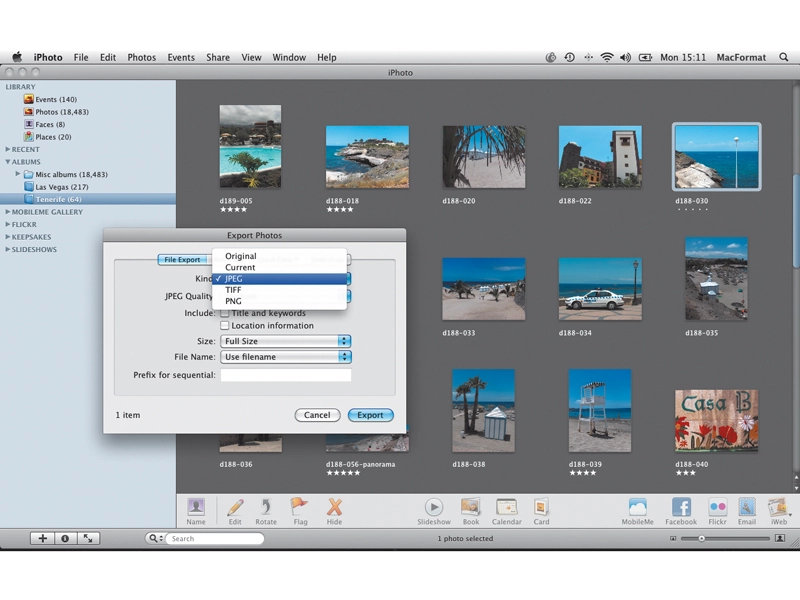
When you use iPhoto's File Export tab, you can choose the file format, the quality (for JPEGs) and the file size – useful if you want to export pictures for web pages or email. If you want the original photo, you should choose Original from the Kind menu.
2. Export file size

If you need to change the size, choose from iPhoto's Small, Medium or Large settings, but you'll probably find it more useful to specify the dimensions using the Custom setting. This enables you to set the maximum size for width or height – 1,000 pixels, for example.
3. Web Page export

The Web Page tab generates a basic web album, exporting it as a set of HTML files to a disk folder, rather than uploading it to a remote server. Select the size of the thumbnails and the grid layout, and the size of the photos you see when you click on a thumbnail.
4. Exported web pages

For slick-looking web albums, send your photos to iWeb, or MobileMe galleries (if you have an account). The pages produced by this option are very basic. But it is a quick way to produce clickable galleries for your own use or distribution to others.
5. QuickTime export

The QuickTime export option generates a movie where each slide is displayed for a fixed period (the Display image for: box) using a simple 'fade' transition. You can set the size of the QuickTime window/movie using the Width and Height boxes; photos are scaled to fit.
6. QuickTime playback

Doing this is a lot quicker than setting up a custom iPhoto slideshow, both in terms of setup time and how long it takes iPhoto to generate the movie. The movie that's produced can be controlled using simple play/pause and forward wind/rewind buttons.
7. Slideshow export

If you select the Slideshow tab, iPhoto will create a more sophisticated movie based on the last-used Slideshow settings, including any themes, transitions and music. The Custom Export button opens up more options, but they quickly get complicated, so try out the presets.
8. Slideshow movies

The Slideshow option generates an MPEG4 movie rather than a QuickTime file; this will open in iTunes by default, but you can also open it with the QuickTime Player. The results are slick, thanks to iPhoto's slideshow features, but the movies take a while to generate.
------------------------------------------------------------------------------------------------------
First published in MacFormat Issue 228
Liked this? Then check out30 best Mac apps for just about everything
Sign up for TechRadar's free Weird Week in Tech newsletter
Get the oddest tech stories of the week, plus the most popular news and reviews delivered straight to your inbox. Sign up at http://www.techradar.com/register
