
 Become a TechRadar Insider


The typical BIOS set-up program is intimidating in the extreme, packed with technical options that could badly damage your PC if you don't use them correctly. And so most people make do with the default settings.
That approach guarantees your system will work, but it also means that it will never deliver its best performance. Learn a little more about the options on offer and BIOS tweaking won't seem as scary.
Our detailed guide to each BIOS menu explains the settings you can change, and the ones you really shouldn't. With a little experimentation you'll be able to discover useful information about your system, cut its boot time, extend battery life on a laptop and overclock your PC for a performance boost.
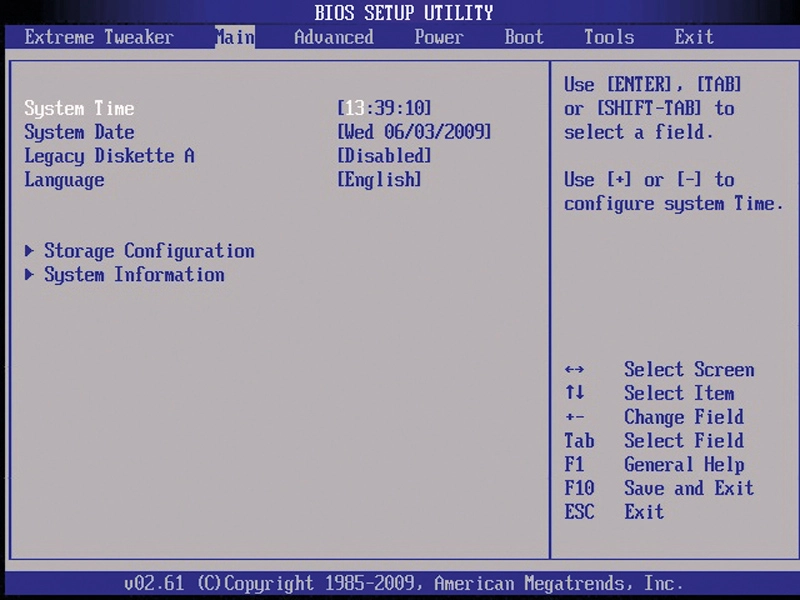
Meet your BIOS
Most BIOSes display a message at boot time telling you how to load their set-up program. Typically this is done by pressing [Del] or [F2]. If your system boots into a full-screen logo then try pressing [Tab] immediately to see any set-up messages, or check your system documentation for more clues.
Once you've launched the BIOS program then you'll probably first see the Main menu. This usually contains only some legacy settings and a few options that the BIOS creator couldn't fit anywhere else, but these can still be useful and the menu is definitely worth a quick look.
Date and time
Normally you can leave this setting alone, but if the clock often resets to some wildly different time then your motherboard battery may be failing. Check your documentation to find out what type it uses, and order a spare. Better still, buy one now, just for emergencies – popular lithium cells like the CR2032 cost under 50p.

Floppy disk
Even now many BIOSes have floppy-related settings. If you have a disk but don't use it, disable these for faster boot times.
IDE/SATA channels
You may have a menu that shows the IDE and SATA drives you've connected to your system and the channels they're using, which is particularly useful if you've installed a new drive and want to be sure it's recognised. If you don't see an attached drive, make sure that the channel isn't disabled (select it in the BIOS and look for options), that the drive is properly connected and that your IDE drives have their master/slave switch set appropriately.
Configure SATA as
Set up your SATA controller to run in one of three modes: RAID if you're combining two or more drives in a RAID configuration, AHCI to enable additional SATA features or IDE for the best compatibility.
Some people claim enabling AHCI will speed up your hard drive, but if there's a difference then it'll be extremely small (and it could actually slow you down). What's more, you may find that Windows won't boot properly, forcing you to reinstall it. We'd leave this alone unless you're very sure that AHCI will help in your particular situation.
IDE Detect Timeout
Some motherboards boot so quickly that IDE drives don't have time to spin up, and so aren't initialised. To avoid this the boards wait for a period of time known as the IDE Detect Timeout. If you have an IDE drive that isn't always detected then increase this value for more reliable results.
The Boot menu includes options to define what happens when your PC starts. Some BIOSes hide these settings away in the Advanced menu.
Boot device priority
Defines the order in which the BIOS will look for bootable drives. Set the first device as your hard drive for quicker boots, but move your DVD drive to the top of the list if you need to boot from your Windows disc, for instance.

Full-screen logo
Displays a logo which annoyingly covers up your BIOS status messages. We'd turn this setting off to avoid missing anything important, and also to avoid the fraction of a second that it adds to your PC's boot time.
Hit [Del] message display
Allows you to disable the message explaining that pressing [Del] will get you into the BIOS set-up program. This might be useful if you're dealing with your kids' PC, where you don't want them tinkering, but be sure you don't forget how to get into the BIOS yourself.
Wait for [F1] if error
Tells the BIOS to wait for you to respond to any boot problems found before it continues with the set-up process. That's normally a good thing, but if it's a minor issue that you already know about – or alternatively if you're using a server that doesn't have a keyboard – then it may be preferable to disable this setting.
System information
A handy list of details on your PC hardware, including CPU type and speed, installed RAM, BIOS version and perhaps the build date.
If your BIOS is very old then upgrading it may add more features and improve compatibility with new hardware and software, but if the upgrade fails then your system may become irreparably broken.
Check to see if your motherboard has any way to recover from a trashed BIOS, and back up any valuable data before attempting an update.
