Trim down your apps for a faster, more secure PC

You've uninstalled unwanted applications, removed unnecessary start-up programs and trimmed your Windows services to a minimum.
That's a great way to save yourself hard drive space, CPU time and system resources, but why stop there?
Many applications are more bloated than Windows and think nothing of clogging up your PC with custom services, plug-ins and add-ons. As well as increasing application start-up time, many of these extra services also run in the background, constantly draining your system's resources.
Getting rid of these unwanted extras will improve your PC and application start-up time, save memory and give you a noticeable performance boost. It also means your system will be more secure, because hackers will have fewer active components to exploit.
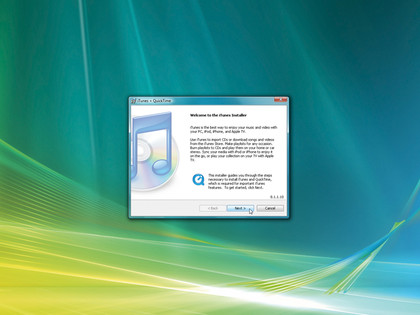
iTunes installation
Optimising your applications starts with the installation. That means going for the 'Custom' or 'Advanced' option rather than the 'Complete' or 'Standard' installation. It's a little extra hassle, but you'll be able to choose which modules to include – so if you find a Swedish dictionary or a remote access backdoor service, you'll be able to dismiss it in a click or two.

Sometimes things aren't that simple. When you install iTunes, for example, you get QuickTime and the Software Update tool.
Sign up for breaking news, reviews, opinion, top tech deals, and more.
Fair enough, but the Apple Mobile Device Support and Bonjour services – which are unnecessary if you don't have an Apple device or don't want to use their network technology – are also installed. Yet the installer offers no way to choose between components. Fortunately, there's an easy solution.
The 'iTunesSetup.exe' file is a self-extracting executable file, so if you use your archive tool to manually extract its contents (use 7-Zip from www.7-zip.org if yours won't do it), you'll find a folder with separate installation programs for each component. Run the ones you need, ignore the rest and you've created a custom lightweight iTunes installation.
You can use the same trick with many other multi-module installation programs, but be careful. The order in which you install application components can be important. It's usually best to install low-level elements such as services before the application itself, for instance. And you should be prepared for odd application behaviour if you don't install something that later turns out to be important.
Adobe Reader
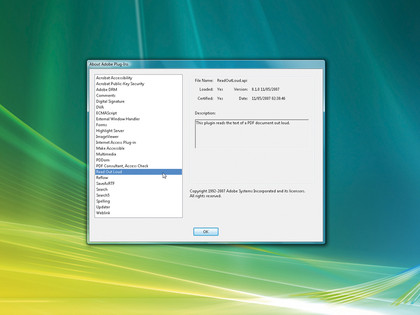
Once you've installed an application, it's worth checking for plug-ins and other extensions that may have been installed by default. In Adobe Reader, for instance, clicking 'Help | About Adobe Plug-Ins' reveals 24 extensions, some of which are unnecessary – have you ever saved a PDF file to RTF format? Neither have we.

There's no built-in way to disable individual plug-ins, either, but that doesn't matter – it's easy to do it yourself. Start by looking for plug-ins you don't want and noting their filenames.
The Acrobat Read Out Loud, Accessibility, Comments, Make Accessible and Save As RTF plug-ins are all high on our list to be dumped, and you may choose others depending on your use of PDF files. If you never fill in PDF forms, then note the name of the Forms plug-in as one to get rid of. If you're happy with your spelling, add the spell-checker ('Spelling. api') to the dump list.
When you're done, close Adobe Reader and browse to the Plug-ins folder (by default Program Files\Adobe\Reader 8.0\ Reader\plug_ins). Locate the file for a plug-in you don't need – 'Save AsRTF.api', say – and give it a '.old' extension: 'SaveAsRTF.api.old'. Repeat the process with the other unwanted plug-ins and then restart Adobe Reader.
Our tests showed that RAM use was cut from 20.5 to 15MB and start-up time fell by 20 to 25 per cent. If you go too far and remove an important plug-in, renaming it back from (for instance) SaveAsRTF.api.old to SaveAsRTF.api should restore it.
- 1
- 2
Current page: Slim down iTunes and Adobe Reader
Next Page Slim down Outlook, Office and Internet Explorer