How to use Windows 10's Focus Assist mode to work better at home
Stay on track

Sign up for breaking news, reviews, opinion, top tech deals, and more.
You are now subscribed
Your newsletter sign-up was successful
If you're working from home, you might be a little concerned as to how you’ll be able to focus in your new working environment. For Windows 10 users, though, there’s an often-overlooked feature called Focus Assist that can come to the rescue.
Flick a switch and you’ll banish notifications, alerts and more from pestering you when you need to stay on track – use it effectively and it becomes your secret weapon against distractions. Just follow the tips in our guide to master this handy feature as we show you how to use Focus Assist.
1. Turn on Focus Assist
The easiest way to get started is to click the Action center icon in the bottom-right corner of your screen (it looks like a speech bubble).
When the Action center opens, click the Focus Assist button in the bottom-left corner. This will cycle through your options, including turning Focus Assist on for priority apps only, for alarms only, or turning it off. We’ll discuss these options in more detail shortly.
Using Focus Assist this way uses Windows 10’s default options, but you’ll want to customize them if you are looking for a bit more control.
2. Allow your alarms through
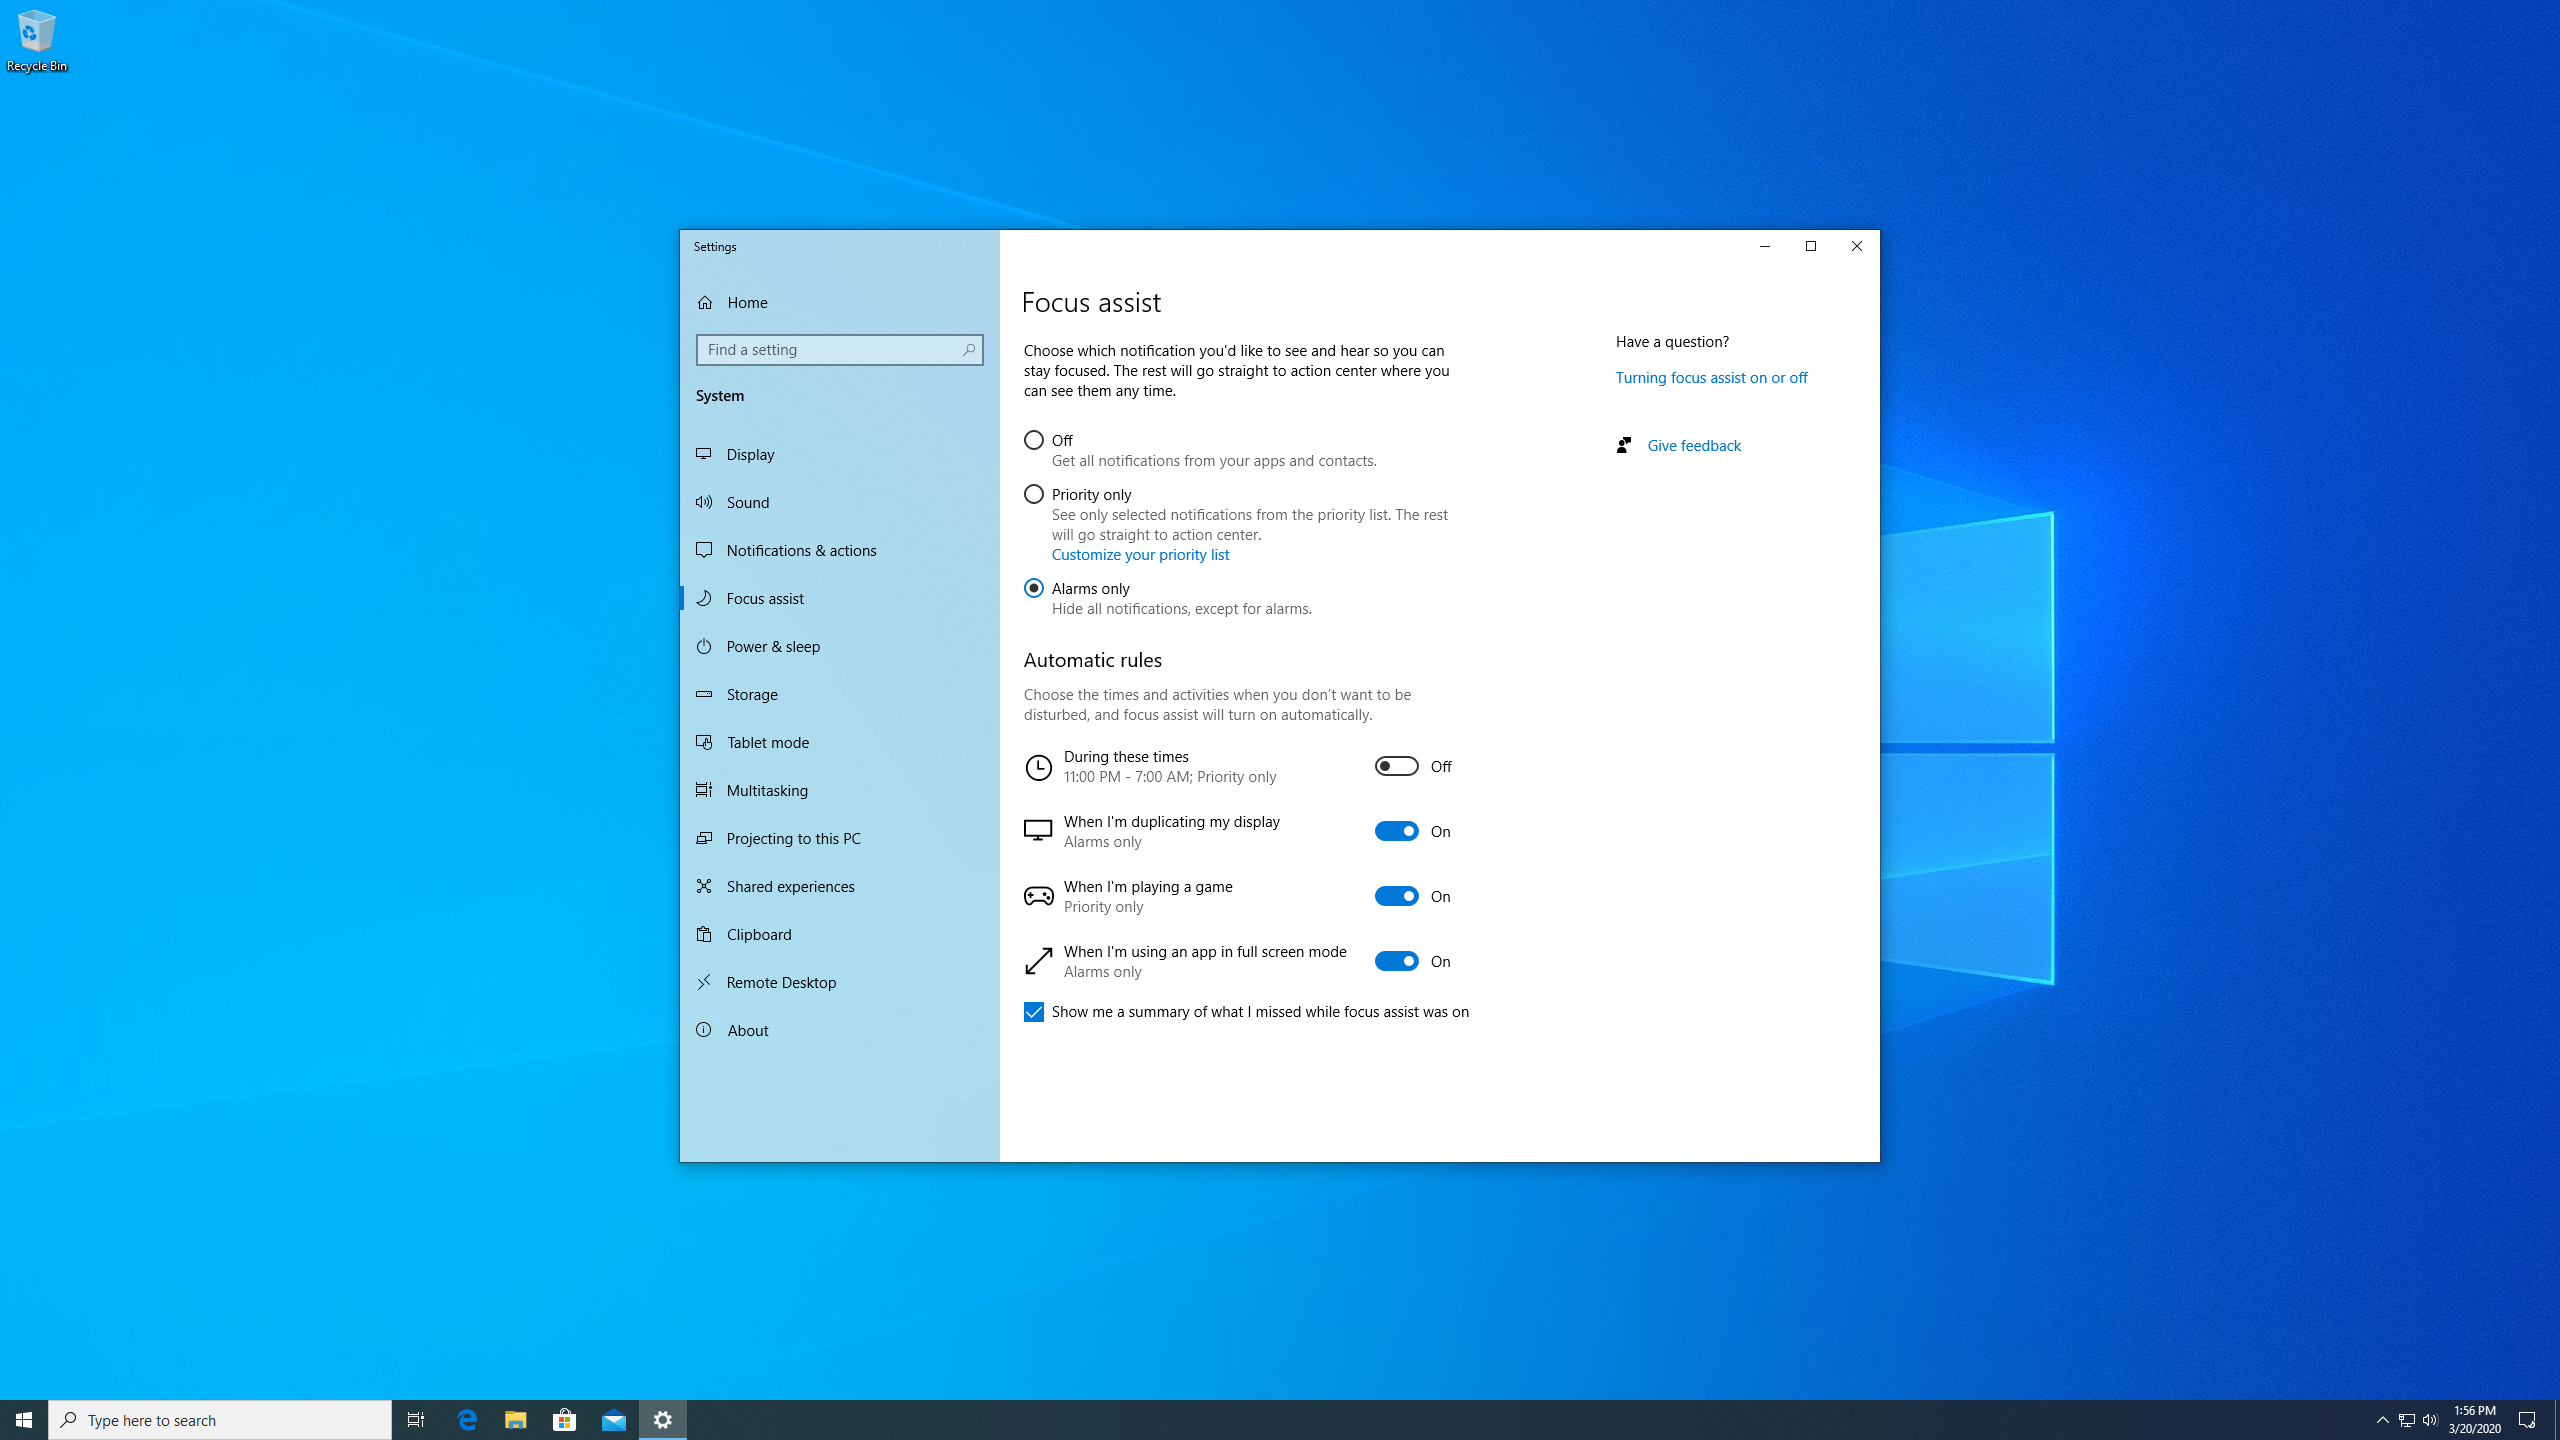
To change the default settings, type “Focus Assist settings” into the Windows 10 search box and click the first result. At the top of the resulting Settings pane you’ll see the three main options for Focus Assist: “Off,” “Priority only,” and “Alarms only.”
Select “Alarms only” to mute everything except alarms. This is useful if you’re working from home and don’t want to be bombarded with various app notifications, but still need to get your reminders to start certain tasks, for example. Enabling that setting may be enough to help keep you on track.
Sign up for breaking news, reviews, opinion, top tech deals, and more.
3. Only permit priority apps
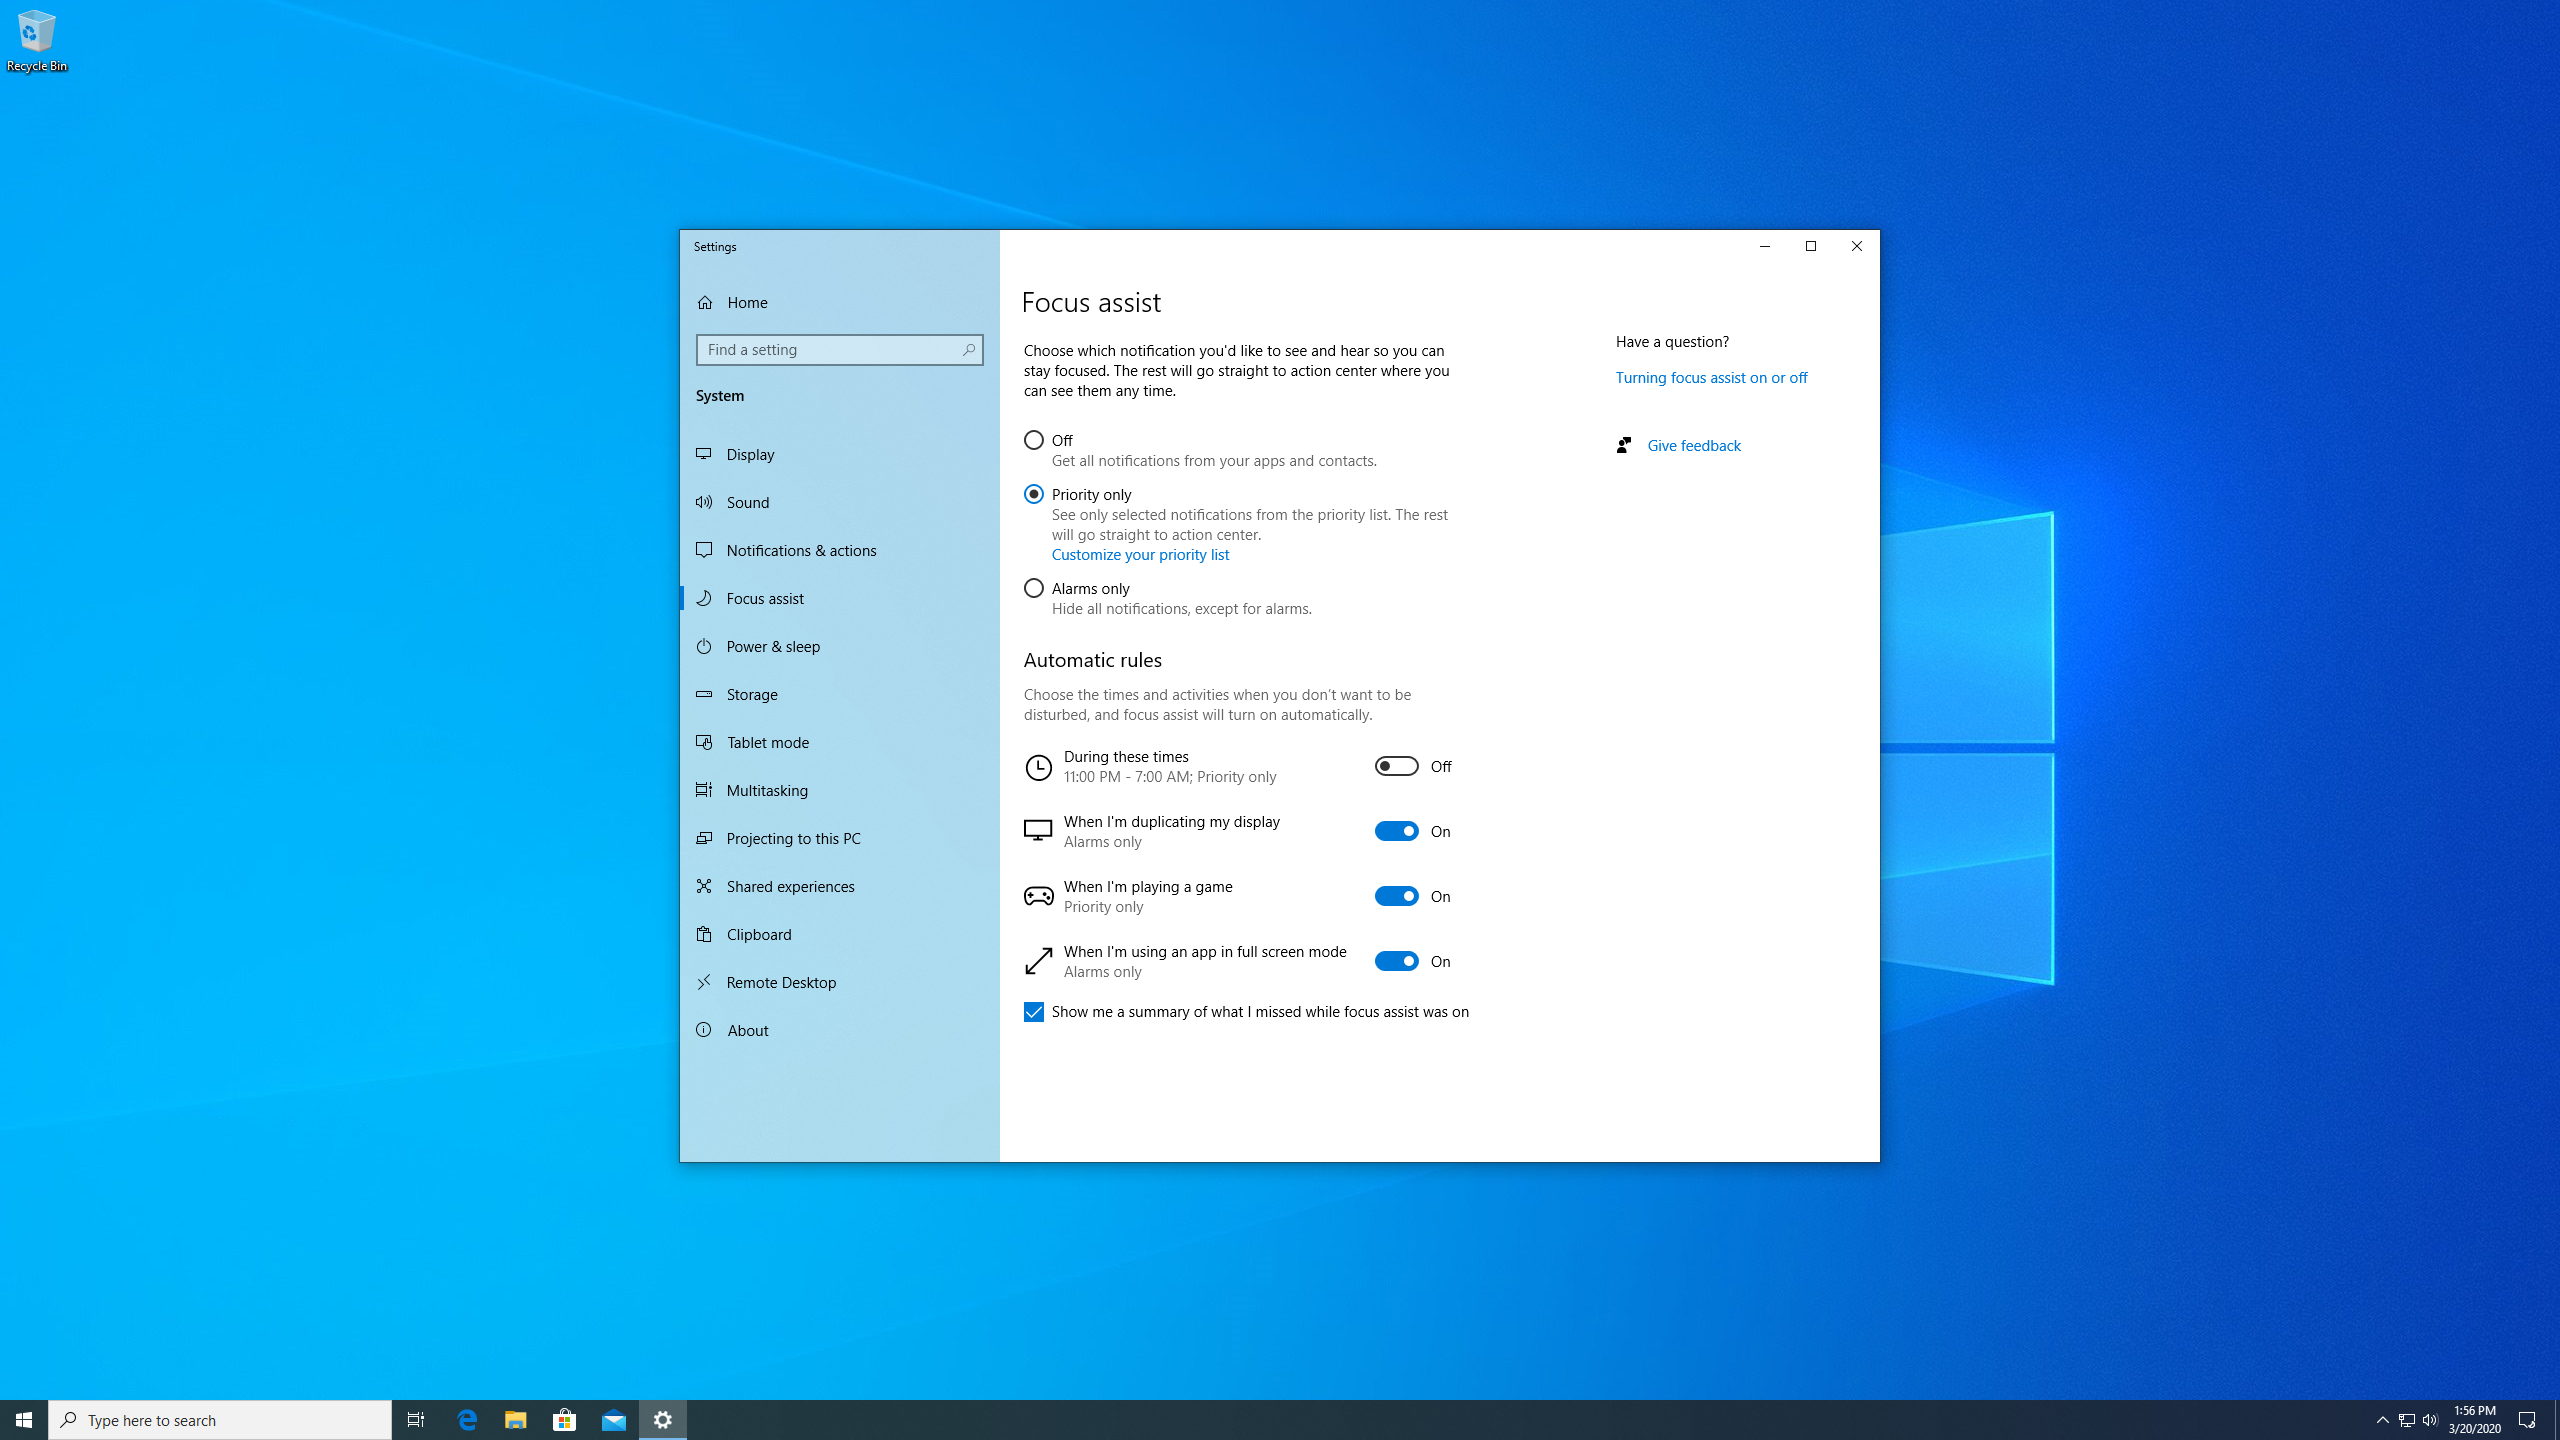
Choosing “Alarms only” may be too much of a blanket option for you, however. There are times when you want to allow certain apps to notify you of events, but block others – for example, you probably won’t want to miss an important email from your boss while you’re working from home.
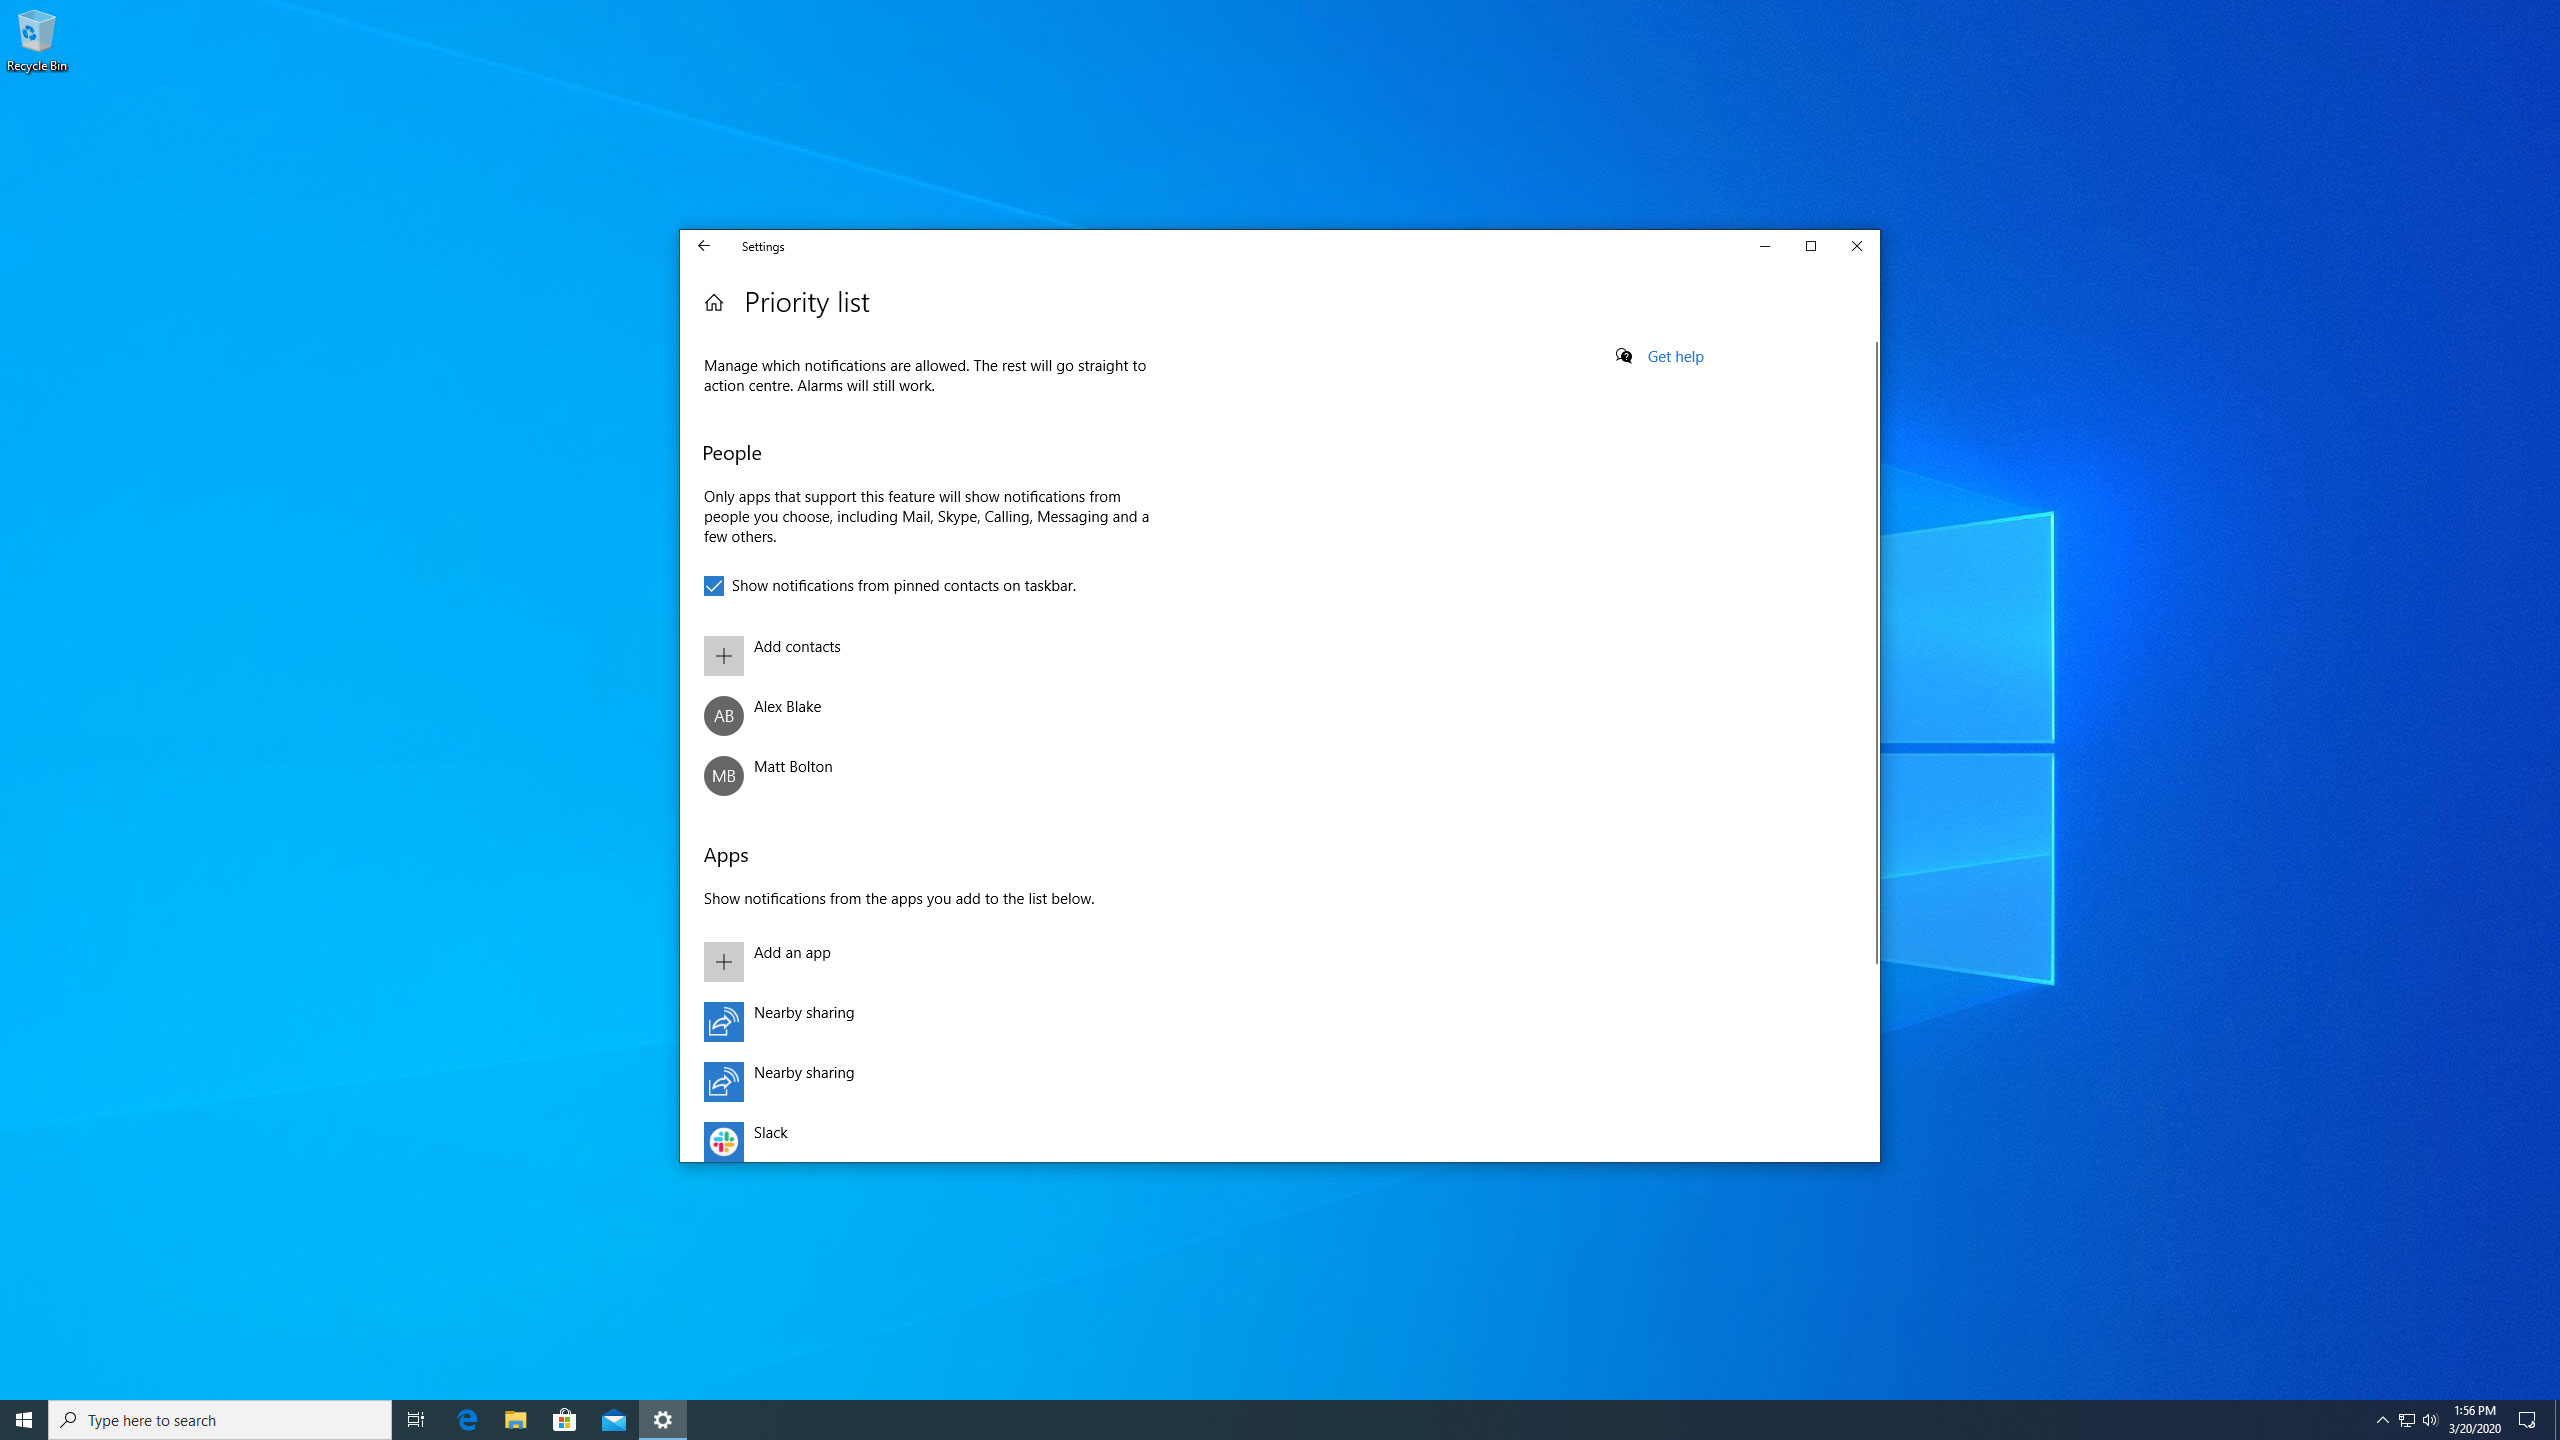
To get more control, select “Priority only” instead of “Alarms only.” This will allow your priority apps and people to get through, but block everything else. You can choose what exactly gets let through by clicking “Customize your priority list.”
4. Prioritize key people
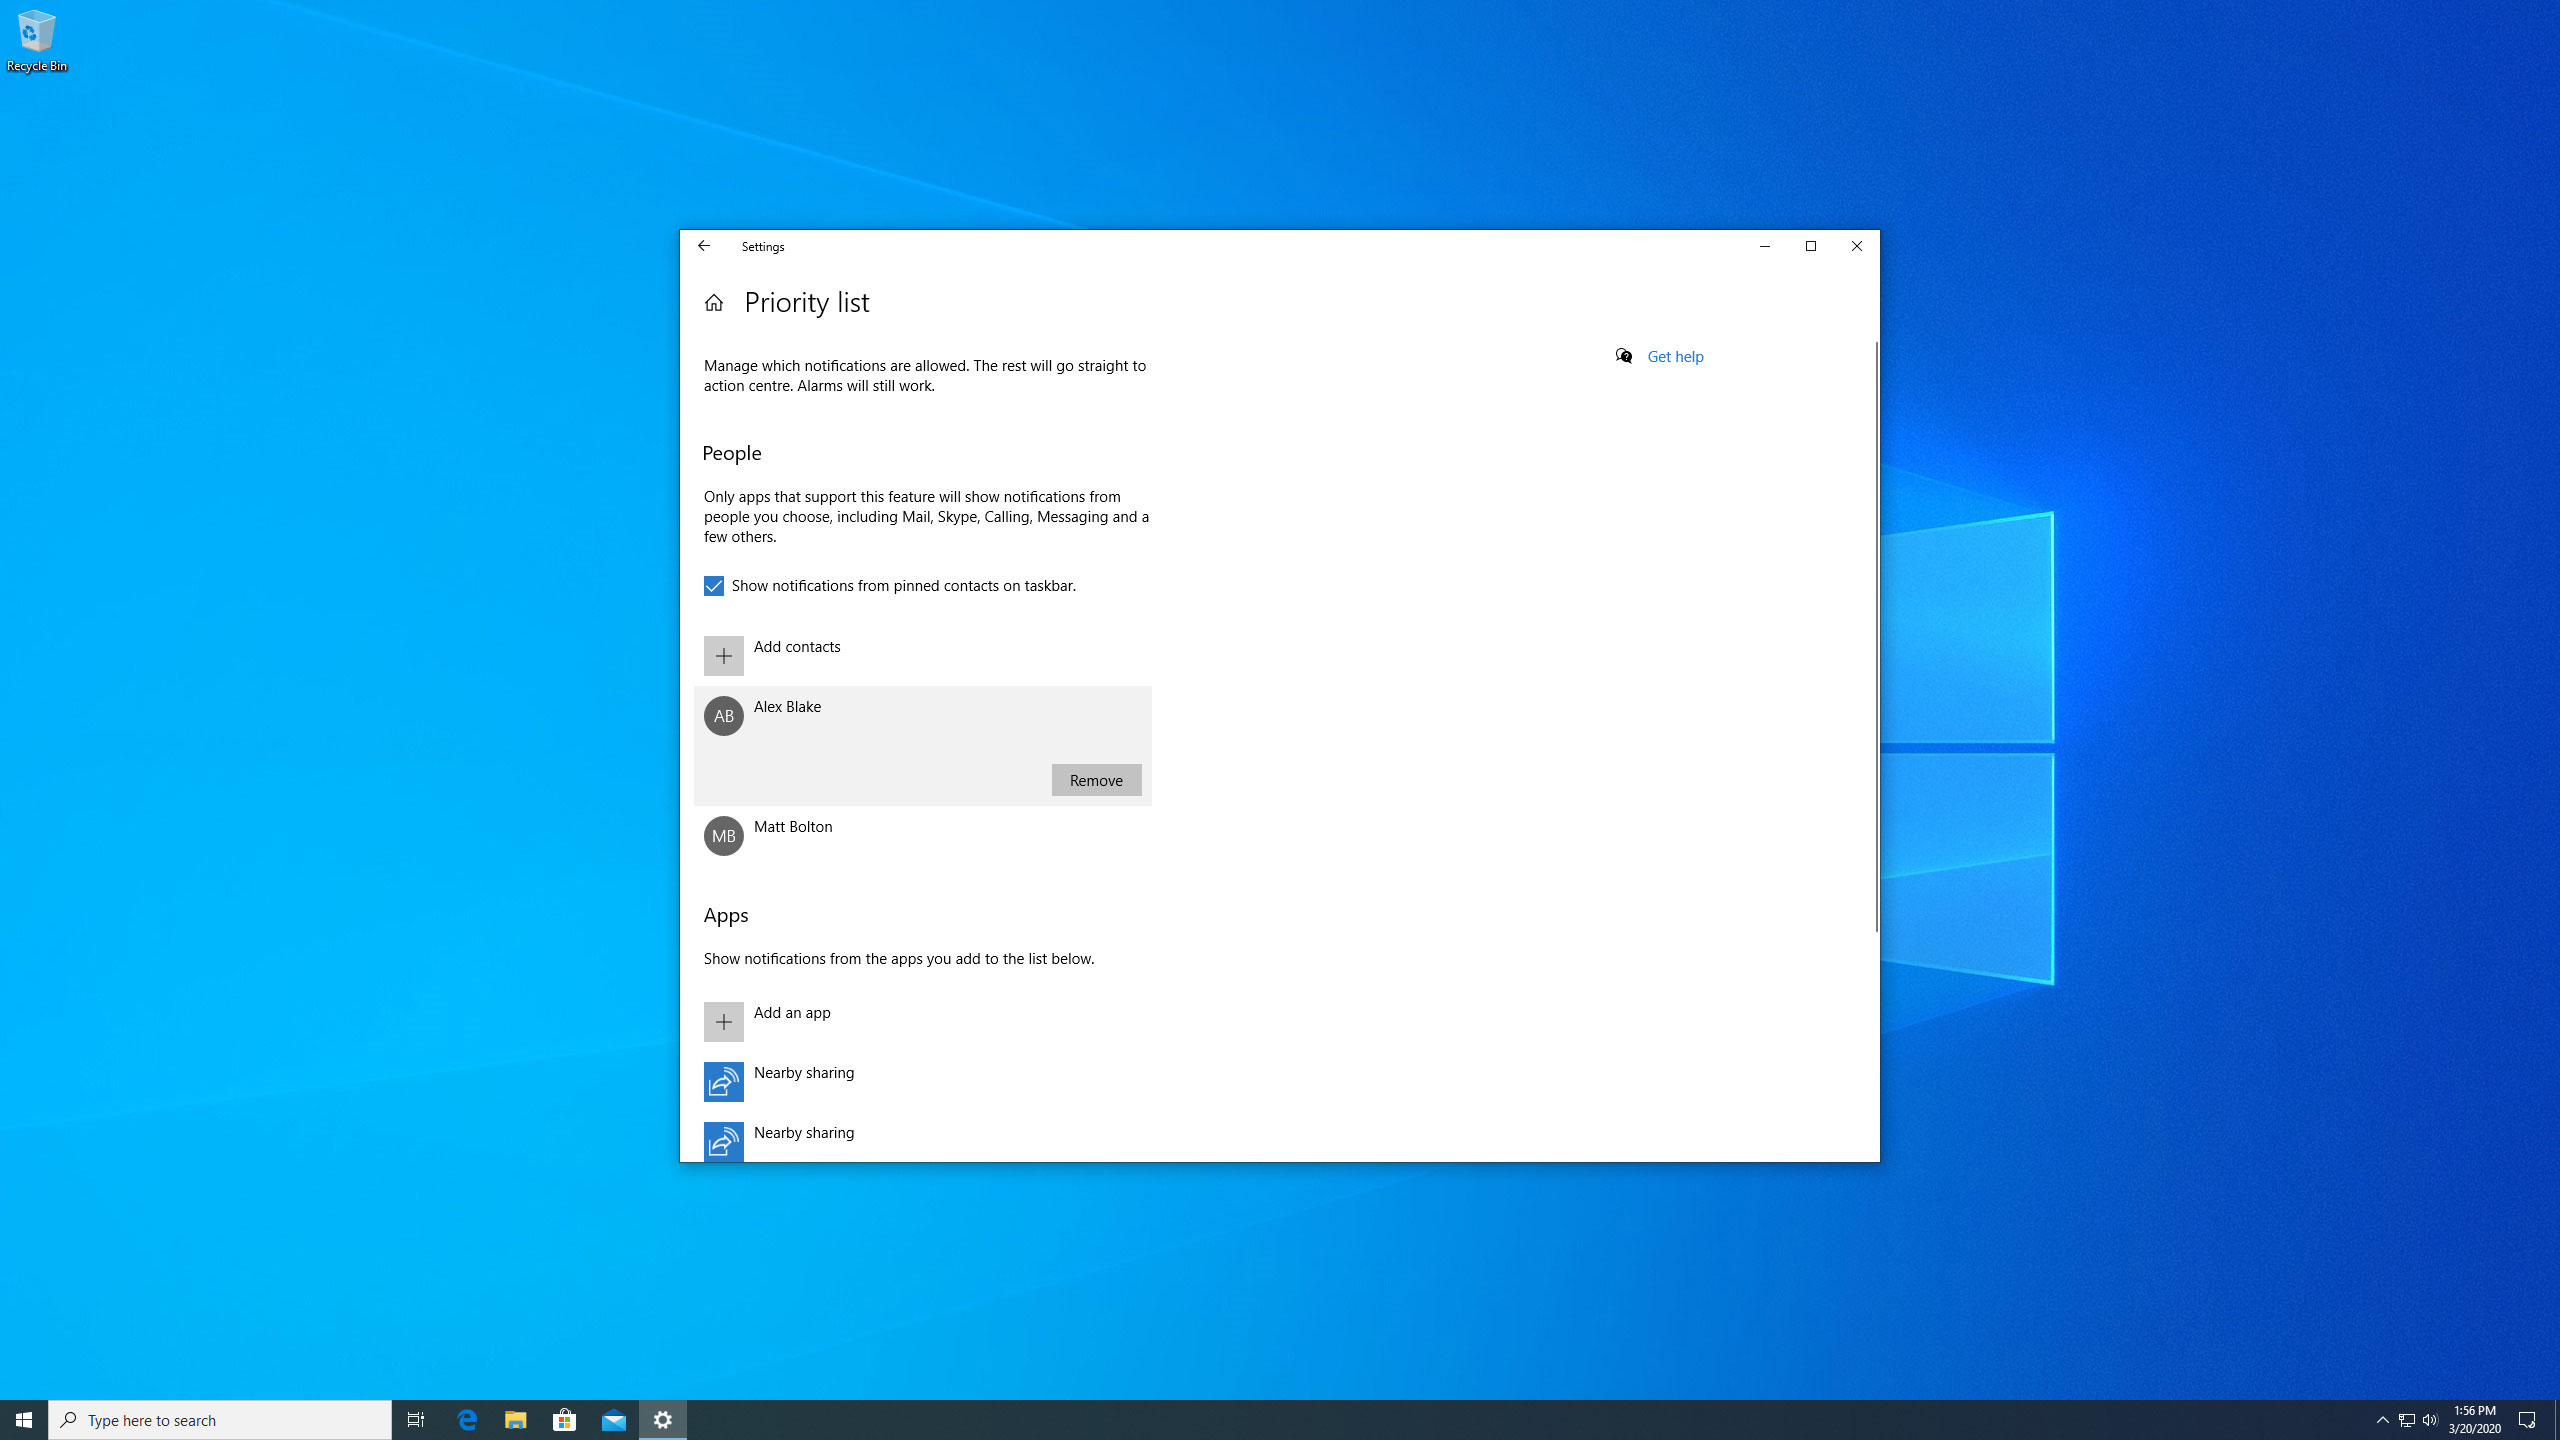
It’s a good idea to add important colleagues to your priority list to ensure their messages reach you. After clicking “Customize your priority list,” click “Add contacts” under the People heading.
You can scroll through the resultant list or search for contacts. Once you’ve found one you want to add, click their name and they’ll be added to a running tally; click the check mark to add your selected contacts to your priority list.
You can remove them by clicking their name in the priority list settings pane, then clicking Remove. If you have contacts pinned to the taskbar, you can also tick a checkbox to get notifications from them.
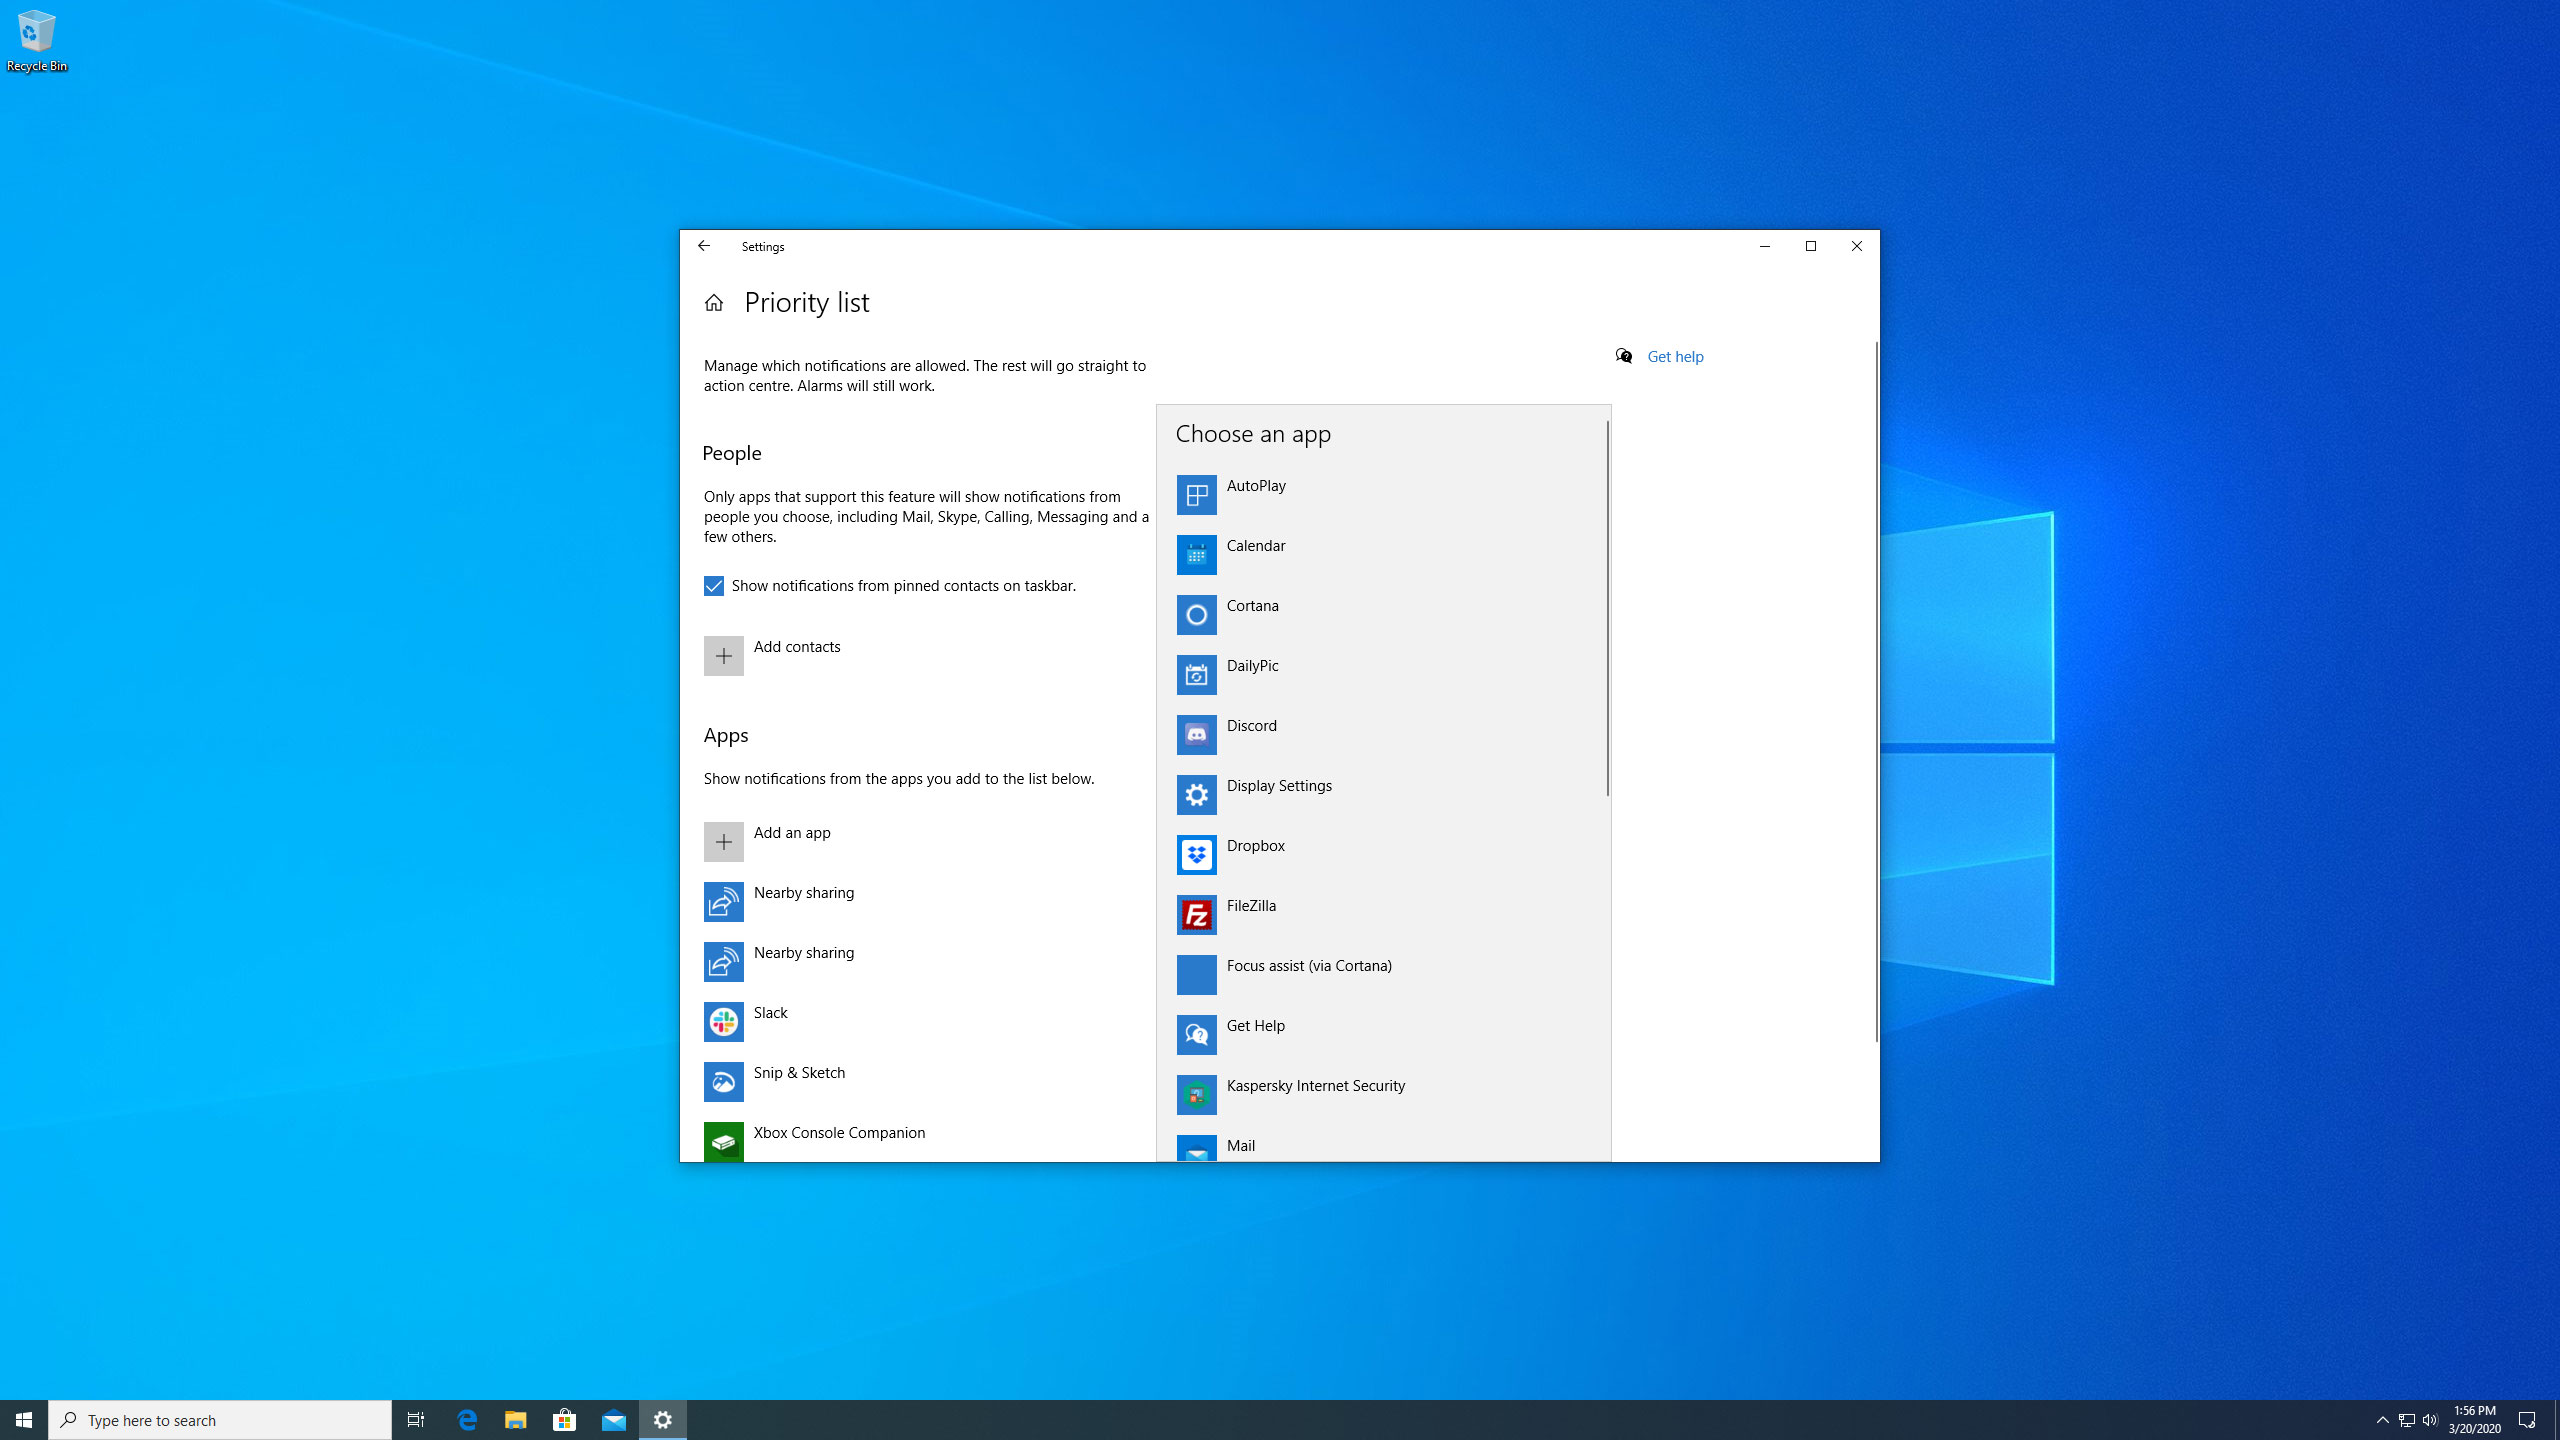
5. Choose priority apps
Just like contacts, you can choose certain apps that will always be allowed through. In the Apps section, choose an app from the list, or click “Add an app” if you don’t see the one you want.
Note that this is mostly limited to apps that are available on the Microsoft Store; desktop apps that have been downloaded from other sources will not appear in this list.
If there’s a notification-happy app that isn’t in the priority list, you may have to open it and alter its notification settings separately.
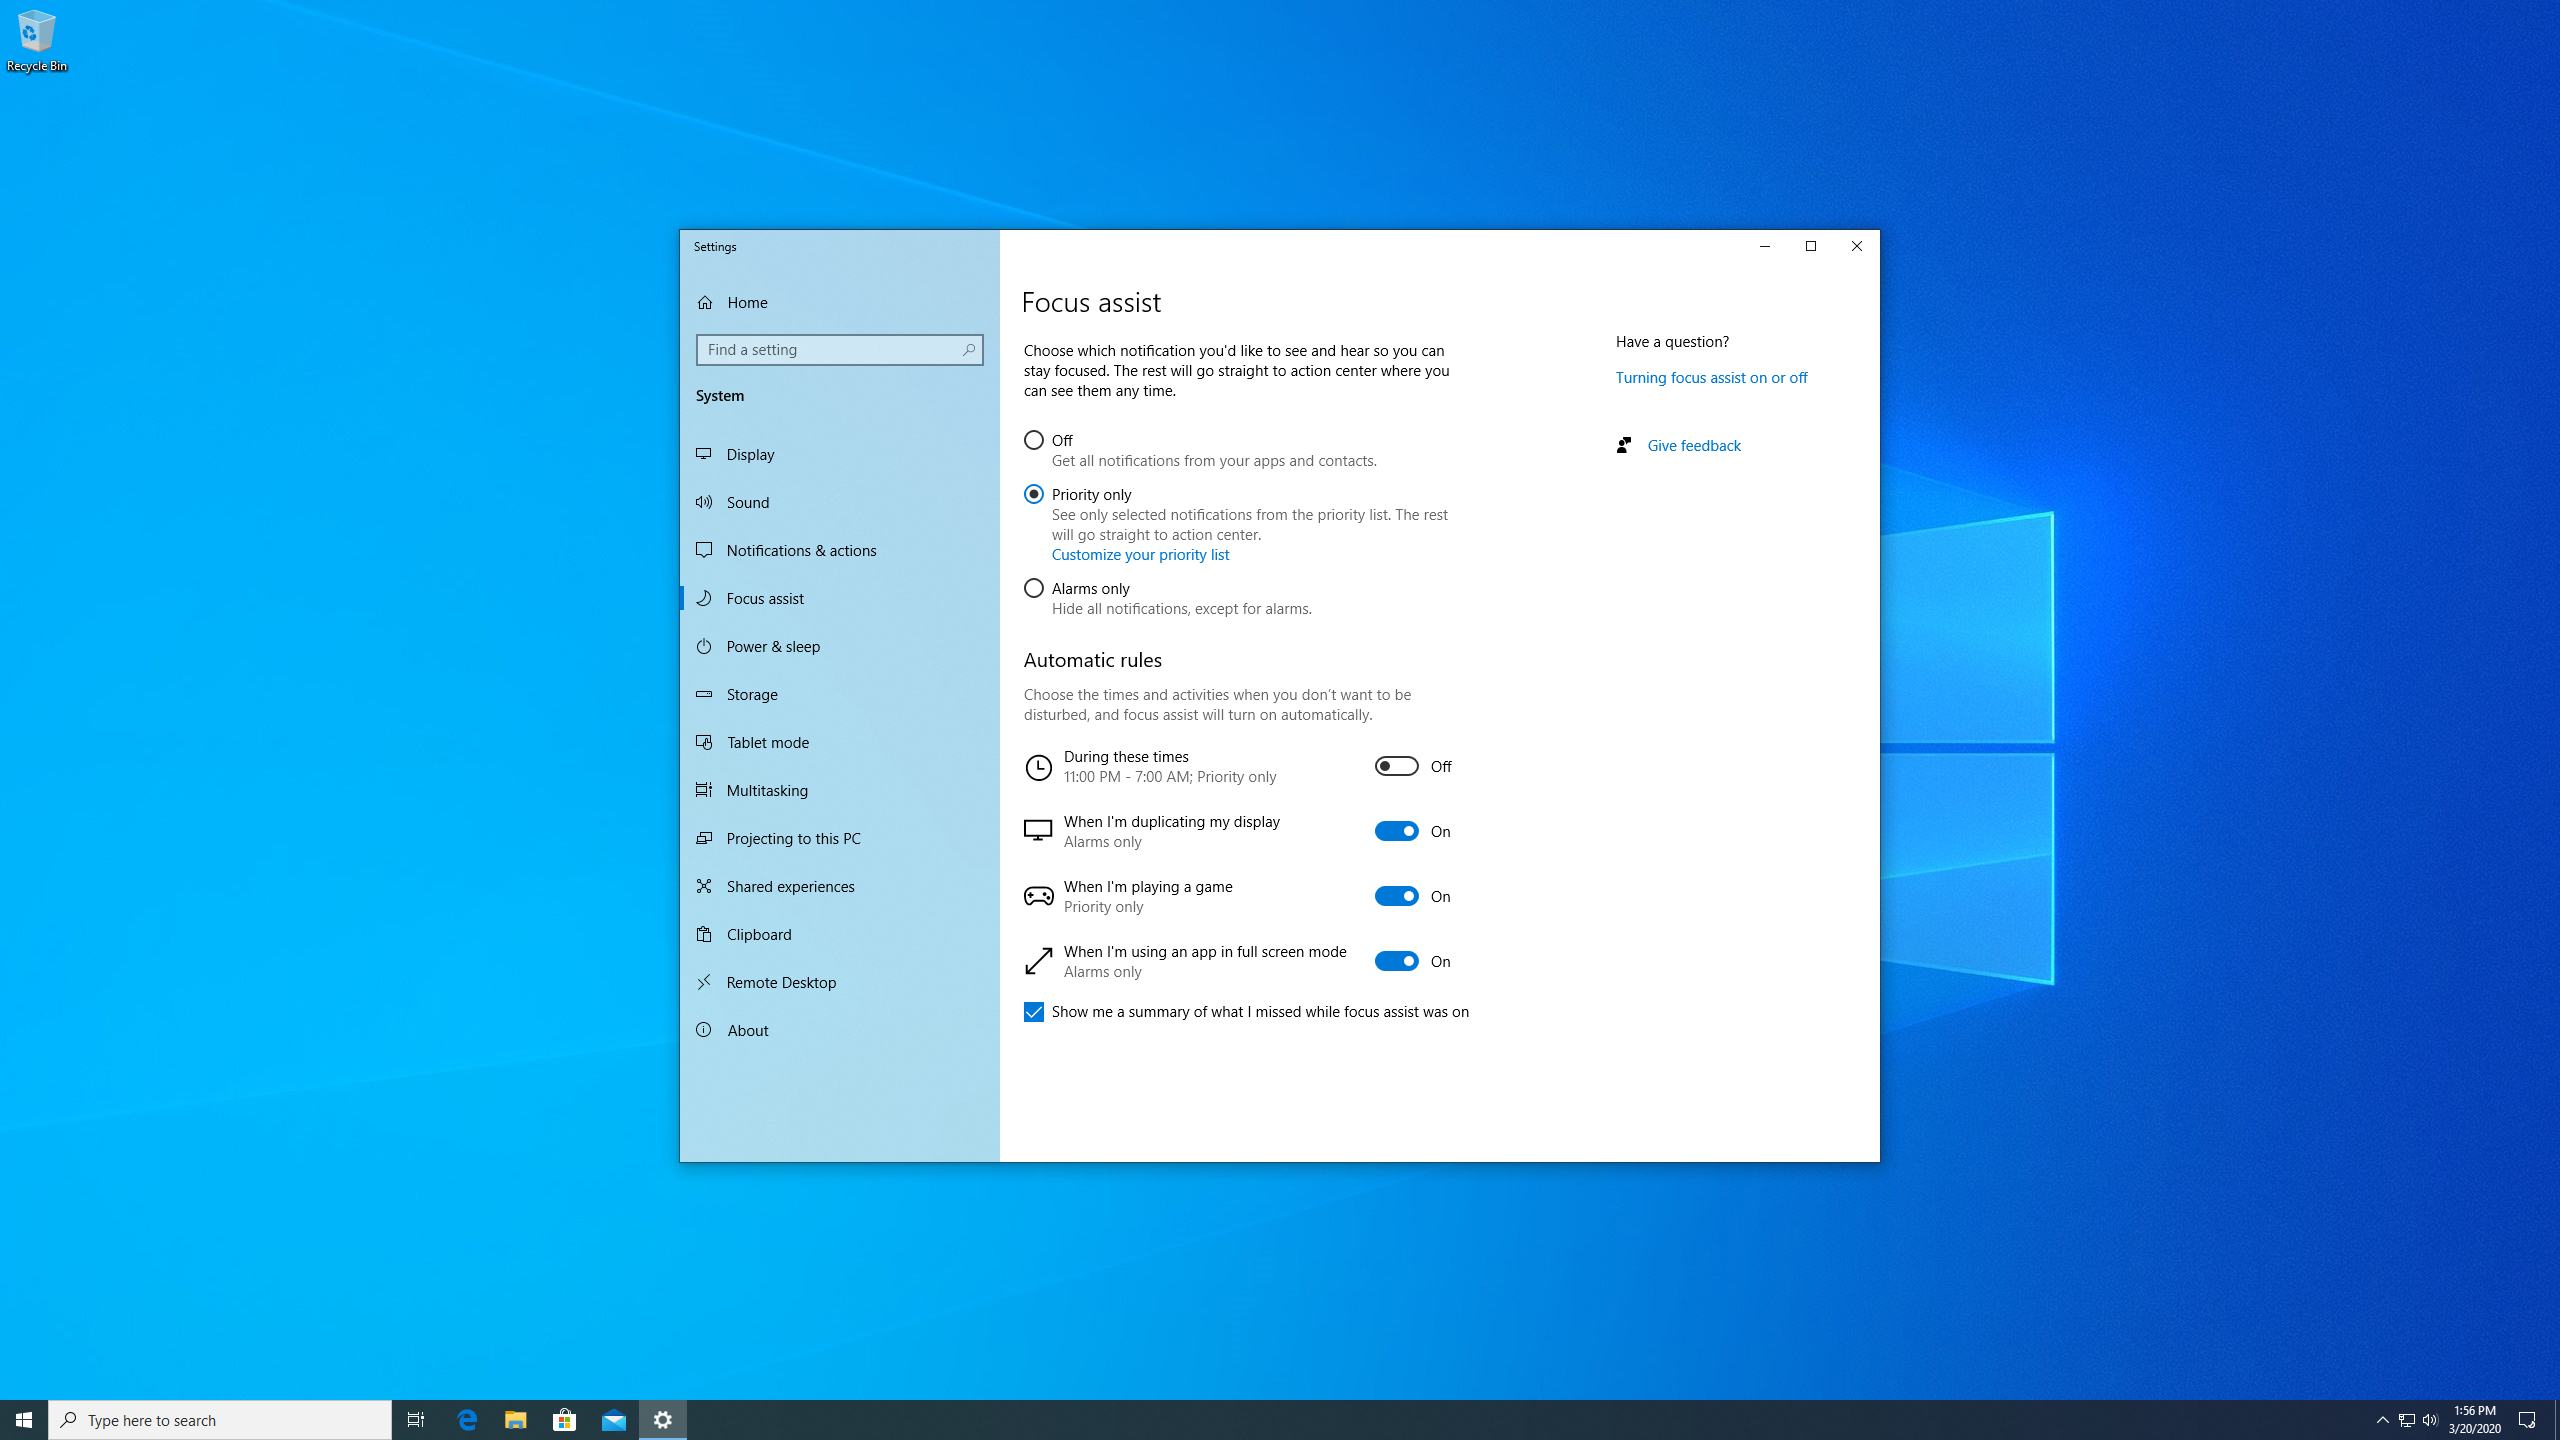
6. Set automatic rules
Instead of fiddling with Focus Assist every time you need to concentrate, set up a few automatic rules to have it take care of things for you. That’ll save time and let you get on with more important jobs.
There are four types of automatic rules: “During these times,” “When I’m duplicating my display,” “When I’m playing a game,” and “When I’m using an app in full-screen mode.” Each has one or two default settings; if you’re happy with these, simply click the slider next to the corresponding setting to enable it.
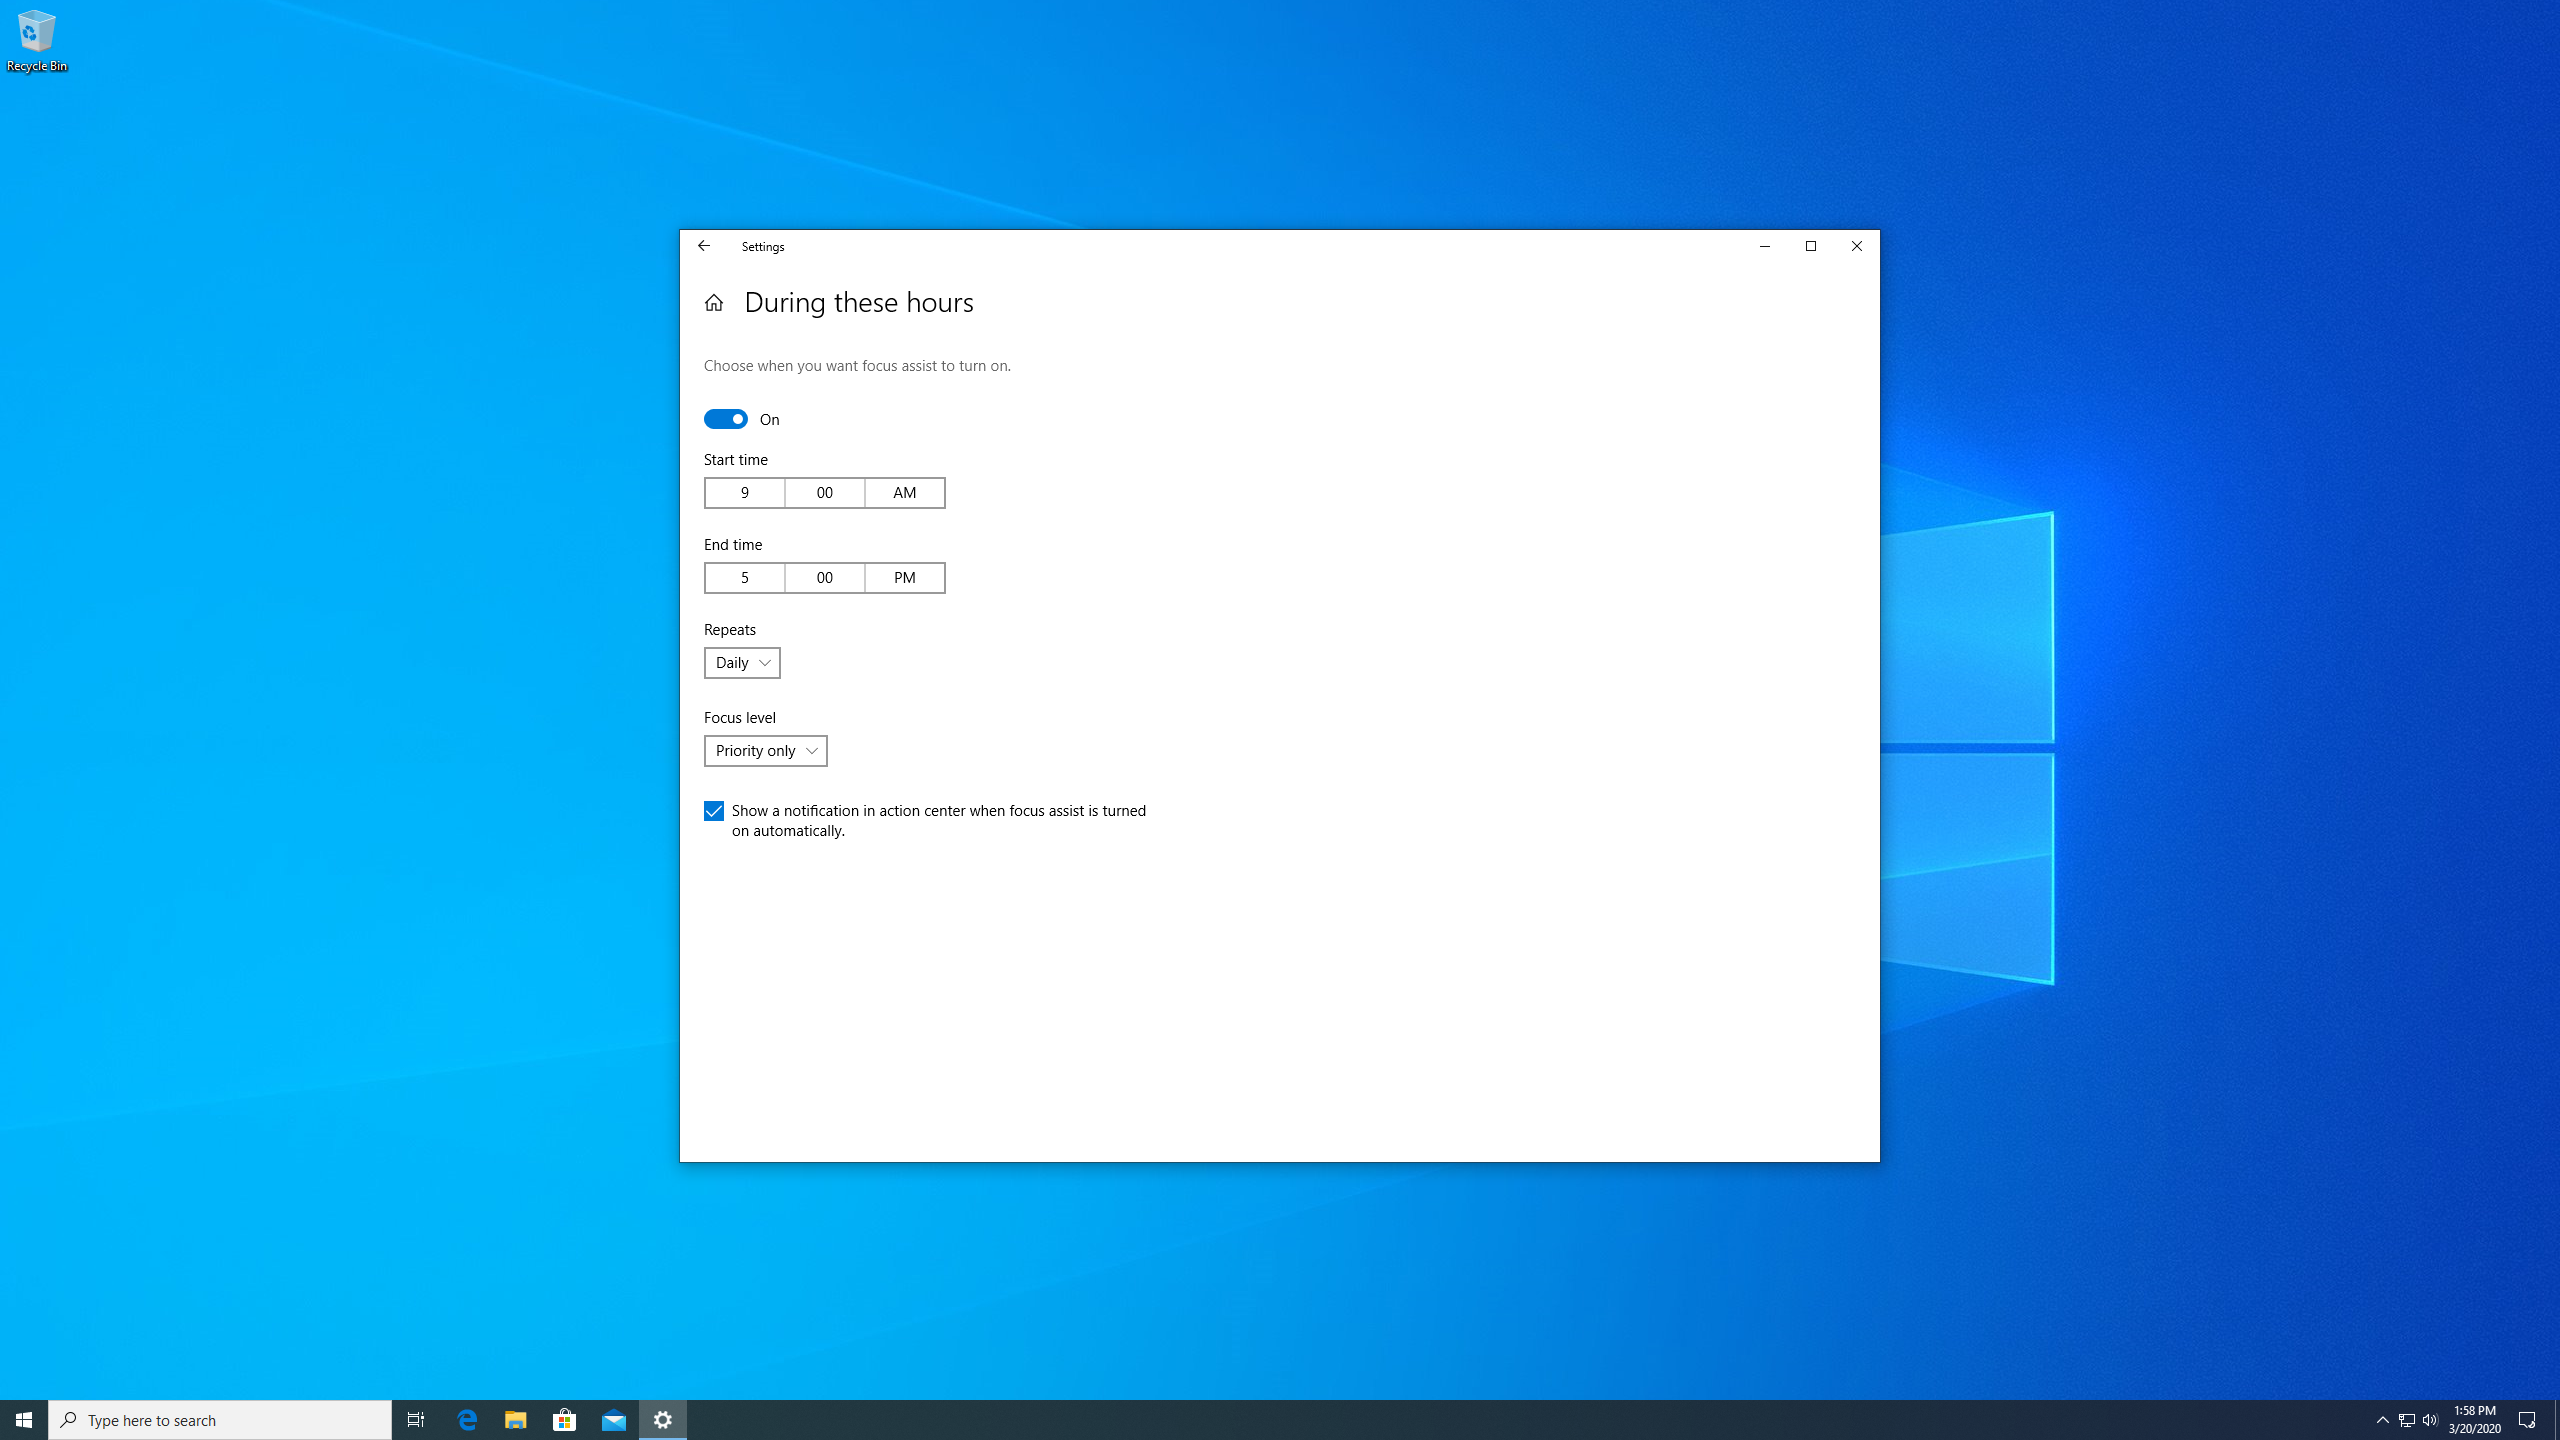
7. Customizing your automatic rules
You can get more granular control by clicking on an automatic rule; this also describes what each setting does in more detail.
After you’ve enabled it, more options will appear. For instance, you can choose when Focus Assist will automatically start and finish, on what days it occurs, and whether it allows through your priority list or alarms. This is ideal for blocking pesky distractions during work hours.
Each of these rules also has an option to display a notification in the action center when Focus Assist has been automatically activated.
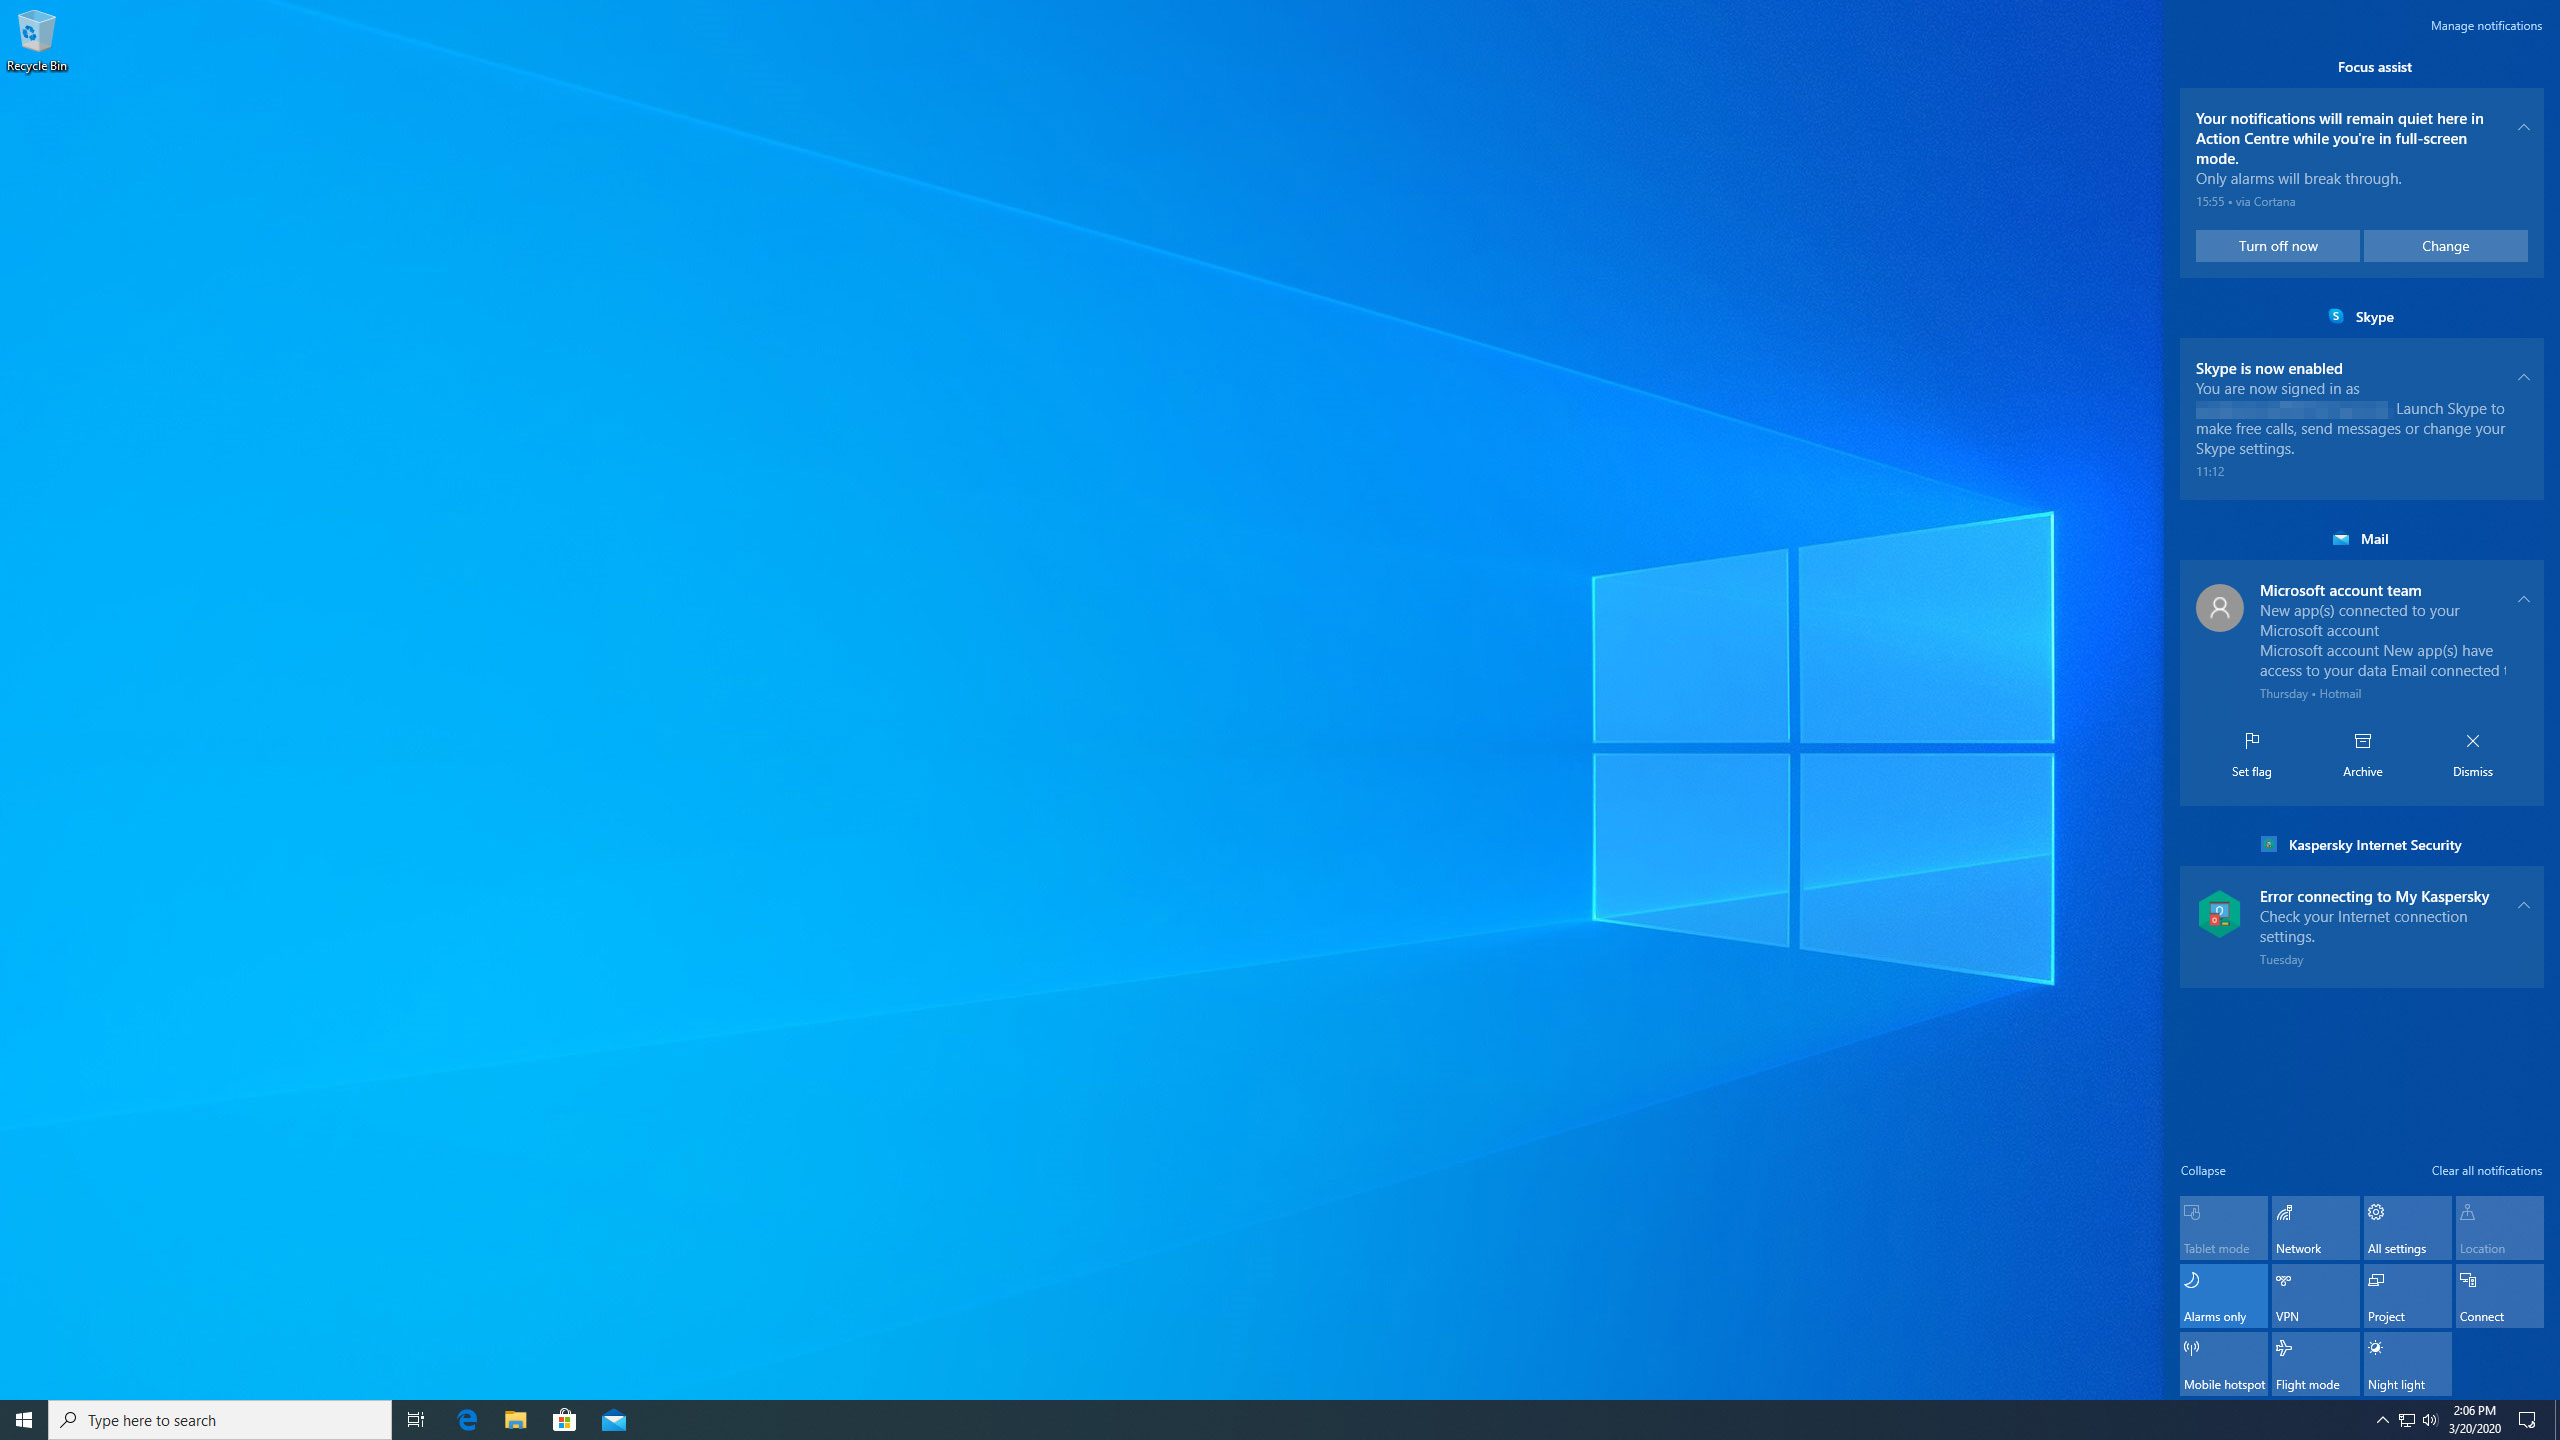
8. Catching up on what you missed
If Focus Assist has hidden notifications, the Action Center icon will be filled in; otherwise, it’ll be empty. Click the icon to see a summary of the notifications that were kept quiet while Focus Assist was on, grouped by app.
Click a message to view it in its parent app. You can hide individual notifications or groups, adjust the app’s notification settings, or turn off alerts for that app. Right-click an app name and you can add it to your priority list (provided it’s a Microsoft Store app). In some cases, such as emails, you can flag, archive or dismiss alerts from within the action center.
- These are the best laptops of 2020

Alex Blake has been fooling around with computers since the early 1990s, and since that time he's learned a thing or two about tech. No more than two things, though. That's all his brain can hold. As well as TechRadar, Alex writes for iMore, Digital Trends and Creative Bloq, among others. He was previously commissioning editor at MacFormat magazine. That means he mostly covers the world of Apple and its latest products, but also Windows, computer peripherals, mobile apps, and much more beyond. When not writing, you can find him hiking the English countryside and gaming on his PC.