Desks are rarely tidy places. If yours is like the ones at PC Plus, there are boxes, parts and old energy drink cans littering the space around the displays, which stand like gleaming beacons among the detritus. With even old graphics cards offering two if not three outputs, it's not unusual to have several displays on a desk.
Having your collection of monitors mounted on a single stand looks a lot neater and frees up desk space, but mounts, especially triple-screen ones, can cost more than the displays themselves.
Article continues belowStrut your stuff
Finally, we came across a system called Unistrut. This is an industrial building system used for serious cable management and light structural work. Importantly, it's affordable, strong, has the necessary parts, and is widely available. The likes of B&Q and Screwfix don't stock it, but many building merchants do.
The main problem with buying Unistrut is that many outlets charge a premium for small orders. This can be as much as £20, doubling the cost. If you can, find a local seller. Otherwise try www.fix8.co.uk, which charges a reasonable £7.50 for delivery.
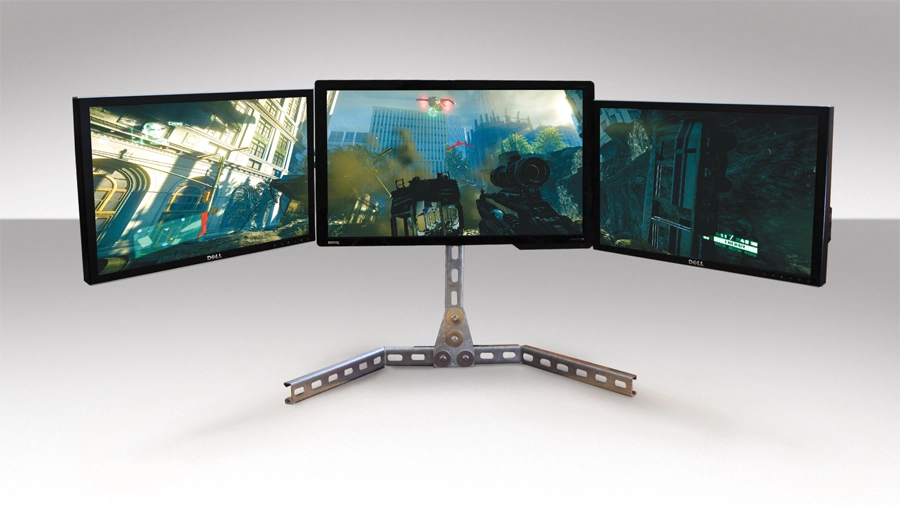
Our custom stand is made up of six parts: one 3m shallow slotted channel, two flat delta-T brackets and three homemade VESA brackets. The channel strips themselves seem to be available in 2.5mm and 1.5mm thicknesses, with the thinner option being a little cheaper. This should still be more than rigid enough, but doesn't seem to be stocked widely.
We imagine if you're trusting thousand of pounds worth of lighting - or even monitors - to support struts, you're not going to choose thinner supports just to save a few pounds here and there.
Alongside this, you also ideally need 14x 25mm M10 bolts, nuts and washers to make the stand. eBay is a good place to find cheap suppliers of bolts. You can get away with M8 roofing bolts instead, but make sure the washers you get are large enough that they don't slip through the slots.
You'll also need a pack of M10 38mm discs, also called repair washers, which are needed to stop even the large M10 bolt heads from slipping into the fixtures. These will work fine with M8 bolts, if you opt for those.
Additionally, to fix the monitors to the VESA mounts, you'll need to get hold of some 12 x 25mm M4 bolts. All of this should come to less than £30, including postage - a fraction of what a commercially built stand would cost. As long as you have a decent hacksaw and either a workmate or decent clamps, you won't need much more than a spanner and a screwdriver at your disposal.
Stand still
One aspect of the stand you may want to consider changing is the base. Our functional design simply uses an additional bar with two angled supports bent to shape. It works, but for a more solid and less conspicuous finish you may want to consider bolting the bracket directly to the desk instead - Unistrut offers alternative brackets that can be used to fix conduit directly to a base. Alternatively, you can bolt your home-made contraption to a prettier-looking stand that you've sourced elsewhere, though our priority was building a low-cost stand that made best use of what we had available.
When we were first planning this build, the first option we tried was to cut up the arms and then bolt everything together using 45° brackets. While this worked, it did increase the total cost, since the number of bolts required rose dramatically.
During our planning, we worked out that if we kept the total required lengths of the support under 3m, we would be able to reduce our requirements to a single 3m length of Unistrut channel. Our rough calculations for this were 60cm for the main crossbar and 40cm for both the extended arms and the upright. This is for 24-inch displays, but you may want to extend this to 45cm arms. Even so, this amounts to 150cm for the crossbar, 90cm for the base and around 30cm for the upright, or 270cm in total. Just enough to get the job done.
Components
1x 3m Unistrut shallow slotted channel £12
2x delta-T flat brackets £3
14x M10 25mm bolts, nut £2
14x M10 20mm washers £2
8x 38mm M10 discs £2
12x 25mm M4 bolts £2
1x 120 x 20 x 450mm plank £2