If you’re running iOS 8 on your iPhone, you’ve got Apple’s Health app. Lots of people haven’t so much as peeked inside it, though, and when they do, the hefty amount of health-tracking data can be daunting. But the app is a lot simpler than you might think, and it’s surprisingly useful even if you don’t exercise at all. It can really improve your life, and possibly even save it — we’ll show you how!
(Also see our list of great third-party apps compatible with Health.)
How It Works

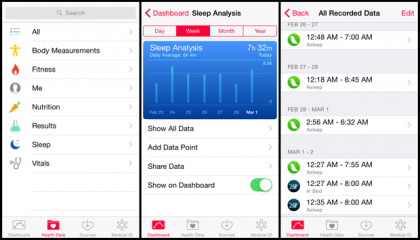
From Active Calories to Zinc, a long list of health categories can be tracked and charted.
Okay, first things first: What exactly does the Health app do? Well, if you don’t open it, fill in your personal data, and give compatible apps permission to work with it, Health won’t do much at all. And what fun is that? The app works as a centralized hub for all things health related. When you first launch Health, it’s pretty empty. The four tabs across the bottom of the screen include three tracking sections: Dashboard, Health Data, and Sources. We’ll start with those and come back to the fourth tab, Medical ID.
The Dashboard is where you can quickly check the data you decide is most relevant to you and see it graphed over time. Health is already logging steps (if you have an iPhone 5S or newer) and flights of stairs climbed (if you have an iPhone 6 or 6 Plus). This functionality is free and easy since your handset’s low-power M7 or M8 coprocessor logs this data in the background. If you use the Health app for nothing else, you can at least monitor how much you get up and move around.
The second tab, Health Data, organizes various metrics by category. Top of the list is “All,” which contains everything the Health app is capable of logging. “Body Measurements” is broken down into BMI, height, weight, and so on. Each subcategory has a management screen where you can review your data, add data manually, share it with third-party apps, and choose whether or not to include this information on your Dashboard.
Of course, manually adding data is tedious, and the whole idea behind the Health app is to make things easier. That third tab, Sources, is where things get fun. Here we see any compatible third-party apps you’ve downloaded to gather more data. And unlike the early days of health-tracking wearables like pedometers and Jawbone’s UP, battery drain is a non-issue since Apple’s low-powered M7 and M8 coprocessors take on tracking duties — the apps don’t even need to be running.
Sign up for breaking news, reviews, opinion, top tech deals, and more.
In Case of Emergency

A thorough Medical ID could help a paramedic save your life at the scene of an accident.
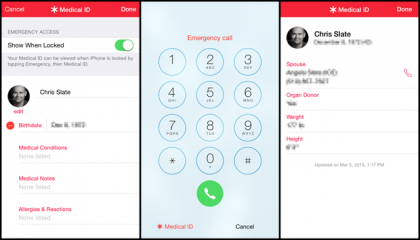
This brings us to the fourth, and arguably most important, tab: Medical ID. Do you take daily medications for high blood pressure, diabetes, anxiety, migraines, or other health concerns? Maybe you have severe food or medication allergies, or react badly to certain treatments? If so, that info needs to go in your Medical ID. Open the Medical ID tab and tap “Create Medical ID.” You’ll see a variety of fields to fill out, such as height and weight, medications you’re taking, allergies, and an emergency contact. At the top of the screen is a “Show When Locked” slider. Health responders are learning that an unconscious patient’s phone can be a vital source of health information.
Tap the Emergency button at the bottom-left of the Passcode screen and you’re taken to the Emergency Call Screen. At the bottom of that screen is a link to your Medical ID for easy access. You can choose which information to share in your Medical ID, but if you’re taking medications with major contraindications or have life-threatening allergies, it’s best to put those things out in the open. It could be a matter of life and death.