MythTV is the best and most powerful open source media server player you can install on your Linux PC. Not only does it record, pause and rewind multiple channels of standard and high-definition television, it can also manage your media collection, play games, open the curtains, skip adverts and play almost any kind of audio file. Only one of those was an exaggeration.
It can be remotely controlled from the internet, or your iPhone, and it can stream your recordings, and your media collection, to any device in the world, including UPnP devices like the Playstation 3. The only cost is the toll on your patience, because getting a working configuration can take some time.
Article continues belowInstall Mythbuntu
When the CD boots, you have the option to try or install - choose 'Install' and enable the options to grab packages in the background and the third party media codecs. As Mythbuntu is bolted onto the standard Ubuntu installer, so you should have no difficulty navigating the first few options.
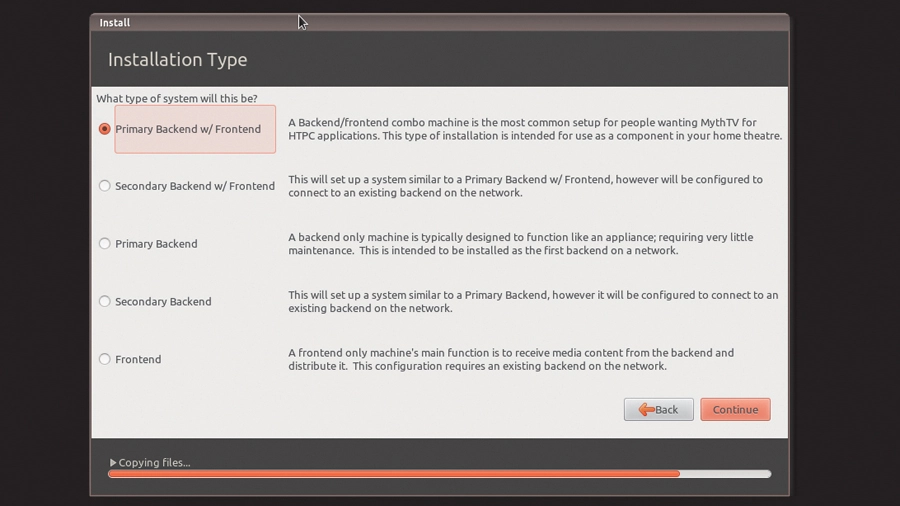
However, you'll soon need to answer a few specific MythTV questions. The first asks what type of system your installation is going to be, and you need to choose the first option - 'Primary Backend w/ Frontend'.
MythTV differentiates between what it calls the back-end and the front-end. The back-end is the recording powerhouse. It manages the television recording hardware and populates the database with your content. It's also responsible for running the web interface and streaming your content. You need at least one back-end.
The front-end is the part that's usually connected to your television. It's the GUI and the modules used to access all of MythTV's functions. Most users run both on the same machine, which is why we've gone with the first option. But you can also forgo the front-end, or use a low-power silent computer next to the television, and hide the noisy power-hungry back-end up in the loft somewhere by your childhood memorabilia.
The second question asks which kind of services you want to run, and you can leave this at the default values.
The third asks if you want to configure your iPhone or Android device as a remote control. We'd highly recommend you do, as configuration is automatic and you can use the provided QNR code to download the app directly to your device.
Depending on your graphics hardware, you may also be asked whether you want to install the proprietary drivers. Unless your hardware is old, say yes.
And with those questions out of the way, wait for the installation to complete and allow it to restart your machine.
Configure the input

Weirdly, when Mythbuntu restarts, it will automatically run the front-end. But it's not configured yet, so you need to quit the front-end (press [Escape]) and go to the 'Applications > System' menu from the desktop then select 'MythTV Back-end Setup'. Allow it to close the back-end process by entering your password.
You've now got to work your way through a few configuration windows, starting with the 'General' option from the first page. You can leave the host address setup at its default values, but if you ever want to run a front-end from a different machine on your LAN (or from the internet), you should enter the IP address of your MythTV machine rather than leaving it as 127.0.0.1.
On the next page of general settings, change the TV format to PAL and the channel frequency table to 'europe-west'. All the other pages can be left at their default values.
Now choose '2. Capture Cards' from the root menu. Press 'Enter' on 'New Capture Card' and on the following page, select 'DVB DTV Capture Card'. As we've recommended in the hardware box, DVB is the easiest and most powerful option, and you should see that your DVB device has been recognised and listed. If not, then there's a hardware compatibility problem with Linux and your DVB device, and you'll need to consult the wisdom of the internet.
Select 'Recorder Options' and change the 'Max Recording' values to 2 to enable your hardware to record two channels from the same multiplex. If you're using a satellite receiver, enter the DiSEqC options page and create a 'LNB' configuration with an LNB Preset of 'Single (Europe)'. Click 'Finish' to return to the root configuration menu.
Adding channels

Skip the Recording Profiles menu option and jump into '4. Video sources'. This is where we tell MythTV where to get programme information (the EPG data).
Select 'New video source' and call it EIT. Change the listings grabber to 'Transmitted Guide Only (EIT)'. This is the easiest option as it requires no further configuration and will grab seven days' worth of data automatically from the digital TV stream.
Finish that page and enter the next page - '5. Input connections'. This is where we link the video source, DVB, with the programme data, EIT.
On the first page, make sure the capture device is correctly displayed and change the video source to EIT. Now click on 'Scan for channels'. Digital terrestrial viewers need only to select a country to begin, whereas satellite viewers need to enter a frequency of 10714000, with horizontal polarity, a symbol rate of 22000000 a Mod Sys of DVB-S, FEC 5/6 and QPSK modulation. Click on 'Next' to perform the scan.
To add high-definition channels, change the frequency to 10847000, the polarity to vertical, the symbol rate to 23000000 a Mod Sys of DVB-S2 and a FEC value of 8/9 and perform the scan again. Hopefully, your system will find plenty of channels, and you can check which have been detected - and edit them - using the channel editor which is option 6 from the root setup menu.
This is all the configuration you need, so when you're ready, quit the setup application, enter your password, and say 'No' to running 'mythfilldatabase' unless you're running XMLTV.
Running the front-end

Now it's time to go back to the front-end to check how things are functioning. It can be started manually from the 'Multimedia' menu from the desktop. When the front-end has loaded, select 'WatchTV' from the menu.
With a bit of luck, after a few seconds you'll be watching a live broadcast from one of the detected channels (you can choose which channel this starts on from the setup utility). Press [p] to pause, and use cursor left and right to move backwards and forwards through the recorded buffer. Up and down changes channels, and you press [i] to learn more about whatever you're watching.
You can press [r] to start a recording, but there are many more options that can be accessed through on-screen menu by pressing [m]. Go from there to the 'Schedule > Program Guide', for instance, and you can view the EPG.
If this is the first time you've run the front-end, you'll have to wait a short while for the guide to be populated with data, but you can watch as slots are occupied with programme information.
Press return on a programme to see Myth's excessive scheduling options, which can record anything from a single instance to every programme containing a keyword. Many of the same functions are also available without watching live TV first. Recording can be scheduled from the second menu option, for example.
If you don't like Mythbuntu's appearance, take a look at the 'Setup > Theme chooser' menu. This lists any currently available themes, customised for various aspect ratios and fonts, and you can enable them with a click. Fine-tune the fonts, colours and overscan for your television in the Appearance menu, and we'd also recommend enabling the OpenGL output module if your hardware is capable.
Settings Manager

Mythbuntu also comes with a fantastic utility that can be used to install the myriad of plugins that come with MythTV, as well as change your graphics configuration, update your remote controls and update packages. The tool is called the 'Mythbuntu Control Center', and you'll find it in the settings menu.
If you want to use a different desktop, or change your installation to be the secondary back-end, use the switches on the System Roles page. If you want to convert your recordings for use on a different device, try the MythExport module. You can enable DVD playback from 'Proprietary Codecs'.
The best page in this panel, though, is the one that enables MythTV's various plugins. From the 'Plugins' module, we'd recommend enabling 'Mytharchive', 'MythGallery', 'MythMusic' and 'MythWeb'.
The first will let you archive your recordings to a variety of formats, the gallery is for holding and displaying photos, while music handles your audio files. It can play almost anything, so it's worth trying.
Finally, MythWeb is the best of the lot. It installs a web portal to your MythTV configuration, which lets you schedule and watch your television from anywhere on your LAN and the internet, although it will need a few more packages to be able to function.
After installation, you'll need to point a web browser at the IP address of your MythTV box. From the web page that appears, click on 'Listings' to get a far more usable EPG than the on-screen version. It will also let you click on television shows and access the same recording options you get from the front-end.
After a recording has been made, you can watch them from the 'Recordings' page by either clicking on the 'ASX' stream - which should work on a Windows machine - or by dragging the direct download into something like VLC.