There's no denying 3D printing your own plastic creations is an amazing experience, one that lets you exercise your creative muscles and watch your very own products come to life right before your eyes. It's fun to print an on-demand toy, smartphone case, guitar pick, or virtually any other idea that might pop into your head.
Although some of those items might prove useful, how practical is it to 3D print something of value versus simply buying it from a store? Sure, there's always the satisfaction of DIY making, but is that the only advantage?
Article continues below 
As with many files of this type from an external source, these Thingiverse objects are provided in STL format, which usually needs to be converted via 3D slicing software to G-code or some other data set that your printer can understand and is optimized for its settings. Popular conversion software includes Slic3r and Cura, or your printer may have its own software.
In this case, I'm using New Matter's web interface for the MOD-t to upload and print the STL files directly. My workstation is a Windows 10 desktop running the Chrome web browser.
The MOD-t has a maximum build size of 6 x 4 x 5 inches (15 x 10 x 12 cm), which is within the range of most other 3D printers. As such, none of the objects I made approach the limits of that build envelope. Additionally, to further simplify printing, none of the selected objects have overhangs or other features requiring support material. Finally, none of the prints should require much post-processing other than the usual snipping of stray filament strands.
In identifying the four household items to print, I wanted to make sure I represented diverse living spaces: kitchen, foyer/entryway, home office/workspace, and bathroom. I'm tackling the rooms in the order of relative object print length and complexity, from shortest and simplest to longest and most complex.
At the end of each print description, I provide the link to the 3D model, the exact filament used at the highest quality print setting and as close to the recommended temperature setting as possible for the MOD-t, estimated average print time for a typical 3D printer (noting that the MOD-t is slower than the average given), and a final verdict of whether you're better off printing or simply buying a retail version of the end product.
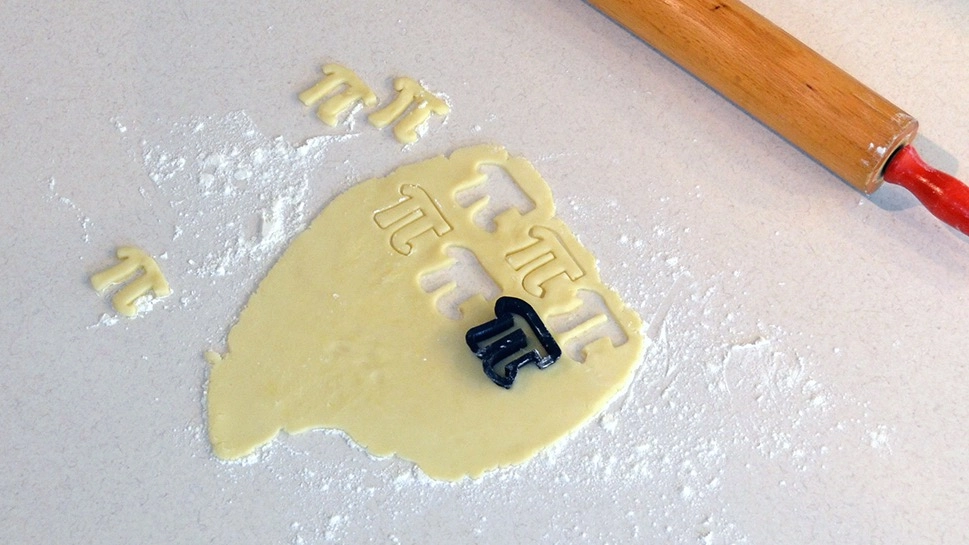
Custom cookie cutter for the kitchen

The simplest build in my adventures, a cookie cutter provides an easy path to show off your creativity since just about any shape is in play. It's also the only object I made that's meant to help you create something else - in this case a tasty treat in the shape of the printed cutter.
Although cookie cutters are widely available, 3D printing your own allows you to print exactly the shape you need on-demand. Whether it's a surprise party, family gathering, holiday, or wacky pseudo-holiday like Star Wars Day or International Talk Like a Pirate Day, the opportunities are endless.
Although my sample print is a Pi symbol in honor of Pi Day, you'll note that model maker "mrbrenbritton" also makes several other mathematical symbols available. Combine those with a set of numbers, and you'll have cookies with incredible educational potential.

Thanks to its non-toxic nature, most PLA filament is a good choice for builds like this that come into temporary contact with food. The fact that you are working with raw cookie dough that then gets cooked further reduces any risk of bacterial or other contamination. Of course, you'll want to take particular care to trim any stray strands of filament on the build and wash the cutter with warm, soapy water before use.
Although the default size of this print is small, creating rather tiny cookies, it's easy to scale the model's size in the software of choice. This scaling ability combined with the option to choose or create literally any shape imaginable makes purchasing cookie cutters from the store completely unnecessary.
Filament Used: MakerGeeks.com Maker Series PLA - Charlie Brown
Estimated Average Print Time: 1.5 hours
Verdict: Print it
Light switch cover for the foyer/entryway

In an informal study, it was determined that one out of two adults in my household misplaces her keys on a daily basis. One potential solution to this location consistency problem was to power up the humble light switch cover with hooks.
Although model maker "asbeg" has variations for double light switch plates and a top shelf, which is good for holding wallets and other objects that can't make use of the hooks, I went with the single switch plate and no shelf design for our foyer/entryway.

While the print itself came out nicely, our wall receptacles require rounded, beveled edge light and outlet switch covers. As a result, when replacing one such cover with this flattened design, there was a visible gap around the edges of the plate.
Despite the convenience of the hooks (or shelf), the relative low cost of even fancy light switch covers that are easier to fit and have a higher quality finish make for a tough challenge for a 3D print. This is one build better left to a purchase from a store.
Light switch cover 3D model link
Filament Used: MakerGeeks.com Maker Series PLA - Charlie Brown
Estimated Average Print Time: 4 hours
Verdict: Buy it
Pen/pencil holder for home office/workspace

This is arguably the most striking build in my 3D printing adventures. Although model maker "Ryanvent3D" came up with a design that has significant artistic appeal, it's also genuinely practical.
While most commercial holders make do with a simple bucket design to dump all of your pens, pencils and scissors into, the seven individual cavities in this honeycomb structure provide easy access to the exact utensil you're after.

Coincidentally, this type of honeycomb pattern, prized for its stability, is usually the preferred structure for the interior of 3D printed objects. Here, it provides similar structural strength, but with a dramatic twist to keep every utensil pointing in its own direction for even easier access.
With a design that would stand out on any desk and an ability to print in a color or material type that best fits your mood or décor, you can feel good about avoiding the store with this build. It might even inspire you to print your own matching desk accessories, like a paperclip holder or smartphone stand.
Pen/pencil holder 3D model link
Filament Used: MakerGeeks.com Crystal Series PLA - Translucent Green
Estimated Average Print Time: 14 hours
Verdict: Print it
Soap dish for bathroom

Unlike the other prints, this build involves printing two separate pieces rather than one. This clever design from "piuLAB" makes use of the aforementioned honeycomb pattern for the upper soap drainage rack, which lays nicely on top of four small supports on the bottom base unit.
While soap dishes are widely available in every price range, this particular 3D print has notable advantages over the store-bought equivalent. Beyond the practical design, this is one build where being able to load any color filament you wish becomes a significant advantage. You can mix and match colors for each piece to perfectly coordinate with your bathroom's décor, and, of course, can even print for special events like holidays, such as orange and black for Halloween.

Pair it with an appropriately colored soap, and all of a sudden you've become a design master - and that's even before you print things like matching toothbrush and razor holders!
Finally, while this is intended as a soap dish, it can also pull double duty as a sponge holder. The upper platform just happens to be the perfect size for common kitchen sponges.
Filament Used: New Matter Arctic Blue Pearl PLA
Estimated Average Print Time: 16 hours for both pieces
Verdict: Print it
Should you really print instead of buy?
When I started on this 3D printing journey, I wasn't quite sure what the outcome would be. I knew there would be a great deal of personal satisfaction just going through the process, but I wasn't sure how practical these prints actually were.
As it turned out, three out of the four proved their use straight from the printer. The one anomalous object, the light switch cover, failed the practicality test only because it didn't quite fit the peculiarities of where it was being placed, added to the fact that it's going up against such an inexpensive retail product.
Despite this particular miss, the ace-in-the-hole for 3D printing versus buying any of these products is that it gets you thinking about possibilities.
For instance, even with the negative verdict on the light switch cover, I became more satisfied with the outcome when I placed the build directly over the pre-existing light switch cover. While this layering might look a bit unusual, it addresses the gap issue I ran into. And as nice as the pen and pencil holder turned out, I noticed that when I placed it on a particularly slippery surface, it slid a bit when a utensil was removed. The fix? Putting a rubber backing on the bottom.

Although the finish of objects made from most 3D printers, including the MOD-t, doesn't match up with their retail counterparts, they have a charm all their own. The textures created by the 3D printing process, which builds an object layer by layer, is distinctive. Perhaps most importantly, though, is that as long as the build is designed with a sound structure, like the items in this article were, they can be every bit as strong or stronger than what you might buy in a store.
From a time standpoint, it was easy enough to find appealing free models, taking no longer to browse Thingiverse than a typical shopping experience on Amazon.
The only real wait involved the printing, but once started, even the longest builds printed without additional intervention. Despite taking more than 37 total hours to print these four objects on the MOD-t, I still felt it was a far more interesting use of my time than driving to the store and browsing the shelves for just what I wanted.
As for the MOD-t, it performed admirably. While there are dozens of 3D printers to choose from, ranging from low-cost kits to high-end professional models, the MOD-t distinguishes itself in a crowded market. Although there were some challenges to overcome, as is inevitable with any new technology, the learning experience was pretty painless.

The printer's modest size and stylish exterior also made it a welcome desktop companion. I loved having it on my standing desk, and the whole family enjoyed gathering around it to watch it print. It was like having a mini factory right in our home.
While the cost of the printer and the filament, which averages around $25 (about £19, AU$33) per 1kg spool, might seem a high for comparatively modest output, keep in mind that this is just scratching the surface of what is possible with a device like this.
That same $25 spool can print dozens or even hundreds more objects before needing to be replaced, making the value proposition far more favorable against the equivalent of even relatively inexpensive retail products like the ones I printed.
Although printing pre-rendered objects is a small fraction of what can be accomplished with a 3D printer, it's an excellent first step to the eventual goal of crafting your own objects. We all need to begin somewhere, and as a starting point, the printing I did was extremely rewarding and surprisingly practical.
Whether 3D printing is right for you is a bigger question because there's a relatively high learning curve and other challenges with even the most user-friendly setups. There's planning and troubleshooting involved in 3D printing, so it may not be for everyone. Nevertheless, as you can see from the four 3D printed objects featured here, the effort you put in can really pay off.