How to upgrade your PS3 hard drive
There's plenty of life in the PlayStation 3 yet - here's how you can upgrade your PS3 hard drive and keep racking up those downloads...

Sign up for breaking news, reviews, opinion, top tech deals, and more.
You are now subscribed
Your newsletter sign-up was successful
If you want to upgrade your PS3 hard drive to create more space to download digital content, then you've come to the right place. While the PS3 isn't exactly hot property in the gaming world anymore, we're fairly confident that you likely haven't even played half of its best titles yet, which makes upgrading the hard drive well worth it.
While there are tons of games you can play on the Sony PS3, most models of the console simply don't have enough hard drive space to store all that many game installs. Some games, like the digital version of Unchartered 3, will eat up a huge chunk of an older PS3's HDD.
Thankfully, if you don't fancy splashing out on the Sony PS4 Slim or the PS5, both of which come with more storage space than the PS3, you'll find it super easy to upgrade your PS3 hard drive yourself, saving you a ton of money in the process.
Below, we walk you through everything you need to upgrade your PS3 hard drive and take you through the process step-by-step, including buying the best hard drive and how to back up all your saved games. You only need to set a half-hour or so aside: it really is that simple. Let's get started...
What you'll need:
- 1x PS3
- 1x Phillips screwdriver
- 1x 2.5-inch SATA HDD
- 1x USB stick (8GB preferred) or 1x FAT32 USB HDD
- 1x laptop or PC with internet
- 1x PS3 controller
- 1x miniUSB cable
Step one: buying the HDD
When it comes time to upgrade your PS3 hard drive, you need to make sure it's a 2.5-inch serial ATA drive of 9.5mm height or less.
In practical terms this means you can buy most 2.5-inch 500GB or 1TB slimline hard drives without any major issues. 2TB hard drives are often a little too tall, but then that capacity is arguably overkill for the aged PS3, especially as the drive will usually cost you at least £85 (US$115, about AU$167).

If you opt for a 5400rpm drive, another spec you should see listed alongside capacity, you'll get similar performance to the standard PS3 HDD. Upgrade to a 7200rpm hard drive or a more expensive 2.5-inch SSD, though, and you'll see significantly improvements to load times. You'll generally have to pay around £15 more for a 7200rpm drive, though, and SSDs are a lot more expensive.
Sign up for breaking news, reviews, opinion, top tech deals, and more.
At the time of writing you're looking at £300 (US$380, about AU$589) or more for a 1TB SSD. The hard drive we're using here is a basic 5400rpm 500GB model.
Step two: backing-up
Unlike the PS4, the PS3 lets you back-up all your saved games to a USB stick in one go, or even back-up almost all of your data (anything that DRM does not bar) before throwing out the old HDD.
You'll find this option in the system settings menu in settings. Alternatively, to just save all your save games go to the game header in the main menu, select save data utility and then copy multiple to save your games to USB. To do all the saves at once, though, you need a PS Plus subscription.
However, as with a PS4, any PS Plus owners get free cloud storage for save games anyway. Backing-up in more than one place is always sensible, but not 100% necessary.
Step three: unleashing the hard drive
There are a few different variants of the PS3 out there. We're going to deal with how to take out the hard drive of the PS3 Slim and more recent PS3 Super Slim, which is the model you can still buy new today.
Slim
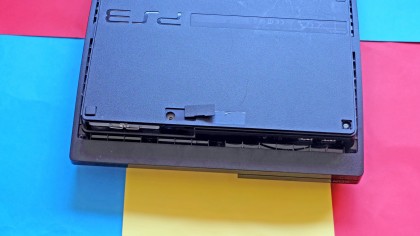
To get the hard drive out of a Slim PS3, you need to turn it off, turn it over and pull off a little plastic flap on its underside. It should be pretty clear, sitting towards the front of the bottom plate.
This flap will reveal a little screw that keeps a piece of plastic in place just under the Blu-ray drive. Remove the screw using a Phillips screwdriver. This piece of plastic hides the hard drive.

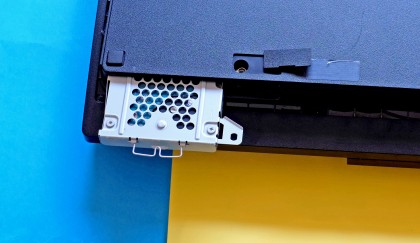
Now you need to slide the piece of plastic under the optical drive to the side just a little. After this you should be able remove it easily.
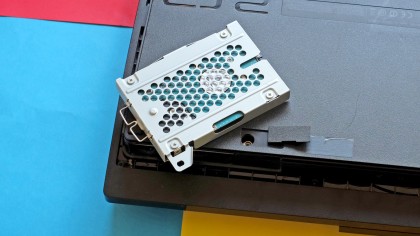
You should now see two little pieces of wire in the space where the flap was. Pull them lightly to remove the hard drive. It should slide out without much effort.

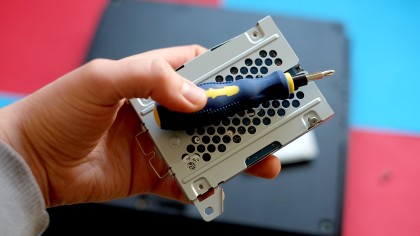
The PS3's hard drive is fixed to a metal plate using four little screws on its underside. You'll need to remove all four to change your old PS3 hard drive for your new one.
When you've swapped the drives, screw the screws back in and re-seat the hard drive in the console. Make sure it's fully inserted, though, or the drive won't actually be attached properly.

Now simply work your way back, putting back the plastic cover, putting the main screw back and re-seating the flap. And there you have it, you now know how to upgrade your PS3 hard drive.
- 1
- 2
Current page: Introduction, what you'll need and steps 1 - 3
Next Page Step 3 for the Super Slim PS3 and Step 4
Andrew is a freelance journalist and has been writing and editing for some of the UK's top tech and lifestyle publications including TrustedReviews, Stuff, T3, TechRadar, Lifehacker and others.