How to use NordVPN on Amazon Fire Stick
Better freedom and privacy for streamers with this top VPN
Sign up for breaking news, reviews, opinion, top tech deals, and more.
You are now subscribed
Your newsletter sign-up was successful
If you're on the hunt for the best Amazon Fire TV Stick VPN to unlock all the power your streaming device has to offer, you might be considering a NordVPN subscription.
There are many reasons why you might want to install a VPN on your Fire Stick, and a fair few why you'd want to go with Nord as your choice. It's a safe bet for streamers, with a great track record when it comes to unblocking foreign catalogs on the likes of Netflix, Amazon Prime, BBC iPlayer and Disney+ and more.
With more than 5,500 ultra-fast servers in 60 countries all around the world, strong encryption protocols to secure your data and other top-notch security features, your streaming experience on Amazon Fire Stick will certainly get better.
NordVPN makes things even easier with its easy-to-use dedicated app for Fire Stick - only the best VPN providers tend to offer them. You'll be able to set-up the service in just a couple of clicks.
However, getting set up can be intimidating, especially if you're not used to delving into the settings of your device. So, here we'll run down everything you need to know when it comes to using NordVPN on your Fire Stick.
NordVPN - a top-notch VPN for your Fire stick
With excellent connection speed and a wide range of servers optimised for streaming (5,500+ across 60 countries), streamers will not be disappointed by NordVPN's capabilities. During our last testing, it unblocked US Netflix, Amazon Prime, iPlayer and more platforms with ease. With Nord, you can watch what you want, wherever you want.
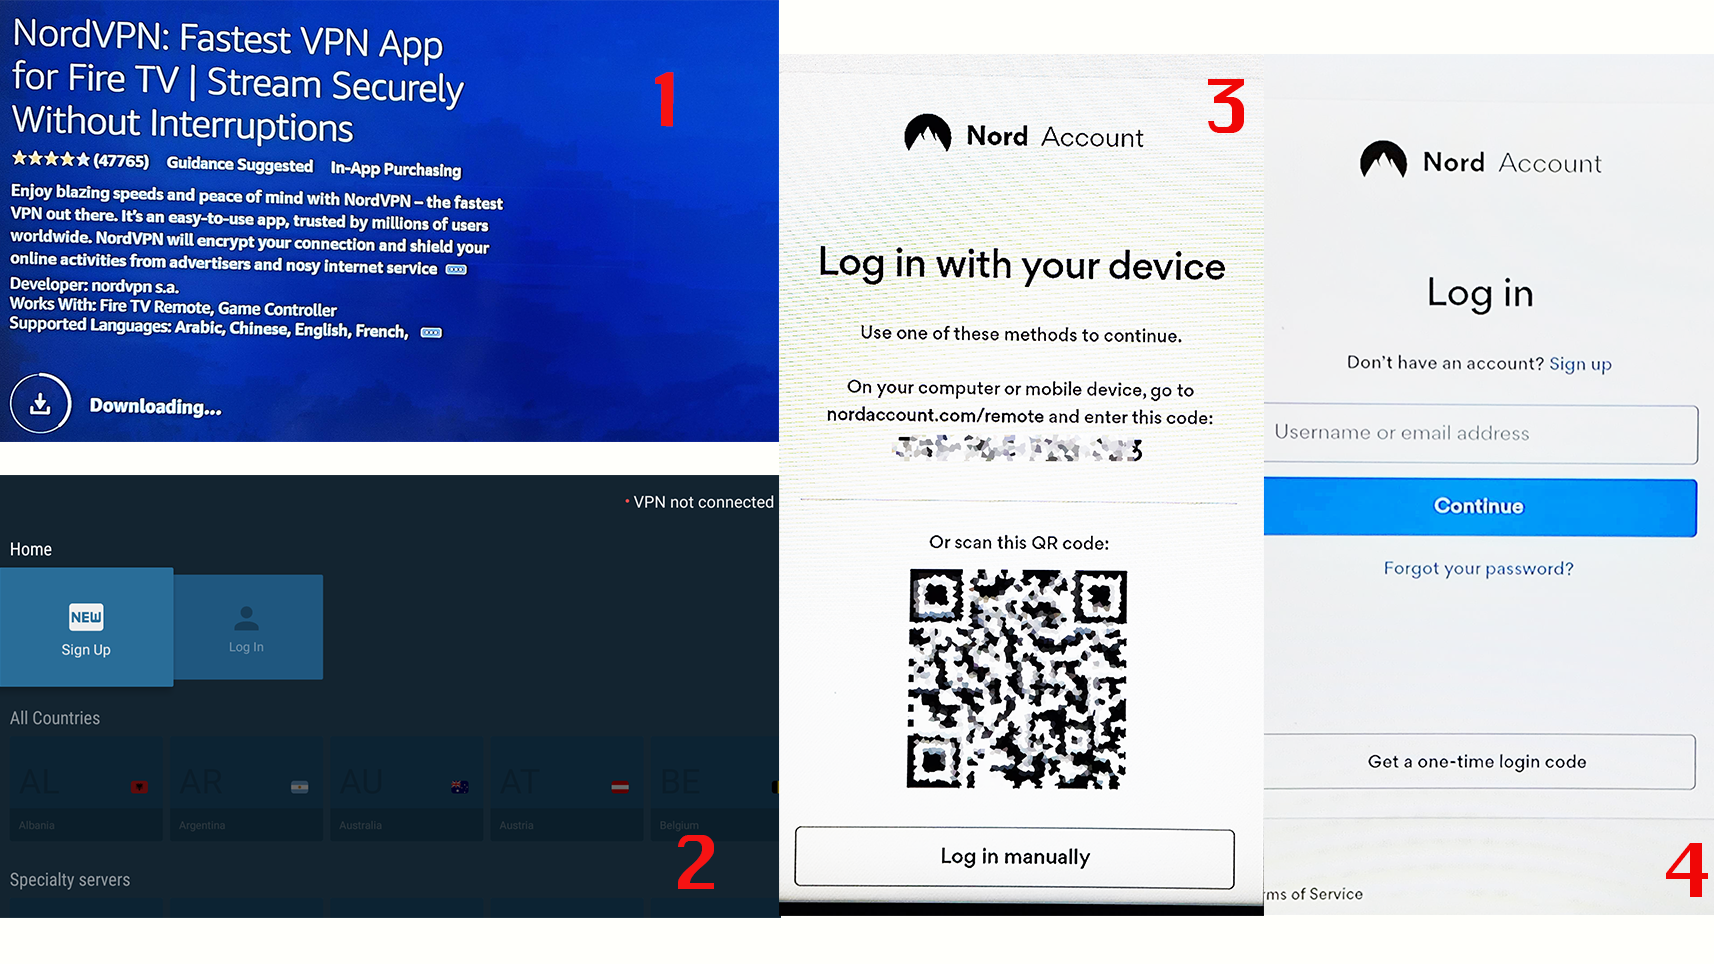
1. Install the NordVPN app on your Amazon Fire Stick
After plugging your streaming device on the HDMI port on your TV, head to the Find button on the homepage and click Search. Type 'NordVPN' in the search tab, then click Select and Download. Wait a few seconds for the app to download, and click Open.
Once the app is opened, you will have the option to either sign up to the service (if you haven't done this before) or log in to your existing account.
To do the latter you will have three options. You can manually enter your credentials, scan the QR code with your smartphone or tablet already connected to your Nord account and follow the instructions, or head to nordaccount.com/remote and enter the unique code you see on your TV screen.
Bear in mind that the first-generation Amazon Fire Stick does not support any VPN connections, but later models will be perfectly fine.
2. Connect to your desired server
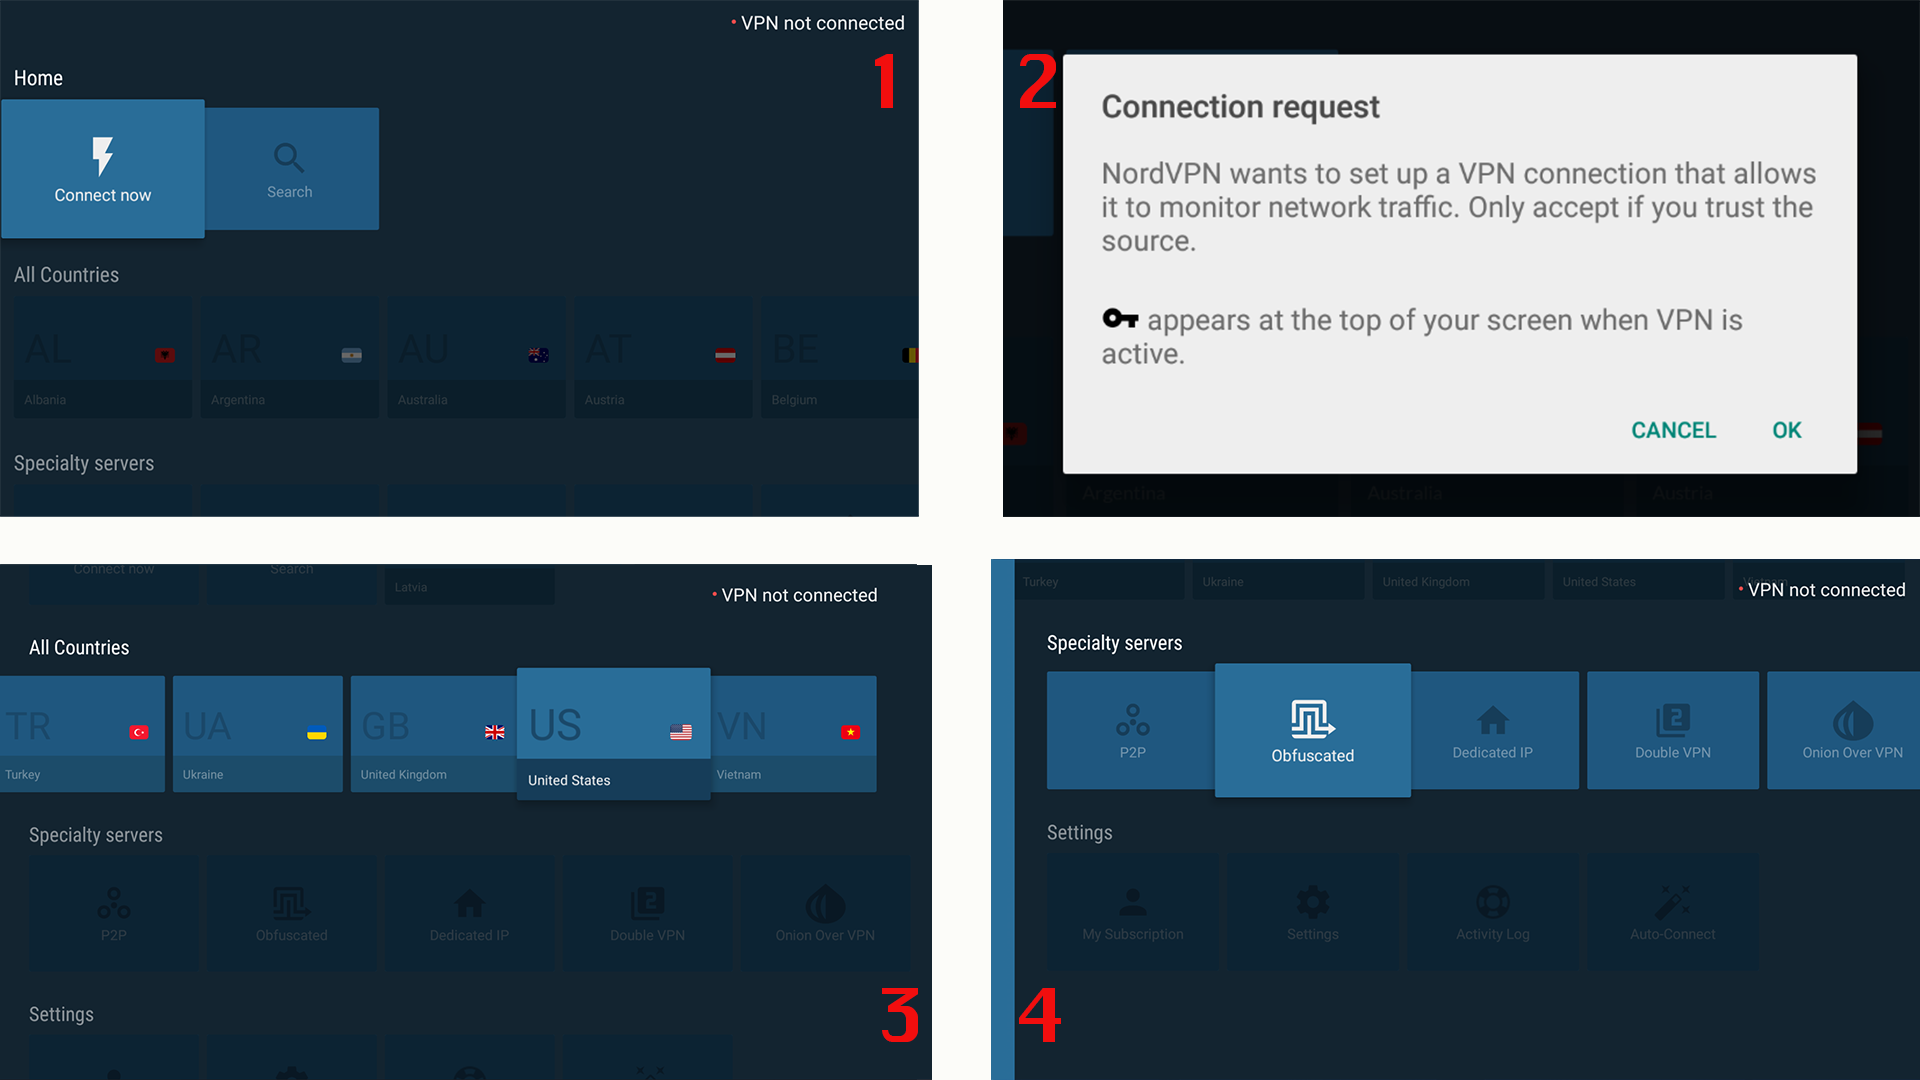
Once you successfully create or access your account, you can press the button Connect Now. The first time you connect your Amazon Fire Stick with the VPN service, you will be redirected to the Connection request page. You must press OK to enable the service.
At this point, NordVPN will automatically connect to the best server for your area. If you wish to change your location, head on All countries and browse all the servers available to choose the one you want.
According to your needs, you can opt for some Speciality servers. These include P2P optimized servers for faster speeds, Onion over VPN to both have the protection of Tor browser and your virtual private network, as well as Nord Double VPN. The latter uses double encryption to reroute your traffic through an extra secure server between you and your desired location.
It's worth mentioning that Onion over VPN and Double VPN are likely to slow down your connection speeds, something that streamers want to avoid. Therefore, your best option will probably be choosing one of the many normal servers. On the other hand, these are all optimized for streaming activities so you cannot go wrong. This feature makes NordVPN one of the best streaming VPNs around, too.
3. Tailor settings according to your needs
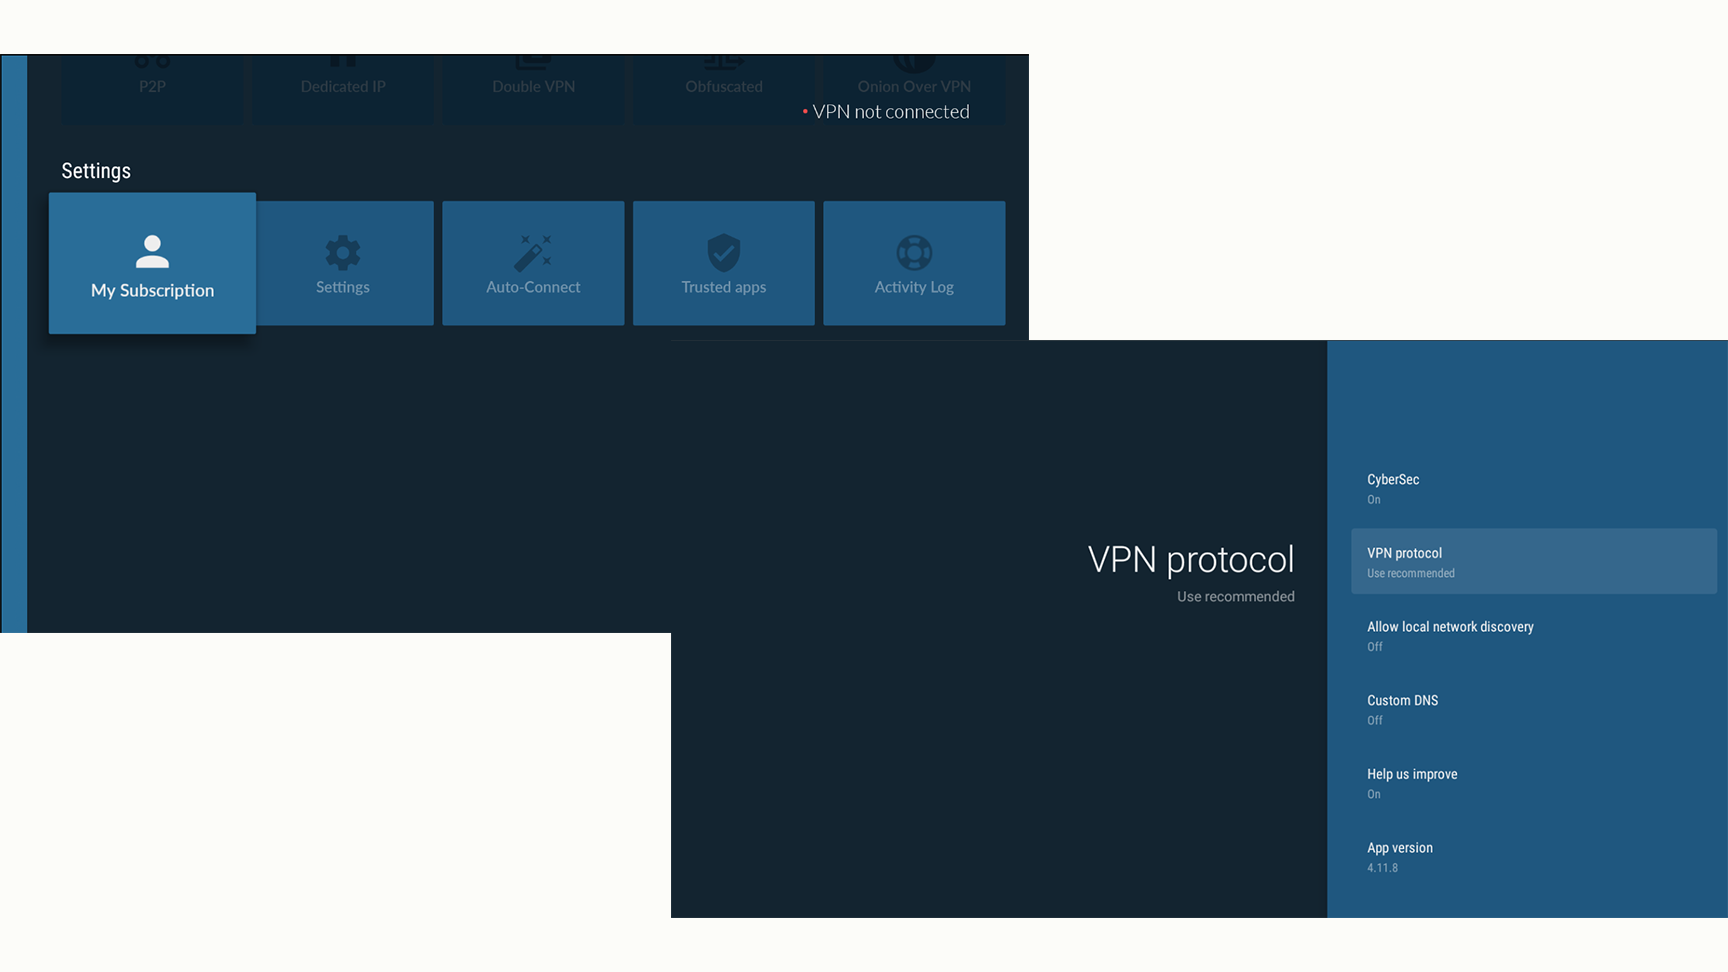
Scrolling down the NordVPN app homepage, you'll find the Settings tab. Here you can manage your subscription and customize your experience even more.
If you click on Settings, you will be able to enable the NordVPN Threat Protection option, set a custom DNS server, or choose which VPN protocol you want to use. Also in this case, NordVPN will automatically choose the best protocol for you when you connect to your desired server.
If you forget where an option is located, don't worry! You can type what you need on the search tab and make your service is working for you.
Now that you're all set up, you're ready to test the unlocking power of Nord. Head to your favorite streaming platform and enjoy the freedom to watch all the geo-restricted content no matter where you are in the world - entirely anonymously, of course.
Sign up for breaking news, reviews, opinion, top tech deals, and more.

Chiara is a multimedia journalist committed to covering stories to help promote the rights and denounce the abuses of the digital side of life – wherever cybersecurity, markets, and politics tangle up. She believes an open, uncensored, and private internet is a basic human need and wants to use her knowledge of VPNs to help readers take back control. She writes news, interviews, and analysis on data privacy, online censorship, digital rights, tech policies, and security software, with a special focus on VPNs, for TechRadar and TechRadar Pro. Got a story, tip-off, or something tech-interesting to say? Reach out to chiara.castro@futurenet.com
