How to clean up and declutter your Mac
Claw back space and improve performance
Replace your Mac's drive with a bigger, faster model
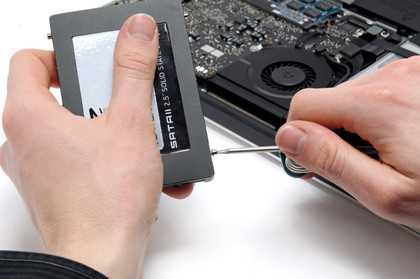
Ultimately you might decide it's not convenient - particularly if you're a MacBook user - to store your data on a separate external drive to your Mac. If you want to keep everything on a single drive, your final option is to upgrade the drive inside your Mac with a bigger model.
The first question to ask is whether or not it's something you can do yourself. Macs aren't equal, and some models are easier to upgrade than others.
The benefits of upgrading yourself are typically that you get to choose the exact drive you want at a price that's cheaper than paying someone to do the upgrade for you. The downside is that you'll invalidate any warranty you have and could look to face a hefty repair bill if something goes wrong.
If the idea of upgrading doesn't put you off, you need to discover if your Mac is one of those models that can be upgraded, or upgraded without recourse to an Apple Service Provider. As a rule of thumb, Mac Pros and later MacBooks (MacBook Air not included) are the simplest to upgrade, Mac minis are considered somewhat difficult, while iMacs are - to all intents and purposes - impossible.
To see the process you'll need to follow to upgrade your Mac's hard drive by yourself, visit http://eshop.macsales.com/installvideos/ for a series of instructional videos. If your model isn't listed, or you don't like what you see, it may need to be upgraded by your local Apple Store or Service Provider. If they can help, you'll be tied into their choice of drive and will have to pay an additional premium for fitting.
Pick the right hard drive
It's important you pick the right type of hard drive for your Mac: that means SATA rather than IDE for all Macs since 2006. The other key consideration is that you pick the right size drive for your Mac - 2.5-inch for MacBooks, MacBook Pros and Mac Minis, and 3.5-inch for Mac Pros.
MacBook Airs don't use standard SATA drives - we cover this separately below. You then need to choose between a traditional hard drive (HDD) or the newer, much faster solid-state drive (SSD).
Sign up for breaking news, reviews, opinion, top tech deals, and more.
SSDs are unbelievably quick compared to their sloth-like rivals, consume less power and are silent in operation, which makes them a perfect fit for MacBooks. But all of these benefits come with a hefty premium attached. The sad, unpalatable fact is that a 64GB SSD will cost you the same as a 2.5-inch 750MB or 3.5-inch 2TB HDD (around £90-100). You'll get a major performance boost, but you won't solve your disk space problem.
There is a third way in the form of a 2.5-inch hybrid drive from Seagate. As its name suggests, the MomentusXT Hybrid combines traditional HDD storage with a tiny amount of SSD (4GB). Thanks to the drive's adaptive technology, your most frequently accessed files are placed on the SSD portion of the drive, which helps provide a notable performance improvement with reading (but not writing) files.
It's a lot less expensive at £80 for 500GB, but it's not all good news, particularly for MacBook owners. That's because the drive can cause some vibration and actually consumes more power than a traditional HDD drive.
Whatever type and size of drive you decide to purchase, there are some other considerations to make that will have an effect on the performance of your new drive. All 2011 Mac models utilise the newer SATA-600 (6Gbp/s) standard, so opt for a SATA-600 model over the older SATA-300 model if possible.
Other considerations
If you're buying a HDD, also look to replace your drive with a 7,200rpm model for maximum performance, although be aware this will generate more heat and consume more power than a slower 5,400rpm model. Also, look at the size of the onboard cache - a drive offering 32MB or even 64MB will outperform one offering 8MB.
If all of this sounds like too much hard work, we've dug out a few models that tick all the right boxes depending on your Mac. If SSD floats your boat, and you can afford the hefty premium, the Crucial 128GB M4 SATA-600 (£170) is worth considering. Mac Pro users will need a special adaptor, such as Icy Dock's MB-882SP (£12) to fit it.
Mac Pro users get the best deal in terms of value and capacity thanks to the fact that 3.5-inch drives are cheaper and more versatile than 2.5-inch models. 2TB drives are now widely available, and Hitachi's Deskstar 7K3000 ticks all the right boxes in terms of performance: 7,200rpm, SATA-600, 64MB cache. Expect to pay around £75.
1TB models are starting to make an appearance on 2.5-inch drives, but SATA-600 models are still a rarity, and come with a hefty price premium (expect to pay around £150 for a 1TB model).
If you can live with the slower SATA-300 standard, however, look at Western Digital's Scorpio Black range, one of the few to offer 7,200rpm and 16MB (as opposed to a measly 8MB) cache on its mobile drives. Its 750GB model costs around £73.
MacBook Air
As we hinted earlier, if you're looking to upgrade your MacBook Air's internal storage, it's a different kettle of fish altogether.
The 2010 and 2011 models both utilise SSD storage with mini-SATA connectors, so you'll need a special drive if you want to go down this route, and with a hefty premium to pay (as much as €1,400 for the Aura Pro Express 480GB from http://www.macupgrades.co.uk/store/) it's something you might want to reconsider.
Fitting your new drive
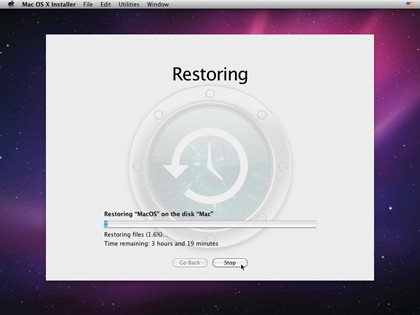
If you're upgrading your drive yourself, make sure you take one last Time Machine backup before you swap out your old drive for your new one. Once the new drive has been fitted, switch on your Mac.
Lion users should create a boot drive or disk; Snow Leopard users should insert their OS X install disc and hold down the C key.
Then it's a simple a case of following the step-by-step guide below to restore your latest backup to your new drive using Time Machine.
Once done, you'll be booted back into OS X as if nothing had happened, except now you'll be able to take advantage of the extra speed and larger size of your new hard drive.
How to restore your Time Machine backup
01. Prepare new drive
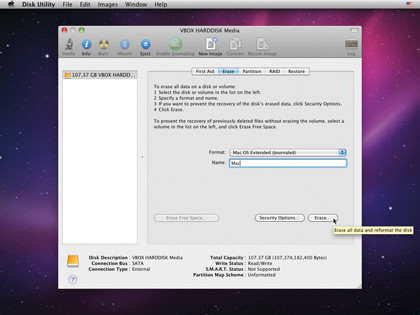
Open the Utilities menu and select Disk Utility. Click your drive, then either choose Partition, or Erase to set it up as a single drive. If selecting Erase, give the drive a name and click Erase again. Once the process is complete close Disk Utility to return to the main menu.
02. Select a backup
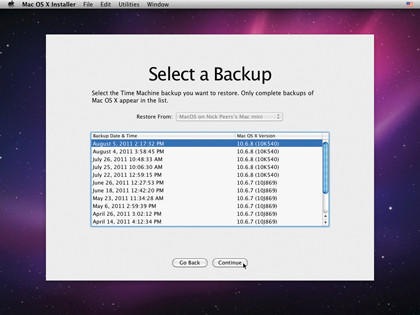
From the main screen either click Restore from Time Machine Backup (Lion) or select the option from the Utilities menu (Snow Leopard). Click Continue for it to detect your drive. Select the one with your backup and click Continue to view a list of available backups.
03. Select destination
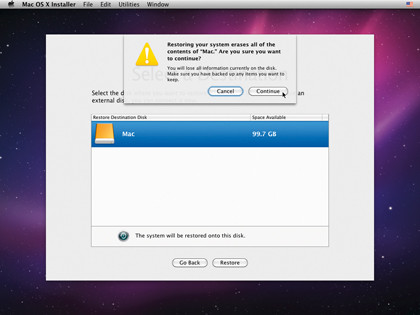
Pick the latest backup from the list and click Continue. Select your new drive from the list and click Restore followed by Continue. Your last backup will now be restored to your new drive. Once done, restart your Mac and it should take you to your desktop.