How to clean up and declutter your Mac
Claw back space and improve performance
Reclaim much-needed disk space by removing files you no longer need

01. Empty the trash
When was the last time you emptied your Trash folder? People often make the mistake of simply dragging files into the Trash and forgetting they're still there, continuing to take up precious space on your hard drive.
Assuming you're not foolish enough to use the Trash as some kind of half-way house for files you think you might need at a later date, the quickest way to free up much-needed space is to empty it.
Open the Finder menu and choose Empty Trash to do so - if some files refuse to vanish, repeat the process, holding down Option before you click Empty Trash to remove stubborn files.
02. Clear out downloads
If you regularly download apps and other files from the web you may find one easy way to free up a few gigabytes of space is to check the Downloads folder for files. Delete any you don't need, or drag the lot to the Trash - you can always download them again.
Mail users can also clear up space by deleting long-forgotten file attachments from their mail. These are stored in your personal Library/Mail Downloads folder - it's hidden in Lion, but you can access the Library folder from Finder: hold down the Option key as you click on Go and select Library. Deleting file attachments from here won't affect the original messages. .
Sign up for breaking news, reviews, opinion, top tech deals, and more.
03. Remove duplicates

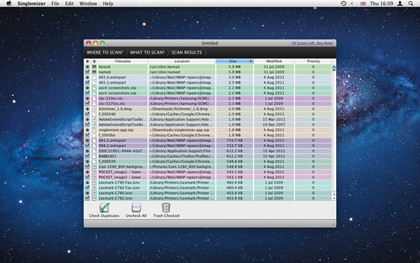
One of the biggest causes of wasted file space is duplicate files. You'll be amazed how many copies of the same file could be clogging up your hard drive. Decent duplicate-finding tools, like Singlemizer, do more than just look for matching filenames - they check the file itself to make sure it's a genuine match.
Singlemizer (£6.99 from the App Store) offers a free trial that lets you perform 20 scans of your drive before registration is required. Simply select the drives or folders you wish to scan, and then leave it to do its work.
All deleted files are sent to the Trash, so until you empty it, you can still get them back.
04. Clear out the junk
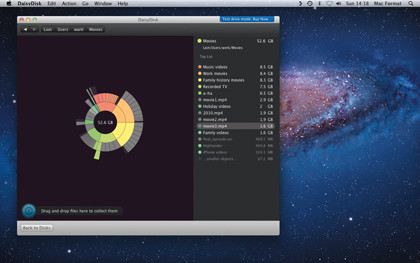
You might be surprised at how much drive space is being taken up by files you've long forgotten about. Tracking them down can be difficult, which is where DaisyDisk comes in.
It simplifies the process of identifying large files on your drive, letting you identify and - if they're no longer needed - delete them too. Note you'll need to purchase the full version (£6.99, App Store) to actually delete the files from your drive.
05. Compress old files
If there are files you don't want to lose, but don't necessarily need quick and easy access to, consider compressing them into zip file archives, which - depending on the file type - could free up significant amounts of free space.
Don't try to archive everything in a single zip file. Instead, archive groups of related files or individual folders by selecting them in Finder and choosing File > Compress…
Once complete, delete the original files and folders. To restore the archived files, just double-click the zip file to automatically extract their contents.
06. Streamline your apps

How many apps have you installed that you've never or rarely used? Another way to free up space is to delete these unwanted programs from your drive.
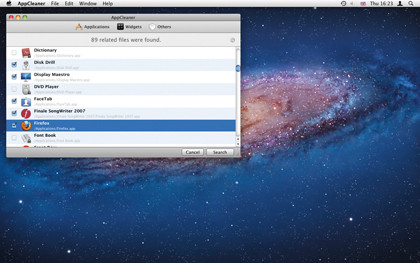
Dragging the program icon to the Trash is a rather imperfect solution; instead, use the free AppCleaner.
Launch the program and click Applications to view all currently installed apps. Tick those you wish to remove and click Search. Deleting programs through AppCleaner ensures a large number of related files are deleted, along with the application itself.
07. Find similar apps
With the help of a site like http://alternativeto.net it's also possible to source alternative applications that take up less drive space than the applications you're using.
Take Adobe Reader for example - why install an app that takes up 450MB of drive space when you can get most of its functionality in Skim, which takes a up a trifling 13MB, instead? Download it from http://skim-app.sourceforge.net.
08. Clear out your browser
Your web browser can build up a significant amount of clutter over time too. All browsers make use of a cache, a special folder where material from websites is downloaded to speed up future browsing of the pages in question. Technically there's no limit to how big these grow, so if you don't empty it regularly, it can soon start taking up lots of drive space.
Thankfully, erasing the cache is a simple process. Safari users can select Safari > Empty Cache, while Chrome users should select Chrome > Clear Browsing Data, tick Empty the cache and click Clear Browsing Data again. Other browsers - like Firefox and Opera - work in a similar way.
09. Clean up after iLife
It's safe to say that media files - photos, videos and music - take up the most space on someone's hard disk. Before you discover how to safely move these to another drive to free up space, start by emptying the Trash in both iPhoto and iMovie - any files deleted in the application go here rather than the actual Trash folder, so expect to free up a large amount of drive space.
You can streamline things further by rebuilding databases - hold down Option+Command as you double-click the app icon to do so. Tick Reclaim unused disk space from databases to free up some extra space.
10. Take the lazy option
If all of this sounds like too much hard work, try an all-in-one tool like MacCleanse (£5.49, Mac App Store) instead.
This will clean out everything you need from within a single app, but be warned: it's possible to make a Mac unbootable if you go too far. Back up before you begin, just in case your cleaning proves to be overzealous.
Current page: Top 10 tips for freeing up space
Prev Page How to declutter your Mac Next Page Long-term solutions