40 iLife tips and tricks you may not be aware of
Cool iLife features you probably don't use
Sign up for breaking news, reviews, opinion, top tech deals, and more.
You are now subscribed
Your newsletter sign-up was successful
Join the club
Get full access to premium articles, exclusive features and a growing list of member rewards.
Easier ways to edit, archive and view clips with iMovie
11. Archiving
The days of FireWire camcorders and recording everything to tape are drawing to a close. Now, everything's on flash memory or hard drives built into cameras.
But this begs the question: what to do with all your footage? Importing it into iMovie is an option, but it gets converted to a format that takes up a lot more disc space.
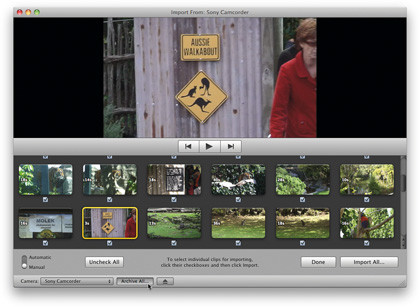
But there is a way to save your media in its original format: connect your camera and go to iMovie's Import window. Bottom left of the interface is an Archive All button. Select it and iMovie will save the entire content of your camera into a special file.
When you're ready to import your clips into an iMovie event in the future, just go to File > Import > Camera Archive and select that file.
12. Copying adjustments
Sign up for breaking news, reviews, opinion, top tech deals, and more.
When it comes to making adjustments to your footage, you have some very powerful tools at your disposal. But just like with iPhoto, having to perform the same changes to multiple clips isn't something many people look forward to. Again, Apple's engineers have come to the rescue.

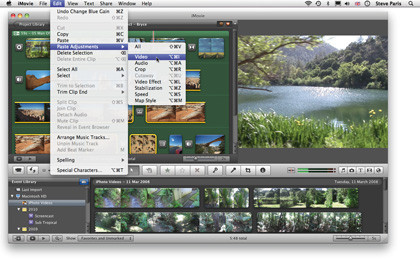
First alter one clip and copy it when you're done. Then select all the clips within the project or event you'd like to change, go to Edit > Paste Adjustments and choose the type of adjustment you'd like to apply.
Once done, all your selected clips will have been modified. You can also use keyboard shortcuts to make this job even faster.
13. Transferring data
If you've got a lot of footage stored on your Mac, you may get a little wary of adding more – especially if your disc space is running low. Even though the media you already have may be old, you're still reluctant to delete it.

But there is something you can do to free up some space – move any event you have to another hard drive. Don't do this from the Finder otherwise you would break the link between them and your projects.
Instead, connect your external drive and go to iMovie. To the right of the Event Library is a small icon representing a hard drive. Click on it to redistribute your events based on the drives they're stored in.
You can now Command-drag any event you like onto the new drive to move it to its new location, while at the same time preserving its link to any project that uses it.
14. Thumbnail selection
Thankfully, iMovie '09 brought back the idea of Themes, which had mysteriously disappeared from the previous version. They come with unique transitions which often pan over random and not particularly useful static shots from your project.
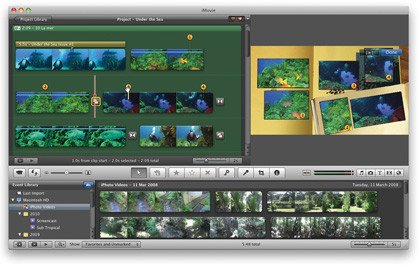
But did you know that you can actually choose which thumbnail images are displayed? To do this, click on the transition to select it. This reveals numbers along your project. Now drag those numbers to a new location to change the thumbnail to whatever you prefer.
15. Transferring your projects to one place
If you'd like to keep your projects and events together, you can perform the same action with your existing projects. Go to the Project Library. With the Event Library drive icon still selected, you should see your projects organised by drive.

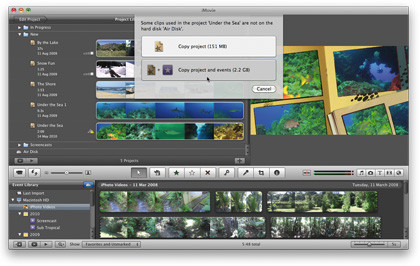
When you move a project, you'll be asked if you'd like to also move the Events associated with them, or simply move the project itself. Now all you have to do is simply select your preferred option and the process will happen immediately.
16. Audio control
It's easy to add music to your film. Just drag it from the Music and Sound Effects section onto your project. But sometimes, that track clashes with your clip's audio, making it hard to hear either of them. When that happens, you can reduce the volume of specific tracks.
Double-click the track you wish to hear and select the Inspector's Audio tab. Tick the Reduce Volume of Other Tracks To box to instantly lower any other audio that also runs over this particular one. You even have a slider to choose how much of a reduction you want to apply – great for fine tuning.
17. Choose a new font
Select a title in your project and you'll see a Show Fonts button, top-left of the main preview section. Click on it and you'll be presented with a very short list of available fonts, along with only nine colours and nine sizes – but you'll be pleased to know that you're not limited by these choices.
Click on that window's System Font Panel button to reveal the regular font window from which you can choose any font, size or colour you'd care to use, adding nicely to the versatility of your finished product.
18. Font control
With the System Font window open you'll find that you have complete control over your title. You can, for instance, use the Kerning values to bring letters together, and not just for your entire title – you can affect only those that you've selected, leaving the others unaltered.
You could do the same with the Baseline controls to raise or lower letters. You could even go as far as choosing a different colour for each letter, or even a different font for each, if you're that way inclined. You're only limited by your own imagination and the boundaries of good taste.
19. Moving Ken Burns
Ken Burns has been part and parcel of iMovie since version 3, and it's been a great tool to bring some motion to still images in your project, but did you know that as of iMovie '09, you can finally apply this effect to video clips as well?

It's a great way to add some motion to a static shot if you'd come to the conclusion that panning across it or zooming in would make it more interesting.
20. Copying titles
Once you've created a unique-looking title with the two tips above, you might be frustrated to realise that you can't Copy the text layer – even when it's selected, that option is greyed out in the Menu Bar.
But don't despair, you won't have to re-create your title for every instance you'll be using it.
All you have to do is hold down the Option key as you drag your text layer to duplicate it. You can then move your copy to another part of your film, alter the text and you're done.
Steve has been writing about technology since 2003. Starting with Digital Creative Arts, he's since added his tech expertise at titles such as iCreate, MacFormat, MacWorld, MacLife, and TechRadar. His focus is on the creative arts, like website builders, image manipulation, and filmmaking software, but he hasn’t shied away from more business-oriented software either. He uses many of the apps he writes about in his personal and professional life. Steve loves how computers have enabled everyone to delve into creative possibilities, and is always delighted to share his knowledge, expertise, and experience with readers.
 Become a TechRadar Insider


