How to fix old photos in iPhoto
Scanned photos are preserved forever, but may need repair work first
Old prints and negatives deteriorate with time, especially if they're kept in damp conditions. Those boxes of pictures in your attic could be in a worse state than you imagine, and the sooner you get them scanned in as digital images, the better.
There are many different ways of doing this. You can use a flatbed scanner or a multi-function device to scan in prints, and some scanners come with transparency adaptors for slides and negatives. But you can also fix prints to a wall and photograph them with your digital camera, and there are attachments for digital SLRs that let you copy slides clipped into a holder on the front.
However you digitise your prints, though, it's likely that you'll have to carry out some basic repairs to get them up to scratch. If the damage is severe, you might need a program like Photoshop to put it right - not to mention a good deal of image-editing expertise. Most of the time, though, you'll find everything you need in iPhoto.
Restoring quality
It's rarely possible to get old photos back to the same standards of colour and sharpness as an image from a modern digital camera, but you can still restore some of the colour, contrast and detail that's been eroded by the passage of time.
When you're faced with a faded old photo, it might be difficult to know where to start, but there are four basic steps you can take to improve your photos. We'll refer to them as the four Cs: cropping, colours, contrast and cloning. Let's look at each one individually.
Cropping (and straightening) is a good place to start. When images are scanned in, they're often slightly misaligned - or, if they were taken by an amateur photographer, they may have been shot skewed. And old photos often have borders, which you don't really want, either because the original print had a border, or because the scanner hasn't automatically detected the edges. iPhoto can do both jobs, and you'll find the tools you need in the Quick Fixes tab in Edit mode.
Fading is probably the most obvious problem, though, and this can affect both the colours and the contrast. The dyes in colour prints don't fade at the same rate, and this is why old prints have a colour cast that is sometimes blue, sometimes magenta, sometimes another colour - it depends on the paper and chemicals used to make the print and the storage conditions.
Sign up for breaking news, reviews, opinion, top tech deals, and more.
You can fix colour casts with the Temperature and Tint sliders in the Adjust panel. Technically, these are for correcting white balance in digital images, but you can use them to correct faded photos too.
Fading doesn't just shift the colours - it reduces the overall contrast too. The darkest parts will often be a wishy-washy grey rather than a dense black, and this makes the picture look flat and dull. By restoring a full contrast range between dense black and brilliant white, you can often restore the vibrancy and depth that's been lost over the years.
The image contrast is something else you can fix in the Adjust panel, but while the Exposure and Contrast sliders might sound like they're the best tools for the job, the Levels sliders found under the histogram at the top are actually more effective.
The other thing to note is that changing the contrast can change the appearance of the colours, and vice versa, so you may need to go back and forth between them once or twice to get the balance just right.
Lastly, you may need to do some 'cloning' (iPhoto features a Retouch tool rather than a Clone tool, but effectively it's the same thing). Repairing larger areas of damage might need a program like Photoshop, but iPhoto can easily deal with the usual dust spots, hairs and scratches that can spoil your old but much-loved pictures.
1. Straighten and Crop
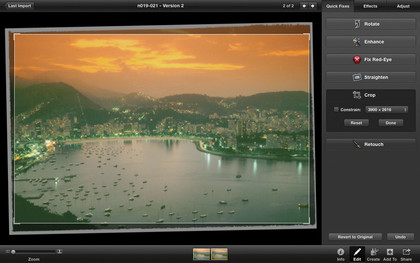
The Straighten and Crop tools are both in iPhoto's Quick Fixes panel, but you need to use them in the right order. If you use the Straighten tool first, you'll be able to crop the photo more accurately without cutting off any areas you don't have to.
Straighten the image by dragging the slider left or right; use the side of a building or the horizon to gauge when the picture is straight. When the Crop tool is selected, the cropped area is indicated by a rectangle, or 'marquee'. You can drag the corners to resize and reposition the cropped area at the same time, or drag on the edges to adjust the top, bottom and sides individually.
You'll spot that the Crop tool has a menu with different sizes on it. This is so that you can match the proportions of your cropped picture to common print sizes, or to fit the aspect ratio of your screen. If you don't have specific proportions in mind, just uncheck the Constrain box.
2. Adjust the Levels
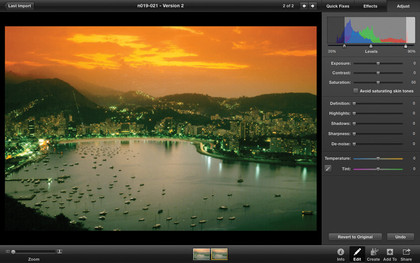
It's difficult to judge whether colours need adjusting if the picture is just generally faded. For that reason, it's often best to fix the contrast first.
iPhoto does have an Enhance button on the Quick Fix tab which can do the job for you with moderately faded images, but if they're particularly bad you'll get better results doing it yourself.
Switch to the Adjust tab and look at the histogram at the top - you'll probably find that it doesn't quite reach either end of the scale. But there are black point and white point sliders directly below, and the usual advice with digital images is to drag the sliders just to the ends of the histogram. This maximises the tonal range of the picture, so that there's a range from solid black to brilliant white.
Usually, it's important not to 'clip' the ends of the histogram because this will produce filled-in shadows and 'blown' highlights. But with pictures shot on film, you may need to clip it a little, especially at the left-hand end in order to get enough contrast in the image and proper blacks in the shadowed areas. Film is more grainy than digital, and if you don't clip the shadows, they can look 'speckly'.
3. Adjust the colours
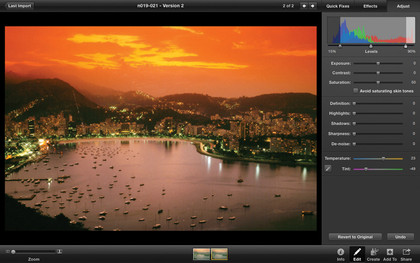
Adjusting the histogram usually makes any colour shifts in the picture more obvious, which is a good reason for adjusting the contrast first. One approach to fixing the colours is to use the white balance eyedropper just below the Temperature slider in the Adjust panel to click on an area of the picture that should be a neutral grey tone.
This doesn't always work with old photos, though, because the grain pattern is multicoloured, and although you might think you've found a grey area, there may be colour variations at a microscopic level, which really throw the adjustment out.
Instead, you'll probably need to adjust the Temperature and Tint sliders manually. These mimic the white balance adjustments on digital cameras, but here you'll need to make the adjustments by eye. You drag the Temperature slider left or right to make it more blue or more yellow, while the Tint slider makes the picture more magenta or more green.
Depending on the colour cast, you may need to make adjustments to both, and there's a certain amount of skill involved in getting it right. Adjusting the Temperature and Tint changes the shape of the histogram, so you may need to go back and make minor adjustments to it to get the best shadow and highlight detail in the picture.
4. Fix dust and scratches
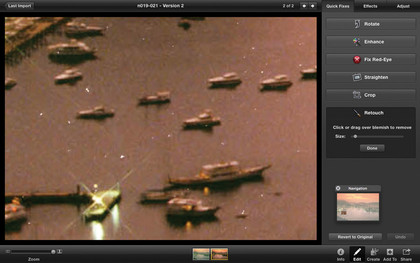
You'll find the Retouch tool back on the Quick Fixes tab, and while it's not really a serious rival to the Clone Stamp tool in Photoshop or Elements, it is simple to use.
First, zoom in so that you can get a closer look at any blemishes you're trying to fix. You can do this by dragging the Zoom slider at the bottom of the iPhoto window or using the 1 key to zoom to 100%, or the 2 key to view it at 200%. iPhoto then displays a Navigator window highlighting the section you're zoomed in on; drag this around to look at different parts of the picture.
The Retouch tool has just a single slider, which controls the size of the brush. The secret is to make this just slightly larger than the blemish you want to fix. All you have to do now is 'dab' on a dust spot or a mark, and the Retouch tool uses pixels from the surrounding areas to fill it in.
Individual spots disappear as if they'd never existed, but scratches are slightly trickier. You can use the same 'dabbing' technique to get rid of them bit by bit, or drag the Retouch tool along them to paint them in with a single stroke, though this can produce a slight blurring effect.

Rod is an independent photographer and photography journalist with more than 30 years' experience. He's previously worked as Head of Testing for Future’s photography magazines, including Digital Camera, N-Photo, PhotoPlus, Professional Photography, Photography Week and Practical Photoshop, and as Reviews Editor on Digital Camera World.