Get more from your OS X Address Book
Handy tips for importing information into Address Book

Sign up for breaking news, reviews, opinion, top tech deals, and more.
You are now subscribed
Your newsletter sign-up was successful
Introduced in Mac OS X 10.2 as a much-needed contact manager, Address Book, and the information within it, now permeates much of Mac OS X. Open a new message in Mail, for instance (go to File > New Message or use the keyboard shortcut
Cmd+[N]
), and there, in the toolbar, is the Address Book icon.
Click it, and you have access to the email addresses of all your contacts – including those that don't come up automatically in the To field. One of the most overlooked features of Address Book is its ability to print mailing labels to those standard Avery A4 sheets you can buy in most stationery stores.
However, getting the information into Address Book is an art in itself. For instance, one client who had switched from Windows had nearly 1000 contacts on her Access 2007 database. She would print mailing labels from her PC using the application's dedicated Wizard, so one of the first tasks to perform was shifting all that information over onto her Mac.
If you want to do this yourself, start by choosing File > Export in Access (or FileMaker) and export your tables as a comma-separated variable (.csv) file or as tab-delimited data (.tab).
Importing your data
Sign up for breaking news, reviews, opinion, top tech deals, and more.
So far, so straightforward. It's when you come to import the data into Address Book that you have to keep your wits about you: first, in Address Book, go to File > Import > Text File…
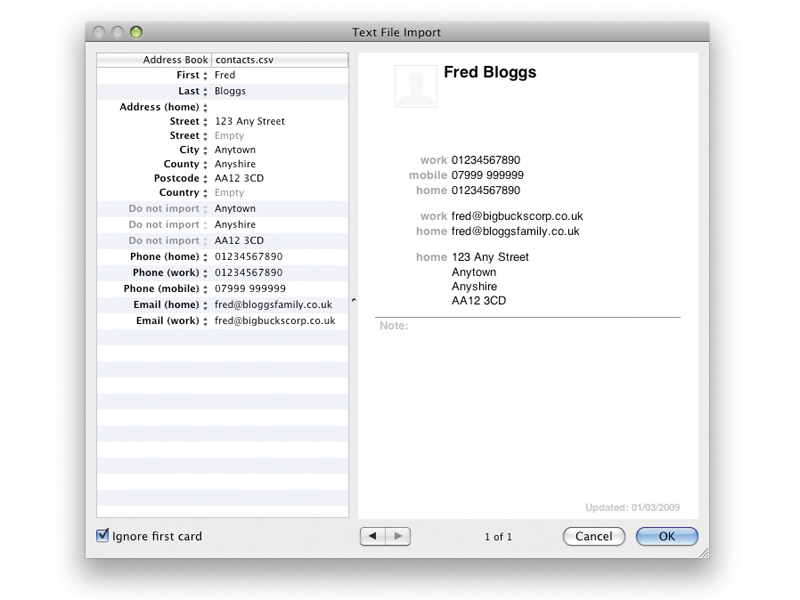
Next, navigate to your CSV or tab-delimited file and click Open to start the Text File Import dialog. When that opens, the left part of the dialog pane will have two columns: the right-hand one contains the data you've exported from your database, while the left column is for you to choose which Address Book field each piece of information will translate to.
For the time being, however, it'll say 'Do not import'. Unless your first database record is a dummy, containing only generic data headers ('First name', 'surname', and so on), you'll need to remove the tick from the box marked Ignore first card, otherwise you'll lose your first contact.
Then, as you go, the right half of the dialog window will change, to show you what the completed card will look like. It's a good idea to make a list of the total number of fields your Address Book cards should have. If you only work on one contact, you might miss essential information – mobile number, for instance – and leave that field out for all contacts.
Use the arrows at the bottom of the dialog to go through your contacts, to make sure that you've got everything. If you're happy, click OK and your data will be imported into Address Book. It's still a good idea to check a few cards – if you have messed up go to Edit > Undo Import before you start again.
Now you can sort your contacts into, say, those that have email addresses and those that don't. To create a group of all contacts that have email addresses: choose File > New Smart Group…, then Email from the first pop-up, and is set from the second. For those contacts without email, repeat this process but choose is not set for the email status. You can then send a group email to the former, and print labels for the latter.