How to make a video from a collection of photos
Sign up for breaking news, reviews, opinion, top tech deals, and more.
You are now subscribed
Your newsletter sign-up was successful
If you have a collection of photos that you'd like to share, turning them into a video is one of the best ways to make them look their best. Videos are more interesting and dynamic than ordinary photo slideshows, and you can share them easily via YouTube or Facebook.
Videos are particularly good if you have a set of photos from a special event like a wedding or birthday party. With the right software it's easy to add all the pictures to a timeline, apply titles and special effects, and set the whole video to music.
Any of the best video editing software and best free video editing software we've tested will let you turn your pictures into a video, but we’ve chosen to use Shotcut because it’s simple to master and packed with interesting effects, but isn’t cluttered with complicated tools you won’t need. It’s available for Windows, Mac and Linux. Let's get started...
Article continues below 
1. Import your photos
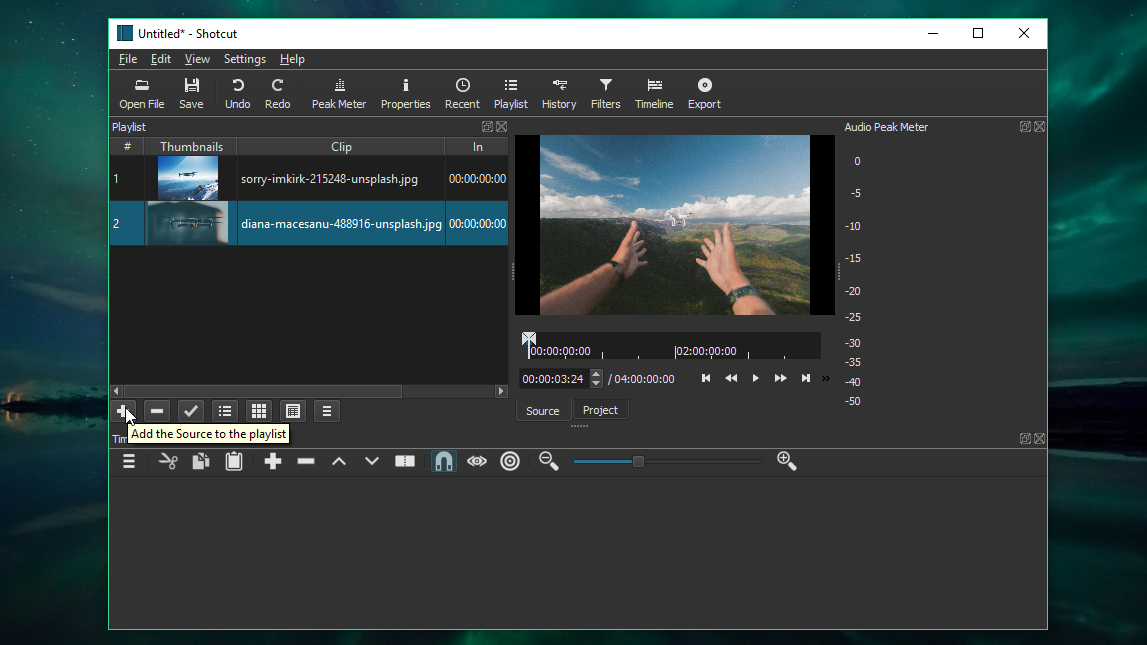
Download and install Shotcut, then open it and click the ‘Playlist’ button at the top. The playlist contains all the media files that you’ll use to create your video.
Click ‘Open file’, choose a photo you want to add and click ‘Open’ to import it, then click the ‘+’ button to add it to your playlist. Repeat the process for each photo. You can remove photos from the playlist by clicking the ‘-’ button. To see all your imported photos in the Playlist window, click the icon showing nine little squares.
This is a good time to save your project; Shotcut is unlikely to crash, but you don’t want to spend time re-importing your photos if something goes wrong. Project files are saved in MLT format, and you can re-open and continue editing them any time.

2. Add photos to the timeline
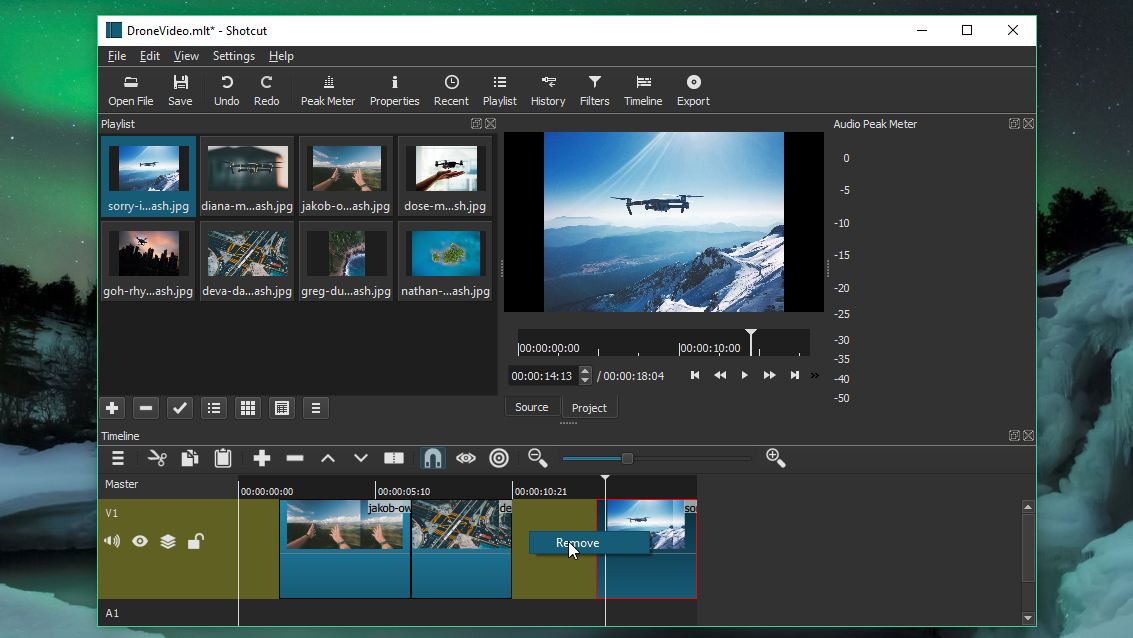
Click the menu button under ‘Timeline’ at the bottom of the Shotcut window and select ‘Add video track’. Drag a photo from your playlist onto the timeline. It will appear on screen for for seconds by default, but you can change this by clicking and dragging to resize it in the timeline. Repeat the process for each of the photos to be included in your video. You can arrange them in any order, and have each one displayed for as long as you like.
Sign up for breaking news, reviews, opinion, top tech deals, and more.
Shotcut will automatically put briefs gap between your photos, represented by brown areas on the timeline. To remove a gap, just right-click it and select ‘Remove’.
To see how your video will look, click ‘Project’ under the preview window and use the playback controls.

3. Apply filters and add titles
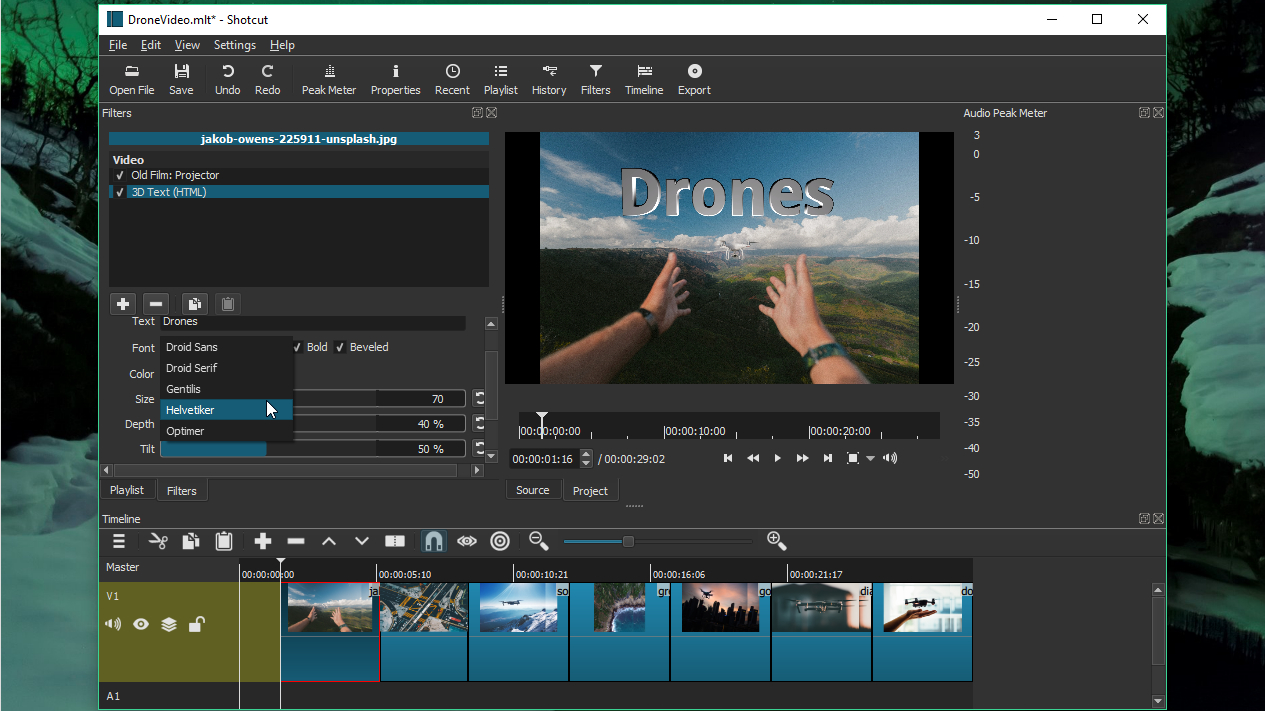
You might be happy with how your photos look already, but the right filters can give your video a whole new look. Click the ‘Filter’ button at the top of the window (it will cover the Playlist, but don’t worry – it’s still there underneath) and click one of the photos in the timeline.
Click the ‘+’ icon to open the list of filters, then select the monitor icon to just show ones that can be applied to images. Pick one (here we’ve chosen Old Film: Projector, which makes the image jump around and flicker) and it will appear in a list, along with a set of options for customizing it. Each filter will give you different options. You can add as many filters as you like by clicking the ‘+’ icon, and remove them by clicking ‘-’. To apply filters to a different photo, just click it in the timeline.
You’ll also find options to add text and 3D text in the list of available filters. These are fully customizable, and ideal for creating titles and subtitles

4. Add music
The right music will really bring your photo video to life, but if you’re planning to share it, you’ll need to make sure you’re not using music without the necessary license. YouTube’s content ID system works to automatically detect copyrighted music, and you could find that your video is taken down or your account is blocked if it detects commercial tracks in your project.
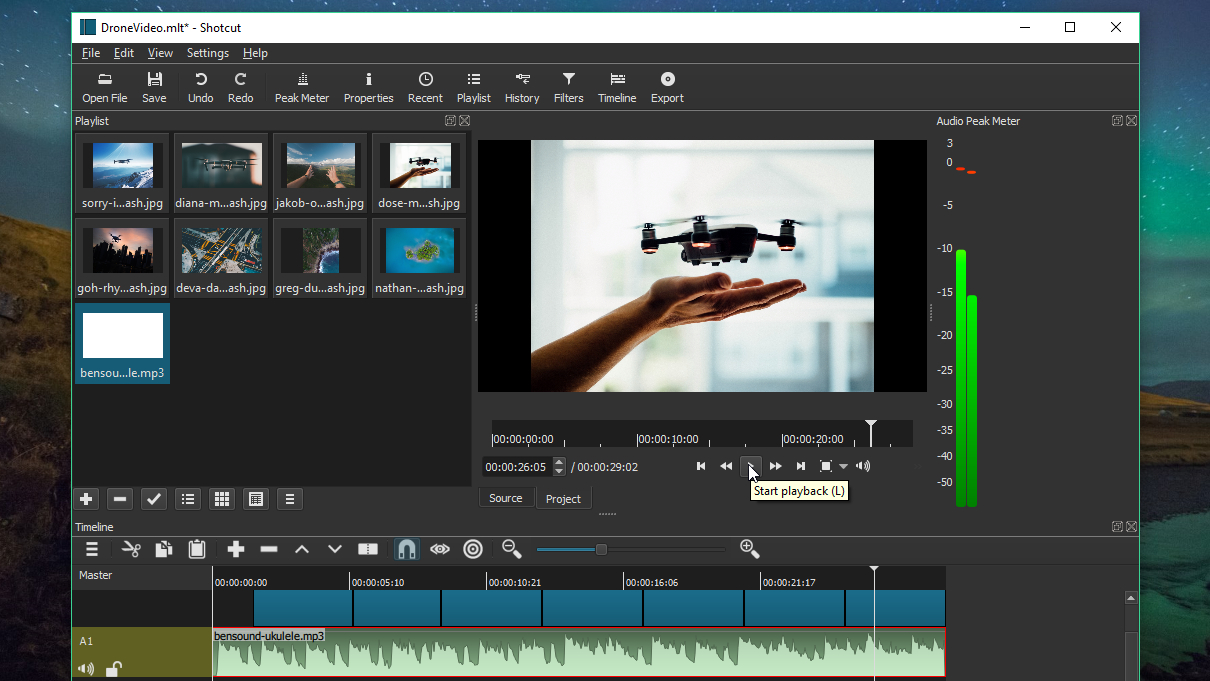
However, there are places where you can find music that’s free to use and makes a great accompaniment to your photos. Our favorite is Bensound, which lists a huge range of tracks in different styles. All Ben asks is that you credit him with a link back to his site in your video’s description. If you don’t want to include a credit, or you want to use Ben’s music commercially, you’ll need to buy a license.
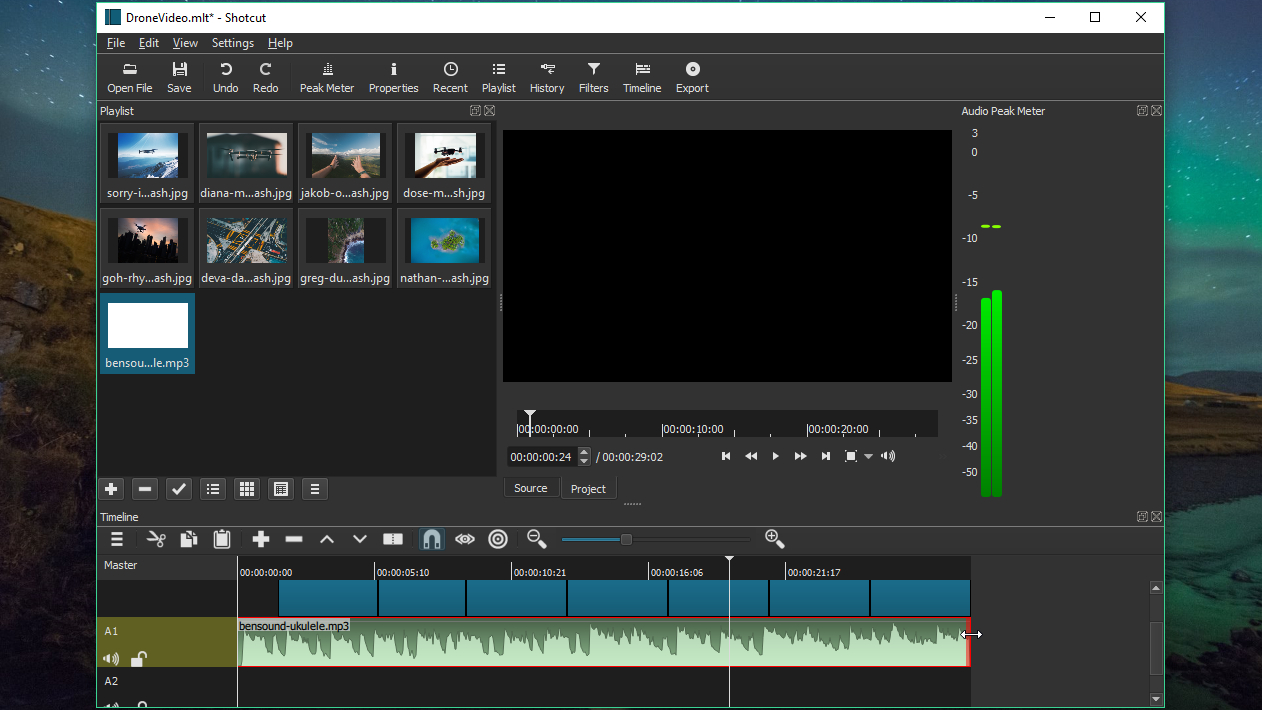
To add music to your video, click ‘Open file’, select the audio file and click ‘Open’, then click the ‘+’ icon to add it to your playlist. Now click the menu button under ‘Timeline’ and select ‘Add audio track’. Drag the audio file into place on the new track (you might need to resize the Shotcut window to see it, or use the scrollbar).
If the music track is too long, you can resize it in the timeline, just like you did with your photos. Use the playback buttons under the preview window to see how the music and photos work together.

5. Export your video
Once you’re happy with the video made from your photos, it's time to export it. We advise saving the project file first in case you decide you want to make any changes later or re-save it in a different format.
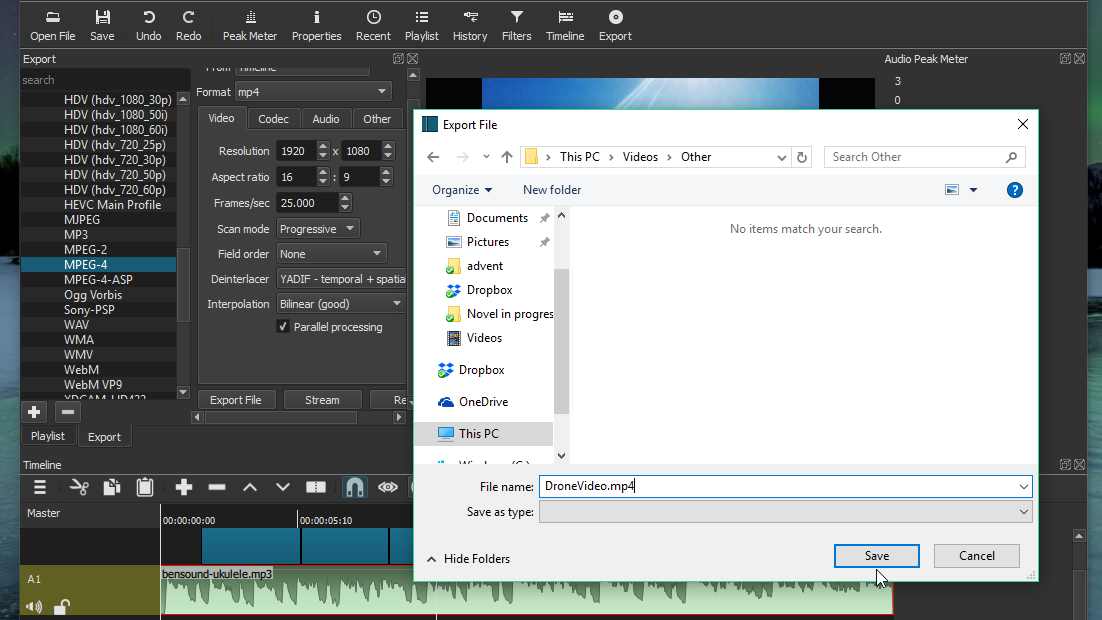
Once that’s done, click the ‘Export’ button and you’ll see a huge range of options. We recommend exporting your video in MP4 format; this will play on almost all devices without any problems, and you’ll be able to upload it to Facebook and YouTube.
Scroll down the list until your find MPEG-4. You’ll then have the option to adjust various settings, including resolution, aspect ratio and frame rate. YouTube’s video player uses a 16:9 aspect ratio, so we recommend leaving that alone. The default frame rate of 24fps is fine for a video made from photos – even if you’ve applied motion filters. YouTube provides a guide to resolutions and aspect ratios, but as you can see, Shotcut's default of 1920:1080 is perfectly all right.
Click the ‘Codec’ tab and make sure the codec selected is mpeg4, then click the ‘Audio’ tab and ensure ‘Disable audio’ isn’t selected.
When you’re ready, click ‘Export video’ and choose a destination for the saved file. Give the file a name ending in .mp4. Click ‘Save’ and you’ll be able to see the rendering progress on the right-hand side of Shotcut’s interface. It might take quite a while to complete, but once it’s done you’ll be able to watch your video, upload it and share it with others however you like.
For more creative essentials, we've reviewed the best video editing computers, the best video editing laptops, and the best video editing Mac and MacBook devices

Cat is TechRadar's Homes Editor, covering smart home tech, kitchen appliances, vacuums, haircare and more. She's been a tech journalist for 15 years, having worked on print magazines including PC Plus and PC Format, and is a Speciality Coffee Association (SCA) certified barista. Whether you want to invest in some smart lights, find your ideal hair styler, or pick the espresso machine of your dreams, she's the right person to help.