Terminal 101: Creating Cron Jobs

Every Monday, we'll show you how to do something new and simple with Apple's built-in command line application. You don't need any fancy software, or a knowledge of coding to do any of these. All you need is a keyboard to type 'em out!
There are many times when you need to run a shell script or command at regular intervals. This can be to clean up your system or run maintenance tasks on your computer. For these jobs, you'll want to use something called "Crons." A cron job is a simple way of specifying a command and run interval to the operating system. We'll show you how to create these jobs, and how to remove them once they become unnecessary.
The Cron Job Syntax
When specifying the time at which a cron runs, there is a specialized syntax that is used to tell the operating system exactly when to run the task.
The timing sequence of a cron job looks like this:
* * * * *
- The first asterisk is for specifying the minute of the run (0-59)
- The second asterisk is for specifying the hour of the run (0-23)
- The third asterisk is for specifying the day of the month for the run (1-31)
- The fourth asterisk is for specifying the month of the run (1-12)
- The fifth asterisk is for specifying the day of the week (where Sunday is equal to 0, up to Saturday is equal to 6)
So, let's take a look at some examples:
If you wanted to run the job every day at 1:00 p.m., then you could use the following cron job timing sequence:
0 13 * * *
If you wanted the job to run every 30 minutes, you could use the following sequence:
Sign up for breaking news, reviews, opinion, top tech deals, and more.
30 * * * *
And, lastly, if you wanted the job to run once a week on Wednesday, you could type the following sequence:
* * * * 3
If you have more intricate requirements for run times of cron jobs, then you can take a look at this guide for more detail on how to format the sequence.
Note that if you're not using a specific item, then you can replace it with an asterisk (*) and the cron will not include that in the timing sequence. Note that between the asterisks, there are tabs used, and not spaces (so, don't copy anything from here and paste), but type with tabs.
Creating a Cron Job

Once you've got the sequence down, then actually creating the job is the easy part. We'll use nano to create a crontab entry that contains the timing sequence that you've figured out, as well as the command (or script location) that you wish to run.
To begin creating the cron file, type the following command:
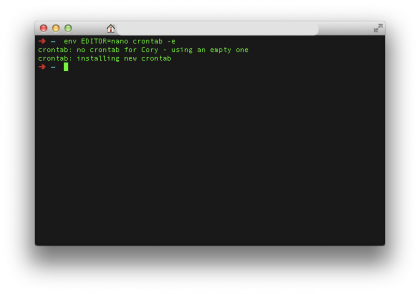
env EDITOR=nano crontab -e
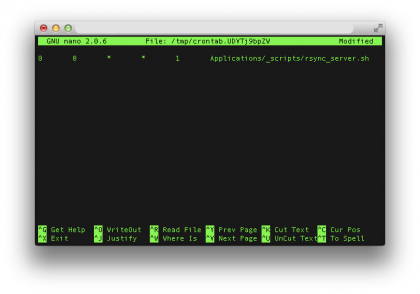
This tells the "crontab" command to open a new file inside of the nano text editor. All of your cron jobs will be placed in this text file, each on a new line. Once the nano editor has loaded, you'll type in the cron jobs like this:
[timing sequence] commandToRun
Replace "[timing sequence]" with the cron job timing sequence that you've worked out in the first step. This will tell the crontab program when to run the command. Replace "commandToRun" with the actual command (or the path to a shell script) that you wish to run at the given time in the timing sequence.
If you wish to enter multiple cron jobs, enter each cron on a separate line in the file.
To save the file, press Control + O (to write out the file), then enter to accept the file name, then press Control + X (to exit nano).

If all went well, then you should now have a cron job created for you. If the cron was properly created, then you should see "crontab: installing new crontab".
Your command (or shell script) will then begin running at the scheduled timing sequence.
Removing Cron Jobs
There may come a time when you don't wish to run a cron job any longer. When that time comes, you can just edit the file by typing in the following command again:
env EDITOR=nano crontab -e
Delete the line that contains the command that you no longer wish to use, then re-save the file by pressing Control + O (to write out the file), then Control + X (to exit nano).
List Scheduled Cron Jobs

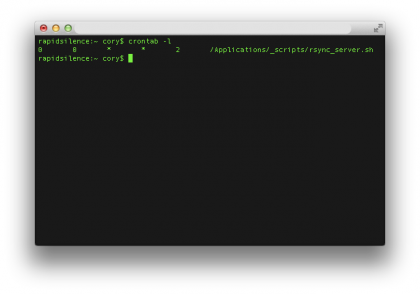
You can see how many jobs are currently scheduled from inside of cron by typing the following command:
crontab -l
This will list the currently scheduled jobs, one-by-one right inside of the Terminal without having to open the crontab file in the text editor.
Cory Bohon is a freelance technology writer, indie Mac and iOS developer, and amateur photographer. Follow this article's author on Twitter.