How to private browse in Chrome on Windows, Android and ChromeOS
Keep your internet traffic secure on your Chrome browser
Sign up for breaking news, reviews, opinion, top tech deals, and more.
You are now subscribed
Your newsletter sign-up was successful
Private browsing entails surfing the web without storing information about your browsing sessions. During private browsing, your web history isn't saved, form data isn't recorded, and cookies are deleted immediately after you close the website window. It helps users safeguard their privacy online, especially when using shared computers.
However, private browsing doesn’t make one invisible online. Your internet service provider (ISP) and network operator can still track the sites you visit. If you need more robust protection, consider combining private browsing with additional tools, such as ad blockers and a virtual private network (VPN) service.
Get 25% off on any plan, from 100 to 60,000 proxies
For a limited time, new users who purchase any plan can claim 25% off their first order. The user will have the discount automatically applied after they click on it and check out.
But that’s not all — there is a free plan that comes as a supplementary offer. All users who create a new Webshare account automatically receive 10 free (shared datacenter) proxies + 1GB/month bandwidth to use for as long as they want, no credit card required. The user who signs up will get a free basic plan, and also have a 25% discount when upgrading.
Preferred partner (What does this mean?)
Private browsing mode on Google Chrome
Google Chrome is the world’s most popular web browser, with a 67% market share. It’s followed by Apple’s Safari, with an 18% share, and Microsoft Edge, with a 5% share. Google Chrome's dominance is helped by its speed, simplicity, and advanced features, including private browsing.
Chrome’s private browsing feature is known as “Incognito mode.” When browsing in this mode, your search and web history won't be saved, and cookies won’t be installed on your device. You can start with a clean browsing history each time you close and reopen Incognito mode.
Google Chrome has native apps for PCs (Windows and macOS) and smartphones (iOS and Android). It’s also integrated into ChromeOS, the operating system primarily used on Chromebooks. This guide will examine how to browse privately on Chrome for Windows, ChromeOS, and Android.
How to use Incognito on Windows
- Find Chrome from your apps menu and launch the app on your PC.
- At the top right of the Chrome browser, select More (the three vertical dots), then New Incognito Window.
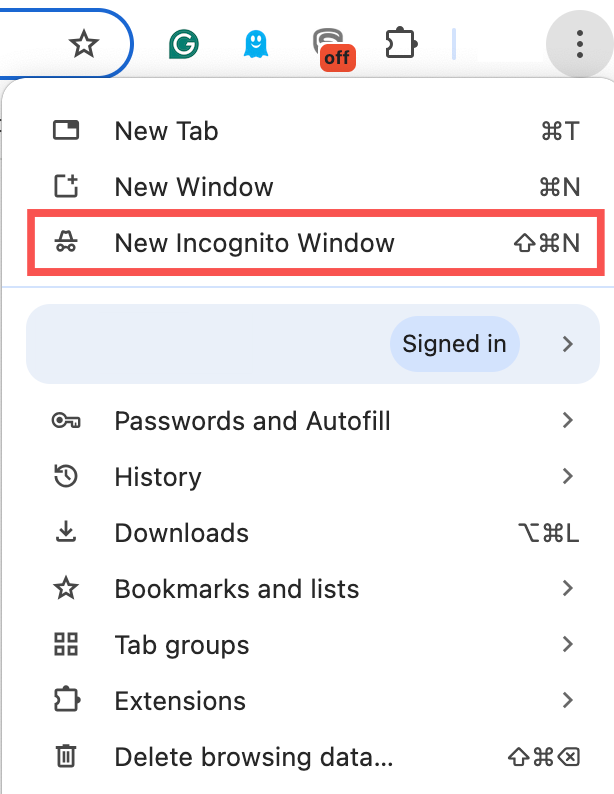
- A new window will open with the Incognito icon in the top-right corner. You can then browse privately without hassle.

Alternatively, you can use the keyboard shortcut Ctrl + Shift + n to open a new Incognito window on Chrome.
You can open multiple Incognito windows and browse privately on all of them. You can also switch between Incognito and regular browser windows.
Sign up to the TechRadar Pro newsletter to get all the top news, opinion, features and guidance your business needs to succeed!
How to use Incognito on Android
- Find Chrome on your Android apps list and open it.
- Tap More (the three vertical dots) at the top right corner, then New Incognito tab.
- A new Incognito window will open with the icon to the left of the address bar.
Notably, you can't take screenshots on your Android phone when browsing in Incognito mode. To take a screenshot, you'll need to open the webpage in a regular tab.
By default, anyone who uses your Android phone can see the Incognito tabs you’ve opened. However, you can hide your Incognito tabs from other users with the steps below:
- Launch Chrome on your Android device.
- Tap More, then Settings > Privacy and security.
- Enable the Lock Incognito tabs when you leave Chrome option.
Note: The feature to lock Incognito tabs is supported only on Android 11 and up.
How to use Incognito on ChromeOS
- Launch the Chrome browser on your Chromebook.
- Select More at the top-right corner, then New Incognito window.
- A new window opens with the Incognito icon at the top-right corner of the address bar.
After launching Chrome, you can also open an incognito window with the shortcut Ctrl + Shift + n. Going Incognito on ChromeOS follows the exact process as on Windows.
Deleting browsing data on Chrome
Incognito isn’t a one-size-fits-all solution for privacy. You also need to take other steps to maintain utmost privacy on Chrome, and deleting browsing data is one of those steps.
Deleting browsing data prevents other people using the same device from checking your browsing history. It erases cookies that keep you logged into websites, ensuring other users can’t access your accounts on a shared device. Likewise, it frees up storage space and improves Chrome's speed and performance.
How to delete browsing data on Windows
- Open Chrome on your Windows PC.
- Click More at the top-right corner, then Delete browsing data.
- Select a time range for data deletion, such as the last hour, the last 7 days, or all time.
- Choose the type of data to delete, including browsing history, cookies, and cached files. You can delete anyone or all of them.
- Click on Delete data.
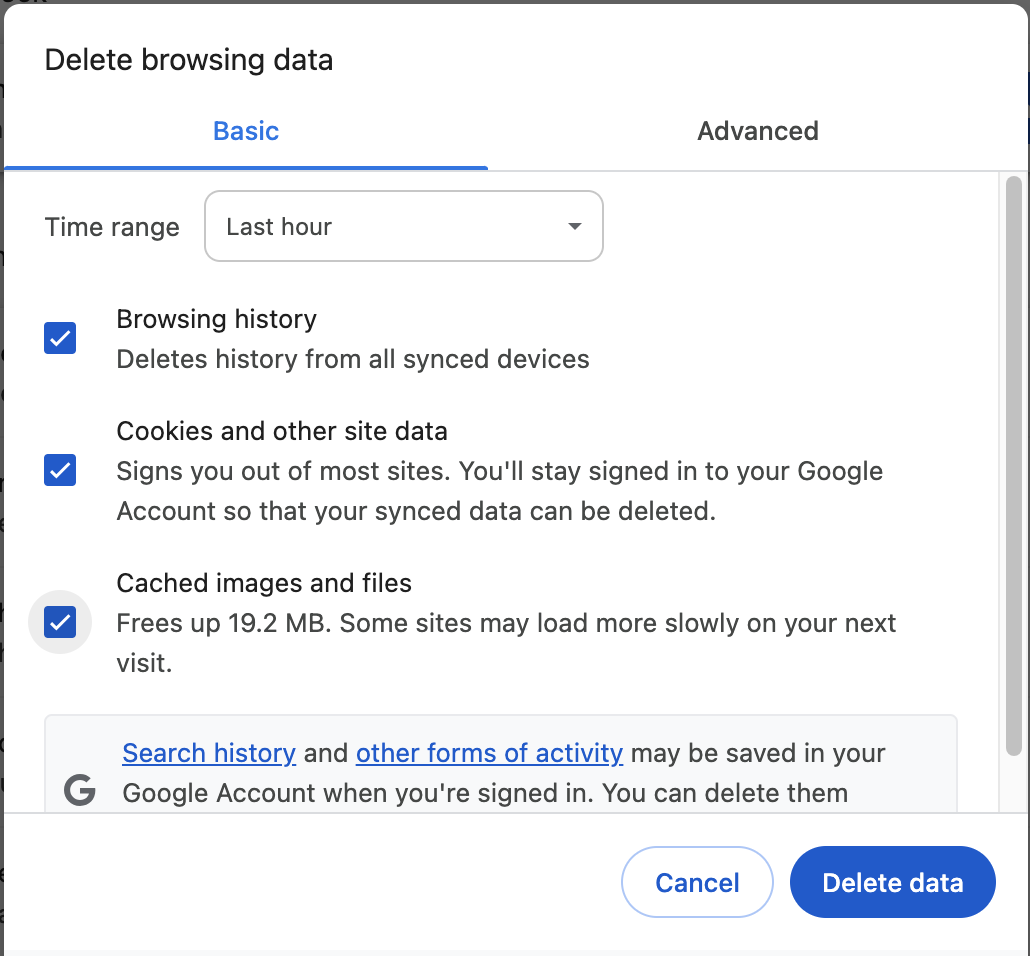
There’s also a shortcut to access the data deletion menu. Type "Delete browsing data" in the address bar and tap the Action chip to access the menu immediately.
How to delete browsing data on Android
- Open Chrome on your Android device.
- Tap More, then Delete browsing data.
- Select a duration for the data you want to delete, ranging from 15 minutes upwards.
- Choose the types of data to be deleted.
- Click Delete data.
How to delete browsing data on ChromeOS
- Launch the Chrome browser on your Chromebook.
- Click More at the top-right corner, then Delete browsing data.
- Choose a time range for the data deletion.
- Select the types of data to be deleted.
- Click Delete data.
Delete Google activity
If you’re signed into Chrome with your Google account, Chrome saves a record of your activities, such as YouTube video history and Google search history.
These activities are saved separately from the data on the Chrome browser. Deleting your browsing data, as in the above section, doesn’t remove these activities from your Google account. Instead, you’ll have to delete them in the My Activity center. You can also turn off most activity from being saved.
The steps are the same for Windows, Android, and ChromeOS, as they occur on the web rather than in-app:
- Open myactivity.google.com in your web browser.
- Click on the Delete button above your activities.
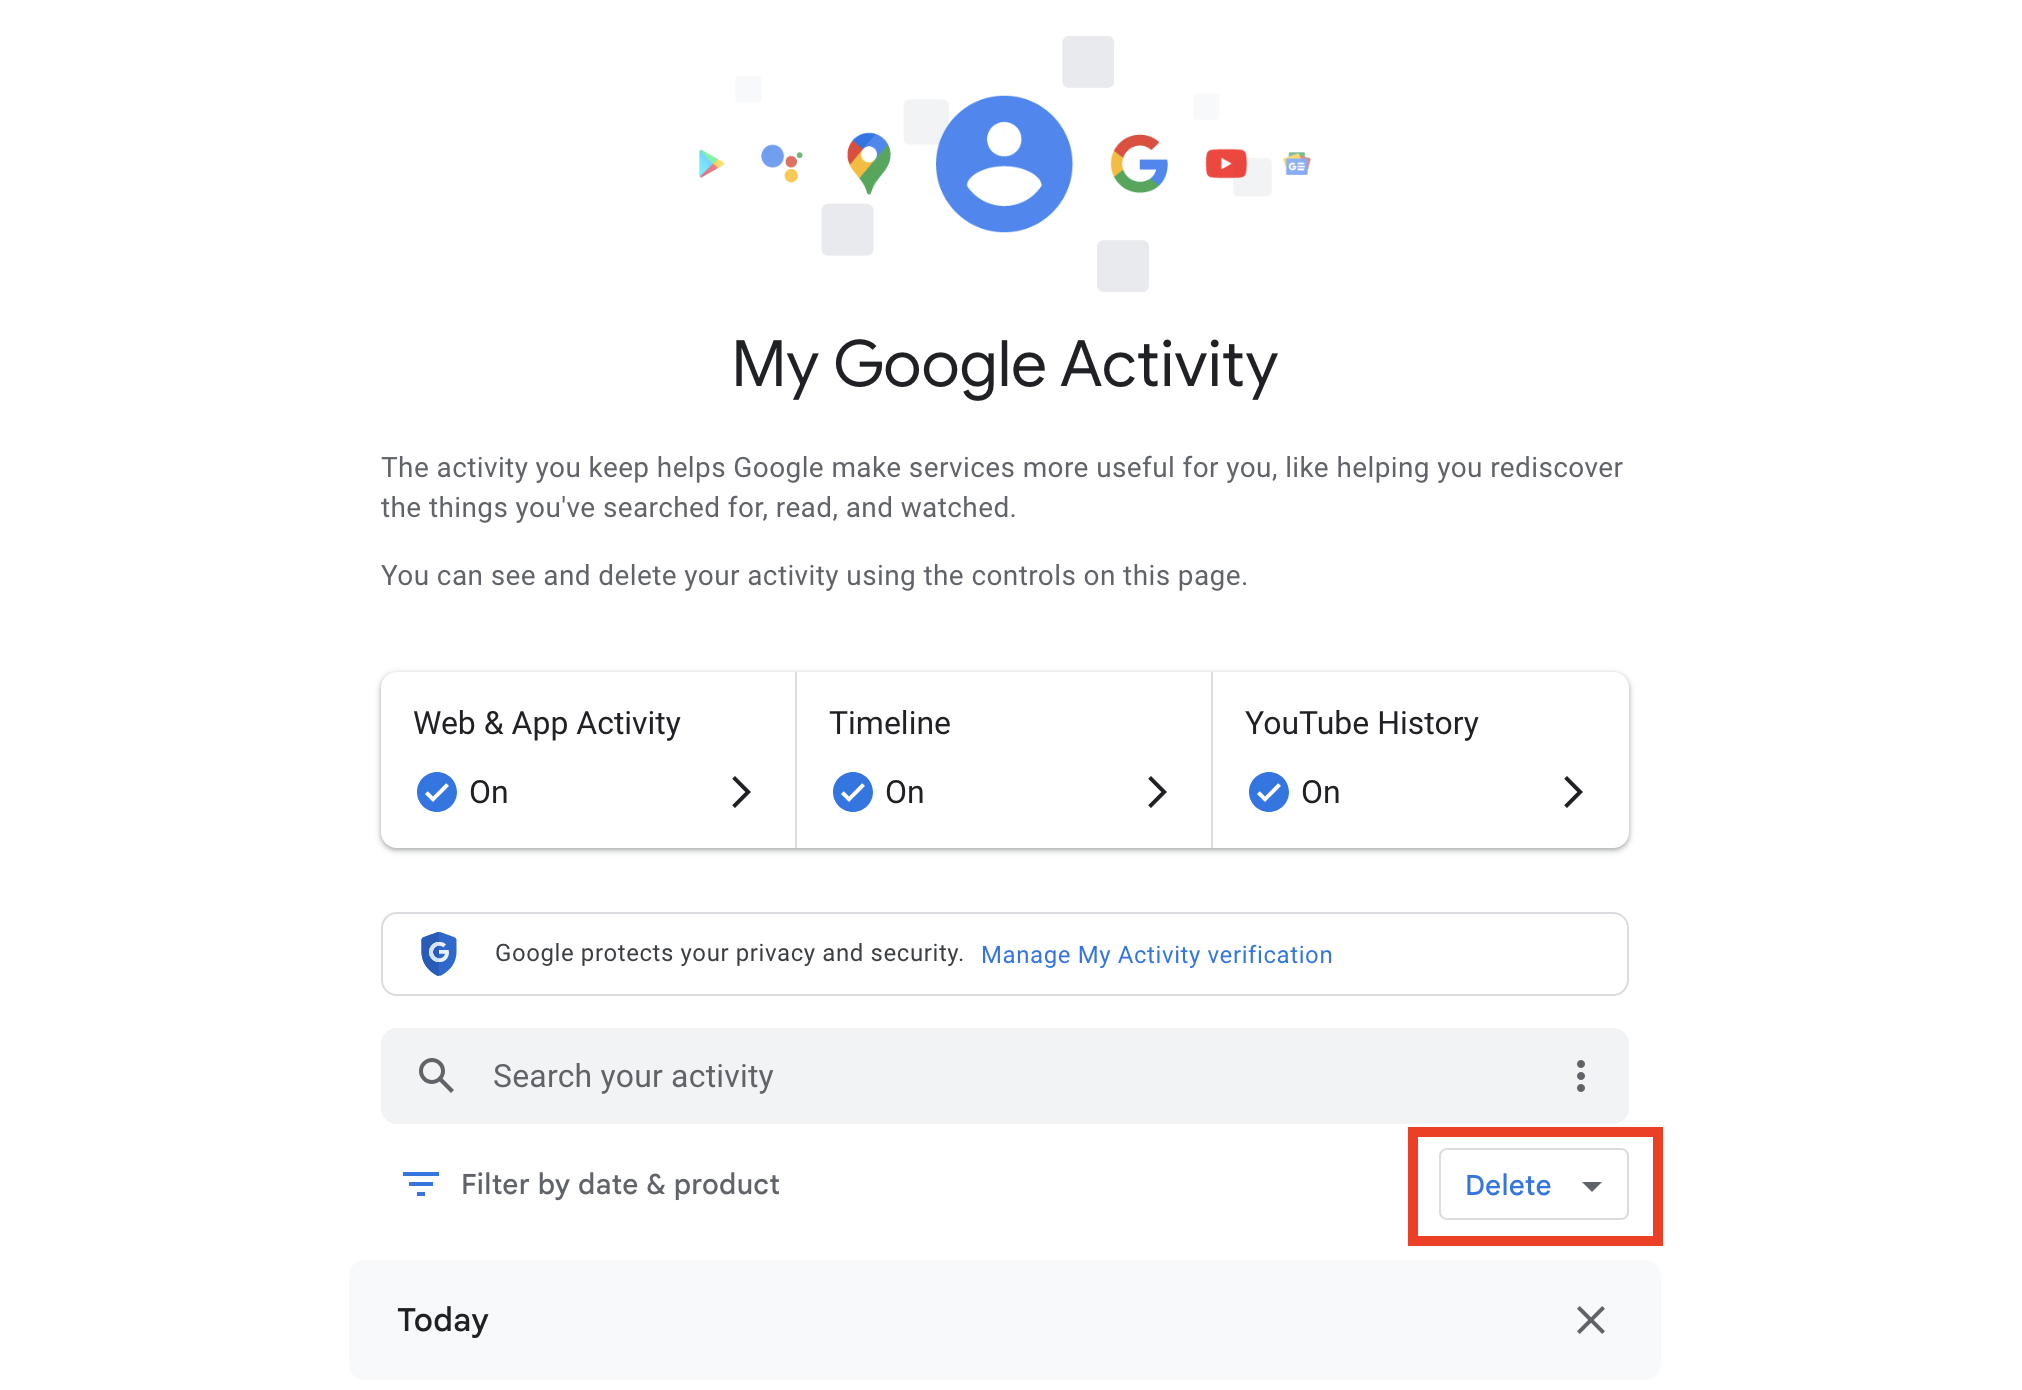
- Choose the duration for the activity data to be deleted, such as the last hour, last day, or all time. You can also choose a custom date range. For utmost privacy, it’s advisable to delete the data for all time.
Deleting your activity reduces the chances of advertisers and other third parties accessing your browsing data. However, privacy doesn’t stop there. You can disallow Google from collecting the data in the first place. Follow the steps below:
- Open myactivity.google.com.
- Select the type of activity you want to turn off collection for: Web & App, Timeline, and YouTube History.
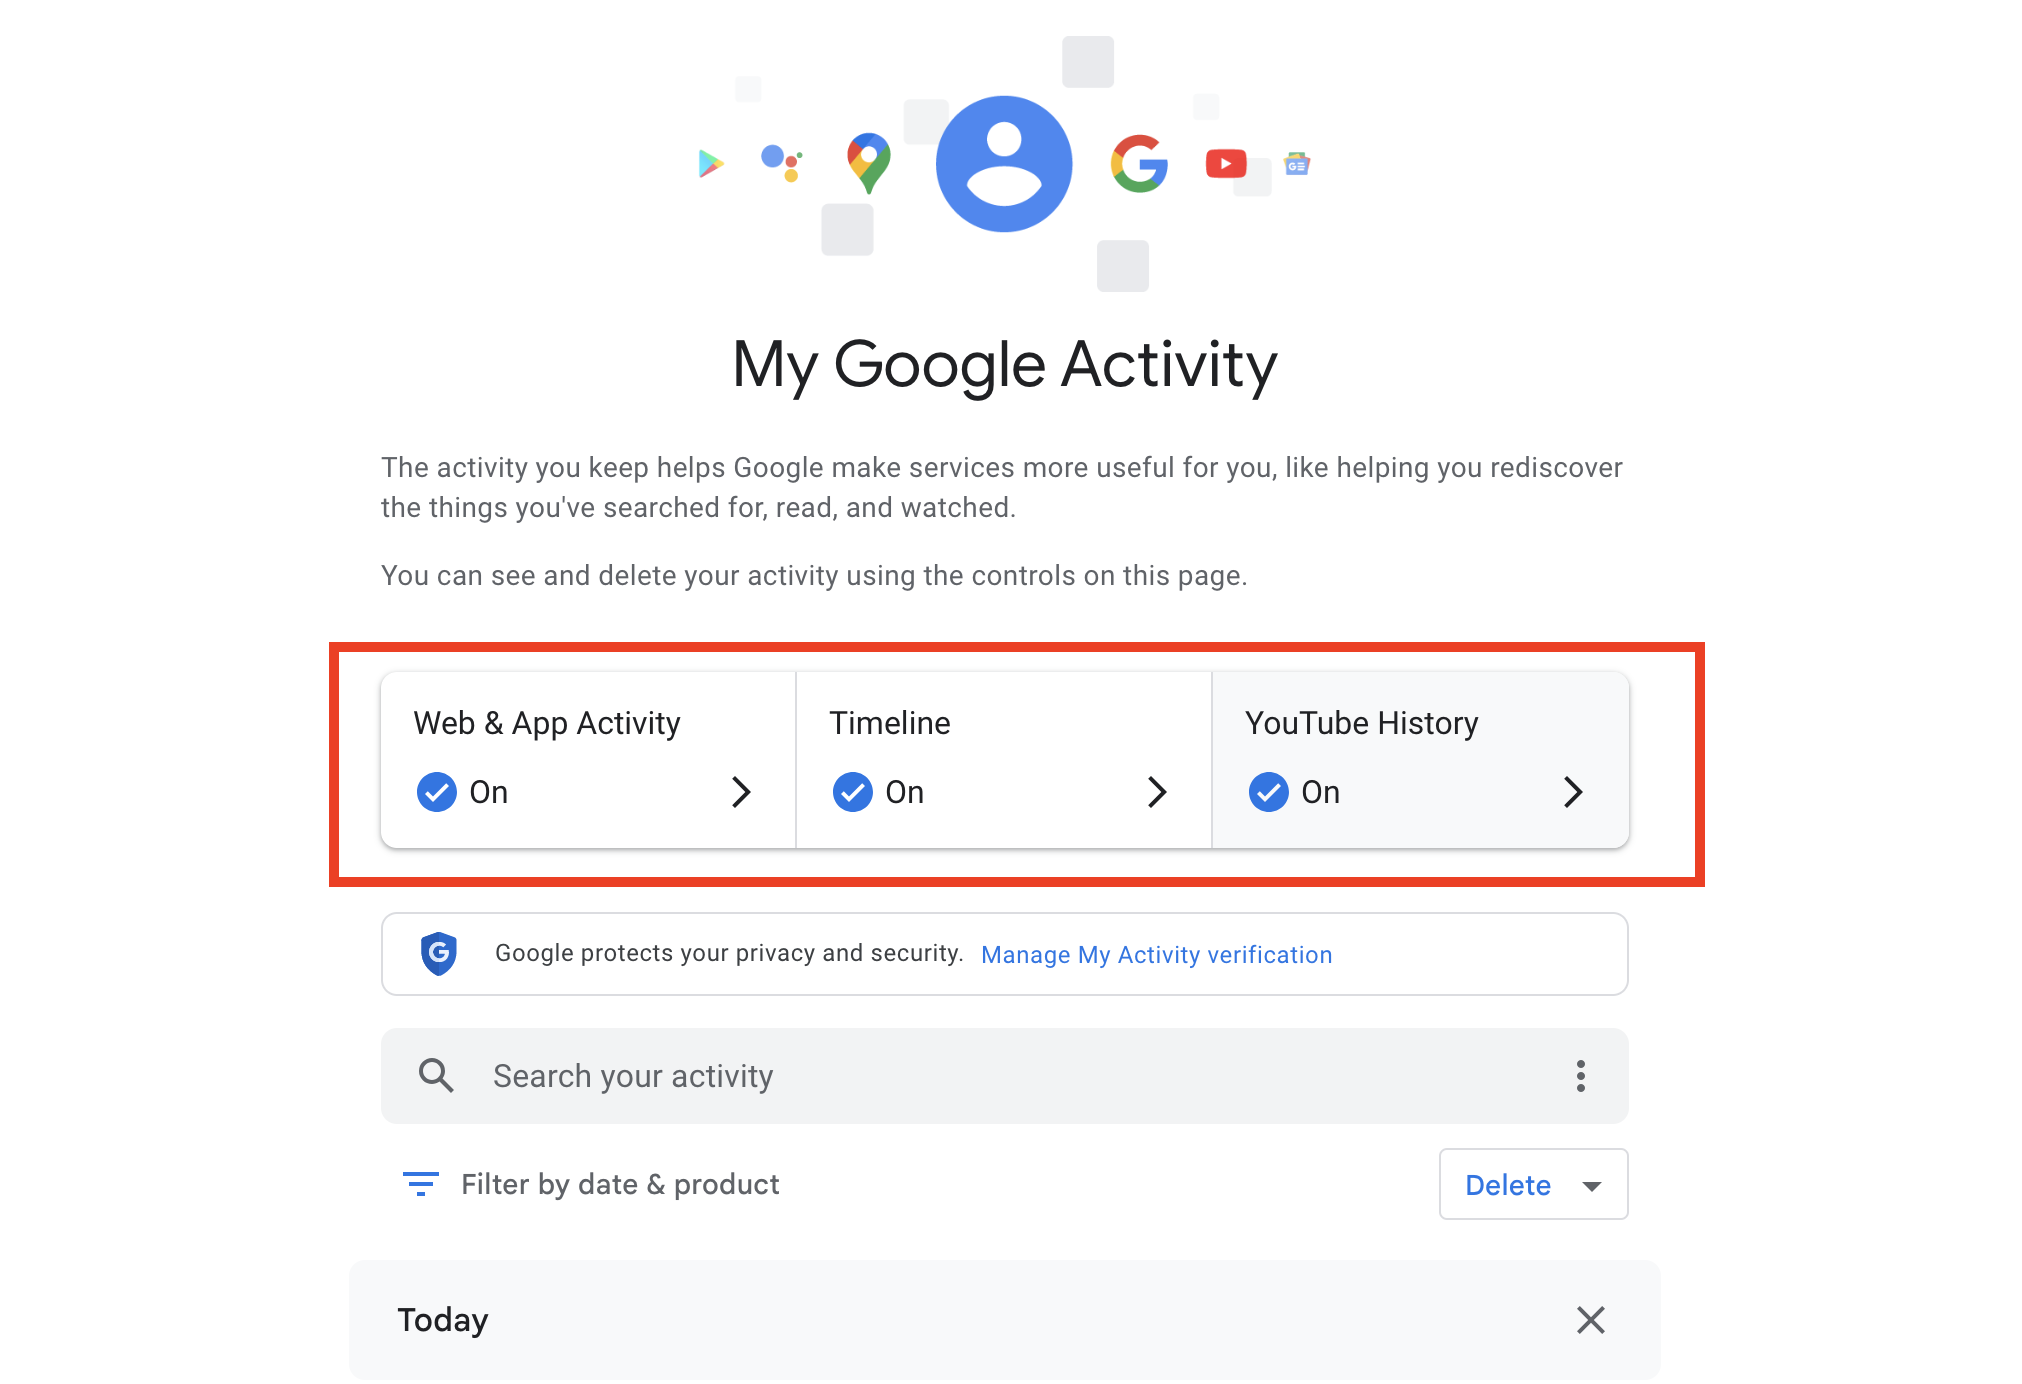
- Click Turn off in the control center for your selected activity.
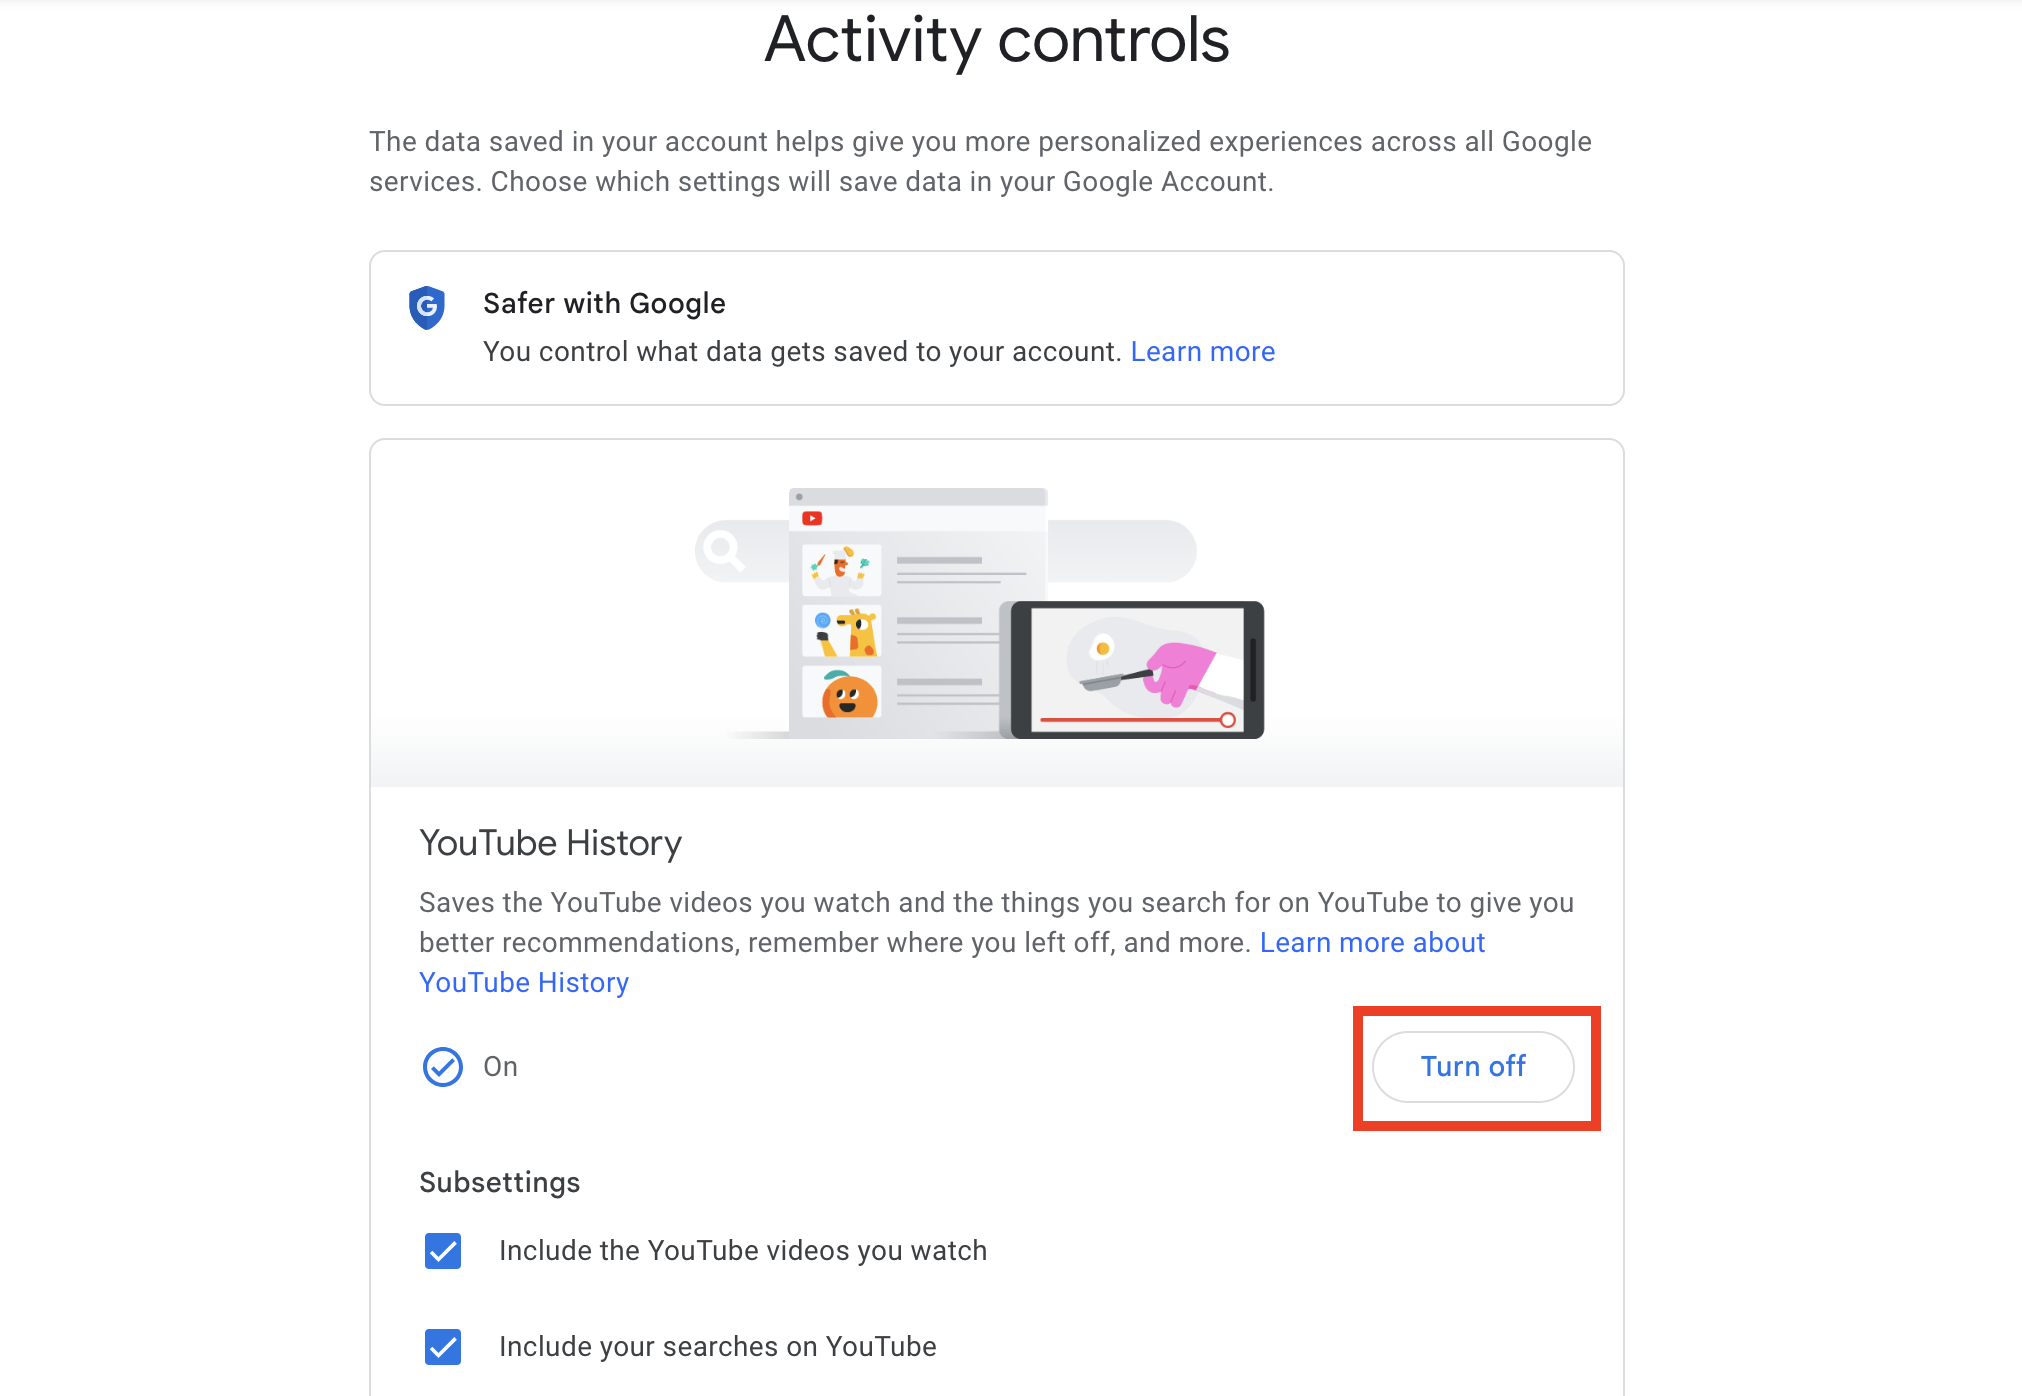
- Google may display a warning highlighting how turning off the activity can result in less personalized experiences when using Google services. This warning is accurate, but since you’re optimizing for privacy, not personalization, you can proceed to turn it off.
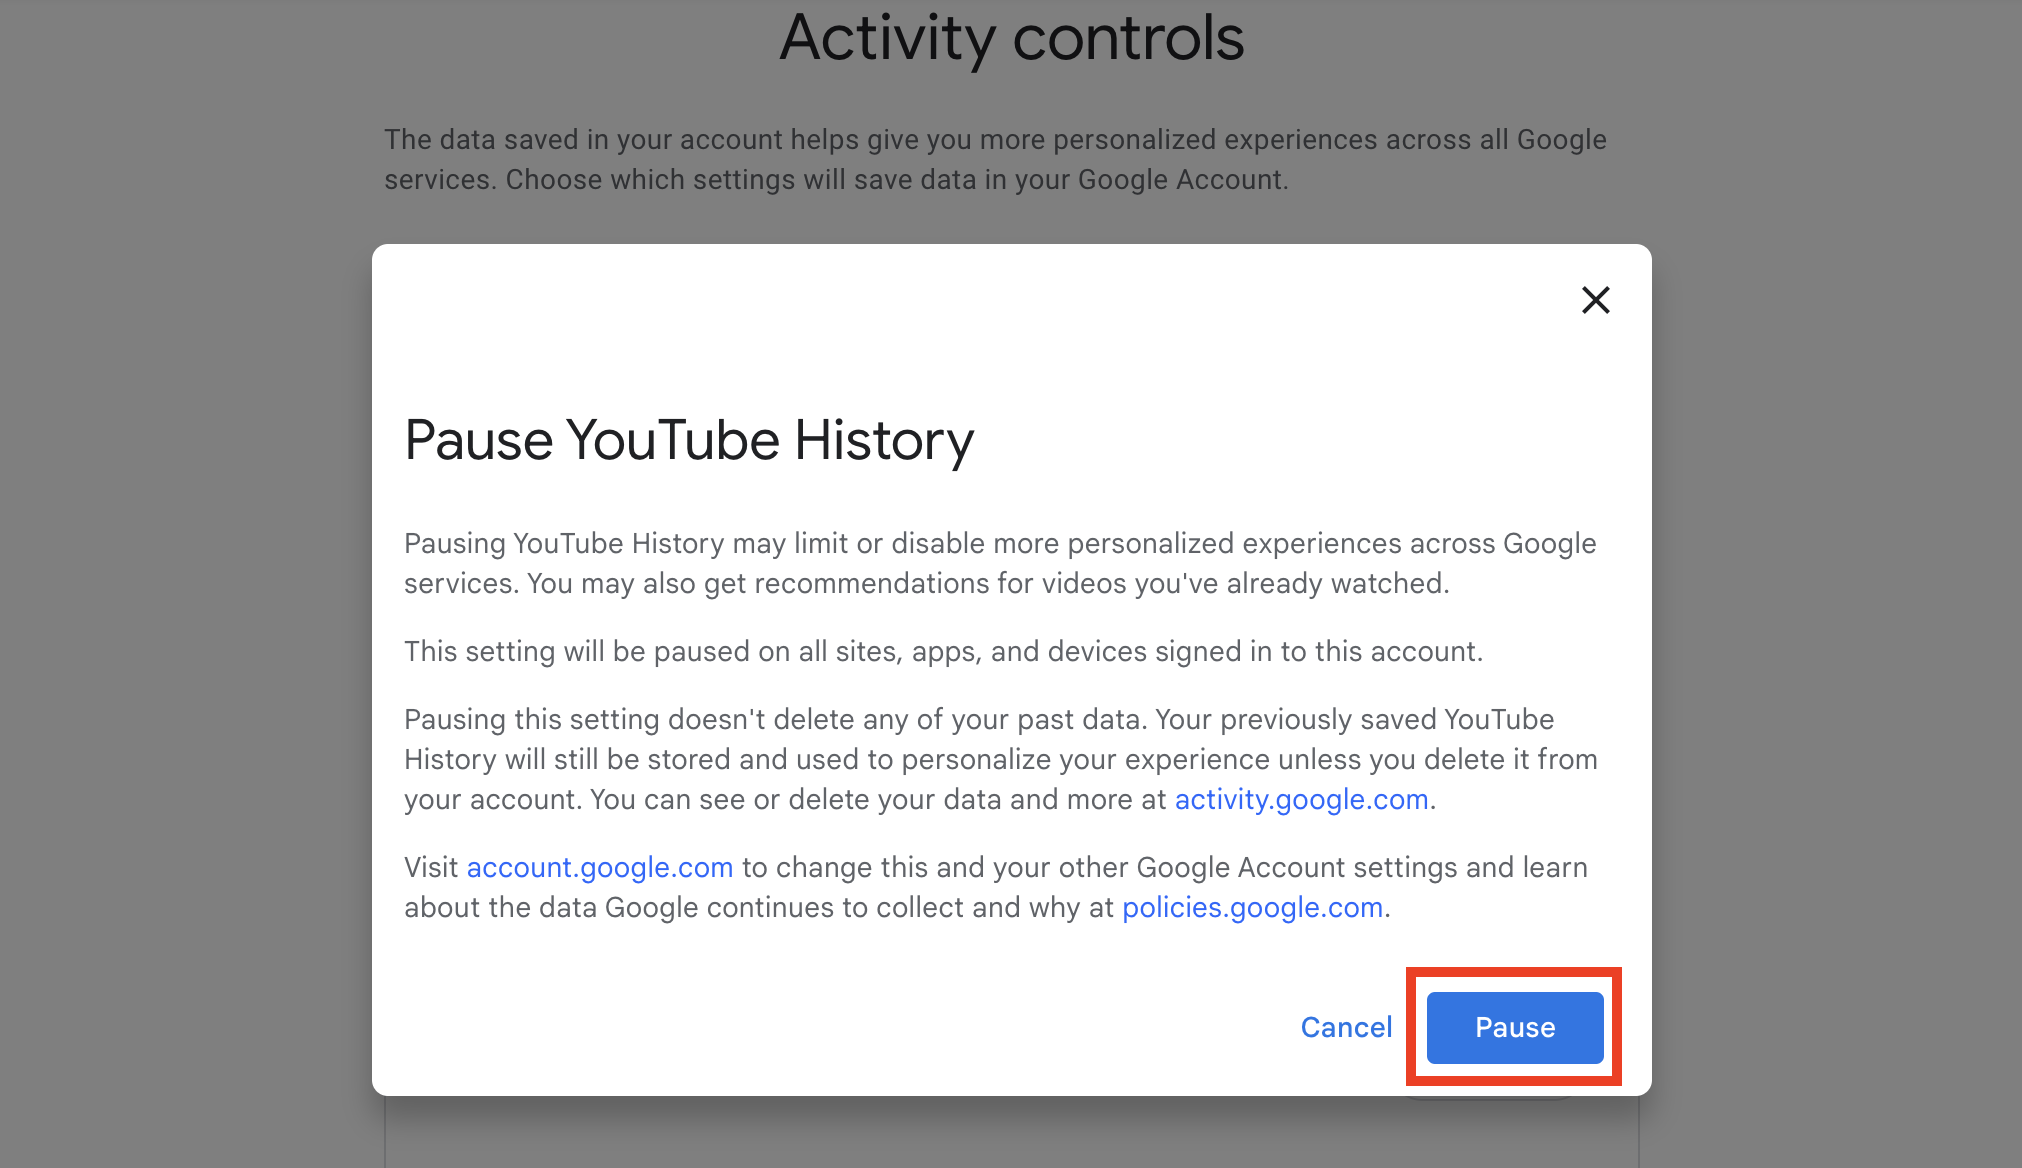
For utmost privacy, repeat the above steps for the three types of activities: Web & App, Timeline, and YouTube History. Henceforth, Google won’t collect this data when using Chrome, boosting your online privacy.
Use a VPN
A virtual private network (VPN) service is an effective way to enhance privacy when surfing the web. It creates a secure, encrypted channel between your device and the internet, preventing third parties from monitoring your browsing activity.
A VPN app hides your real IP address and replaces it with another from an encrypted remote server. Thus, it appears like you’re using Chrome from another country or city. VPN apps allow you to select your server location for added convenience.
A VPN app doesn't just help you browse privately. It also lets you bypass geo-restrictions and access content that's restricted in your region. You can download a VPN as a separate app on your PC or mobile phone, or add it as an extension to your Chrome browser.
You can choose from many VPN services. We’ve reviewed some of the best options, including ExpressVPN, NordVPN, and ProtonVPN. Factors to consider when choosing a VPN include its encryption strength, no-logs policy, number of supported server locations, number of simultaneous connections, speed, and ease of use.
For more detailed information, view our guide to the best VPN services in 2025.
Block cookies
You can completely block cookies in Chrome to enhance your online privacy. Hence, advertisers and websites won't be able to install cookies to track your activity and create a profile of your browsing behavior.
Blocking cookies has some downsides, such as requiring you to log in to websites repeatedly and refill shopping carts if you exit an online store and then return. However, these downsides are the tradeoffs for enhancing privacy when using Chrome.
How to block cookies on Windows
- Open Chrome on your Windows PC.
- Click More at the top-right corner, then Settings.
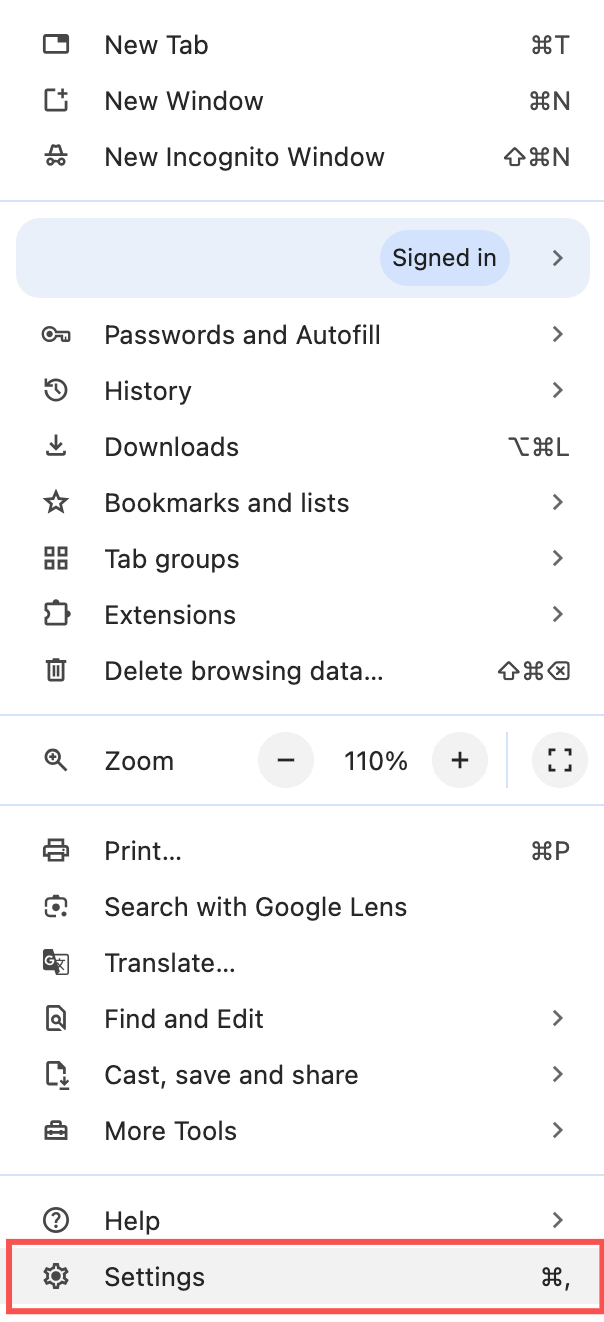
- Select Privacy and security > Third-party cookies.
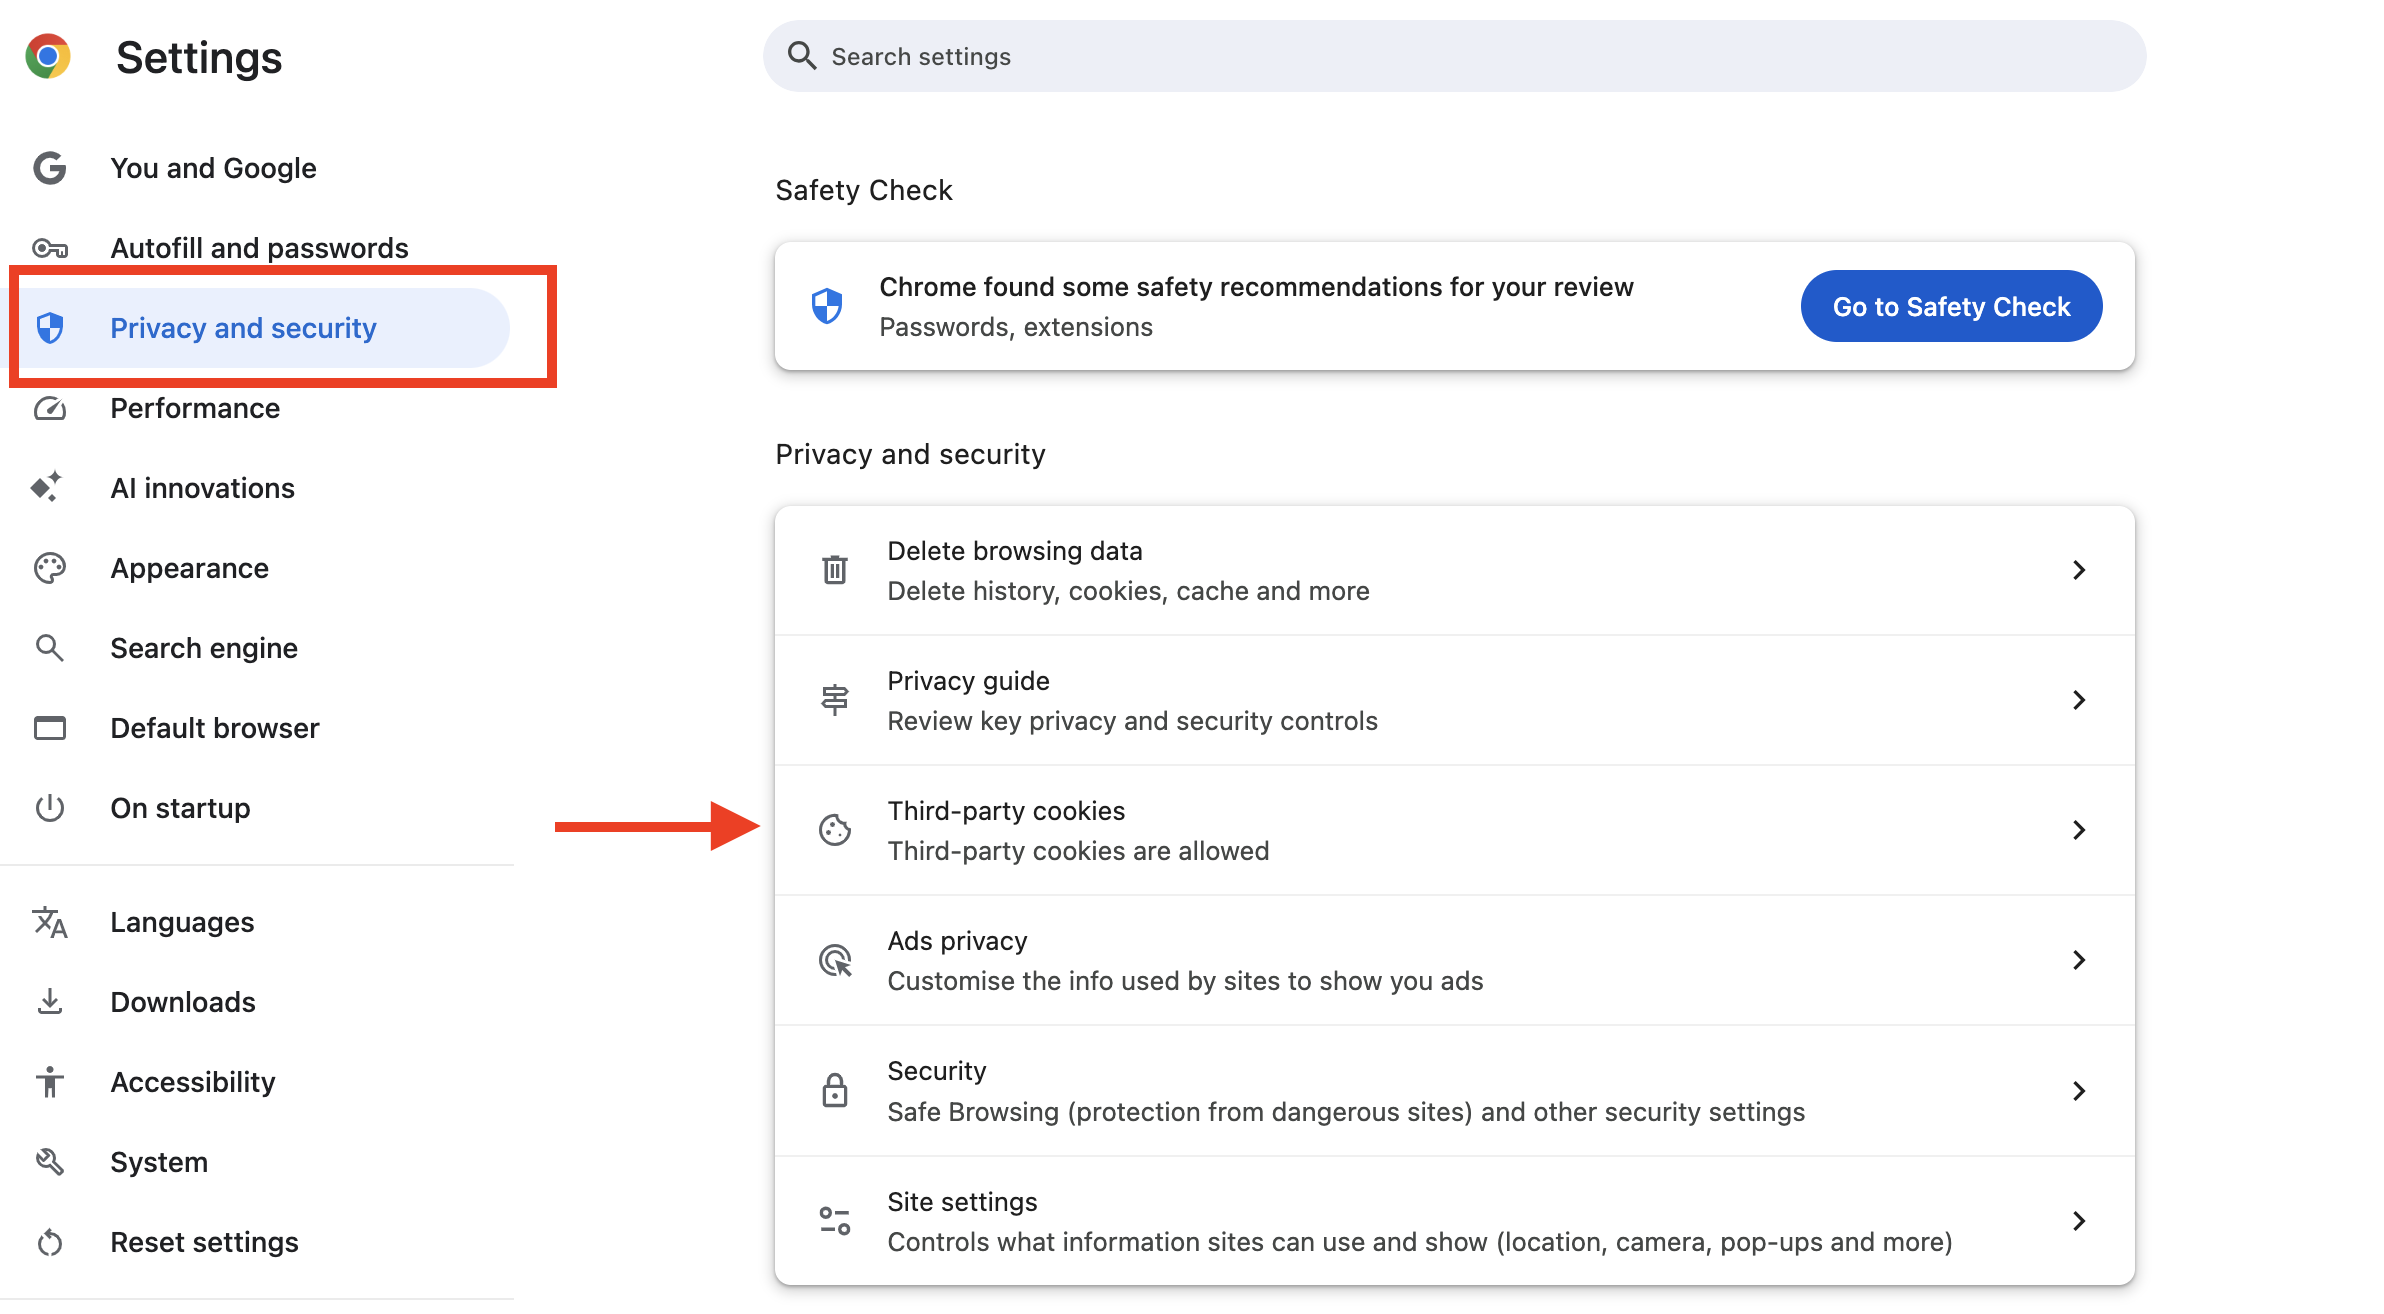
- Turn on Block third-party cookies.
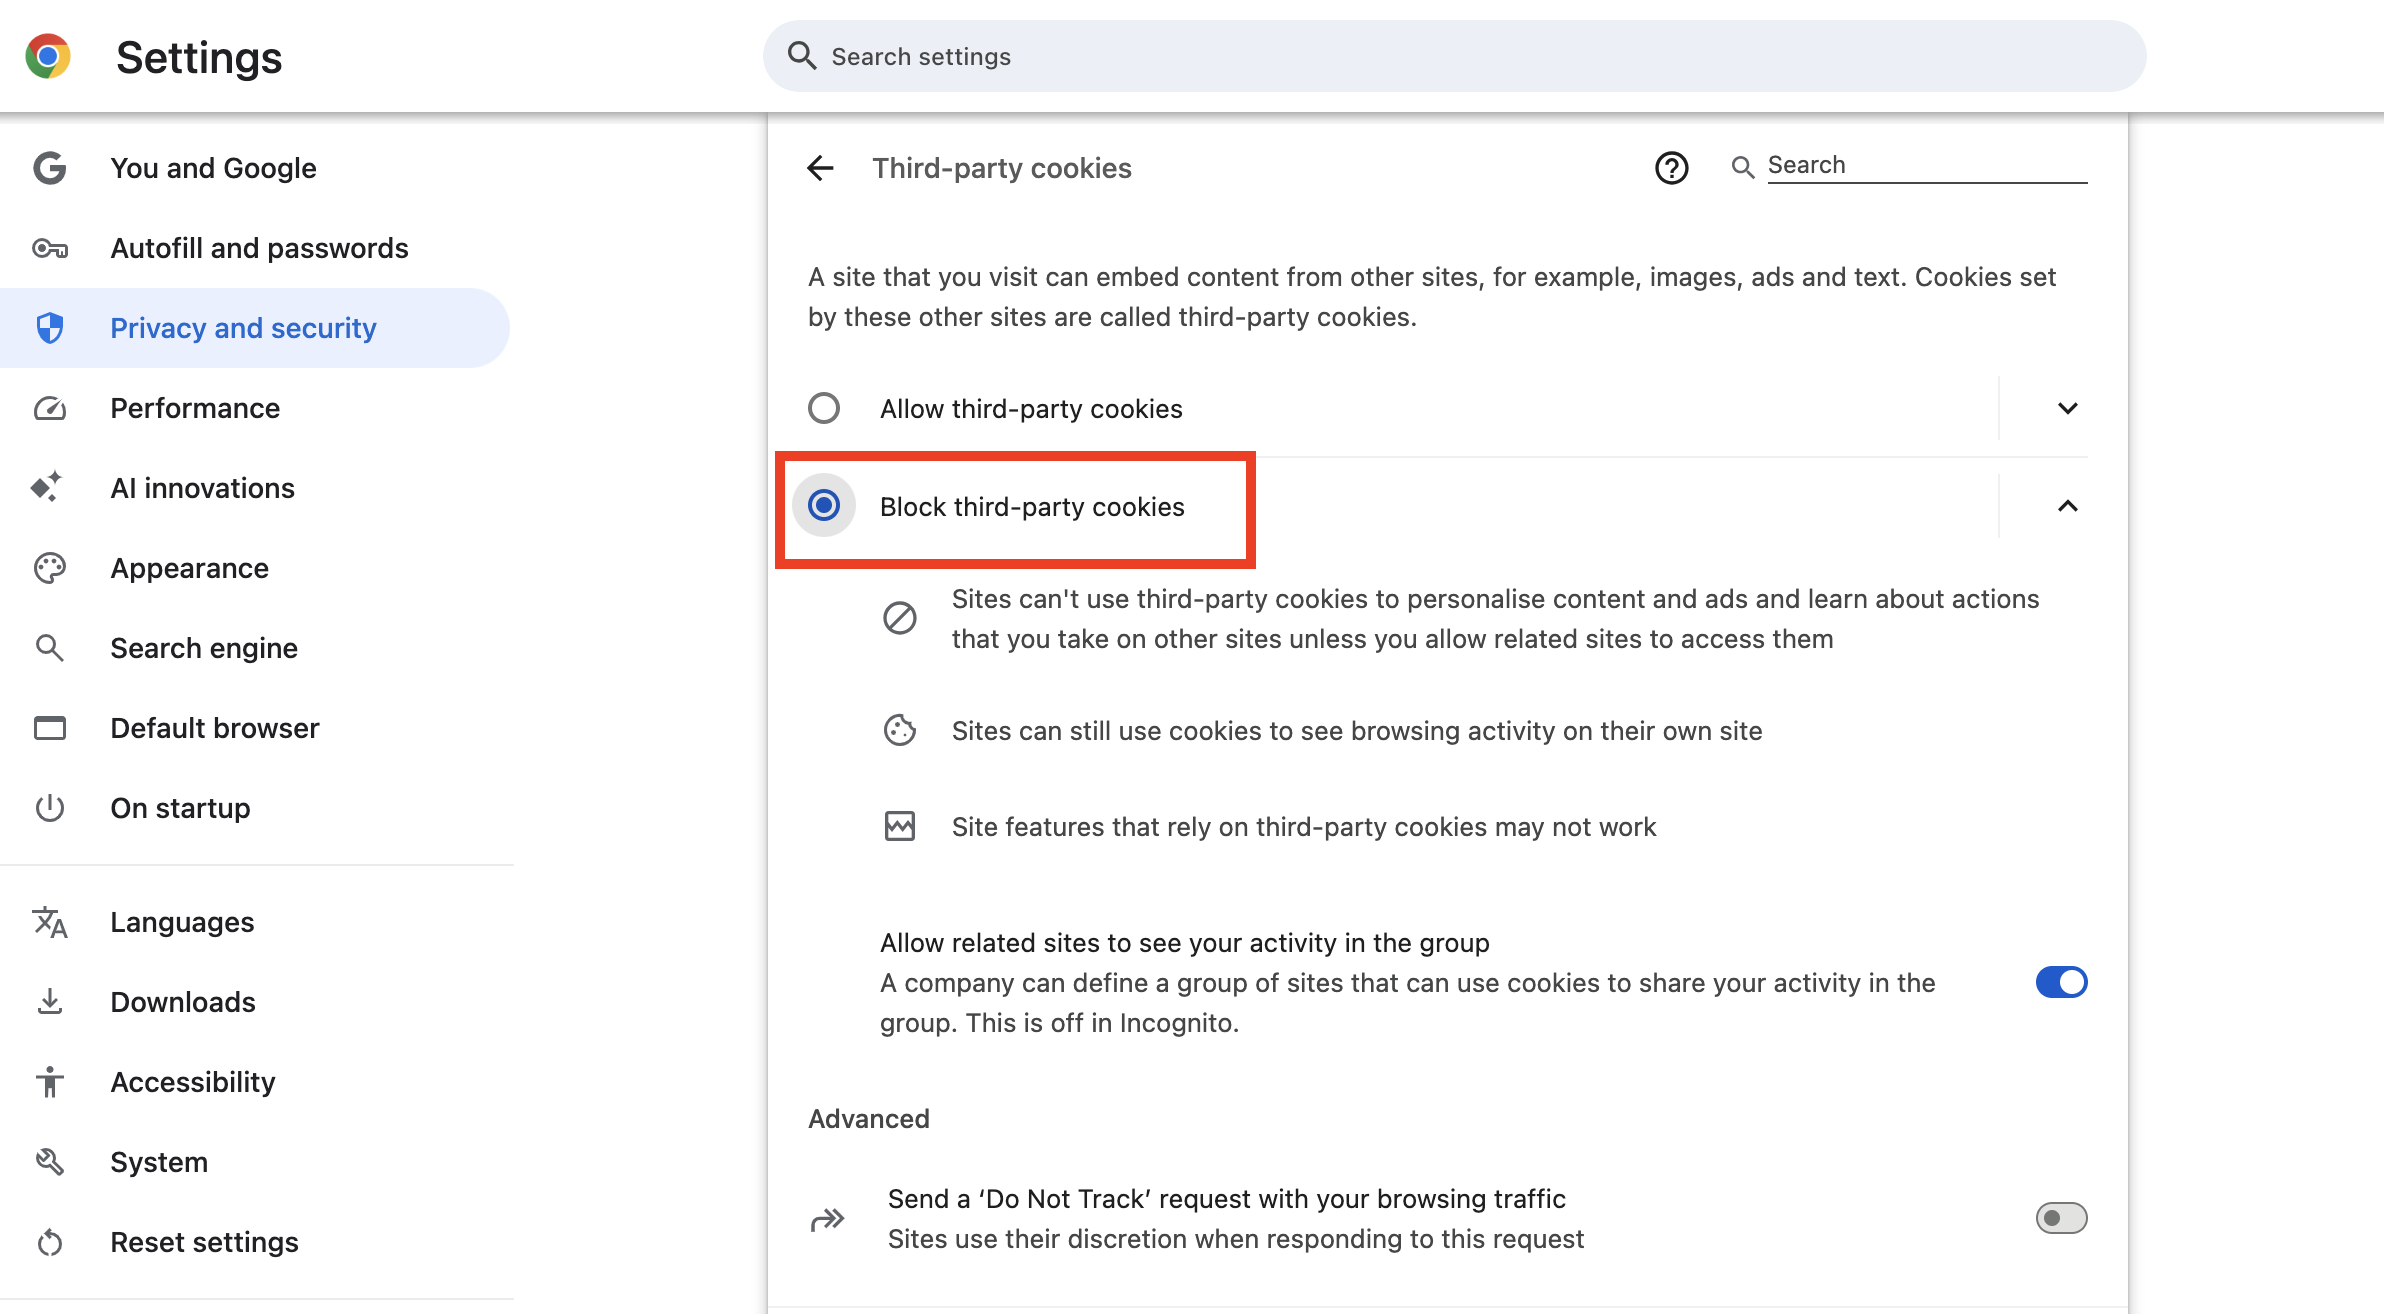
How to block cookies on Android
- Open Chrome on your Android device.
- Tap More at the top-right corner, then Settings.
- Tap Site settings and then Third-party cookies.
- Turn on Block third-party cookies.
How to block cookies on ChromeOS
- Open Chrome on your Chromebook.
- Click More > Settings.
- Select Privacy and security > Third-party cookies.
- Turn on the Block third-party cookies option.
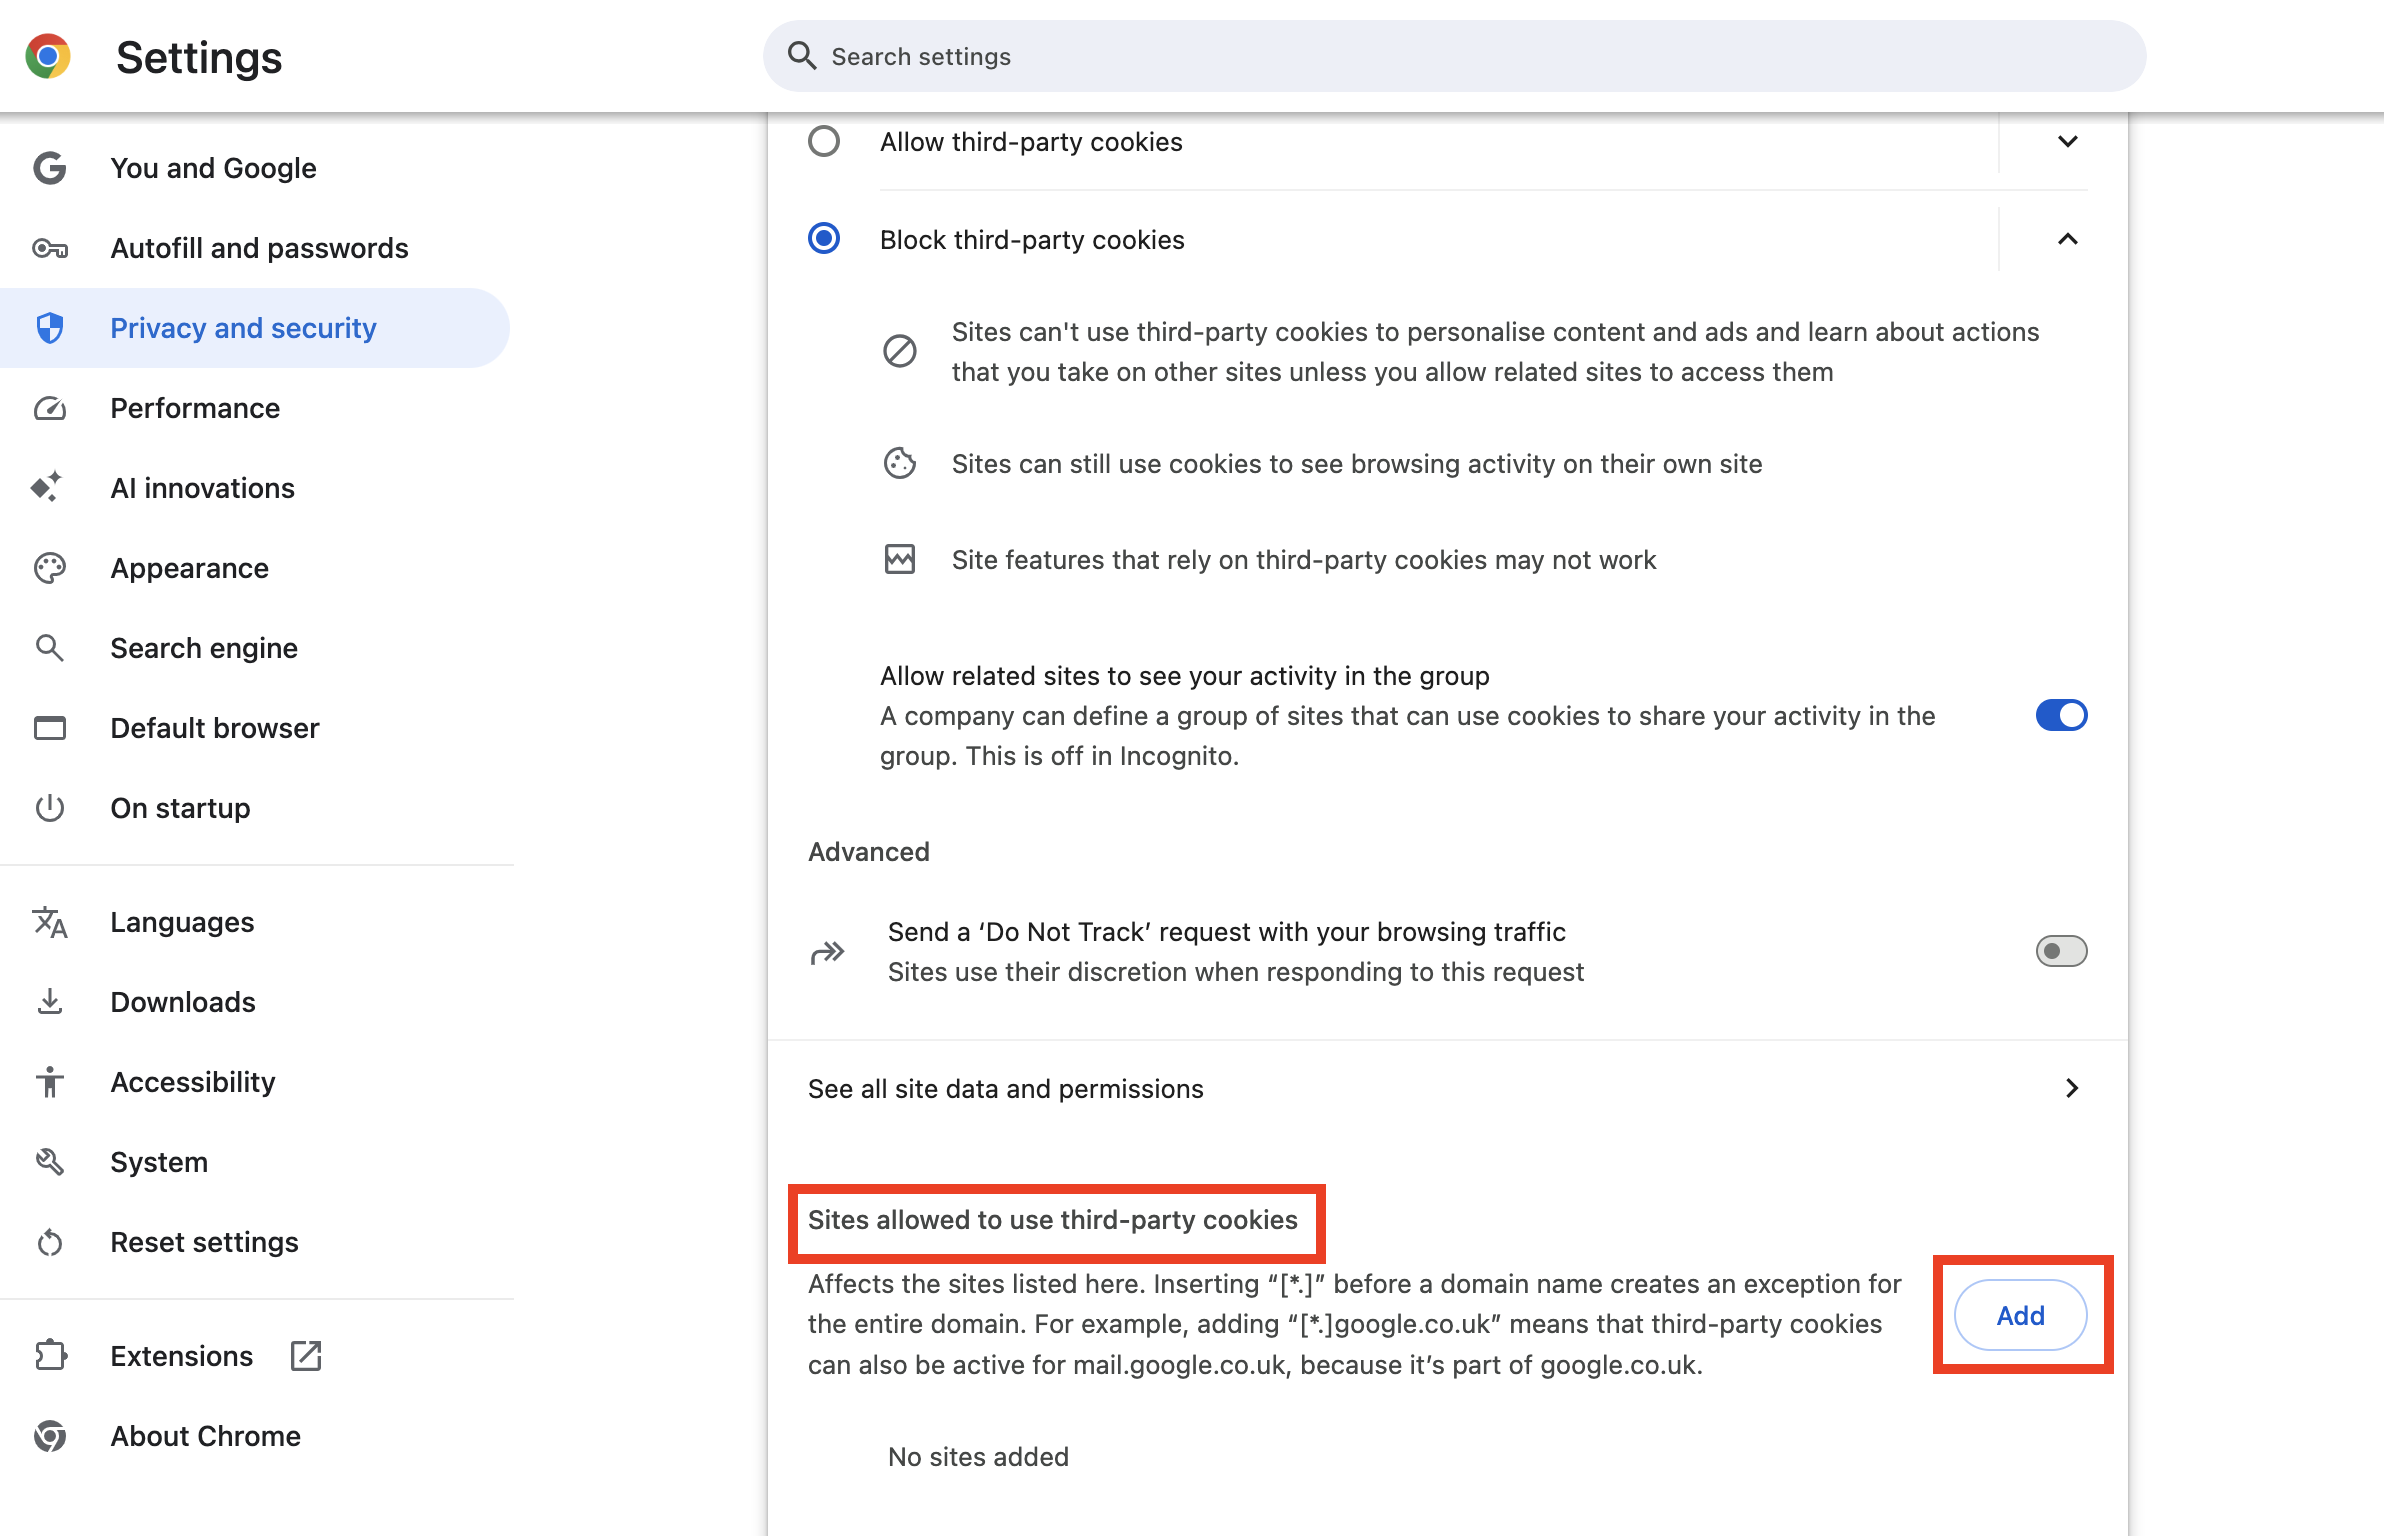
Blocking cookies completely can be inconvenient, but Chrome provides a workaround. You can allow specific sites to install cookies on your browser, while all others remain blocked.
On the same menu as the Block third-party cookies option, click Add under Sites allowed to use third-party cookies.
Then, add the websites you want to allow to install cookies.
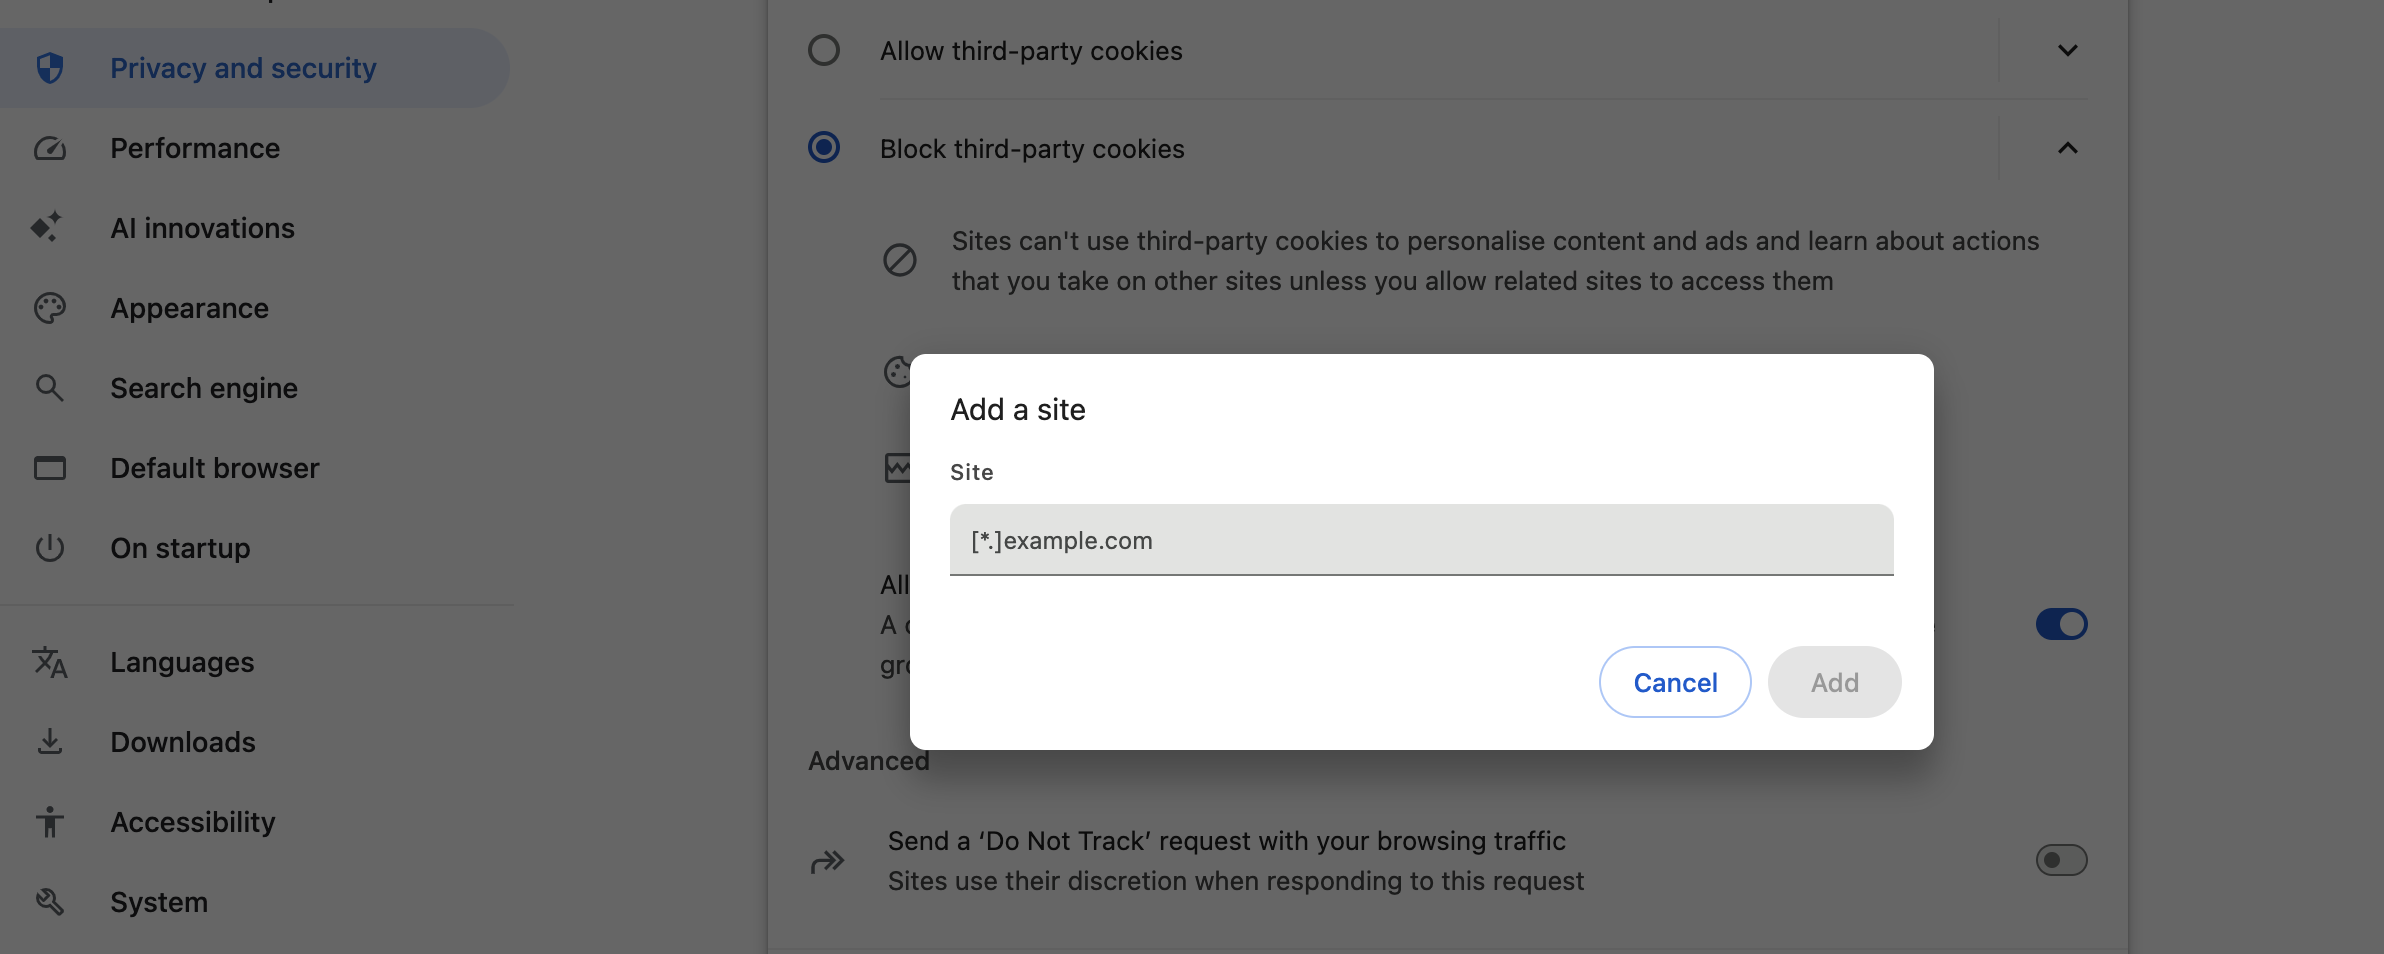
Hence, only specified sites will be allowed to install cookies on your browser; the rest will not be able to do so.
Enable Safe Browsing
Safe Browsing is a feature offered by Google to protect Chrome users from harmful websites, including those that steal data. It scans your visited websites, downloads, and extensions for unsafe elements and alerts you to any issues.
Follow the steps below to turn on Safe Browsing. The steps apply to both Windows, Android, and ChromeOS.
- Open Chrome on your device.
- Tap More, then Settings.
- Enter Privacy and Security.
- Click Security (Safe Browsing).
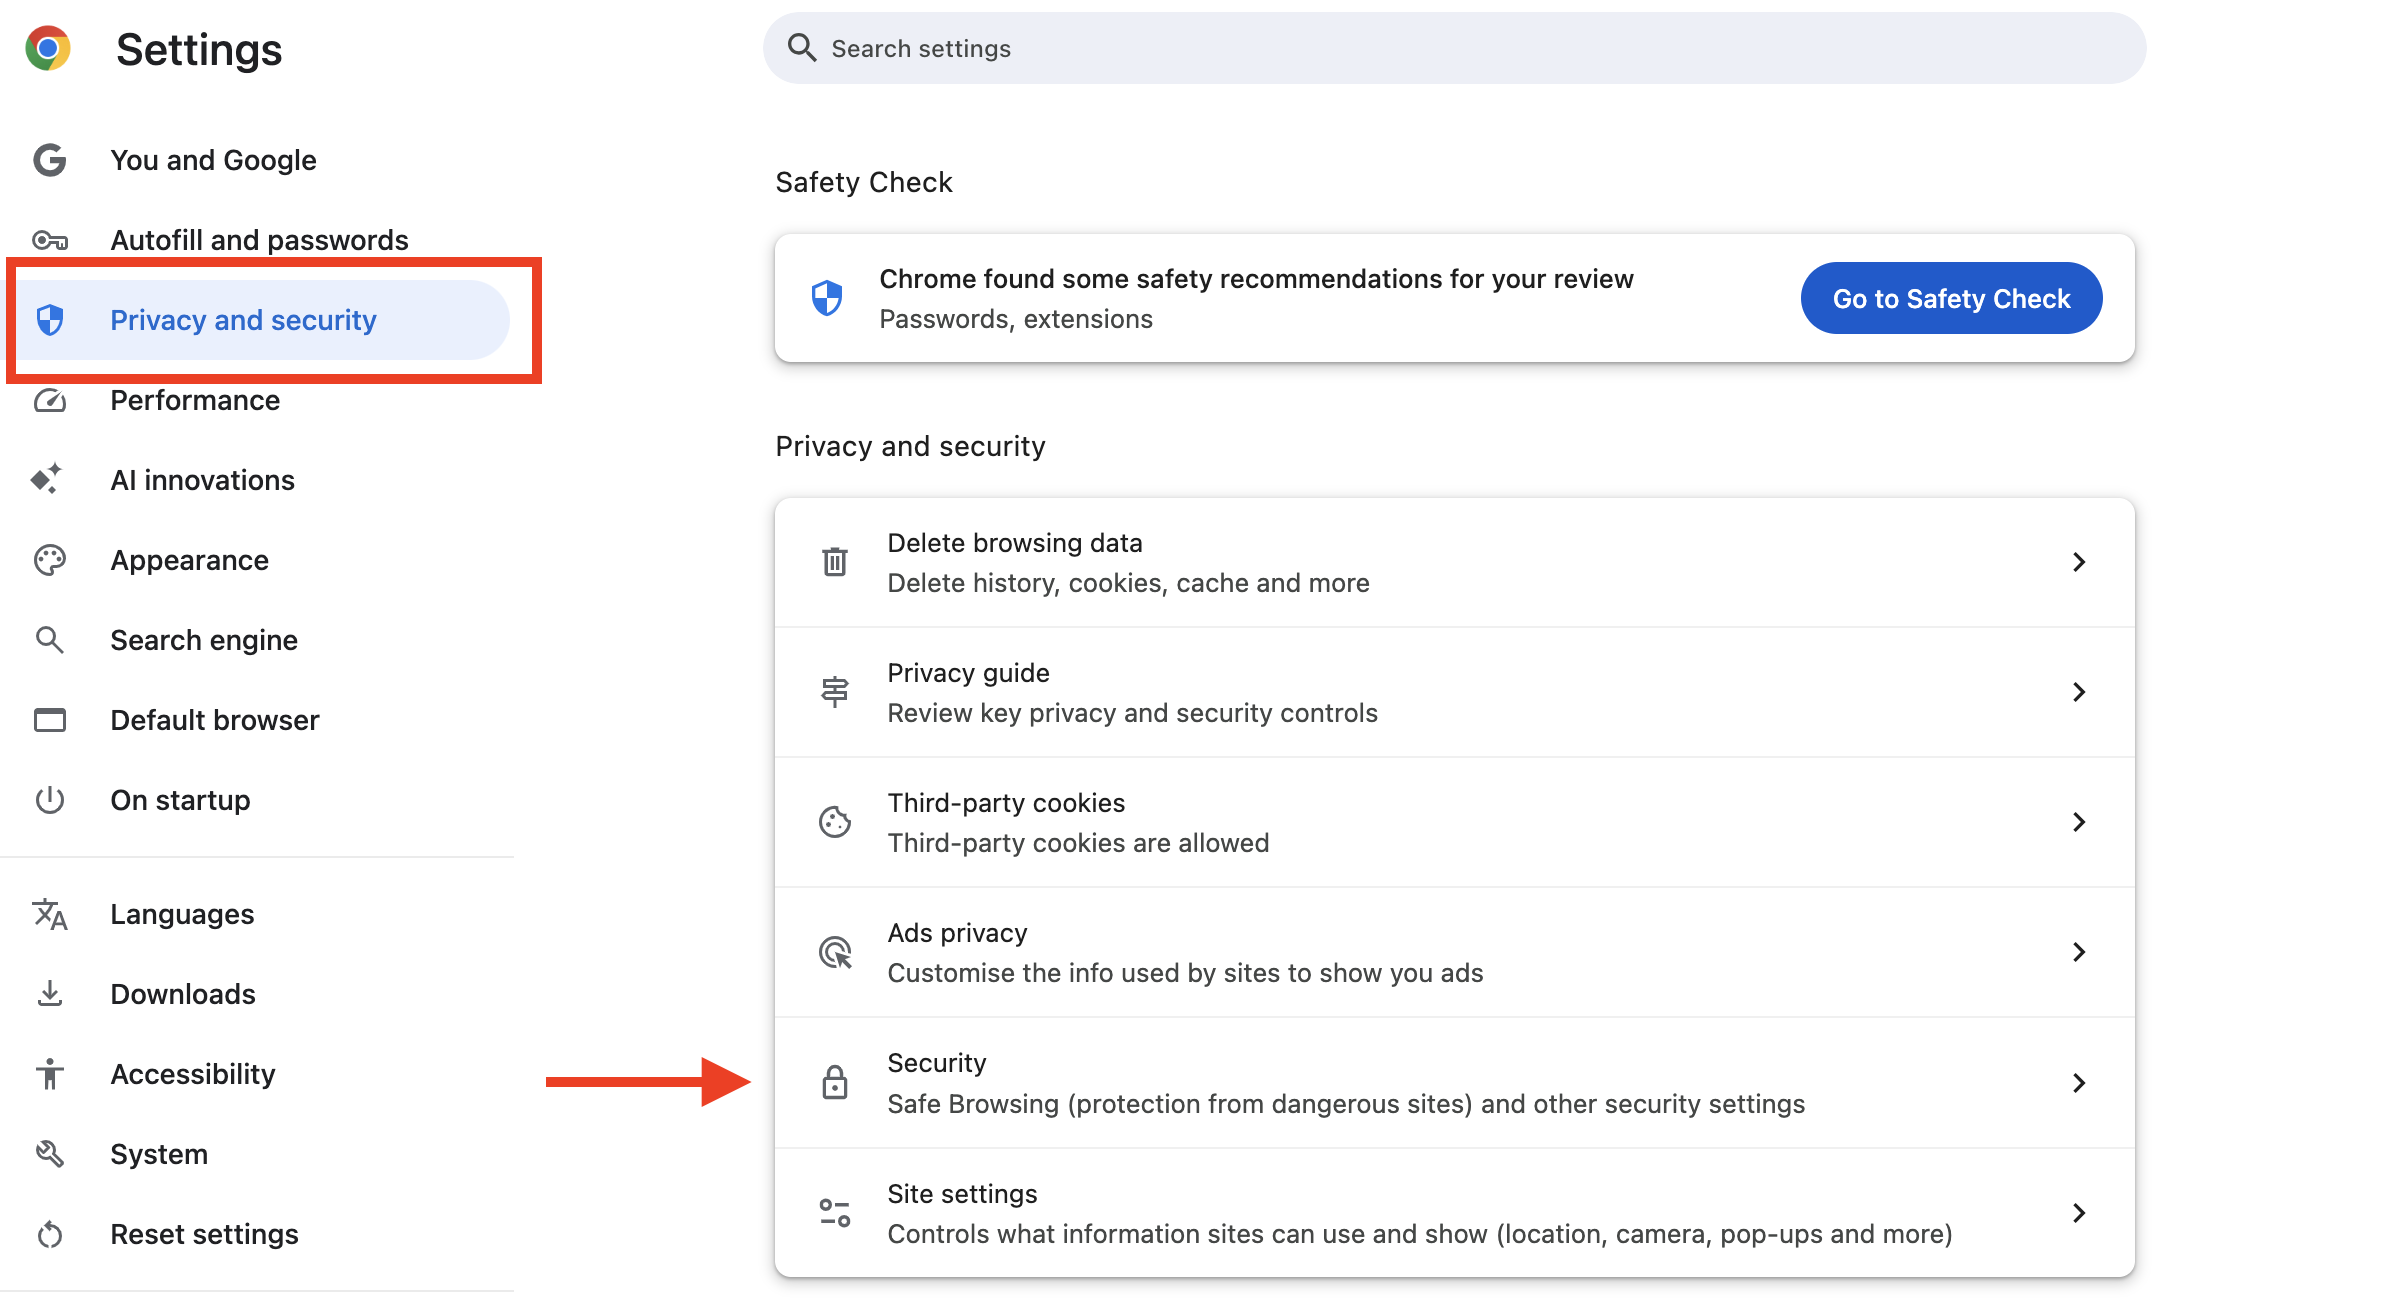
- Choose your level of Safe Browsing protection: Enhanced or Standard.
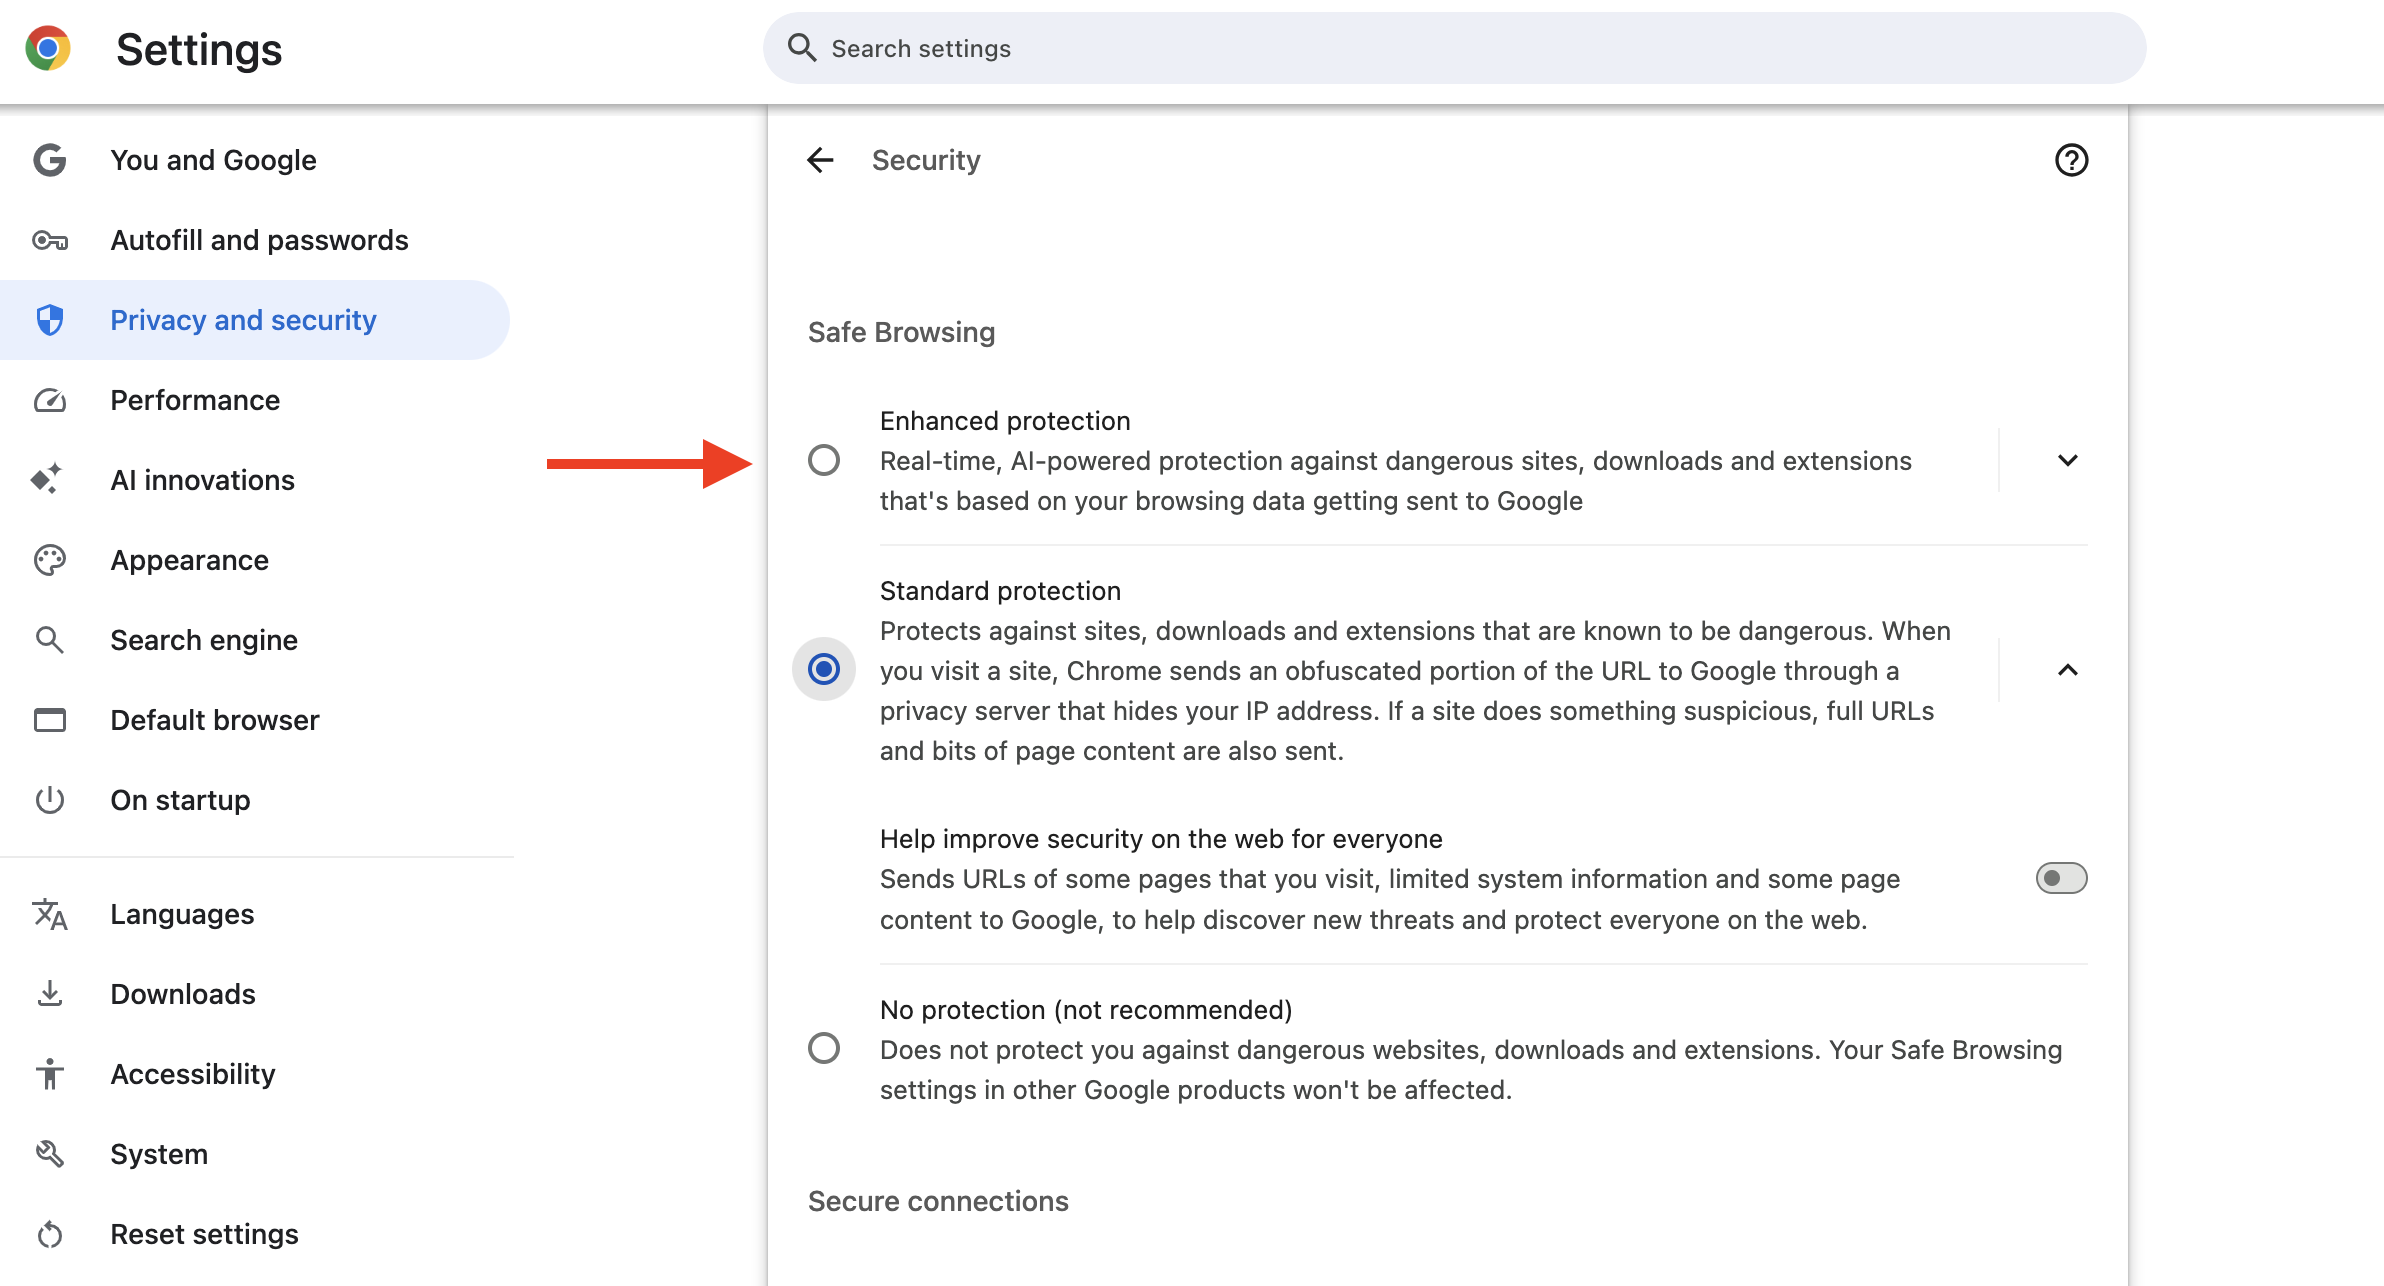
By default, Standard protection is enabled for all Chrome users. Enhanced protection provides artificial intelligence (AI)-powered, real-time protection, warning you against visiting dangerous sites and scanning downloads for malware.
However, there’s a catch. Enhanced protection requires sending browsing data in real-time to Google. Enabling it means trusting Google to store and analyze your data safely. If you’re okay with this arrangement, you can turn it on and enjoy advanced protection.
Otherwise, you can opt for Standard protection, which doesn’t send real-time data to Google. Instead, Chrome sends obfuscated data through a privacy server that hides your IP address.
More private browsing top tips
Avoid signing in to Chrome
We’ve discussed how Chrome records your activities when signed into Google and how to turn off this feature. However, an effective way to keep your browsing information private is to avoid signing into Google Chrome altogether.
Admittedly, being signed into Chrome with your Google account offers various benefits. It syncs your browsing activities across all your devices, so you can start with one and easily continue with another. It also syncs passwords across all devices, making it easy to log into your frequently used websites.
However, the personalized features come at the expense of giving up some privacy. If you don’t need the sync features, you can sign out of Chrome to prevent further data collection.
Regular updates
Regular software updates might seem trivial, but they play a crucial role in keeping you safe online. Ensure your Chrome app is always up to date, whether on Windows, Android, ChromeOS, or any other operating system where it’s installed.
Google occasionally finds security bugs in Chrome and releases quick updates to fix them. For example, Google recently discovered a Chrome vulnerability, codenamed CVE-2025-541, that allowed hackers to execute malicious code on affected desktops. It immediately issued an update to close this zero-day flaw.
Ensure automatic updates are turned on for Chrome on all devices where it’s installed. This way, your browser will always stay up to date and protected from emerging security threats.
Final thoughts
You play the most crucial part in maintaining online privacy. We’ve outlined the practical steps to take to enjoy the best privacy when surfing the web via Chrome. Follow these guidelines to browse securely on your PC, smartphone, tablet, and Chromebook.
Stefan has always been a lover of tech. He graduated with an MSc in geological engineering but soon discovered he had a knack for writing instead. So he decided to combine his newfound and life-long passions to become a technology writer. As a freelance content writer, Stefan can break down complex technological topics, making them easily digestible for the lay audience.
You must confirm your public display name before commenting
Please logout and then login again, you will then be prompted to enter your display name.

