10 cool iMovie effects to make your videos sparkle
Dolly zoom and steadycam effects, cutting to music and more
Sign up for breaking news, reviews, opinion, top tech deals, and more.
You are now subscribed
Your newsletter sign-up was successful
Join the club
Get full access to premium articles, exclusive features and a growing list of member rewards.
With iMovie, Apple created an editing program that's highly versatile – so much so in fact that it was the inspiration for the newlook Final Cut Pro released earlier this year. With iMovie, you can create a short film in minutes, if not seconds (depending on how complex you want it to be) and share it with friends and family over the web.
But this simplicity is just the tip of the iceberg. If you have the time and the inclination, you can create advanced effects and editing styles just like all those Hollywood movies you see at the cinema or rent with iTunes.
Obviously, the one thing that stands in your way is your budget – or lack thereof: you can't hope to replicate the same quality of effect as a major motion picture, but you'd be surprised how close you can actually get. So let's roll up our sleeves and have a look at what you can achieve with a consumer program that comes free with every new Mac, or which can be purchased for only £10.49 from the Mac App Store.
Article continues belowMost of the effects we'll be showing you over the course of this article can be achieved straight from within iMovie, but we'll also give you a few tips on what you can do during the shoot itself to give your clips the best possible chance of looking and sounding their best. That way they'll be ready to dazzle your audience as part of your latest low-budget blockbuster home movie.
1. Working with green or blue screens
You don't need to go to exotic locations – you can do it all from home!
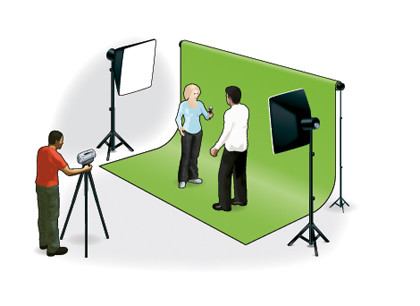
Being able to fly, walk on an alien world or survive a spectacular accident is par for the course in most blockbuster Hollywood movies. But obviously none of it is real – it's all done with smoke and mirrors, or more precisely, chroma keying.
The idea behind the process is that it's easy to cut out a single colour, rendering it transparent and allowing you to put something else in its place. Green or blue are used because both colours are the furthest away from all human skin tones.
Sign up for breaking news, reviews, opinion, top tech deals, and more.
One of iMovie's advanced tools is the ability to automatically remove a green or blue background from a clip. But how do you get such a background in the first place?
Low budget
That's where it gets a little complicated, but it's perfectly achievable and the results are very effective, even on a low budget. Then you'll be able to be anywhere in the world. You'll need to get yourself some equipment, none of which is optional if you want the effect to work properly.
The first one is a backdrop. If you already have a green or blue sheet, or even a wall of the appropriate colour, you could experiment with it and see if it works as expected. Otherwise, eBay has a lot of resellers offering affordable chroma key backdrops.
What's more important is the lighting. You need to evenly light your backdrop; then you'll need to light your subject separately. This way, it'll be much easier to find the edges around the subject to avoid a potential halo around it when the backdrop is cut.
Since you're on a budget, you need to find workarounds to expensive modern professional lights. Twin 500W halogen work lights on a tripod will do an excellent job. Get two sets – one for either side of the screen.
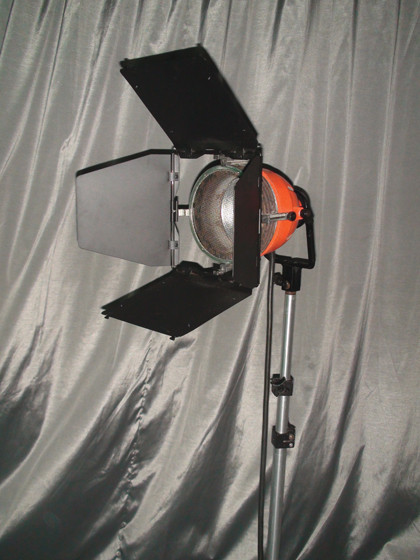
Using the same lighting system for your subject would completely wash it out. Getting redheads is probably your best bet as it's not the most recent technology, so you can get them cheaper. Again: eBay. Make sure you get at least two to light your subject evenly.
Lastly, you need to make sure your camera will remain static for the whole duration of the shoot, so either place it on a shelf or stool, or invest in a tripod. Since the purpose is to keep the camera motionless, the most basic tripod will do. You won't be able to do tracking shots or follow the subject as they walk around; you'd have to match the movement with the background exactly and this can only be done with motion-tracking cameras.
Light placing
Next, you'll have to experiment to make sure the lighting is in the right place for the effect to work, and then import the footage into iMovie.
Then you need to make sure the program's Advanced Tools are turned on (done from the Preferences window). Then, add your backdrop onto your project and drag your green/blue screen clip on top of it.
Select the appropriate pop-up option and the background clip should appear behind your subject.
2. Get a dolly zoom effect
This effect is usually done during the shoot but can be recreated in iMovie

The dolly zoom effect is very recognisable: the subject in the foreground stays motionless, but the background appears to change and zoom out so you can see more of it.
To achieve this, you need to move the camera back as you zoom into your subject. The speed of the trackback and the zooming in must be the same for the subject's size to remain the same. The effect works very well, but is very difficult to replicate with a consumer camera since the zoom controls on such devices are far from precise.
You can, however, cheat the whole thing by using a green screen backdrop. You don't even need to zoom out of your background clip while you're shooting: all of it can be done from within iMovie. Just make sure both the background and the subject were shot using a static camera – ideally on a tripod.
You could also use a photograph for the background if you prefer, since images are usually taken at resolutions that are much higher than high-definition video, eliminating the possibility of pixellating the backdrop if you zoom into it too much.
How to create a dolly zoom effect
1. Get Advanced
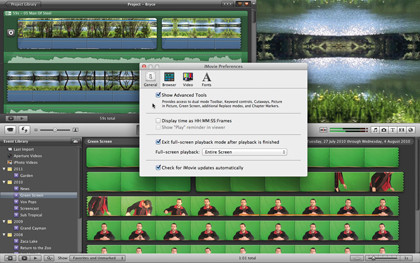
In order to work with a blue or green screen clip you need to turn on the Advanced Tools. Go to iMovie > Preferences (or use the Command + , keyboard shortcut).
Make sure the General tab is selected (first on the left) and tick the Show Advanced Tools box to give you more editing and organising options.
2. Stack up your clips
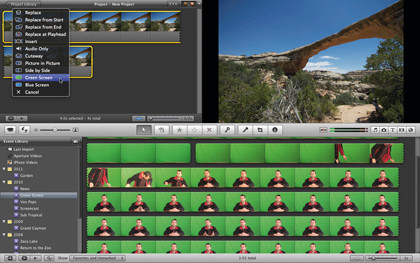
Choose your backdrop from an event or from your photo library, and add it to your project. Next, find your subject and drag it over the backdrop. You'll be given a series of options. Select either Green Screen or Blue Screen – depending, of course, on the colour of your backdrop.3. Apply Ken Burns
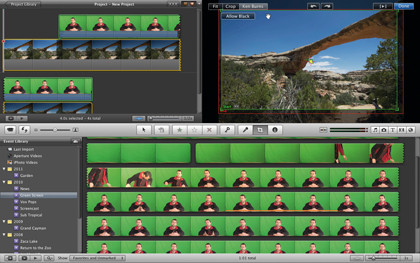
Select the backdrop clip (to give it a yellow highlight around it), then click on the Crop tool in the tool bar (or simply hit the c key on your keyboard). This tool offers you three choices at the top-left of the main preview window: Fit, Crop and Ken Burns. Make sure the latter is selected.
4. Zoom Out
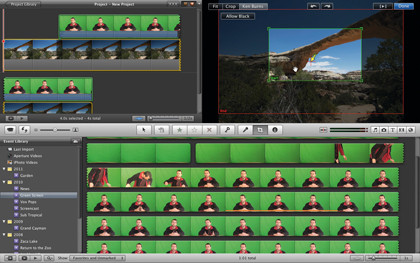
Now you should see two rectangles, one green and one red. Make sure the green one (your starting frame) is smaller and inside the red one (the clip's last frame). This will give viewers the illusion of the background zooming out over time. Now click the play button to preview it.
5. Fine-tune the Look
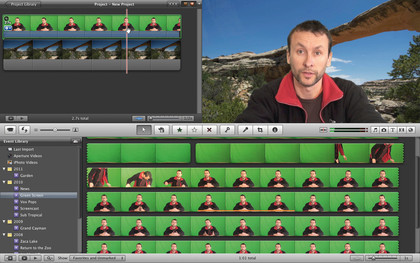
Click Done to set the effect. Be sure to check what it looks like with your subject over it. The effect may work best if either the top or bottom of the frame stays the same (right where the green and red rectangles meet) so go back and tweak your zoom until you're happy with the result.
6. Zoom In
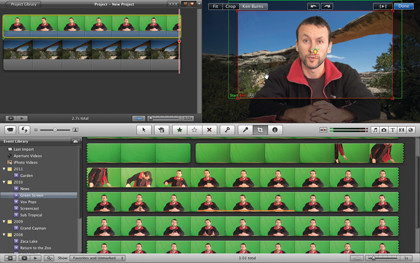
You may also find that zooming in on your subject over time can improve the effect. You can apply a Ken Burns effect to your chroma keyed clip too, only make the change more subtle and make sure the end frame is smaller than the start frame. Your dolly zoom effect should then be complete.
3. The steadycam effect
Stabilise your shots to smooth the motion for that professional touch
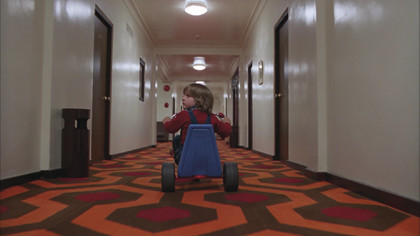
The Shining is probably the best example of the use of steadycams, as the camera glides through the hotel's corridors and its maze.
Usually, to get a steady moving shot, you'd put your camera on a dolly – essentially a set of tracks – but there's obviously huge limitations to this technique: one is that you mustn't show the ground otherwise you reveal the tracks; another is the difficulty in going up or down stairs.
With a steadycam, you can follow your subject wherever they may go. Proper steadycams cost an absolute fortune, but the Smoothee for iPhone is relatively cheap at £170 and if you're a handy DIY person, Johnny Chung Lee very kindly posted an article on how to build your very own steadycam for little more than US$14 (£9) in parts. The instructions are at www.littlegreatideas.com/stabilizer/diy.
Using a steadycam requires quite a bit of practice, but once you've perfected your moves, you can create incredibly smooth motion as you walk, no matter what you follow. Sadly, not all of us are handy with a screwdriver and until the cheapest steadycam in the world becomes available for sale you may have to do your best.
But Apple hasn't left you high and dry: iMovie has a tool for stabilising your clip's motion. It can't work miracles and an overly shaky shot won't be fixed (instead, you'll see a red squiggly line over the problem segments in its Event), but it can be highly effective on most clips.
How to smooth out those shaky shots
1. Analyse in an Event
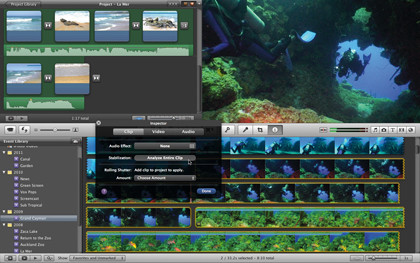
You can analyse your clips even before you add them to a project. To do this, select a clip (or multiple ones) and open the Inspector by clicking on the toolbar's 'i' button. Make sure that window's Clip tab is selected and click on Analyse Entire Clip. The process may take a while.
2. Choose the right part
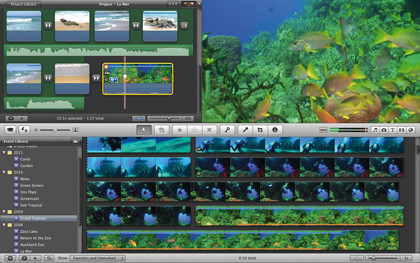
By default, an analysed clip will have its motion smoothed automatically as soon as you insert it into your project – as long as you don't select any part of the clip that had those red squiggly lines. If you do, the stabilisation process will not occur, so make sure you only add a section that will work.
3. Stabilisation control
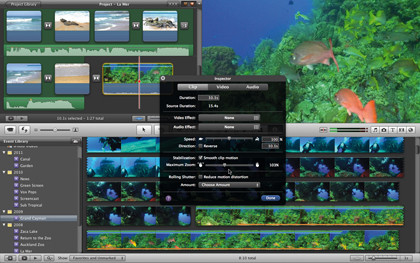
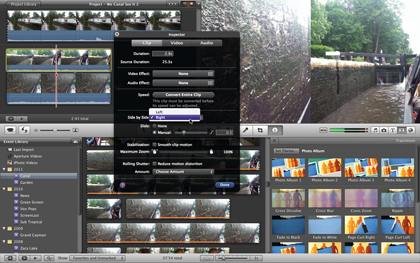
Play that clip back and you should see an improvement over the original. Unlike the green screen effect, you have some control over the process: double-click the clip to open the Inspector. The stabilisation section has a slider. Drag it to the left to lower the amount of stabilisation applied to your clip.
Steve has been writing about technology since 2003. Starting with Digital Creative Arts, he's since added his tech expertise at titles such as iCreate, MacFormat, MacWorld, MacLife, and TechRadar. His focus is on the creative arts, like website builders, image manipulation, and filmmaking software, but he hasn’t shied away from more business-oriented software either. He uses many of the apps he writes about in his personal and professional life. Steve loves how computers have enabled everyone to delve into creative possibilities, and is always delighted to share his knowledge, expertise, and experience with readers.

 Become a TechRadar Insider


