10 cool iMovie effects to make your videos sparkle
Dolly zoom and steadycam effects, cutting to music and more
4. Use external microphones
If your movie sounds great it will make your screen images look even better
There's one element that makes it obvious you're watching an amateur movie as opposed to a professional one: the audio. Although nearly all camcorders or video recording devices capture sound as well as images, the quality is often very poor. Even HD camcorders that produce vibrant, high-quality clips are often let down by the low quality of the on-board mic.
It's a well-known fact that audio is crucial to the appreciation of your film. Poor sound makes your audience feel that the video was actually of poorer quality than it actually is. Good-quality audio enhances the whole experience. So get yourself a device whose sole purpose is recording sound and you will greatly increase your production value for very little money indeed.
Article continues belowSmall recorder
Take the Samson Zoom H1, for instance. It's a tiny audio recording device that records very high-quality sound in stereo. You can choose various formats, but since we're going for quality, you should select an uncompressed one: WAV. This means that the files will take up more space, but this is a small price to pay for higher quality.
If you're going to go for this device (which is available via www.amazon.co.uk) make sure you also budget for its Accessory Pack, which includes a tripod and a windscreen foam cover, designed to cut out unwanted sound (which often gets captured, especially when shooting outdoors). In total, this should cost you something in the region of £100.
If your camcorder is capable of taking in audio input – with a line in stereo jack, for instance – then you could connect it to your microphone. That way you wouldn't have to worry about syncing the sound with the video later on in the editing process. But having an external mic can offer you advantages that those tethered to the camera cannot match: you could have a long shot and still hear the people you're recording perfectly because the mic is hidden near them and a long cable would be hard to conceal from view.
So if you've got your audio and video on separate files on your Mac, how do you go about connecting them together? This can be a little difficult to achieve in iMovie but it can work.
Sign up for breaking news, reviews, opinion, top tech deals, and more.
First of all, you need a clear point of reference to achieve the sync. This is where clapperboards come in, but why purchase one when a couple of hands clapping will work just as well? As long as your clap can be seen on screen and heard on the audio track, then you can add a marker on your project when the clap happens (markers are one of iMovie's many hidden advanced tools that you can reveal from the Preferences window).
Toggle the waveforms for your audio tracks to see the spike that represents the clap, and move it until that spike is under the marker. Mute the original audio and play your footage back. Drag the audio left or right until the sync is perfect. Once you've achieved this, you might not use your camcorder's built-in microphone ever again.
5. Working with effects
Change a clip's look progressively over time using iMovie's built-in effects
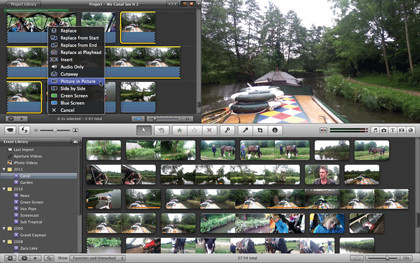
Modern camcorders can automatically focus, white balance and colour correct for you. As such, most of your clips will look fine and be ready to be included into a project the moment you import them. But machines being what they are, they do sometimes get it wrong, which is why iMovie's various video tools can come in so handy.
With them, you can alter the brightness, contrast and colour of any shot. You can obviously use them to also distort the image, giving it an unnatural appearance to simulate unusual weather conditions or to create that alien planet feel you were after.
Couple those changes with one of iMovie's 19 video filters and you have a broad palette to play with (you can also copy and paste those changes from one clip to others by using the Edit > Paste Adjustments commands in the menu bar; these can save you a lot of time if you want to create a special visual style for a large part of your project).
Unlike Final Cut Pro and other professional editing packages, there isn't an obvious way to gradually apply that change over time – it's a black and white clip, or it's a colour one, for instance; there's no in-between.
So what do you do if you want to play around with your image and slowly intensify the colour – like the effect in Limitless when a mind-enhancing tablet is taken? Thankfully, such an effect isn't out of the reach of iMovie. All you have to do is cut the clip in the right place, as shown below.
How to alter a clip progressively over time
1. Find and cut
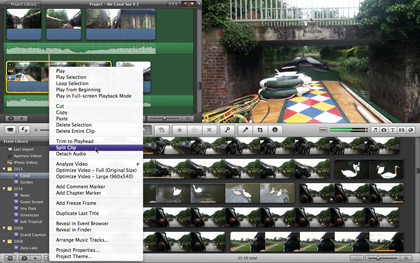
Find the clip you want to alter over time and add it to your project. Skim over it with the mouse until you're over the part you'd like the change to occur. Without moving the cursor, press the Shift+Command+S keys to activate the Split Clip tool, which cuts the clip into two at that very point.
2. All change
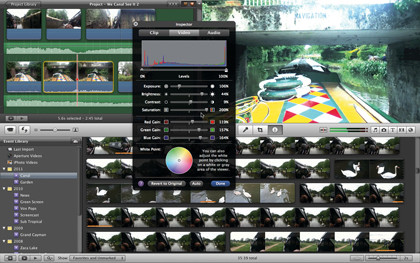
Double-click on one part of the clip to bring up the Inspector window. Select the Video tab and make your changes. You can also make use of the Video Effect menu in the Inspector's Clip tab to add a single effect to your clip (only one can be used at a time). You can alter your modifications at any time.
03. Transition
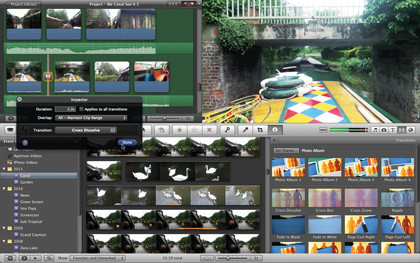
Go to Window > Transitions to reveal the Transitions panel, bottom-right of the interface (or use the Command+4 keyboard shortcut). Locate Cross Dissolve and drag it onto the gap between the clips. To change its length, double-click on it in your project and type in a new value in the Duration field.
6. Create cutaway shots
Cut to another shot without ever losing the focus of your story
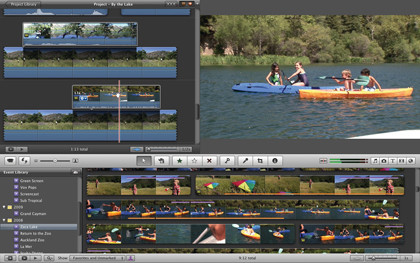
Look at any movie or television show, from any period, and you'll see that the editing never stays on the same shot for too long. In fact, you may feel that some do overstay their welcome and you long for the camera to let you see something else.
Changing shots doesn't mean changing scenes: when done right, cutting to different angles keeps the story interesting and the pace flowing. It also makes it easier to use a different take that had a better reaction. You can use it to cut to the scenery that is being described in the current shot, while still hearing the narrator talk about the location.
The official term for this is creating cutaways. As we saw earlier, although iMovie appears to only handle a single layer of video (meaning you can't stack clips on top of each other, as you can with Final Cut Pro for instance) there is support for an additional layer when the need arises, and when the Advanced Tools have been turned on.
Just like you could with the split screen effect, you can add a clip on top of another, but instead of seeing both at the same time, it's a straight cut: the clip above completely replaces the one below for its duration.
Why would you do this instead of cutting the clip and inserting the other in between? For flexibility: that way you can move the cutaway clip over the narrating one until you find the perfect spot. Also, the narrating clip's audio track is uninterrupted so you can see a shot and listen to another clip's audio at the same time.
How to create a cutaway effect
1. Make a cutaway
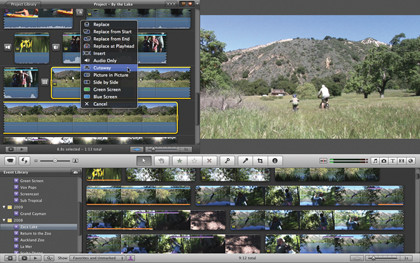
With iMovie's Advanced Tools turned on in the Preferences window, select a shot from one of your Events and drag it over a clip in your chosen project. A contextual menu will appear. Select Cutaway and the clip will be placed above the original, on a second layer.
2. Move and alter
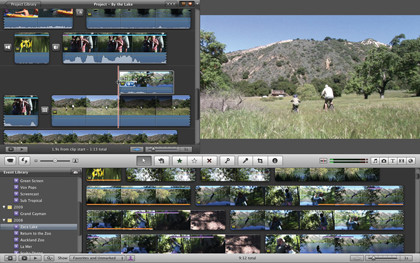
As you drag the cutaway along, a shadow will appear on the clip beneath it to give you an idea of which part will be obstructed. Move the cursor to either one of the cutaway's edges to turn it into a resize tool. You can drag the edges inward or outward to decrease or increase duration.
3. Fades and opacity
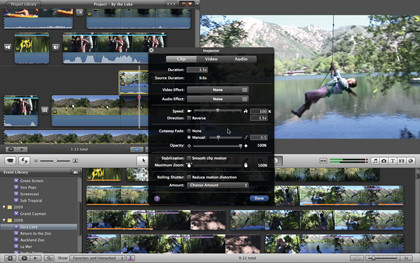
Double-click on the cutaway to open the Inspector window. The middle section offers you a couple of options specifically for that type of clip: you can choose to add a cross-fade transition which will appear both at its start and end; or alter the opacity to see part of the lower clip through it.
Current page: Cool iMovie effects: 4-6
Prev Page Cool iMovie effects: 1-3 Next Page Cool iMovie effects: 7-10Steve has been writing about technology since 2003. Starting with Digital Creative Arts, he's since added his tech expertise at titles such as iCreate, MacFormat, MacWorld, MacLife, and TechRadar. His focus is on the creative arts, like website builders, image manipulation, and filmmaking software, but he hasn’t shied away from more business-oriented software either. He uses many of the apps he writes about in his personal and professional life. Steve loves how computers have enabled everyone to delve into creative possibilities, and is always delighted to share his knowledge, expertise, and experience with readers.

 Become a TechRadar Insider


